

User Manual
Page 3
...Projector Height 11 ------- Troubleshooting 22 ------- On-Screen Display Menus 15 ------- Specifications 25 ------- Compatibility Modes 26 English 1 Remote Control with Mouse Function and Laser Pointer 7 ------- Panel Control & Remote Control 13 ----+--- Image-II (Video mode 19 ------- Image-II (Computer mode 18 ------- Package Overview 4 ----+--- Laser Pointer... Off the Projector 10 ----+--- Adjusting the Projector Zoom/Focus 12 ------- Adjusting Projection Image Size 12 User Controls ------- Image-I (Video mode 17 ------- Language 20 -------
...Projector Height 11 ------- Troubleshooting 22 ------- On-Screen Display Menus 15 ------- Specifications 25 ------- Compatibility Modes 26 English 1 Remote Control with Mouse Function and Laser Pointer 7 ------- Panel Control & Remote Control 13 ----+--- Image-II (Video mode 19 ------- Image-II (Computer mode 18 ------- Package Overview 4 ----+--- Laser Pointer... Off the Projector 10 ----+--- Adjusting the Projector Zoom/Focus 12 ------- Adjusting Projection Image Size 12 User Controls ------- Image-I (Video mode 17 ------- Language 20 -------

User Manual
Page 4
...the projector first. To reduce the risk of the lamp itself. This product will burn out and may hurt your cleaning. This remote control is not being used for ventilation. To replace the lamp, follow all warnings, precautions and maintenance as this happens, the projector will... not turn on the remote control and do not expose this product to cool down, and follow the procedures listed under the following conditions: - v Use under "Changing ...
...the projector first. To reduce the risk of the lamp itself. This product will burn out and may hurt your cleaning. This remote control is not being used for ventilation. To replace the lamp, follow all warnings, precautions and maintenance as this happens, the projector will... not turn on the remote control and do not expose this product to cool down, and follow the procedures listed under the following conditions: - v Use under "Changing ...
User Manual
Page 5
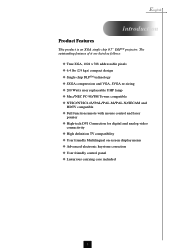
... Watts user replaceable UHP lamp u Mac/NEC PC-98/FM Towns compatible u NTSC/NTSC4.43/PAL/PAL-M/PAL-N/SECAM and HDTV compatible u Full function remote with mouse control and laser pointer u High-tech DVI Connection for digital and analog video connectivity u High definition TV compatibility u User friendly Multilingual on-screen display menu...
... Watts user replaceable UHP lamp u Mac/NEC PC-98/FM Towns compatible u NTSC/NTSC4.43/PAL/PAL-M/PAL-N/SECAM and HDTV compatible u Full function remote with mouse control and laser pointer u High-tech DVI Connection for digital and analog video connectivity u High definition TV compatibility u User friendly Multilingual on-screen display menu...

User Manual
Page 6
Check to D-Sub Cable Remote Mouse Y Cable Remote Control with Mouse Function and Laser Pointer User's Guide Quick Start Card Warranty Card Carrying Case 4 Battery x 2 English Introduction Package Overview This projector comes with lens cap 3 Power Cord 4 VGA Cable 5 S-Video Cable 6 Audio Cable Jack/RCA 7 Composite Video Cable DVI to make sure your dealer immediately if anything is complete. Contact your unit is missing. 1 2 Projector with all the items shown below.
Check to D-Sub Cable Remote Mouse Y Cable Remote Control with Mouse Function and Laser Pointer User's Guide Quick Start Card Warranty Card Carrying Case 4 Battery x 2 English Introduction Package Overview This projector comes with lens cap 3 Power Cord 4 VGA Cable 5 S-Video Cable 6 Audio Cable Jack/RCA 7 Composite Video Cable DVI to make sure your dealer immediately if anything is complete. Contact your unit is missing. 1 2 Projector with all the items shown below.

User Manual
Page 7
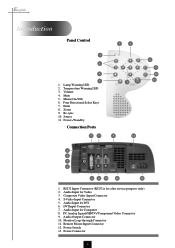
Speaker 8. Focus Ring 5. Elevator Button 10. Panel Control 2. Connection Ports 4. Zoom Lens 6. Elevator Foot 5 Power Connector & Power Switch 3. Zoom Ring 7. Remote Control Receiver 9. English Product Overview Main Unit 7 Introduction 1 2 6 3 5 4 8 9 10 1.
Speaker 8. Focus Ring 5. Elevator Button 10. Panel Control 2. Connection Ports 4. Zoom Lens 6. Elevator Foot 5 Power Connector & Power Switch 3. Zoom Ring 7. Remote Control Receiver 9. English Product Overview Main Unit 7 Introduction 1 2 6 3 5 4 8 9 10 1.
User Manual
Page 8
... purpose only) 2. Monitor Loop-through Connector 11. Source 11. S-Video Input Connector 5. Audio Input for Video 3. Temperature Warning LED 3. Menu (On/Off) 6. English Introduction Panel Control 1 3 4 5 1. Audio Input for Computer 8. Remote Mouse Input Connector 12. Power Switch 13. Enter 8.
... purpose only) 2. Monitor Loop-through Connector 11. Source 11. S-Video Input Connector 5. Audio Input for Video 3. Temperature Warning LED 3. Menu (On/Off) 6. English Introduction Panel Control 1 3 4 5 1. Audio Input for Computer 8. Remote Mouse Input Connector 12. Power Switch 13. Enter 8.
User Manual
Page 9
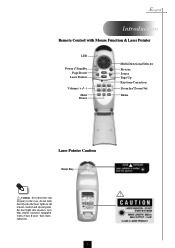
English Introduction Remote Control with a Class II laser that emits radiation. 7 This remote control is equipped with Mouse Function & Laser Pointer LED Power / Standby Page Down Laser Pointer Volume ( + / - ) Mute Freeze Multi-Directional Selector Re-sync Source Page Up Keystone Correction Zoom In / Zoom Out Menu Laser Pointer Caution Enter Key Caution : To reduce the risk of injury to the eyes, do not look directly into the laser light on the remote control and do not point the laser light into anyone's eyes.
English Introduction Remote Control with a Class II laser that emits radiation. 7 This remote control is equipped with Mouse Function & Laser Pointer LED Power / Standby Page Down Laser Pointer Volume ( + / - ) Mute Freeze Multi-Directional Selector Re-sync Source Page Up Keystone Correction Zoom In / Zoom Out Menu Laser Pointer Caution Enter Key Caution : To reduce the risk of injury to the eyes, do not look directly into the laser light on the remote control and do not point the laser light into anyone's eyes.

User Manual
Page 11
... cord and signal cable are securely connected. v If you connect multiple sources at the same time, use the "Source" button on the Remote Control or Panel Control to warm up for 20 seconds and the Power/Standby indicator will display and count down for 1-2 minutes. 4. Remove the lens... cap.Œ 2. Turn on the projector first and then the computer. Turn on the main power switch on the panel control. Ž The startup screen will light solid amber. vTurn on your source automatically. Turn on the lamp by pressing "Power/Standby" button on the...
... cord and signal cable are securely connected. v If you connect multiple sources at the same time, use the "Source" button on the Remote Control or Panel Control to warm up for 20 seconds and the Power/Standby indicator will display and count down for 1-2 minutes. 4. Remove the lens... cap.Œ 2. Turn on the projector first and then the computer. Turn on the main power switch on the panel control. Ž The startup screen will light solid amber. vTurn on your source automatically. Turn on the lamp by pressing "Power/Standby" button on the...
User Manual
Page 15
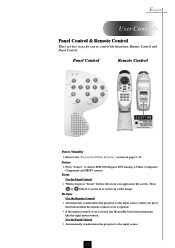
...button functions like the right mouse button. Re-Sync Use the Remote Control 4 Automatically synchronizes the projector to the "Power On/Off the Projector" section on page 9~10. Use the Panel Control 4 Automatically synchronizes the projector to choose RGB, DVI-Digital, ... 4 Press "Source" to the input source. 13 English User Controls Panel Control & Remote Control There are two ways for you to zoom in the screen. Press or button to control the functions: Remote Control and Panel Control. Panel Control Remote Control Power / Standby 4 Refer to the input source, when you...
...button functions like the right mouse button. Re-Sync Use the Remote Control 4 Automatically synchronizes the projector to the "Power On/Off the Projector" section on page 9~10. Use the Panel Control 4 Automatically synchronizes the projector to choose RGB, DVI-Digital, ... 4 Press "Source" to the input source. 13 English User Controls Panel Control & Remote Control There are two ways for you to zoom in the screen. Press or button to control the functions: Remote Control and Panel Control. Panel Control Remote Control Power / Standby 4 Refer to the input source, when you...

User Manual
Page 16
...Press "Menu" to open the front cover of 32 times on -screen display (OSD) menus and press key to a factor of remote control. 4 If the remote control cover is closed, the Enter button functions like the left mouse button. The projector will save any change you open the on the ...you made automatically. Page Down (Computer mode only) 4 Use this button to page up to select main menu . Enter Use the Remote Control 4 Confirm your selection of remote control, this button to page down. Four Directional Select Keys 4 When you close the cover of items. 14 Page Up (Computer mode only...
...Press "Menu" to open the front cover of 32 times on -screen display (OSD) menus and press key to a factor of remote control. 4 If the remote control cover is closed, the Enter button functions like the left mouse button. The projector will save any change you open the on the ...you made automatically. Page Down (Computer mode only) 4 Use this button to page up to select main menu . Enter Use the Remote Control 4 Confirm your selection of remote control, this button to page down. Four Directional Select Keys 4 When you close the cover of items. 14 Page Up (Computer mode only...

User Manual
Page 17
... be back to blue. Only key is selected, the color of the item will be the "Computer OSD". While making selection on the Remote Control or Panel Control. 4 When OSD is displayed, press key to select the required item and adjust the settings by pushing "Enter" button after all/part ...of the items have been modified. English User Controls On-Screen Display Menus How to operate 4The Projector has a multilingual On-Screen Display(OSD) menus that allow you to adjust the parameter or...
... be back to blue. Only key is selected, the color of the item will be the "Computer OSD". While making selection on the Remote Control or Panel Control. 4 When OSD is displayed, press key to select the required item and adjust the settings by pushing "Enter" button after all/part ...of the items have been modified. English User Controls On-Screen Display Menus How to operate 4The Projector has a multilingual On-Screen Display(OSD) menus that allow you to adjust the parameter or...
User Manual
Page 24
... your display resolution setting is less than or equal to 1024 x 768. If the problem persists, please contact your computer is switched on the Remote Control. 4 If you are using a PC: If the resolution of the monitor display is less than or equal to the "Changing the lamp" ... devices". Verify that the resolution setting is still not projecting the whole image, you will find the resolution setting. Open "My Computer" icon, the "Control Panel" folder, and then double click the "Display" icon. 2. You are required to 1024 x 768 resolution. For Windows 95: 1. Verify that...
... your display resolution setting is less than or equal to 1024 x 768. If the problem persists, please contact your computer is switched on the Remote Control. 4 If you are using a PC: If the resolution of the monitor display is less than or equal to the "Changing the lamp" ... devices". Verify that the resolution setting is still not projecting the whole image, you will find the resolution setting. Open "My Computer" icon, the "Control Panel" folder, and then double click the "Display" icon. 2. You are required to 1024 x 768 resolution. For Windows 95: 1. Verify that...


