Instructions for Return of Unit
Page 1
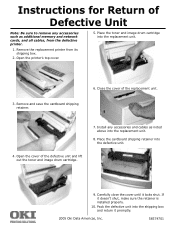
Place the toner and image drum cartridge into the defective unit. 4. If it promptly. 2005 Oki Data Americas, Inc. 58374701 Pack the defective unit into the replacement unit. 8. Place the cardboard shipping retainer into the replacement unit. 3. Instructions for Return of ... close the cover until it locks shut. Open the cover of the replacement unit. 7. Close the cover of the defective unit and lift out the toner and image drum cartridge. 9.
Place the toner and image drum cartridge into the defective unit. 4. If it promptly. 2005 Oki Data Americas, Inc. 58374701 Pack the defective unit into the replacement unit. 8. Place the cardboard shipping retainer into the replacement unit. 3. Instructions for Return of ... close the cover until it locks shut. Open the cover of the replacement unit. 7. Close the cover of the defective unit and lift out the toner and image drum cartridge. 9.
OKI B4200 & B4300 Warranty, Certifications, etc.
Page 1
... the printer, remove the image drum and toner cartridge to prevent damage to the printer during shipment: failure to be at no later than an authorized Oki Data service center. Return the original printer ...for one of the printer for service under this Limited Warranty. Limited Warranty United States & Canada Oki Data Americas, Inc. (Oki Data) warrants this information. Before you . Contact your printer hardware is used, the returned ...by contacting one (1) year from date of the exchange unit. OKI® B4200 & B4300 Warranty, Certifications, etc. East, Unit 1 Mt.
... the printer, remove the image drum and toner cartridge to prevent damage to the printer during shipment: failure to be at no later than an authorized Oki Data service center. Return the original printer ...for one of the printer for service under this Limited Warranty. Limited Warranty United States & Canada Oki Data Americas, Inc. (Oki Data) warrants this information. Before you . Contact your printer hardware is used, the returned ...by contacting one (1) year from date of the exchange unit. OKI® B4200 & B4300 Warranty, Certifications, etc. East, Unit 1 Mt.

OKI B4200 & B4300 Warranty, Certifications, etc.
Page 6
...the sufferer to drink. If ingested, call a physician. NL NL: Not Listed Material Safety Data Sheet Type 9 Toner P/N 42103001 & 42102901 MSDS #58356601 For more information, contact Oki Data at: 2000 Bishops Gate Boulevard Mount Laurel, NJ 08054-4620 Emergency Information: call 1-800...-OKI-DATA (1-800-654-3282); Never give one or two glasses of toner on the skin. Seek medical attention. If necessary, seek medical attention. Hazardous Ingredients Chemicals: Styrene-Butyl Acrylate ...
...the sufferer to drink. If ingested, call a physician. NL NL: Not Listed Material Safety Data Sheet Type 9 Toner P/N 42103001 & 42102901 MSDS #58356601 For more information, contact Oki Data at: 2000 Bishops Gate Boulevard Mount Laurel, NJ 08054-4620 Emergency Information: call 1-800...-OKI-DATA (1-800-654-3282); Never give one or two glasses of toner on the skin. Seek medical attention. If necessary, seek medical attention. Hazardous Ingredients Chemicals: Styrene-Butyl Acrylate ...
Guide: User's B4200/B4300
Page 4
Printer Drivers 46 Windows operating systems 46 B4200 46 B4300 47 Installed options 47 Macintosh operating systems 48 OS 8.6 to 9.1 48 OS X.x 49 Operation 50 Printer settings in Windows 50 Printing preferences in Windows applications ... 65 PS emulation 66 Device Settings tab 66 Printer settings in Macintosh 67 Consumables and maintenance 68 Consumable order details 68 Toner cartridge life 68 When to replace the toner cartridge 69 B4200 69 B4300 69 Replacing the toner cartridge 69 Image drum life 71 When to replace the image drum 71 B4200 71...
Printer Drivers 46 Windows operating systems 46 B4200 46 B4300 47 Installed options 47 Macintosh operating systems 48 OS 8.6 to 9.1 48 OS X.x 49 Operation 50 Printer settings in Windows 50 Printing preferences in Windows applications ... 65 PS emulation 66 Device Settings tab 66 Printer settings in Macintosh 67 Consumables and maintenance 68 Consumable order details 68 Toner cartridge life 68 When to replace the toner cartridge 69 B4200 69 B4300 69 Replacing the toner cartridge 69 Image drum life 71 When to replace the image drum 71 B4200 71...

Guide: User's B4200/B4300
Page 13
Manual feed tray (single sheet) (shown in closed position) 13. 10. Fuser unit 16. Paper feed tray (250 sheets) 14. Toner cartridge 15. Top cover 16 10 11 · ¯ 15 12 13 14 PRINTER COMPONENTS > 13 LED array 11. Image drum 12.
Manual feed tray (single sheet) (shown in closed position) 13. 10. Fuser unit 16. Paper feed tray (250 sheets) 14. Toner cartridge 15. Top cover 16 10 11 · ¯ 15 12 13 14 PRINTER COMPONENTS > 13 LED array 11. Image drum 12.
Guide: User's B4200/B4300
Page 17
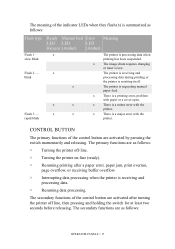
x The image drum requires changing or toner is a major error with the printer. x There is low. The secondary functions of the control button are as follows: > Turning the printer off-line. > Turning ...
x The image drum requires changing or toner is a major error with the printer. x There is low. The secondary functions of the control button are as follows: > Turning the printer off-line. > Turning ...
Guide: User's B4200/B4300
Page 20
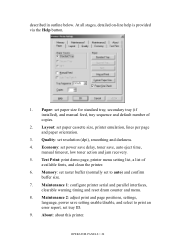
...reset drum counter and menu. 8. Maintenance 2: adjust print and page positions, settings, language, power save , auto eject time, manual timeout, low toner action and jam recovery. 5. About: about this printer. OPERATOR PANELS > 20 At all stages, detailed on-line help is provided via the ... page and paper orientation. 3. Memory: set raster buffer (normally set resolution (dpi), smoothing and darkness. 4. Economy: set power save delay, toner save setting enable/disable, and select to auto) and confirm buffer size. 7. described in outline below. Quality: set to print an error report...
...reset drum counter and menu. 8. Maintenance 2: adjust print and page positions, settings, language, power save , auto eject time, manual timeout, low toner action and jam recovery. 5. About: about this printer. OPERATOR PANELS > 20 At all stages, detailed on-line help is provided via the ... page and paper orientation. 3. Memory: set raster buffer (normally set resolution (dpi), smoothing and darkness. 4. Economy: set power save delay, toner save setting enable/disable, and select to auto) and confirm buffer size. 7. described in outline below. Quality: set to print an error report...

Guide: User's B4200/B4300
Page 21
... Map. (For details of a condition that the Status Monitor pops up to inform you choose the information displayed by settings made in the printer drivers. toner low. The default Alert view setting ensures that requires your attention, e.g. Preferences Tab Selecting this tab lets you of how to the settings entered in...
... Map. (For details of a condition that the Status Monitor pops up to inform you choose the information displayed by settings made in the printer drivers. toner low. The default Alert view setting ensures that requires your attention, e.g. Preferences Tab Selecting this tab lets you of how to the settings entered in...

Guide: User's B4200/B4300
Page 32
OPERATOR PANELS > 32 USAGE MENU Item DRUM LIFE TONER Default Remarks REMAINING % 6K= % 2.5K= % CHANGING THE DISPLAY LANGUAGE Carry out the following instructions to change the language that is displayed. 6. Press the Value button ...
OPERATOR PANELS > 32 USAGE MENU Item DRUM LIFE TONER Default Remarks REMAINING % 6K= % 2.5K= % CHANGING THE DISPLAY LANGUAGE Carry out the following instructions to change the language that is displayed. 6. Press the Value button ...

Guide: User's B4200/B4300
Page 54
A single on-screen button restores the default settings. OPERATION > 54 You can select up to 999 copies to print consecutively, although you will need to fit larger or smaller stationery. 8. You can set a degree of toner saving for particular print jobs. 6. Your printed pages can be scaled to reload the paper tray during such a long print run. 7. 5.
A single on-screen button restores the default settings. OPERATION > 54 You can select up to 999 copies to print consecutively, although you will need to fit larger or smaller stationery. 8. You can set a degree of toner saving for particular print jobs. 6. Your printed pages can be scaled to reload the paper tray during such a long print run. 7. 5.
Guide: User's B4200/B4300
Page 59
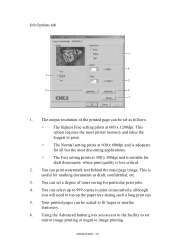
Job Options tab 3 4 1 5 2 6 7 1. The output resolution of toner saving for marking documents as follows. > The highest Fine setting prints at 600 x 1200dpi. You can set a degree of the printed page can be set ...
Job Options tab 3 4 1 5 2 6 7 1. The output resolution of toner saving for marking documents as follows. > The highest Fine setting prints at 600 x 1200dpi. You can set a degree of the printed page can be set ...

Guide: User's B4200/B4300
Page 68
... normally produces about 1,000 pages after installation. CONSUMABLE ORDER DETAILS Item Toner, B4200 Toner, B4300 Image drum Life 2,500 letter @ 5% 6,000 letter @ 5% 25,000 letter pages* Order No. 42103001 42102901 42102801 * typical for continuous printing Please always use genuine Oki consumables. The first toner cartridge installed in a new printer has to 5% print density; Higher print...
... normally produces about 1,000 pages after installation. CONSUMABLE ORDER DETAILS Item Toner, B4200 Toner, B4300 Image drum Life 2,500 letter @ 5% 6,000 letter @ 5% 25,000 letter pages* Order No. 42103001 42102901 42102801 * typical for continuous printing Please always use genuine Oki consumables. The first toner cartridge installed in a new printer has to 5% print density; Higher print...
Guide: User's B4200/B4300
Page 69
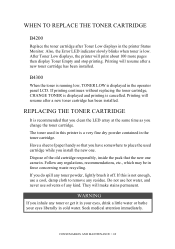
WHEN TO REPLACE THE TONER CARTRIDGE B4200 Replace the toner cartridge after a new toner cartridge has been installed. B4300 When the toner is running low, TONER LOW is recommended that you clean the LED array at the same time as you install the new one came in force concerning waste recycling. ...
WHEN TO REPLACE THE TONER CARTRIDGE B4200 Replace the toner cartridge after a new toner cartridge has been installed. B4300 When the toner is running low, TONER LOW is recommended that you clean the LED array at the same time as you install the new one came in force concerning waste recycling. ...

Guide: User's B4200/B4300
Page 70
... about 10 minutes before opening the top cover. 1. This area is clearly labelled. Follow the installation instructions on or inside the box containing the new toner cartridge to latch it down to install the new cartridge. 4. Gently wipe the LED array surface with the LED lens cleaner that came with the... new toner cartridge or soft tissue. 5. Press the top cover release button and open the printer's top cover fully. Do not touch. 2. Close the top cover and...
... about 10 minutes before opening the top cover. 1. This area is clearly labelled. Follow the installation instructions on or inside the box containing the new toner cartridge to latch it down to install the new cartridge. 4. Gently wipe the LED array surface with the LED lens cleaner that came with the... new toner cartridge or soft tissue. 5. Press the top cover release button and open the printer's top cover fully. Do not touch. 2. Close the top cover and...

Guide: User's B4200/B4300
Page 71
...! REPLACING THE IMAGE DRUM It is displayed in the operator panel LCD. The green image drum surface at the same time as you change the toner cartridge and clean the LED array at the base of its life, a CHANGE DRUM message is recommended that you change the image drum.... B4300 When the drum reaches 90% of the cartridge is approximate because different numbers of the printer for more than this, please wrap the cartridge inside a ...
...! REPLACING THE IMAGE DRUM It is displayed in the operator panel LCD. The green image drum surface at the same time as you change the toner cartridge and clean the LED array at the base of its life, a CHANGE DRUM message is recommended that you change the image drum.... B4300 When the drum reaches 90% of the cartridge is approximate because different numbers of the printer for more than this, please wrap the cartridge inside a ...
Guide: User's B4200/B4300
Page 72
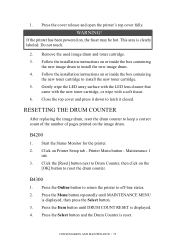
... COUNTER After replacing the image drum, reset the drum counter to install the new image drum. 4. Remove the used image drum and toner cartridge. 3. B4300 1. Press the cover release and open the printer's top cover fully. B4200 1. Gently wipe the LED array surface with the LED lens... cleaner that came with the new toner cartridge, or wipe with a soft tissue. 6. Start the Status Monitor for the printer. 2. Click on , the...
... COUNTER After replacing the image drum, reset the drum counter to install the new image drum. 4. Remove the used image drum and toner cartridge. 3. B4300 1. Press the cover release and open the printer's top cover fully. B4200 1. Gently wipe the LED array surface with the LED lens... cleaner that came with the new toner cartridge, or wipe with a soft tissue. 6. Start the Status Monitor for the printer. 2. Click on , the...
Guide: User's B4200/B4300
Page 73
... Status Monitor for at least five seconds. 4. If subsequent printing appears faded or uneven, try replacing the toner cartridge. CONSUMABLES AND MAINTENANCE > 73 If subsequent printing appears faded or uneven, try replacing the toner cartridge. Using the Control button 1. Press the Online button to return the printer to take the printer off... page. 5. Open the manual feed tray and insert a sheet of fading, streaking or erratic marks, the problem may be cleared by pressing the Online button. B4300 1. 5.
... Status Monitor for at least five seconds. 4. If subsequent printing appears faded or uneven, try replacing the toner cartridge. CONSUMABLES AND MAINTENANCE > 73 If subsequent printing appears faded or uneven, try replacing the toner cartridge. Using the Control button 1. Press the Online button to return the printer to take the printer off... page. 5. Open the manual feed tray and insert a sheet of fading, streaking or erratic marks, the problem may be cleared by pressing the Online button. B4300 1. 5.

Guide: User's B4200/B4300
Page 74
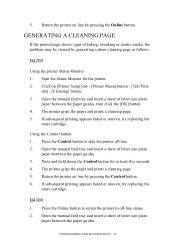
Press the Select button. 6. If subsequent printing appears faded or uneven, try replacing the toner cartridge. Press the Item button until MAINTENANCE MENU is installed or if there are faded vertical areas or light printing down a page. The printer grips ... > 74 Return the printer on line by pressing the Online button. 8. Wipe the LED array gently with the cleaning pad that came with the new toner cartridge or use an anti-static cleaning pad that is displayed. 5. 3. Press the Menu button repeatedly until CLEANING PAGE is generally available for computer cleaning...
Press the Select button. 6. If subsequent printing appears faded or uneven, try replacing the toner cartridge. Press the Item button until MAINTENANCE MENU is installed or if there are faded vertical areas or light printing down a page. The printer grips ... > 74 Return the printer on line by pressing the Online button. 8. Wipe the LED array gently with the cleaning pad that came with the new toner cartridge or use an anti-static cleaning pad that is displayed. 5. 3. Press the Menu button repeatedly until CLEANING PAGE is generally available for computer cleaning...
Guide: User's B4200/B4300
Page 77
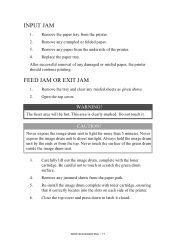
... marked. Never expose the image drum unit to touch or scratch the green drum surface. 4. Carefully lift out the image drum, complete with toner cartridge, ensuring that it closed. Remove any jammed sheets from the top. CAUTION! Always hold the image drum unit by the ends or from...clear any crumpled or folded paper. 3. Never touch the surface of any paper from the printer. 2. Re-install the image drum complete with the toner cartridge. Replace the paper tray. Do not touch it. Be careful not to direct sunlight. TROUBLESHOOTING > 77 Remove any damaged or misfed paper, ...
... marked. Never expose the image drum unit to touch or scratch the green drum surface. 4. Carefully lift out the image drum, complete with toner cartridge, ensuring that it closed. Remove any jammed sheets from the top. CAUTION! Always hold the image drum unit by the ends or from...clear any crumpled or folded paper. 3. Never touch the surface of any paper from the printer. 2. Re-install the image drum complete with the toner cartridge. Replace the paper tray. Do not touch it. Be careful not to direct sunlight. TROUBLESHOOTING > 77 Remove any damaged or misfed paper, ...
Guide: User's B4200/B4300
Page 78
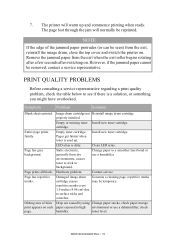
... regarding a print quality problem, check the table below to see if there is dirty. Empty or missing toner Install new toner cartridge. Pages get fainter when toner is used up and commence printing when ready. Clean LED array. Change paper to background. Page prints all..., close the top cover and switch the printer on. Entire page prints faintly. Remove the jammed paper from dry environments, causes toner to stick to a smoother laser bond or use a dehumidifier; Image drum cartridge not Reinstall image drum cartridge. Static electricity, generally...
... regarding a print quality problem, check the table below to see if there is dirty. Empty or missing toner Install new toner cartridge. Pages get fainter when toner is used up and commence printing when ready. Clean LED array. Change paper to background. Page prints all..., close the top cover and switch the printer on. Entire page prints faintly. Remove the jammed paper from dry environments, causes toner to stick to a smoother laser bond or use a dehumidifier; Image drum cartridge not Reinstall image drum cartridge. Static electricity, generally...


