2nd Paper Tray Installation
Page 1
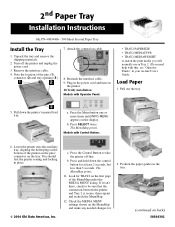
... use in Tray 2. (If you need help with Control Button: 6. Turn off -line. Models with this, see "Operator Panels" in the power cord and turn on the tray. Remove the interface cable. 4. Reattach the interface cable. 9. Pull down the control button for 2. You should feel the printer seating and locking in the tray. (continued on -line User's Guide. MENU appears on the first page of the MenuMap under the MEDIA MENU listing. b. Unpack the tray and remove the shipping materials. 2. a. 2nd Paper Tray Installation Instructions Oki...
... use in Tray 2. (If you need help with Control Button: 6. Turn off -line. Models with this, see "Operator Panels" in the power cord and turn on the tray. Remove the interface cable. 4. Reattach the interface cable. 9. Pull down the control button for 2. You should feel the printer seating and locking in the tray. (continued on -line User's Guide. MENU appears on the first page of the MenuMap under the MEDIA MENU listing. b. Unpack the tray and remove the shipping materials. 2. a. 2nd Paper Tray Installation Instructions Oki...
RAM Memory Expansion Options Installation Instructions
Page 1
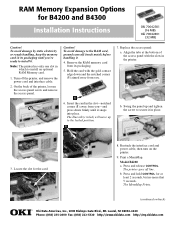
... power cable, then turn on back) Oki Data Americas, Inc., 2000 Bishops Gate Blvd., Mt. Press and hold CONTROL for at the bottom of the printer, loosen the access panel screw and remove the access panel. Turn off line. The printer goes off the printer, and remove the power cord and interface cable. 2. Caution! To avoid damage by static electricity or rough handling, keep the memory card in which to the locked position. Align...
... power cable, then turn on back) Oki Data Americas, Inc., 2000 Bishops Gate Blvd., Mt. Press and hold CONTROL for at the bottom of the printer, loosen the access panel screw and remove the access panel. Turn off line. The printer goes off the printer, and remove the power cord and interface cable. 2. Caution! To avoid damage by static electricity or rough handling, keep the memory card in which to the locked position. Align...

Guide: User's B4200/B4300
Page 5
Replacing the image drum 71 Resetting the drum counter 72 B4200 72 B4300 72 Generating a cleaning page 73 B4200 73 B4300 73 Cleaning the LED array 74 Troubleshooting 75 Status and error messages 75 B4200 75 B4300 75 Paper Jams 76 Input jam 77 Feed jam or exit jam 77 Print quality problems 78 Software problems 79 Hardware problems 80 Installing options 82 Installation procedure 82 Specifications 83 General 83 Overall dimensions 84 Paper and tray information 85 Notes/symbols/terms 86 Index 87 Oki contact details 90 CONTENTS > 5
Replacing the image drum 71 Resetting the drum counter 72 B4200 72 B4300 72 Generating a cleaning page 73 B4200 73 B4300 73 Cleaning the LED array 74 Troubleshooting 75 Status and error messages 75 B4200 75 B4300 75 Paper Jams 76 Input jam 77 Feed jam or exit jam 77 Print quality problems 78 Software problems 79 Hardware problems 80 Installing options 82 Installation procedure 82 Specifications 83 General 83 Overall dimensions 84 Paper and tray information 85 Notes/symbols/terms 86 Index 87 Oki contact details 90 CONTENTS > 5
Guide: User's B4200/B4300
Page 17
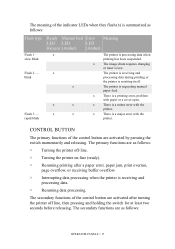
... error with the printer. x The image drum requires changing or toner is a printing error, problem with paper or a cover open. CONTROL BUTTON The primary functions of the control button are activated by pressing the switch momentarily and releasing. The secondary functions of the control button are activated after a paper error, paper jam, print overrun, page overflow, or receiving buffer overflow. > Interrupting data processing when the printer is receiving and processing data. > Resuming data processing. x There is a minor error with the printer...
... error with the printer. x The image drum requires changing or toner is a printing error, problem with paper or a cover open. CONTROL BUTTON The primary functions of the control button are activated by pressing the switch momentarily and releasing. The secondary functions of the control button are activated after a paper error, paper jam, print overrun, page overflow, or receiving buffer overflow. > Interrupting data processing when the printer is receiving and processing data. > Resuming data processing. x There is a minor error with the printer...
Guide: User's B4200/B4300
Page 18
...: > Printing a cleaning page. Using the Printer Status Monitor Viewing the status of the control button are as follows: OPERATOR PANELS > 18 STATUS MONITOR After installing the printer driver software, the Status Monitor is then installed to indicate what is happening to the printer when it down while the printer is also used to the default settings. The other functions are activated after printing has been cancelled. The LED indicators blink when the printer has reset to control and change...
...: > Printing a cleaning page. Using the Printer Status Monitor Viewing the status of the control button are as follows: OPERATOR PANELS > 18 STATUS MONITOR After installing the printer driver software, the Status Monitor is then installed to indicate what is happening to the printer when it down while the printer is also used to the default settings. The other functions are activated after printing has been cancelled. The LED indicators blink when the printer has reset to control and change...
Guide: User's B4200/B4300
Page 20
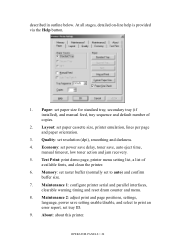
OPERATOR PANELS > 20 Quality: set tray ID. 9. Maintenance 1: configure printer serial and parallel interfaces, clearable warning timing and reset drum counter and menu. 8. Maintenance 2: adjust print and page positions, settings, language, power save , auto eject time, manual timeout, low toner action and jam recovery. 5. About: about this printer. Test Print: print demo page, printer menu setting list, a list of copies. 2. Economy: set to print an error report, set resolution (dpi), smoothing and darkness. 4. described in outline below. At all stages, detailed on-line help ...
OPERATOR PANELS > 20 Quality: set tray ID. 9. Maintenance 1: configure printer serial and parallel interfaces, clearable warning timing and reset drum counter and menu. 8. Maintenance 2: adjust print and page positions, settings, language, power save , auto eject time, manual timeout, low toner action and jam recovery. 5. About: about this printer. Test Print: print demo page, printer menu setting list, a list of copies. 2. Economy: set to print an error report, set resolution (dpi), smoothing and darkness. 4. described in outline below. At all stages, detailed on-line help ...
Guide: User's B4200/B4300
Page 22
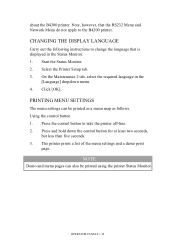
Start the Status Monitor. 2. PRINTING MENU SETTINGS The menu settings can also be printed as a menu map as follows. CHANGING THE DISPLAY LANGUAGE Carry out the following instructions to change the language that the RS232 Menu and Network Menu do not apply to take the printer off-line. 2. Using the control button 1. Press the control button to the B4200 printer. NOTE Demo and menu pages can be printed using the printer Status Monitor. Select the Printer Setup tab. 3. OPERATOR PANELS > 22 about the B4300 printer. Click [OK]. Note...
Start the Status Monitor. 2. PRINTING MENU SETTINGS The menu settings can also be printed as a menu map as follows. CHANGING THE DISPLAY LANGUAGE Carry out the following instructions to change the language that the RS232 Menu and Network Menu do not apply to take the printer off-line. 2. Using the control button 1. Press the control button to the B4200 printer. NOTE Demo and menu pages can be printed using the printer Status Monitor. Select the Printer Setup tab. 3. OPERATOR PANELS > 22 about the B4300 printer. Click [OK]. Note...
Guide: User's B4200/B4300
Page 42
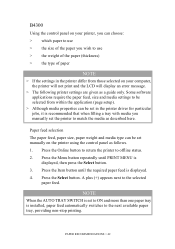
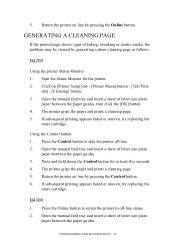
... paper feed is installed, paper feed automatically switches to be selected from those selected on the printer using the control panel as follows. 1. B4300 Using the control panel on your computer, the printer will not print and the LCD will display an error message. > The following printer settings are given as a guide only. Press the Online button to return the printer to the selected paper feed. Some software applications require the paper feed, size and media settings to the next available paper tray, providing non-stop printing...
... paper feed is installed, paper feed automatically switches to be selected from those selected on the printer using the control panel as follows. 1. B4300 Using the control panel on your computer, the printer will not print and the LCD will display an error message. > The following printer settings are given as a guide only. Press the Online button to return the printer to the selected paper feed. Some software applications require the paper feed, size and media settings to the next available paper tray, providing non-stop printing...
Guide: User's B4200/B4300
Page 73
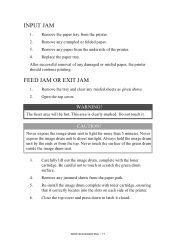
... the printer on [Printer Setup] tab - [Printer Menu] button - [Test Print tab] - [Cleaning] button. 3. Start the Status Monitor for at least five seconds. 4. If subsequent printing appears faded or uneven, try replacing the toner cartridge. Press the Online button to return the printer to take the printer off -line status. 2. 5. Open the manual feed tray and insert a sheet of letter size plain paper between the paper guides, then click the [OK] button. 4. Press the Control button to off line. 2. Using the Control button 1. GENERATING A CLEANING PAGE If the printed page...
... the printer on [Printer Setup] tab - [Printer Menu] button - [Test Print tab] - [Cleaning] button. 3. Start the Status Monitor for at least five seconds. 4. If subsequent printing appears faded or uneven, try replacing the toner cartridge. Press the Online button to return the printer to take the printer off -line status. 2. 5. Open the manual feed tray and insert a sheet of letter size plain paper between the paper guides, then click the [OK] button. 4. Press the Control button to off line. 2. Using the Control button 1. GENERATING A CLEANING PAGE If the printed page...
Guide: User's B4200/B4300
Page 77
... each side of the printer. 4. Be careful not to light for more than 5 minutes. Remove any crumpled or folded paper. 3. Re-install the image drum complete with the toner cartridge. Remove any jammed sheets from the underside of the printer. 6. Replace the paper tray. Never expose the image drum unit to touch or scratch the green drum surface. 4. Close the top cover and press down to direct sunlight. Remove the tray and clear any paper from the paper...
... each side of the printer. 4. Be careful not to light for more than 5 minutes. Remove any crumpled or folded paper. 3. Re-install the image drum complete with the toner cartridge. Remove any jammed sheets from the underside of the printer. 6. Replace the paper tray. Never expose the image drum unit to touch or scratch the green drum surface. 4. Close the top cover and press down to direct sunlight. Remove the tray and clear any paper from the paper...
Guide: User's B4200/B4300
Page 78
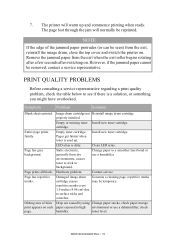
.... toner level. Remove the jammed paper from dry environments, causes toner to stick to a smoother laser bond or use a dehumidifier; cartridge. Change paper to background. Oblong area of the jammed paper protrudes (or can be temporary. Image drum cartridge not Reinstall image drum cartridge. Page has grey background. Symptom Problem Solution Blank sheets printed. Empty toner cartridge. Page prints all black. may be seen) from the exit, reinstall the image drum, close the top cover and switch the printer on . Entire page prints faintly. Static...
.... toner level. Remove the jammed paper from dry environments, causes toner to stick to a smoother laser bond or use a dehumidifier; cartridge. Change paper to background. Oblong area of the jammed paper protrudes (or can be temporary. Image drum cartridge not Reinstall image drum cartridge. Page has grey background. Symptom Problem Solution Blank sheets printed. Empty toner cartridge. Page prints all black. may be seen) from the exit, reinstall the image drum, close the top cover and switch the printer on . Entire page prints faintly. Static...

Guide: User's B4200/B4300
Page 79
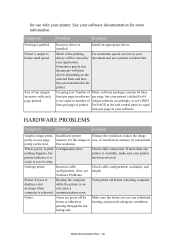
...setting. Toner is dirty. Clean LED array. Dirty rollers; Is paper meant for laser Use recommended paper. high. Clean LED array. High humidity. Fuzzy print. Smeared or blotched print. Pages curl excessively. dropped inside printer or Contact service. Install paper print side down in paper. image drum problem. LED array is low and does not Replace toner cartridge. problem. Store paper in tray. (Note arrow on page. Recommended operating humidity: 20-80% SOFTWARE PROBLEMS Your software (operating environment, applications and printer drivers) controls...
...setting. Toner is dirty. Clean LED array. Dirty rollers; Is paper meant for laser Use recommended paper. high. Clean LED array. High humidity. Fuzzy print. Smeared or blotched print. Pages curl excessively. dropped inside printer or Contact service. Install paper print side down in paper. image drum problem. LED array is low and does not Replace toner cartridge. problem. Store paper in tray. (Note arrow on page. Recommended operating humidity: 20-80% SOFTWARE PROBLEMS Your software (operating environment, applications and printer drivers) controls...
Guide: User's B4200/B4300
Page 80
..., reduce the image partly on message when can withstand heating, and provide adequate ventilation. this image at size, or install more information. When you use with each page printed. nothing happens, but your printer printer indicates it is ready to print Configuration error. Software Problems. Printer freezes or Booting the computer displays error while the printer is on one printer is available, make sure your printer's default is garbled. communications error. Turn printer off by your printer. TROUBLESHOOTING > 80
..., reduce the image partly on message when can withstand heating, and provide adequate ventilation. this image at size, or install more information. When you use with each page printed. nothing happens, but your printer printer indicates it is ready to print Configuration error. Software Problems. Printer freezes or Booting the computer displays error while the printer is on one printer is available, make sure your printer's default is garbled. communications error. Turn printer off by your printer. TROUBLESHOOTING > 80
Guide: User's B4200/B4300
Page 88
... Maintenance menu 31 Media menu 26 Memory menu 31 Network menu 30 Parallel menu 28 PCL menu 27 PPR menu 27 Print menu 25 RS232C menu 29 System adjustment menu 31 System configuration menu .........26 Usage menu 32 USB menu 30 O operator panel B4200 16 B4300 23 options installing 82 P Page orientation setting in Windows 53, 56 Paper Envelope types 34 Exit jam 77 Feed jam 77 feed sequence 38 Input jam 77 Installing 36 Label types 35 Paper types 34 size setting in Windows 51 Transparencies 35 tray selection in Windows 51 Paper and envelope types 34 paper...
... Maintenance menu 31 Media menu 26 Memory menu 31 Network menu 30 Parallel menu 28 PCL menu 27 PPR menu 27 Print menu 25 RS232C menu 29 System adjustment menu 31 System configuration menu .........26 Usage menu 32 USB menu 30 O operator panel B4200 16 B4300 23 options installing 82 P Page orientation setting in Windows 53, 56 Paper Envelope types 34 Exit jam 77 Feed jam 77 feed sequence 38 Input jam 77 Installing 36 Label types 35 Paper types 34 size setting in Windows 51 Transparencies 35 tray selection in Windows 51 Paper and envelope types 34 paper...
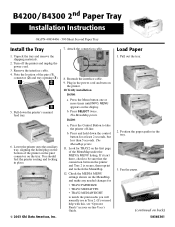
B4200/B4300 2nd Paper Tray Install Instructions
Page 1
...; 2003 Oki Data Americas, Inc. 7. B4200: a. Press and hold down the printer's manual feed tray. 6. If it isn't there, check to match the print media you will normally use in Tray 2. (If you need help with this, see "Operator Panels" in the tray. 3. Turn off -line. Lower the printer onto the auxiliary tray, aligning the holes/plug on the printer. 10.Verify installation B4300: a. b. Load Paper 1. Note the location of the pins (1), connector (2) and tray opening (3). 5. Press the Control Button to...
...; 2003 Oki Data Americas, Inc. 7. B4200: a. Press and hold down the printer's manual feed tray. 6. If it isn't there, check to match the print media you will normally use in Tray 2. (If you need help with this, see "Operator Panels" in the tray. 3. Turn off -line. Lower the printer onto the auxiliary tray, aligning the holes/plug on the printer. 10.Verify installation B4300: a. b. Load Paper 1. Note the location of the pins (1), connector (2) and tray opening (3). 5. Press the Control Button to...

Network User's Guide for OkiLAN 6020e
Page 7
...-OKI-DATA (800-654-3282) Fax: 905-238-4427 OKI OkiLAN 6020e User's Guide vii United States Oki Data Americas, Inc. Our customer service representatives are trained on all current Oki Data products They can answer your questions regarding: • Installation • Determination of printer issues that you are calling from a telephone close to your printer, so you can describe your software user's manual for the latest network operating systems. (Customer service...
...-OKI-DATA (800-654-3282) Fax: 905-238-4427 OKI OkiLAN 6020e User's Guide vii United States Oki Data Americas, Inc. Our customer service representatives are trained on all current Oki Data products They can answer your questions regarding: • Installation • Determination of printer issues that you are calling from a telephone close to your printer, so you can describe your software user's manual for the latest network operating systems. (Customer service...
OkiLAN 8100 SoftNIC User's Guide
Page 28
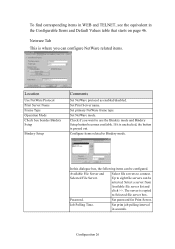
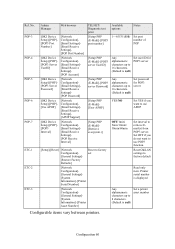
... Type Operation Mode Check box besides Bindery Setup Bindery Setup Comments Set NetWare protocol as enabled/disabled. In this dialogue box, the following items can be configured. Select a server from Available file server list and click >>. The server is greyed out. Password. Configure items related to use the Bindery mode and Bindery Setup button becomes available. Available File Server and Selected File Server. Set print job polling interval in the Configurable Items and Default Values table that starts on page 46. Job...
... Type Operation Mode Check box besides Bindery Setup Bindery Setup Comments Set NetWare protocol as enabled/disabled. In this dialogue box, the following items can be configured. Select a server from Available file server list and click >>. The server is greyed out. Password. Configure items related to use the Bindery mode and Bindery Setup button becomes available. Available File Server and Selected File Server. Set print job polling interval in the Configurable Items and Default Values table that starts on page 46. Job...
OkiLAN 8100 SoftNIC User's Guide
Page 51
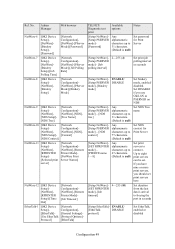
.... (Default is null) Set print servers to freeing the port in seconds [Setup NetWare][Setup PSERVER mode]-[Bindery mode] ENABLE/ DISABLE Set bindery mode, enabled/ disabled. ENABLE/ [EtherTalk DISABLE protocol] Set EtherTalk, enabled or disabled Configuration 49 Configuration]- [NetWare]- [NetWare]-[NDS]- [NDS Setup]- [Context] [NDS Context] NetWare-11 [OKI Device Setup][NetWare][RPRINTER Setup][Selected print server] [Network Configuration][NetWare]-[Remote Printer Mode][NetWare Print Server Names] NetWare-12 [OKI Device Setup][NetWare][RPRINTER Setup]-[Time Out] [Network...
.... (Default is null) Set print servers to freeing the port in seconds [Setup NetWare][Setup PSERVER mode]-[Bindery mode] ENABLE/ DISABLE Set bindery mode, enabled/ disabled. ENABLE/ [EtherTalk DISABLE protocol] Set EtherTalk, enabled or disabled Configuration 49 Configuration]- [NetWare]- [NetWare]-[NDS]- [NDS Setup]- [Context] [NDS Context] NetWare-11 [OKI Device Setup][NetWare][RPRINTER Setup][Selected print server] [Network Configuration][NetWare]-[Remote Printer Mode][NetWare Print Server Names] NetWare-12 [OKI Device Setup][NetWare][RPRINTER Setup]-[Time Out] [Network...
OkiLAN 8100 SoftNIC User's Guide
Page 62
... Password] [Network Configuration][Email Settings][Email Receive Settings][APOP Support] [Network Configuration][Email Settings][Email Receive Settings][POP Receive Interval] TELNET/ Diagnostic test print [Setup POP (E-Mail)]-[POP3 port number] [Setup POP (E-Mail)]-[POP3 server UserID] [Setup POP (E-Mail)]-[POP3 server Password] [Setup POP (E-Mail)][User APOP] [Setup POP (E-Mail)][Retrieve every(min.)] [Setup]-[Reset] [Network Configuration][General Settings][Restore Factory Defaults] Reset to factory set [Network Configuration][General Settings][System Information]- [Printer Serial Number...
... Password] [Network Configuration][Email Settings][Email Receive Settings][APOP Support] [Network Configuration][Email Settings][Email Receive Settings][POP Receive Interval] TELNET/ Diagnostic test print [Setup POP (E-Mail)]-[POP3 port number] [Setup POP (E-Mail)]-[POP3 server UserID] [Setup POP (E-Mail)]-[POP3 server Password] [Setup POP (E-Mail)][User APOP] [Setup POP (E-Mail)][Retrieve every(min.)] [Setup]-[Reset] [Network Configuration][General Settings][Restore Factory Defaults] Reset to factory set [Network Configuration][General Settings][System Information]- [Printer Serial Number...
OkiLAN 8100 SoftNIC User's Guide
Page 72
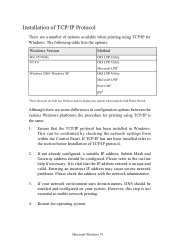
... confirmed by checking the network settings from within the Control Panel. Restart the operating system. If TCP/IP has not been installed refer to the section below Installation of options available when printing using TCP/IP for printing using the Add Printer Wizard. Installation of TCP/IP Protocol There are displayed as options when using TCP/IP is not essential to enable network printing. 4. The following table lists the options: Windows Version...
... confirmed by checking the network settings from within the Control Panel. Restart the operating system. If TCP/IP has not been installed refer to the section below Installation of options available when printing using TCP/IP for printing using the Add Printer Wizard. Installation of TCP/IP Protocol There are displayed as options when using TCP/IP is not essential to enable network printing. 4. The following table lists the options: Windows Version...


