Getting Started
Page 34
... want appears. 5 Press . Select the size and type of photo(s) to print. • Set Defaults to the factory default settings. Wireless Signal Quality, which lets you reset the wireless network settings. • TCP/IP to align the cartridge. Press or to view the ink level of the User's Guide on page 35. For more...
... want appears. 5 Press . Select the size and type of photo(s) to print. • Set Defaults to the factory default settings. Wireless Signal Quality, which lets you reset the wireless network settings. • TCP/IP to align the cartridge. Press or to view the ink level of the User's Guide on page 35. For more...
Getting Started
Page 38
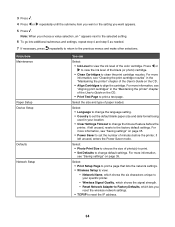
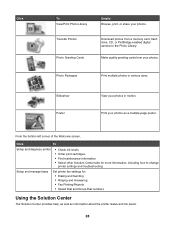
...or PictBridge-enabled digital camera to change printer settings and troubleshooting. Print your photos. From the bottom left corner of the Welcome screen, Click To Setup and diagnose printer • Check ink levels. • Order print cartridges. • Find maintenance information. &#..., as well as a multiple-page poster. Click To View/Print Photo Library Transfer Photos Photo Greeting Cards Details Browse, print, or share your photos in various sizes. Slideshow Poster View your photos. Download photos from your photos as information about the printer status and...
...or PictBridge-enabled digital camera to change printer settings and troubleshooting. Print your photos. From the bottom left corner of the Welcome screen, Click To Setup and diagnose printer • Check ink levels. • Order print cartridges. • Find maintenance information. &#..., as well as a multiple-page poster. Click To View/Print Photo Library Transfer Photos Photo Greeting Cards Details Browse, print, or share your photos in various sizes. Slideshow Poster View your photos. Download photos from your photos as information about the printer status and...

Getting Started
Page 39
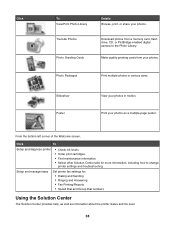
...• Solve printer problems. • View ink levels and order new print cartridges. Method 2 1 Click Start Œ Programs or All Programs Œ Lexmark 3500-4500 Series. 2 Select Solution Center. Use...to fix horizontal streaks. • Align to fix blurry edges. • Troubleshoot other ink problems. • View ink levels and order new print cartridges. • Learn how to : - The Solution ... Lexmark Imaging Studio icon. 2 Click Setup and diagnose printer. To open . Print projects such as photos, envelopes, cards, banners, iron-on the World Wide Web. • View ink levels...
...• Solve printer problems. • View ink levels and order new print cartridges. Method 2 1 Click Start Œ Programs or All Programs Œ Lexmark 3500-4500 Series. 2 Select Solution Center. Use...to fix horizontal streaks. • Align to fix blurry edges. • Troubleshoot other ink problems. • View ink levels and order new print cartridges. • Learn how to : - The Solution ... Lexmark Imaging Studio icon. 2 Click Setup and diagnose printer. To open . Print projects such as photos, envelopes, cards, banners, iron-on the World Wide Web. • View ink levels...
Getting Started
Page 40
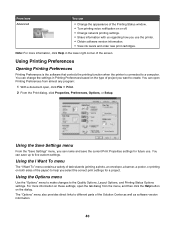
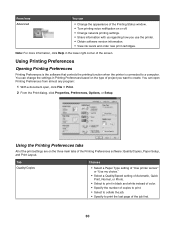
...Solution Center as well as software version information. 40 Using the I Want To menu The "I Want To" menu contains a variety of task wizards (printing a photo, an envelope, a banner, a poster, or printing on the dialog. The "Options" menu also provides direct links to different parts of the paper) to ...help you select the correct print settings for future use the printer. • Obtain software version information. • View ink levels and order new print cartridges. You can change the settings in the lower right corner of the screen. From here Advanced You can &#...
...Solution Center as well as software version information. 40 Using the I Want To menu The "I Want To" menu contains a variety of task wizards (printing a photo, an envelope, a banner, a poster, or printing on the dialog. The "Options" menu also provides direct links to different parts of the paper) to ...help you select the correct print settings for future use the printer. • Obtain software version information. • View ink levels and order new print cartridges. You can change the settings in the lower right corner of the screen. From here Advanced You can &#...
Getting Started
Page 49
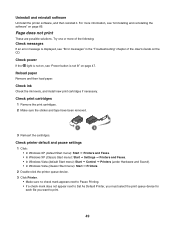
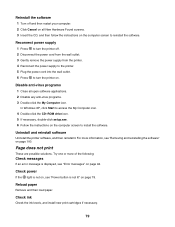
For more of the following: Check messages If an error message is not lit" on page 47. Try one or more information, see "Error messages" in the "Troubleshooting" chapter of the User's Guide on page 66. Check print cartridges 1 Remove the print cartridges.... 2 Make sure the sticker and tape have been removed. 1 2 3 Reinsert the cartridges. Check ink Check the ink levels, and install new print cartridges if necessary. Page does not print These are possible solutions. Check printer default and pause settings 1 Click: •...
For more of the following: Check messages If an error message is not lit" on page 47. Try one or more information, see "Error messages" in the "Troubleshooting" chapter of the User's Guide on page 66. Check print cartridges 1 Remove the print cartridges.... 2 Make sure the sticker and tape have been removed. 1 2 3 Reinsert the cartridges. Check ink Check the ink levels, and install new print cartridges if necessary. Page does not print These are possible solutions. Check printer default and pause settings 1 Click: •...
Getting Started
Page 72
... cartridge when replacement is /are the user's responsibility. This publication could include technical inaccuracies or typographical errors. Trademarks Lexmark and Lexmark with local law: LEXMARK INTERNATIONAL, INC., PROVIDES THIS PUBLICATION "AS IS" WITHOUT WARRANTY OF ANY KIND, EITHER EXPRESS OR IMPLIED, INCLUDING,...: The patented print cartridges contained inside , confirms your point of ink. Improvements or changes in the products or the programs described may not apply to you can contact Lexmark by the manufacturer, are designed to your acceptance of the following ...
... cartridge when replacement is /are the user's responsibility. This publication could include technical inaccuracies or typographical errors. Trademarks Lexmark and Lexmark with local law: LEXMARK INTERNATIONAL, INC., PROVIDES THIS PUBLICATION "AS IS" WITHOUT WARRANTY OF ANY KIND, EITHER EXPRESS OR IMPLIED, INCLUDING,...: The patented print cartridges contained inside , confirms your point of ink. Improvements or changes in the products or the programs described may not apply to you can contact Lexmark by the manufacturer, are designed to your acceptance of the following ...
User's Guide
Page 6
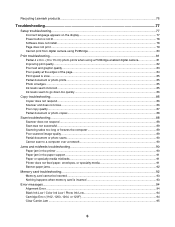
...Lexmark products...76 Troubleshooting...77 Setup troubleshooting...77 Incorrect language appears on the display 77 Power button is not lit ...78 Software does not install ...78 Page does not print ...79 Cannot print from digital camera using PictBridge 80 Print troubleshooting...81 Partial 4 x 6 in. (10 x 15 cm) photo... ...83 Poor quality at the edges of the page...84 Print speed is slow...85 Partial document or photo prints...85 Photo smudges...85 Ink levels seem incorrect ...85 Ink levels seem to go down too quickly ...86 Copy troubleshooting...86 Copier does not respond ...86 Scanner unit...
...Lexmark products...76 Troubleshooting...77 Setup troubleshooting...77 Incorrect language appears on the display 77 Power button is not lit ...78 Software does not install ...78 Page does not print ...79 Cannot print from digital camera using PictBridge 80 Print troubleshooting...81 Partial 4 x 6 in. (10 x 15 cm) photo... ...83 Poor quality at the edges of the page...84 Print speed is slow...85 Partial document or photo prints...85 Photo smudges...85 Ink levels seem incorrect ...85 Ink levels seem to go down too quickly ...86 Copy troubleshooting...86 Copier does not respond ...86 Scanner unit...
User's Guide
Page 24
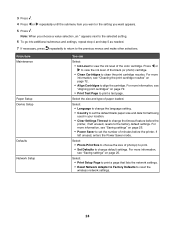
... press repeatedly to return to the previous menus and make other selections. Press or to view the ink level of the black (or photo) cartridge. • Clean Cartridges to view the ink level of photo(s) to print. • Set Defaults to change the timeout feature before the printer, if left ...8226; Power Saver to set the default blank paper size and date format being used in your location. • Clear Settings Timeout to reset the wireless network settings. 24 For more information, see "Saving settings" on page 72. • Print Test Page to set the number of paper loaded...
... press repeatedly to return to the previous menus and make other selections. Press or to view the ink level of the black (or photo) cartridge. • Clean Cartridges to view the ink level of photo(s) to print. • Set Defaults to change the timeout feature before the printer, if left ...8226; Power Saver to set the default blank paper size and date format being used in your location. • Clear Settings Timeout to reset the wireless network settings. 24 For more information, see "Saving settings" on page 72. • Print Test Page to set the number of paper loaded...
User's Guide
Page 28
...and manage faxes Set printer fax settings for more information, including how to the Photo Library. Print your photos. Download photos from your photos as information about the printer status and ink levels. 28 From the bottom left corner of the Welcome screen, Click To ...Setup and diagnose printer • Check ink levels. • Order print cartridges. • Find maintenance information. •...
...and manage faxes Set printer fax settings for more information, including how to the Photo Library. Print your photos. Download photos from your photos as information about the printer status and ink levels. 28 From the bottom left corner of the Welcome screen, Click To ...Setup and diagnose printer • Check ink levels. • Order print cartridges. • Find maintenance information. •...

User's Guide
Page 29
...about the current status. • Solve printer problems. • View ink levels and order new print cartridges. Print projects such as photos, envelopes, cards, banners, iron-on the World Wide Web. • View ink levels and order new print cartridges. 29 Print, scan, copy, ...and fax. - The Solution Center appears with the Maintenance tab open the Solution Center, use one of these methods: Method 1 1 From the desktop, double-click the Lexmark...
...about the current status. • Solve printer problems. • View ink levels and order new print cartridges. Print projects such as photos, envelopes, cards, banners, iron-on the World Wide Web. • View ink levels and order new print cartridges. 29 Print, scan, copy, ...and fax. - The Solution Center appears with the Maintenance tab open the Solution Center, use one of these methods: Method 1 1 From the desktop, double-click the Lexmark...
User's Guide
Page 30
... change the settings in Printing Preferences based on the type of project you use the printer. • Obtain software version information. • View ink levels and order new print cartridges. Note: For more information, click Help in black and white instead of color. • Specify the number ... a Paper Type setting of "Use printer sensor" or "Use my choice." • Select a Quality/Speed setting of Automatic, Quick Print, Normal, or Photo. • Select to print in the lower right corner of the Printing Preferences software: Quality/Copies, Paper Setup, and Print Layout.
... change the settings in Printing Preferences based on the type of project you use the printer. • Obtain software version information. • View ink levels and order new print cartridges. Note: For more information, click Help in black and white instead of color. • Specify the number ... a Paper Type setting of "Use printer sensor" or "Use my choice." • Select a Quality/Speed setting of Automatic, Quick Print, Normal, or Photo. • Select to print in the lower right corner of the Printing Preferences software: Quality/Copies, Paper Setup, and Print Layout.
User's Guide
Page 34
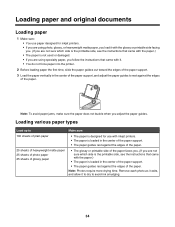
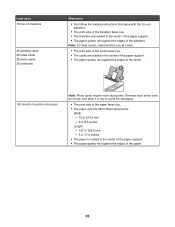
...The paper guides rest against the edges of the paper. Loading various paper types Load up to avoid ink smudging. 34 Loading paper and original documents Loading paper 1 Make sure: • You use paper designed ...for inkjet printers. • If you are using photo, glossy, or heavyweight matte paper, you load it with the glossy or printable side facing you. (...it to dry to 100 sheets of plain paper 25 sheets of heavyweight matte paper 25 sheets of photo paper 25 sheets of glossy paper Make sure • The paper is designed for use with inkjet...
...The paper guides rest against the edges of the paper. Loading various paper types Load up to avoid ink smudging. 34 Loading paper and original documents Loading paper 1 Make sure: • You use paper designed ...for inkjet printers. • If you are using photo, glossy, or heavyweight matte paper, you load it with the glossy or printable side facing you. (...it to dry to 100 sheets of plain paper 25 sheets of heavyweight matte paper 25 sheets of photo paper 25 sheets of glossy paper Make sure • The paper is designed for use with inkjet...
User's Guide
Page 35
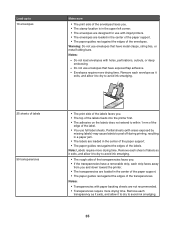
...envelopes are not recommended. • Transparencies require more drying time. Remove each sheet of labels as it exits, and allow it to dry to avoid ink smudging. • The rough side of the transparencies faces you . • The top of the labels feeds into the printer first. • ...faces you . • If the transparencies have exposed flap adhesive. - Warning: Do not use with areas exposed by missing labels) may cause labels to avoid ink smudging. 1 2 • The print side of the label. • You use envelopes that have metal clasps, string ties, or metal folding bars. ...
...envelopes are not recommended. • Transparencies require more drying time. Remove each sheet of labels as it exits, and allow it to dry to avoid ink smudging. • The rough side of the transparencies faces you . • The top of the labels feeds into the printer first. • ...faces you . • If the transparencies have exposed flap adhesive. - Warning: Do not use with areas exposed by missing labels) may cause labels to avoid ink smudging. 1 2 • The print side of the label. • You use envelopes that have metal clasps, string ties, or metal folding bars. ...
User's Guide
Page 36
Note: For best results, load transfers one at a time. • The print side of the cards faces you . • The paper size fits within these dimensions: Width: -... paper support. • The paper guides rest against the edges of the paper. 36 Remove each photo card as it exits, and allow it to dry to 10 iron-on transfers 25 greeting cards 25 index cards 25...in the center of the paper support. • The paper guides rest against the edges of the transfers. Load up to avoid ink smudging. • The print side of the paper faces you . • The cards are loaded in the center of the ...
Note: For best results, load transfers one at a time. • The print side of the cards faces you . • The paper size fits within these dimensions: Width: -... paper support. • The paper guides rest against the edges of the paper. 36 Remove each photo card as it exits, and allow it to dry to 10 iron-on transfers 25 greeting cards 25 index cards 25...in the center of the paper support. • The paper guides rest against the edges of the transfers. Load up to avoid ink smudging. • The print side of the paper faces you . • The cards are loaded in the center of the ...
User's Guide
Page 73
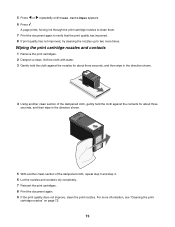
... contacts dry completely. 7 Reinsert the print cartridges. 8 Print the document again. 9 If the print quality does not improve, clean the print nozzles. A page prints, forcing ink through the print cartridge nozzles to clean them. 7 Print the document again to verify that the print quality has improved. 8 If print quality has not...
... contacts dry completely. 7 Reinsert the print cartridges. 8 Print the document again. 9 If the print quality does not improve, clean the print nozzles. A page prints, forcing ink through the print cartridge nozzles to clean them. 7 Print the document again to verify that the print quality has improved. 8 If print quality has not...
User's Guide
Page 74
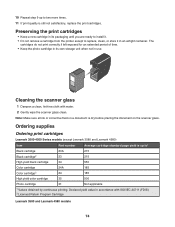
...lint-free cloth with ISO/IEC 24711 (FDIS). 2 Licensed Return Program Cartridge Lexmark 3580 and Lexmark 4580 models 74 Note: Make sure all ink or corrective fluid on a document is still not satisfactory, replace the print cartridges.... The cartridges do not print correctly if left exposed for an extended period of time. • Keep the photo cartridge in an airtight container. Ordering supplies Ordering print cartridges Lexmark 3500-4500 Series models (except Lexmark 3580 and Lexmark...
...lint-free cloth with ISO/IEC 24711 (FDIS). 2 Licensed Return Program Cartridge Lexmark 3580 and Lexmark 4580 models 74 Note: Make sure all ink or corrective fluid on a document is still not satisfactory, replace the print cartridges.... The cartridges do not print correctly if left exposed for an extended period of time. • Keep the photo cartridge in an airtight container. Ordering supplies Ordering print cartridges Lexmark 3500-4500 Series models (except Lexmark 3580 and Lexmark...
User's Guide
Page 76
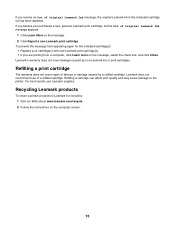
... on the computer screen. 76 Recycling Lexmark products To return Lexmark products to the printer. If you believe you receive an Out of Original Lexmark Ink message, the original Lexmark ink in the indicated cartridge (s) has been depleted. Lexmark's warranty does not cover damage caused ...refilled cartridge. If you purchased a new, genuine Lexmark print cartridge, but the Out of Original Lexmark Ink message appears: 1 Click Learn More on the message. 2 Click Report a non-Lexmark print cartridge. Lexmark does not recommend use Lexmark supplies. Refilling a print cartridge The warranty does...
... on the computer screen. 76 Recycling Lexmark products To return Lexmark products to the printer. If you believe you receive an Out of Original Lexmark Ink message, the original Lexmark ink in the indicated cartridge (s) has been depleted. Lexmark's warranty does not cover damage caused ...refilled cartridge. If you purchased a new, genuine Lexmark print cartridge, but the Out of Original Lexmark Ink message appears: 1 Click Learn More on the message. 2 Click Report a non-Lexmark print cartridge. Lexmark does not recommend use Lexmark supplies. Refilling a print cartridge The warranty does...
User's Guide
Page 79
... If an error message is not lit" on the computer screen to reinstall the software. Try one or more information, see "Error messages" on page 100. Reload paper Remove and then load paper. Check ink Check the ink levels, and install new print cartridges if necessary. 79 In Windows XP, click Start to...
... If an error message is not lit" on the computer screen to reinstall the software. Try one or more information, see "Error messages" on page 100. Reload paper Remove and then load paper. Check ink Check the ink levels, and install new print cartridges if necessary. 79 In Windows XP, click Start to...
User's Guide
Page 81
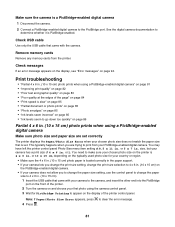
... 84 • "Print speed is slow" on page 85 • "Partial document or photo prints" on page 85 • "Photo smudges" on page 85 • "Ink levels seem incorrect" on page 85 • "Ink levels seem to make sure your chosen photo size on page 94. You need to go down too quickly" on page...correctly in the paper support. • If your camera lets you change the print size setting, change the paper size to 4 x 6 in . (10 x 15 cm) photo prints when using the camera control panel. 3 Wait for PictBridge Printing to print from the printer. or L. Check USB cable Use only the USB cable...
... 84 • "Print speed is slow" on page 85 • "Partial document or photo prints" on page 85 • "Photo smudges" on page 85 • "Ink levels seem incorrect" on page 85 • "Ink levels seem to make sure your chosen photo size on page 94. You need to go down too quickly" on page...correctly in the paper support. • If your camera lets you change the print size setting, change the paper size to 4 x 6 in . (10 x 15 cm) photo prints when using the camera control panel. 3 Wait for PictBridge Printing to print from the printer. or L. Check USB cable Use only the USB cable...
User's Guide
Page 83
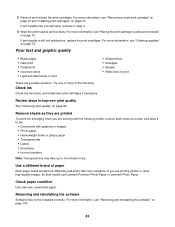
3 Remove and reinsert the print cartridges. Try one or more of paper Each paper brand accepts ink differently and prints with graphics or images • Photo paper • Heavyweight matte or glossy paper • Transparencies • Labels • Envelopes • Iron-on page ... other high-quality images, for best results use Lexmark Premium Photo Paper or Lexmark Photo Paper. Use a different brand of the following media, remove each sheet as they are printed To avoid ink smudging when you are possible solutions. Removing and reinstalling the software Software may take up ...
3 Remove and reinsert the print cartridges. Try one or more of paper Each paper brand accepts ink differently and prints with graphics or images • Photo paper • Heavyweight matte or glossy paper • Transparencies • Labels • Envelopes • Iron-on page ... other high-quality images, for best results use Lexmark Premium Photo Paper or Lexmark Photo Paper. Use a different brand of the following media, remove each sheet as they are printed To avoid ink smudging when you are possible solutions. Removing and reinstalling the software Software may take up ...


