User's Guide
Page 3
Contents Setting up the printer 7 Checking the box contents 7 Finding information about the printer 8 Learning about the printer 13 Understanding the parts of the printer 13 Using the control panel 15 Navigating the control panel menus 17 Using the Copy menu 17 Using the Scan menu 18 Using the Photo... Card menu 19 Learning about the printer software 22 Using the printer software 22 Opening the Imaging Studio 22 Using the Imaging Studio buttons 23 Using the All-In-One Center 24 Using the Scanning...
Contents Setting up the printer 7 Checking the box contents 7 Finding information about the printer 8 Learning about the printer 13 Understanding the parts of the printer 13 Using the control panel 15 Navigating the control panel menus 17 Using the Copy menu 17 Using the Scan menu 18 Using the Photo... Card menu 19 Learning about the printer software 22 Using the printer software 22 Opening the Imaging Studio 22 Using the Imaging Studio buttons 23 Using the All-In-One Center 24 Using the Scanning...
User's Guide
Page 5
... or newspapers 63 Faxing 65 Faxing a document using the software 65 Receiving a fax using the software 66 Networking 67 Installing network printers 67 Tips for installing a network printer 69 Maintaining the printer 71 Removing a used print cartridge 71 Installing print cartridges 72 Aligning print cartridges 74 Cleaning the print cartridge nozzles 75 Wiping...
... or newspapers 63 Faxing 65 Faxing a document using the software 65 Receiving a fax using the software 66 Networking 67 Installing network printers 67 Tips for installing a network printer 69 Maintaining the printer 71 Removing a used print cartridge 71 Installing print cartridges 72 Aligning print cartridges 74 Cleaning the print cartridge nozzles 75 Wiping...
User's Guide
Page 7
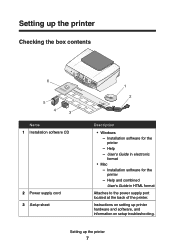
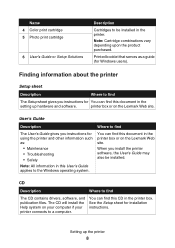
Installation software for the printer - Setting up printer hardware and software, and information on setting up the printer 7 Instructions on setup troubleshooting. User's Guide in HTML format Attaches to the power supply port located at the back of the printer. Help and combined User's Guide in electronic format • Mac - Help - Installation software for the printer - Setting up the printer Checking the box contents 6 5 4 3 Name 1 Installation software CD 2 Power supply cord 3 Setup sheet 1 2 Description • Windows -
Installation software for the printer - Setting up printer hardware and software, and information on setting up the printer 7 Instructions on setup troubleshooting. User's Guide in HTML format Attaches to the power supply port located at the back of the printer. Help and combined User's Guide in electronic format • Mac - Help - Installation software for the printer - Setting up the printer Checking the box contents 6 5 4 3 Name 1 Installation software CD 2 Power supply cord 3 Setup sheet 1 2 Description • Windows -
User's Guide
Page 8
...guide (for Windows users). When you instructions for installation instructions. printer box or on your computer if your printer connects to find this CD in the printer. You can find this document in the printer box or on the Lexmark Web site. CD Description Where to a computer. The CD will... install the Help system on the Lexmark Web site. Setting up hardware...
...guide (for Windows users). When you instructions for installation instructions. printer box or on your computer if your printer connects to find this CD in the printer. You can find this document in the printer box or on the Lexmark Web site. CD Description Where to a computer. The CD will... install the Help system on the Lexmark Web site. Setting up hardware...

User's Guide
Page 9
Help Description Help gives you need. Readme file Description This file contains late-breaking information about the printer and software that does not appear in other software. 1 Click Start ΠPrograms or All Programs ΠLexmark 6300 Series. 2 Select Lexmark Solution Center. Where to change. Where to find Visit our Web site at www...
Help Description Help gives you need. Readme file Description This file contains late-breaking information about the printer and software that does not appear in other software. 1 Click Start ΠPrograms or All Programs ΠLexmark 6300 Series. 2 Select Lexmark Solution Center. Where to change. Where to find Visit our Web site at www...
User's Guide
Page 10
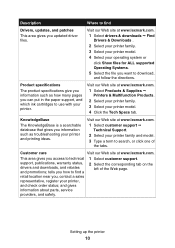
... to technical support, publications, warranty status, drivers and downloads, and rebates and promotions; Setting up the printer 10 Visit our Web site at www.lexmark.com. Product specifications The product specifications give you can put in the paper support, and which ink cartridges... near you want to download, and follow the directions. Visit our Web site at www.lexmark.com. 1 Select drivers & downloads ΠFind Drivers & Downloads . 2 Select your printer family. 3 Select your printer model. 4 Select your operating system or click Show files for ALL supported Operating Systems. ...
... to technical support, publications, warranty status, drivers and downloads, and rebates and promotions; Setting up the printer 10 Visit our Web site at www.lexmark.com. Product specifications The product specifications give you can put in the paper support, and which ink cartridges... near you want to download, and follow the directions. Visit our Web site at www.lexmark.com. 1 Select drivers & downloads ΠFind Drivers & Downloads . 2 Select your printer family. 3 Select your printer model. 4 Select your operating system or click Show files for ALL supported Operating Systems. ...
User's Guide
Page 11
... cartridges and paper from our Web site. For e-mail support, visit our Web site: www.lexmark.com. 1 Select customer support ΠTechnical Support. 2 Select your printer family, and then select your printer model. 3 From the Support Tools section, click eMail a Support Representative. 4 Complete the form...Warranty Information. 2 From the Statement of 12 months www.lexmark.com. Description Where to find Call us at (800) 332-4120. furnishes a this limited warranty, please refer to the limited warranty that this printer will be Statement of Limited Warranty included free of defects in...
... cartridges and paper from our Web site. For e-mail support, visit our Web site: www.lexmark.com. 1 Select customer support ΠTechnical Support. 2 Select your printer family, and then select your printer model. 3 From the Support Tools section, click eMail a Support Representative. 4 Complete the form...Warranty Information. 2 From the Statement of 12 months www.lexmark.com. Description Where to find Call us at (800) 332-4120. furnishes a this limited warranty, please refer to the limited warranty that this printer will be Statement of Limited Warranty included free of defects in...

User's Guide
Page 12
Description Where to find Record the following information (located on the store receipt and the back of the printer), and have it ready when you contact us so that we may serve you faster: Machine Type number: Serial number: Date purchased: Store where purchased: Setting up the printer 12
Description Where to find Record the following information (located on the store receipt and the back of the printer), and have it ready when you contact us so that we may serve you faster: Machine Type number: Serial number: Date purchased: Store where purchased: Setting up the printer 12
User's Guide
Page 13
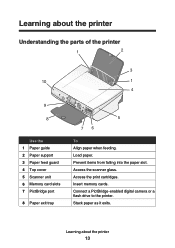
Connect a PictBridge-enabled digital camera or a flash drive to the printer. Load paper. Access the scanner glass. Prevent items from falling into the paper slot. Learning about the printer 13 Learning about the printer Understanding the parts of the printer 1 2 3 10 1 4 9 8 Use the 1 Paper guide 2 Paper support 3 Paper feed guard 4 Top cover 5 Scanner unit 6 Memory card slots 7 PictBridge port 8 Paper exit tray 5 76 To Align paper when feeding. Insert memory cards. Stack paper as it exits. Access the print cartridges.
Connect a PictBridge-enabled digital camera or a flash drive to the printer. Load paper. Access the scanner glass. Prevent items from falling into the paper slot. Learning about the printer 13 Learning about the printer Understanding the parts of the printer 1 2 3 10 1 4 9 8 Use the 1 Paper guide 2 Paper support 3 Paper feed guard 4 Top cover 5 Scanner unit 6 Memory card slots 7 PictBridge port 8 Paper exit tray 5 76 To Align paper when feeding. Insert memory cards. Stack paper as it exits. Access the print cartridges.
User's Guide
Page 14
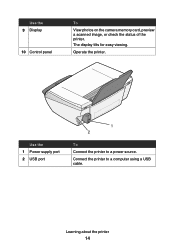
Use the 9 Display 10 Control panel To View photos on the camera memory card, preview a scanned image, or check the status of the printer. Use the 1 Power supply port 2 USB port 1 2 To Connect the printer to a computer using a USB cable. Operate the printer. Connect the printer to a power source. Learning about the printer 14 The display tilts for easy viewing.
Use the 9 Display 10 Control panel To View photos on the camera memory card, preview a scanned image, or check the status of the printer. Use the 1 Power supply port 2 USB port 1 2 To Connect the printer to a computer using a USB cable. Operate the printer. Connect the printer to a power source. Learning about the printer 14 The display tilts for easy viewing.
User's Guide
Page 15
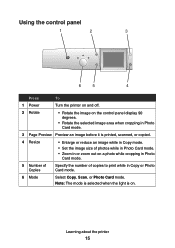
... image size of photos while in Photo Card mode. • Zoom in or zoom out on . Using the control panel 1 2 3 6 5 4 Press To 1 Power Turn the printer on and off. 2 Rotate • Rotate the image on the control panel display 90 degrees. • Rotate the selected image area when cropping in Photo... Specify the number of copies to print while in Copy or Photo Card mode. 6 Mode Select Copy, Scan, or Photo Card mode. Learning about the printer 15
... image size of photos while in Photo Card mode. • Zoom in or zoom out on . Using the control panel 1 2 3 6 5 4 Press To 1 Power Turn the printer on and off. 2 Rotate • Rotate the image on the control panel display 90 degrees. • Rotate the selected image area when cropping in Photo... Specify the number of copies to print while in Copy or Photo Card mode. 6 Mode Select Copy, Scan, or Photo Card mode. Learning about the printer 15
User's Guide
Page 16
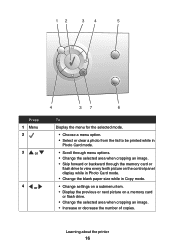
Learning about the printer 16 12 34 5 Press 1 Menu 2 3 or 4 or 4 37 6 To Display the menu for the selected mode. • Choose a menu option. • Select or clear a photo ...
Learning about the printer 16 12 34 5 Press 1 Menu 2 3 or 4 or 4 37 6 To Display the menu for the selected mode. • Choose a menu option. • Select or clear a photo ...
User's Guide
Page 17
... order for a photo print job to start , a memory card or flash drive must be inserted, or a PictBridge-enabled digital camera must be connected to the printer. • Cancel a copy, scan, or print job. • Clear the selected preview photo from the list while in Photo Card mode. • Cancel all photo..., or Photo Card mode. 2 Press Menu to open the menu for the selected mode. 3 Press or to scroll through the menus. 4 Press or to the printer. Press 5 Color 6 Black 7 To Start a color copy, scan, or photo job. Note: Make sure the mode you want is selected. Using the Copy menu 1 ...
... order for a photo print job to start , a memory card or flash drive must be inserted, or a PictBridge-enabled digital camera must be connected to the printer. • Cancel a copy, scan, or print job. • Clear the selected preview photo from the list while in Photo Card mode. • Cancel all photo..., or Photo Card mode. 2 Press Menu to open the menu for the selected mode. 3 Press or to scroll through the menus. 4 Press or to the printer. Press 5 Color 6 Black 7 To Start a color copy, scan, or photo job. Note: Make sure the mode you want is selected. Using the Copy menu 1 ...
User's Guide
Page 18
...paper support. • Select a language for the control panel display text. • Specify when settings are cleared. • Specify when the printer enters Power Save mode. Specify the number of images to place on the scanner glass. • Check ink levels. • Change cartridges. ...cartridge diagnostic information. • Restore default settings. • Specify the type of paper loaded in the paper support. Learning about the printer 18 4 Press or to scroll through the menu. Menu item Copy Quality Brightness Blank Paper Size Repeat Image Size of the original document ...
...paper support. • Select a language for the control panel display text. • Specify when settings are cleared. • Specify when the printer enters Power Save mode. Specify the number of images to place on the scanner glass. • Check ink levels. • Change cartridges. ...cartridge diagnostic information. • Restore default settings. • Specify the type of paper loaded in the paper support. Learning about the printer 18 4 Press or to scroll through the menu. Menu item Copy Quality Brightness Blank Paper Size Repeat Image Size of the original document ...
User's Guide
Page 19
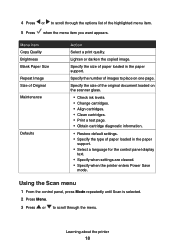
... item. 5 Press when the menu item you want appears. Lighten or darken the scanned image. 4 Press or to enter Power Save mode. Learning about the printer 19 From this menu Maintenance Defaults You can Specify the size of the highlighted menu item. 5 Press when the menu item you want appears. Select...
... item. 5 Press when the menu item you want appears. Lighten or darken the scanned image. 4 Press or to enter Power Save mode. Learning about the printer 19 From this menu Maintenance Defaults You can Specify the size of the highlighted menu item. 5 Press when the menu item you want appears. Select...
User's Guide
Page 20
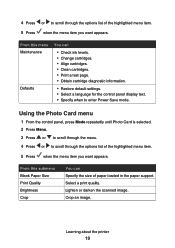
... a memory card or flash drive, and select which photos to print. Print all of the photos on a memory card or flash drive. Learning about the printer 20 From this submenu Auto Image Enhance Red Eye Reduction Colorize Effect Print All Photos View Slide Show Print Index Page View Photos or Print...
... a memory card or flash drive, and select which photos to print. Print all of the photos on a memory card or flash drive. Learning about the printer 20 From this submenu Auto Image Enhance Red Eye Reduction Colorize Effect Print All Photos View Slide Show Print Index Page View Photos or Print...
User's Guide
Page 21
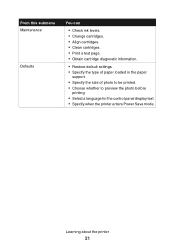
Learning about the printer 21 From this submenu Maintenance Defaults You can • Check ink levels. • Change cartridges. • Align cartridges. • Clean cartridges. • Print a test page. • Obtain cartridge diagnostic information. • Restore default settings. • Specify the type of paper loaded in the paper support. • Specify the size of photo to be printed. • Choose whether to preview the photo before printing. • Select a language for the control panel display text. • Specify when the printer enters Power Save mode.
Learning about the printer 21 From this submenu Maintenance Defaults You can • Check ink levels. • Change cartridges. • Align cartridges. • Clean cartridges. • Print a test page. • Obtain cartridge diagnostic information. • Restore default settings. • Specify the type of paper loaded in the paper support. • Specify the size of photo to be printed. • Choose whether to preview the photo before printing. • Select a language for the control panel display text. • Specify when the printer enters Power Save mode.
User's Guide
Page 22
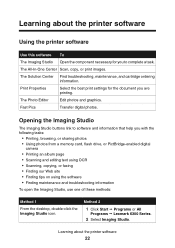
... 2 1 Click Start ΠPrograms or All Programs ΠLexmark 6300 Series. 2 Select Imaging Studio. Fast Pics Transfer digital photos. Print Properties Select the best print settings for you to software and information that help you are printing. Learning about the printer software Using the printer software Use this software To The Imaging Studio... complete a task. The All-In-One Center Scan, copy, or print images. The Solution Center Find troubleshooting, maintenance, and cartridge ordering information. Learning about the printer software 22
... 2 1 Click Start ΠPrograms or All Programs ΠLexmark 6300 Series. 2 Select Imaging Studio. Fast Pics Transfer digital photos. Print Properties Select the best print settings for you to software and information that help you are printing. Learning about the printer software Using the printer software Use this software To The Imaging Studio... complete a task. The All-In-One Center Scan, copy, or print images. The Solution Center Find troubleshooting, maintenance, and cartridge ordering information. Learning about the printer software 22
User's Guide
Page 23
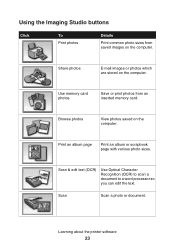
... Click To Print photos Details Print common photo sizes from an inserted memory card. Browse photos View photos saved on the computer. Learning about the printer software 23 Share photos E-mail images or photos which are stored on the computer.
... Click To Print photos Details Print common photo sizes from an inserted memory card. Browse photos View photos saved on the computer. Learning about the printer software 23 Share photos E-mail images or photos which are stored on the computer.

User's Guide
Page 24
...the desktop, double-click the Imaging Studio icon, and then click the Scan or Copy button. 1 Click Start Œ Programs or All Programs Œ Lexmark 6300 Series. 2 Select All-In-One Center. Find maintenance and troubleshooting information and tools to scan, copy, and fax documents. Using the All-In-...One Center Use the All-In-One Center software to keep the printer working properly. Note: Click See More Scan Settings to . • Select what you can do with this software. Using the Scanning & Copying ...
...the desktop, double-click the Imaging Studio icon, and then click the Scan or Copy button. 1 Click Start Œ Programs or All Programs Œ Lexmark 6300 Series. 2 Select All-In-One Center. Find maintenance and troubleshooting information and tools to scan, copy, and fax documents. Using the All-In-...One Center Use the All-In-One Center software to keep the printer working properly. Note: Click See More Scan Settings to . • Select what you can do with this software. Using the Scanning & Copying ...


