User's Guide
Page 3
... Setting up the printer 7 Checking the box contents 7 Finding information about the printer 8 Learning about the printer 13 Understanding the parts of the printer 13 Using the control panel 15 Navigating the control panel menus 17 Using the Copy menu 17 Using the Scan menu 18 Using the Photo Card menu 19 ...Learning about the printer software 22 Using the printer software 22 Opening the Imaging Studio 22 Using the Imaging Studio buttons 23 Using the All-In-One ...
... Setting up the printer 7 Checking the box contents 7 Finding information about the printer 8 Learning about the printer 13 Understanding the parts of the printer 13 Using the control panel 15 Navigating the control panel menus 17 Using the Copy menu 17 Using the Scan menu 18 Using the Photo Card menu 19 ...Learning about the printer software 22 Using the printer software 22 Opening the Imaging Studio 22 Using the Imaging Studio buttons 23 Using the All-In-One ...
User's Guide
Page 8
...for You can find this document in the printer box or on the Lexmark Web site. See the Setup sheet for Windows users). CD Description Where to be installed. Setting up hardware and software. Name 4 Color print cartridge 5 Photo print cartridge 6 User's Guide or Setup ...Solutions Description Cartridges to find The CD contains drivers, software, and publication files. printer box or on the Lexmark Web site. The CD will install the Help system on your...
...for You can find this document in the printer box or on the Lexmark Web site. See the Setup sheet for Windows users). CD Description Where to be installed. Setting up hardware and software. Name 4 Color print cartridge 5 Photo print cartridge 6 User's Guide or Setup ...Solutions Description Cartridges to find The CD contains drivers, software, and publication files. printer box or on the Lexmark Web site. The CD will install the Help system on your...
User's Guide
Page 14
Use the 9 Display 10 Control panel To View photos on the camera memory card, preview a scanned image, or check the status of the printer. Use the 1 Power supply port 2 USB port 1 2 To Connect the printer to a computer using a USB cable. Connect the printer to a power source. Operate the printer. Learning about the printer 14 The display tilts for easy viewing.
Use the 9 Display 10 Control panel To View photos on the camera memory card, preview a scanned image, or check the status of the printer. Use the 1 Power supply port 2 USB port 1 2 To Connect the printer to a computer using a USB cable. Connect the printer to a power source. Operate the printer. Learning about the printer 14 The display tilts for easy viewing.
User's Guide
Page 15
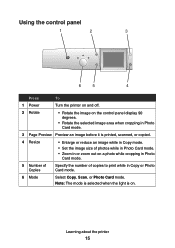
... Copy mode. • Set the image size of photos while in Photo Card mode. • Zoom in Copy or Photo Card mode. 6 Mode Select Copy, Scan, or Photo Card mode. Using the control panel 1 2 3 6 5 4 Press To 1 Power Turn the printer on and off. 2 Rotate • Rotate the... image on the control panel display 90 degrees. • Rotate the selected image area when cropping in Photo Card mode. 3 Page Preview Preview an image before it is on a photo while cropping in Photo Card mode. 5 Number of Copies...
... Copy mode. • Set the image size of photos while in Photo Card mode. • Zoom in Copy or Photo Card mode. 6 Mode Select Copy, Scan, or Photo Card mode. Using the control panel 1 2 3 6 5 4 Press To 1 Power Turn the printer on and off. 2 Rotate • Rotate the... image on the control panel display 90 degrees. • Rotate the selected image area when cropping in Photo Card mode. 3 Page Preview Preview an image before it is on a photo while cropping in Photo Card mode. 5 Number of Copies...
User's Guide
Page 16
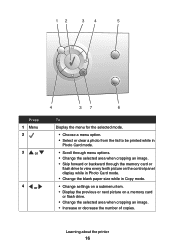
...6 To Display the menu for the selected mode. • Choose a menu option. • Select or clear a photo from the list to be printed while in Photo Card mode. • Scroll through menu options. • Change the selected area when cropping an image. • Skip...forward or backward through the memory card or flash drive to view every tenth picture on the control panel display while in Photo Card mode. • Change the blank paper size while in Copy mode. • Change settings on a submenu ... an image. • Increase or decrease the number of copies. Learning about the printer 16
...6 To Display the menu for the selected mode. • Choose a menu option. • Select or clear a photo from the list to be printed while in Photo Card mode. • Scroll through menu options. • Change the selected area when cropping an image. • Skip...forward or backward through the memory card or flash drive to view every tenth picture on the control panel display while in Photo Card mode. • Change the blank paper size while in Copy mode. • Change settings on a submenu ... an image. • Increase or decrease the number of copies. Learning about the printer 16
User's Guide
Page 17
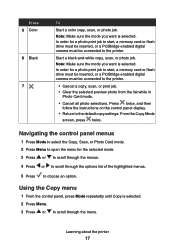
...must be inserted, or a PictBridge-enabled digital camera must be connected to the printer. • Cancel a copy, scan, or print job. • Clear the selected preview photo from the list while in Photo Card mode. • Cancel all photo selections. From the Copy Mode screen, press twice. Press 5 Color 6 Black... Mode to select the Copy, Scan, or Photo Card mode. 2 Press Menu to open the menu for a photo print job to start , a memory card or flash drive must be inserted, or a PictBridge-enabled digital camera must be connected to the printer. In order for the selected mode. 3...
...must be inserted, or a PictBridge-enabled digital camera must be connected to the printer. • Cancel a copy, scan, or print job. • Clear the selected preview photo from the list while in Photo Card mode. • Cancel all photo selections. From the Copy Mode screen, press twice. Press 5 Color 6 Black... Mode to select the Copy, Scan, or Photo Card mode. 2 Press Menu to open the menu for a photo print job to start , a memory card or flash drive must be inserted, or a PictBridge-enabled digital camera must be connected to the printer. In order for the selected mode. 3...
User's Guide
Page 19
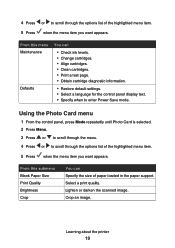
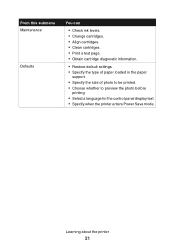
... menu Maintenance Defaults You can Specify the size of the highlighted menu item. 5 Press when the menu item you want appears. Learning about the printer 19 From this submenu Blank Paper Size Print Quality Brightness Crop You can • Check ink levels. • Change cartridges. • Align ...text. • Specify when to scroll through the options list of paper loaded in the paper support. Using the Photo Card menu 1 From the control panel, press Mode repeatedly until Photo Card is selected. 2 Press Menu. 3 Press or to scroll through the menu. 4 Press or to enter ...
... menu Maintenance Defaults You can Specify the size of the highlighted menu item. 5 Press when the menu item you want appears. Learning about the printer 19 From this submenu Blank Paper Size Print Quality Brightness Crop You can • Check ink levels. • Change cartridges. • Align ...text. • Specify when to scroll through the options list of paper loaded in the paper support. Using the Photo Card menu 1 From the control panel, press Mode repeatedly until Photo Card is selected. 2 Press Menu. 3 Press or to scroll through the menu. 4 Press or to enter ...
User's Guide
Page 20
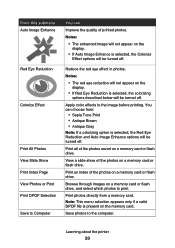
...slide show of the photos saved on a memory card or flash drive. Save photos to the computer. Notes: • The red eye reduction will not appear on the memory card. Learning about the printer 20 Reduce the red eye effect in photos. Print an index of printed photos. From this submenu... Auto Image Enhance Red Eye Reduction Colorize Effect Print All Photos View Slide Show Print Index Page View Photos or Print Print DPOF Selection Save ...
...slide show of the photos saved on a memory card or flash drive. Save photos to the computer. Notes: • The red eye reduction will not appear on the memory card. Learning about the printer 20 Reduce the red eye effect in photos. Print an index of printed photos. From this submenu... Auto Image Enhance Red Eye Reduction Colorize Effect Print All Photos View Slide Show Print Index Page View Photos or Print Print DPOF Selection Save ...
User's Guide
Page 21
From this submenu Maintenance Defaults You can • Check ink levels. • Change cartridges. • Align cartridges. • Clean cartridges. • Print a test page. • Obtain cartridge diagnostic information. • Restore default settings. • Specify the type of paper loaded in the paper support. • Specify the size of photo to be printed. • Choose whether to preview the photo before printing. • Select a language for the control panel display text. • Specify when the printer enters Power Save mode. Learning about the printer 21
From this submenu Maintenance Defaults You can • Check ink levels. • Change cartridges. • Align cartridges. • Clean cartridges. • Print a test page. • Obtain cartridge diagnostic information. • Restore default settings. • Specify the type of paper loaded in the paper support. • Specify the size of photo to be printed. • Choose whether to preview the photo before printing. • Select a language for the control panel display text. • Specify when the printer enters Power Save mode. Learning about the printer 21
User's Guide
Page 22
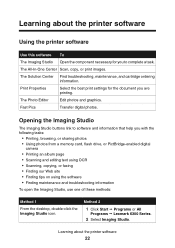
The Solution Center Find troubleshooting, maintenance, and cartridge ordering information. The Photo Editor Edit photos and graphics. Method 2 1 Click Start ΠPrograms or All Programs ΠLexmark 6300 Series. 2 Select Imaging Studio. Learning about the printer software Using the printer software Use this software To The Imaging Studio Open the component necessary for the document you...
The Solution Center Find troubleshooting, maintenance, and cartridge ordering information. The Photo Editor Edit photos and graphics. Method 2 1 Click Start ΠPrograms or All Programs ΠLexmark 6300 Series. 2 Select Imaging Studio. Learning about the printer software Using the printer software Use this software To The Imaging Studio Open the component necessary for the document you...
User's Guide
Page 23
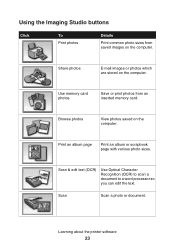
... are stored on the computer. Print an album page Print an album or scrapbook page with various photo sizes. Learning about the printer software 23 Use memory card photos Save or print photos from saved images on the computer. Scan & edit text (OCR) Use Optical Character Recognition (OCR) to scan a document to a word processor...
... are stored on the computer. Print an album page Print an album or scrapbook page with various photo sizes. Learning about the printer software 23 Use memory card photos Save or print photos from saved images on the computer. Scan & edit text (OCR) Use Optical Character Recognition (OCR) to scan a document to a word processor...

User's Guide
Page 24
.... • Select the scan quality. Click To Copy Fax Details • Copy photos or documents. • Enlarge, reduce, or change other features before printing. Find maintenance and troubleshooting information and tools to view all settings. Learn more about the printer software 24 Using the All-In-One Center Use the All-In... 2 From the desktop, double-click the Imaging Studio icon, and then click the Scan or Copy button. 1 Click Start Œ Programs or All Programs Œ Lexmark 6300 Series. 2 Select All-In-One Center.
.... • Select the scan quality. Click To Copy Fax Details • Copy photos or documents. • Enlarge, reduce, or change other features before printing. Find maintenance and troubleshooting information and tools to view all settings. Learn more about the printer software 24 Using the All-In-One Center Use the All-In... 2 From the desktop, double-click the Imaging Studio icon, and then click the Scan or Copy button. 1 Click Start Œ Programs or All Programs Œ Lexmark 6300 Series. 2 Select All-In-One Center.
User's Guide
Page 25
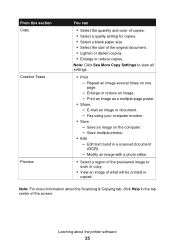
Repeat an image several times on the computer. - Save multiple photos. • Edit - Edit text found in the top center of what will be printed or copied. Note: For more information about the printer software 25 Enlarge or reduce an image. - E-mail an image or document. - ...View an image of the screen. Learning about the Scanning & Copying tab, click Help in a scanned document (OCR). - Modify an image with a photo editor. • Select a region of the original document. • Lighten or darken copies. • Enlarge or reduce copies. From this section Copy ...
Repeat an image several times on the computer. - Save multiple photos. • Edit - Edit text found in the top center of what will be printed or copied. Note: For more information about the printer software 25 Enlarge or reduce an image. - E-mail an image or document. - ...View an image of the screen. Learning about the Scanning & Copying tab, click Help in a scanned document (OCR). - Modify an image with a photo editor. • Select a region of the original document. • Lighten or darken copies. • Enlarge or reduce copies. From this section Copy ...
User's Guide
Page 26
...Main Page Creative Tasks section. - Note: For more information about the printer software 26 Share • E-mail an image. • Fax using your computer modem. - From this section Preview Open With Photo Prints Creative Tasks You can • Show or create folders. •... images. • Rename, delete, or edit selected images. Using the Maintain/Troubleshoot link The Maintain/Troubleshoot link provides you with various photo sizes. • Perform creative tasks available from these topics: • Maintain or fix quality problems • Troubleshoot problems Learning about ...
...Main Page Creative Tasks section. - Note: For more information about the printer software 26 Share • E-mail an image. • Fax using your computer modem. - From this section Preview Open With Photo Prints Creative Tasks You can • Show or create folders. •... images. • Rename, delete, or edit selected images. Using the Maintain/Troubleshoot link The Maintain/Troubleshoot link provides you with various photo sizes. • Perform creative tasks available from these topics: • Maintain or fix quality problems • Troubleshoot problems Learning about ...
User's Guide
Page 28
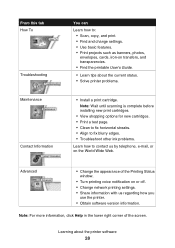
Advanced • Change the appearance of the screen. Learning about the current status. • Solve printer problems. • Install a print cartridge. Note: Wait until scanning is complete before installing new print cartridges. • View shopping options for new...and change settings. • Use basic features. • Print projects such as banners, photos, envelopes, cards, iron-on transfers, and transparencies. • Find the printable User's Guide. • Learn tips about the printer software 28 Note: For more information, click Help in the lower right corner of the ...
Advanced • Change the appearance of the screen. Learning about the current status. • Solve printer problems. • Install a print cartridge. Note: Wait until scanning is complete before installing new print cartridges. • View shopping options for new...and change settings. • Use basic features. • Print projects such as banners, photos, envelopes, cards, iron-on transfers, and transparencies. • Find the printable User's Guide. • Learn tips about the printer software 28 Note: For more information, click Help in the lower right corner of the ...

User's Guide
Page 29
... 1 With a document open, click File ΠPrint. 2 From the Print dialog, click Properties, Preferences, Options, or Setup. Learning about the printer software 29 Options menu Use the "Options" menu to make changes to different parts of the paper) to create. The "Options" menu also provides direct...Options, Layout Options, and Printing Status Options settings. I Want To menu The "I Want To" menu contains a variety of task wizards (printing a photo, an envelope, a banner, a poster, or printing on the type of project you want to help you can change the settings in Print Properties ...
... 1 With a document open, click File ΠPrint. 2 From the Print dialog, click Properties, Preferences, Options, or Setup. Learning about the printer software 29 Options menu Use the "Options" menu to make changes to different parts of the paper) to create. The "Options" menu also provides direct...Options, Layout Options, and Printing Status Options settings. I Want To menu The "I Want To" menu contains a variety of task wizards (printing a photo, an envelope, a banner, a poster, or printing on the type of project you want to help you can change the settings in Print Properties ...

User's Guide
Page 31
...flash drive to the computer. Using Fast Pics Use Fast Pics to save or print photos from a memory card or flash drive" on page 43. • From the Imaging Studio, click Use Memory Card Photos. Use one image at a time. • Move the mouse pointer over the tool... on page 45. For more information, see "Printing photos using a computer. Learning about the printer software 31 Using the Photo Editor Use the Photo Editor software to edit graphics or photos. 1 Click Start Œ Programs or All Programs Œ Lexmark 6300 Series. 2 Click Photo Editor. 3 Click File Œ Open to select ...
...flash drive to the computer. Using Fast Pics Use Fast Pics to save or print photos from a memory card or flash drive" on page 43. • From the Imaging Studio, click Use Memory Card Photos. Use one image at a time. • Move the mouse pointer over the tool... on page 45. For more information, see "Printing photos using a computer. Learning about the printer software 31 Using the Photo Editor Use the Photo Editor software to edit graphics or photos. 1 Click Start Œ Programs or All Programs Œ Lexmark 6300 Series. 2 Click Photo Editor. 3 Click File Œ Open to select ...
User's Guide
Page 33
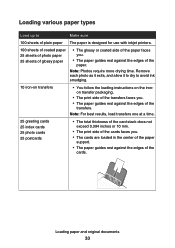
... 33 Note: For best results, load transfers one at a time. 25 greeting cards 25 index cards 25 photo cards 25 postcards • The total thickness of the card stack does not exceed 0.394 inches or 10... faces you. • The paper guides rest against the edges of the transfers. Remove each photo as it exits, and allow it to dry to Make sure 100 sheets of plain paper The paper... is designed for use with inkjet printers. 100 sheets of coated paper 25 sheets of photo paper 25 sheets of glossy paper • The glossy or coated side of...
... 33 Note: For best results, load transfers one at a time. 25 greeting cards 25 index cards 25 photo cards 25 postcards • The total thickness of the card stack does not exceed 0.394 inches or 10... faces you. • The paper guides rest against the edges of the transfers. Remove each photo as it exits, and allow it to dry to Make sure 100 sheets of plain paper The paper... is designed for use with inkjet printers. 100 sheets of coated paper 25 sheets of photo paper 25 sheets of glossy paper • The glossy or coated side of...
User's Guide
Page 36
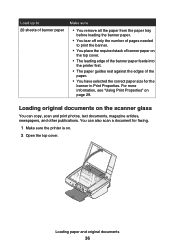
You can copy, scan and print photos, text documents, magazine articles, newspapers, and other publications. Loading paper and original ...the required stack of banner paper on the top cover. • The leading edge of the banner paper feeds into the printer first. • The paper guides rest against the edges of the paper. • You have selected the correct paper... size for faxing. 1 Make sure the printer is on. 2 Open the top cover. For more information, see "Using Print Properties" on the scanner glass You can...
You can copy, scan and print photos, text documents, magazine articles, newspapers, and other publications. Loading paper and original ...the required stack of banner paper on the top cover. • The leading edge of the banner paper feeds into the printer first. • The paper guides rest against the edges of the paper. • You have selected the correct paper... size for faxing. 1 Make sure the printer is on. 2 Open the top cover. For more information, see "Using Print Properties" on the scanner glass You can...

User's Guide
Page 39
... smudging, remove each card as it exits, and let it dry before stacking. 3 Click Properties, Preferences, Options, or Setup. 4 Select a Quality/Speed setting. Select Photo for photos and greeting cards and Normal for other types of the transparencies loaded. 5 Click OK. 6 Click OK or Print. Notes: • To avoid paper jams, do...
... smudging, remove each card as it exits, and let it dry before stacking. 3 Click Properties, Preferences, Options, or Setup. 4 Select a Quality/Speed setting. Select Photo for photos and greeting cards and Normal for other types of the transparencies loaded. 5 Click OK. 6 Click OK or Print. Notes: • To avoid paper jams, do...


