User's Guide
Page 5
... Receiving a fax using the software 66 Networking 67 Installing network printers 67 Tips for installing a network printer 69 Maintaining the printer 71 Removing a used print cartridge 71 Installing print cartridges 72 Aligning print cartridges 74 Cleaning the print cartridge nozzles 75 Wiping the print cartridge nozzles and contacts 75 Preserving the print...
... Receiving a fax using the software 66 Networking 67 Installing network printers 67 Tips for installing a network printer 69 Maintaining the printer 71 Removing a used print cartridge 71 Installing print cartridges 72 Aligning print cartridges 74 Cleaning the print cartridge nozzles 75 Wiping the print cartridge nozzles and contacts 75 Preserving the print...
User's Guide
Page 6
Using the cartridge storage area 77 Refilling the print cartridges 78 Ordering Lexmark Supplies 80 Ordering supplies 80 Troubleshooting 81 Setup troubleshooting 81 Print troubleshooting 85 Copy troubleshooting 88 Scan troubleshooting 89 Fax troubleshooting 90 Network troubleshooting 93 Jams and misfeeds troubleshooting 94 Memory card troubleshooting 97 Error messages 99 Removing and reinstalling the software 104 Notices 105 Index 111 Contents 6
Using the cartridge storage area 77 Refilling the print cartridges 78 Ordering Lexmark Supplies 80 Ordering supplies 80 Troubleshooting 81 Setup troubleshooting 81 Print troubleshooting 85 Copy troubleshooting 88 Scan troubleshooting 89 Fax troubleshooting 90 Network troubleshooting 93 Jams and misfeeds troubleshooting 94 Memory card troubleshooting 97 Error messages 99 Removing and reinstalling the software 104 Notices 105 Index 111 Contents 6
User's Guide
Page 8
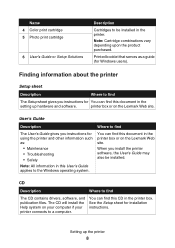
...printer connects to a computer. CD Description Where to find this CD in the printer box or on the Lexmark Web site. Name 4 Color print cartridge 5 Photo print cartridge 6 User's Guide or Setup Solutions Description Cartridges to be installed. When you instructions for using the printer and other information such as a guide (for ... Windows operating system. You can find The CD contains drivers, software, and publication files. The CD will install the Help system on the Lexmark Web site. Note: Cartridge combinations vary depending upon the product purchased.
...printer connects to a computer. CD Description Where to find this CD in the printer box or on the Lexmark Web site. Name 4 Color print cartridge 5 Photo print cartridge 6 User's Guide or Setup Solutions Description Cartridges to be installed. When you instructions for using the printer and other information such as a guide (for ... Windows operating system. You can find The CD contains drivers, software, and publication files. The CD will install the Help system on the Lexmark Web site. Note: Cartridge combinations vary depending upon the product purchased.
User's Guide
Page 10
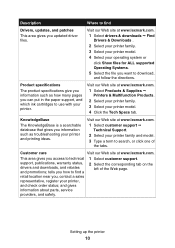
...or click Show files for ALL supported Operating Systems. 5 Select the file you can put in the paper support, and which ink cartridges to use with your printer. Setting up the printer 10 Description Where to find a retail location near you access to technical support..., publications, warranty status, drivers and downloads, and rebates and promotions; Visit our Web site at www.lexmark.com. 1 Select customer support ΠTechnical Support. 2 Select your printer model. 4 Click the Tech Specs tab. Product specifications The product...
...or click Show files for ALL supported Operating Systems. 5 Select the file you can put in the paper support, and which ink cartridges to use with your printer. Setting up the printer 10 Description Where to find a retail location near you access to technical support..., publications, warranty status, drivers and downloads, and rebates and promotions; Visit our Web site at www.lexmark.com. 1 Select customer support ΠTechnical Support. 2 Select your printer model. 4 Click the Tech Specs tab. Product specifications The product...
User's Guide
Page 11
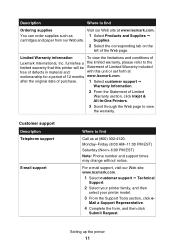
For e-mail support, visit our Web site: www.lexmark.com. 1 Select customer support ΠTechnical Support. 2 Select your printer family,...this unit or set forth at workmanship for a period of Lexmark International, Inc. Limited Warranty information To view the limitations and conditions of 12 months www.lexmark.com. Monday-Friday (8:00 AM-11:00 PM EST) ...Customer support Description Telephone support E-mail support Where to find Ordering supplies Visit our Web site at www.lexmark.com. Setting up the printer 11 Description Where to find Call us at (800) 332-4120. You...
For e-mail support, visit our Web site: www.lexmark.com. 1 Select customer support ΠTechnical Support. 2 Select your printer family,...this unit or set forth at workmanship for a period of Lexmark International, Inc. Limited Warranty information To view the limitations and conditions of 12 months www.lexmark.com. Monday-Friday (8:00 AM-11:00 PM EST) ...Customer support Description Telephone support E-mail support Where to find Ordering supplies Visit our Web site at www.lexmark.com. Setting up the printer 11 Description Where to find Call us at (800) 332-4120. You...
User's Guide
Page 13
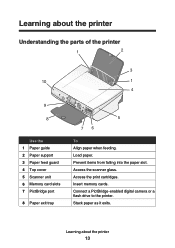
Access the print cartridges. Connect a PictBridge-enabled digital camera or a flash drive to the printer. Stack paper as it exits. Insert memory cards. Learning about the printer Understanding the parts of the printer 1 2 3 10 1 4 9 8 Use the 1 Paper guide 2 Paper support 3 Paper feed guard 4 Top cover 5 Scanner unit 6 Memory card slots 7 PictBridge port 8 Paper exit tray 5 76 To Align paper when feeding. Load paper. Access the scanner glass. Learning about the printer 13 Prevent items from falling into the paper slot.
Access the print cartridges. Connect a PictBridge-enabled digital camera or a flash drive to the printer. Stack paper as it exits. Insert memory cards. Learning about the printer Understanding the parts of the printer 1 2 3 10 1 4 9 8 Use the 1 Paper guide 2 Paper support 3 Paper feed guard 4 Top cover 5 Scanner unit 6 Memory card slots 7 PictBridge port 8 Paper exit tray 5 76 To Align paper when feeding. Load paper. Access the scanner glass. Learning about the printer 13 Prevent items from falling into the paper slot.
User's Guide
Page 18
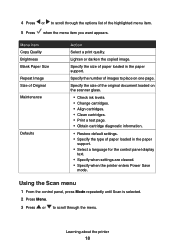
... through the menu. Specify the number of images to place on the scanner glass. • Check ink levels. • Change cartridges. • Align cartridges. • Clean cartridges. • Print a test page. • Obtain cartridge diagnostic information. • Restore default settings. • Specify the type of the highlighted menu item. 5 Press when the menu item...
... through the menu. Specify the number of images to place on the scanner glass. • Check ink levels. • Change cartridges. • Align cartridges. • Clean cartridges. • Print a test page. • Obtain cartridge diagnostic information. • Restore default settings. • Specify the type of the highlighted menu item. 5 Press when the menu item...
User's Guide
Page 19
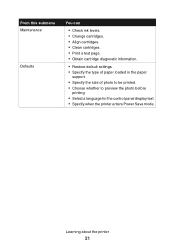
... want appears. From this submenu Blank Paper Size Print Quality Brightness Crop You can • Check ink levels. • Change cartridges. • Align cartridges. • Clean cartridges. • Print a test page. • Obtain cartridge diagnostic information. • Restore default settings. • Select a language for the control panel display text. • Specify when to enter...
... want appears. From this submenu Blank Paper Size Print Quality Brightness Crop You can • Check ink levels. • Change cartridges. • Align cartridges. • Clean cartridges. • Print a test page. • Obtain cartridge diagnostic information. • Restore default settings. • Select a language for the control panel display text. • Specify when to enter...
User's Guide
Page 21
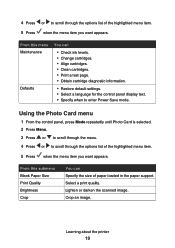
Learning about the printer 21 From this submenu Maintenance Defaults You can • Check ink levels. • Change cartridges. • Align cartridges. • Clean cartridges. • Print a test page. • Obtain cartridge diagnostic information. • Restore default settings. • Specify the type of paper loaded in the paper support. • Specify the size of photo to be printed. • Choose whether to preview the photo before printing. • Select a language for the control panel display text. • Specify when the printer enters Power Save mode.
Learning about the printer 21 From this submenu Maintenance Defaults You can • Check ink levels. • Change cartridges. • Align cartridges. • Clean cartridges. • Print a test page. • Obtain cartridge diagnostic information. • Restore default settings. • Specify the type of paper loaded in the paper support. • Specify the size of photo to be printed. • Choose whether to preview the photo before printing. • Select a language for the control panel display text. • Specify when the printer enters Power Save mode.
User's Guide
Page 22
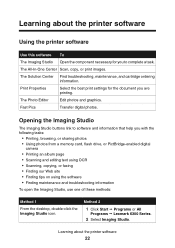
The Solution Center Find troubleshooting, maintenance, and cartridge ordering information. Method 2 1 Click Start ΠPrograms or All Programs ΠLexmark 6300 Series. 2 Select Imaging Studio. The All-In-One Center Scan, copy, or print images. Fast Pics Transfer digital photos. The Photo Editor Edit photos ...
The Solution Center Find troubleshooting, maintenance, and cartridge ordering information. Method 2 1 Click Start ΠPrograms or All Programs ΠLexmark 6300 Series. 2 Select Imaging Studio. The All-In-One Center Scan, copy, or print images. Fast Pics Transfer digital photos. The Photo Editor Edit photos ...
User's Guide
Page 27
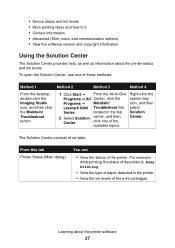
..., and then Center. For example, while printing, the status of the printer is Busy Printing. • View the type of the print cartridges. Learning about the printer status and ink levels. The Solution Center consists of six tabs: From this tab Printer Status (Main dialog) You can... the Maintain/ Troubleshoot button. 1 Click Start Œ From the All-In-One Programs or All Center, click the Programs Œ Maintain/ Lexmark 6300 Troubleshoot link Series. Right-click the system tray icon, and then select Solution Center. click one of the printer. • Device status ...
..., and then Center. For example, while printing, the status of the printer is Busy Printing. • View the type of the print cartridges. Learning about the printer status and ink levels. The Solution Center consists of six tabs: From this tab Printer Status (Main dialog) You can... the Maintain/ Troubleshoot button. 1 Click Start Œ From the All-In-One Programs or All Center, click the Programs Œ Maintain/ Lexmark 6300 Troubleshoot link Series. Right-click the system tray icon, and then select Solution Center. click one of the printer. • Device status ...
User's Guide
Page 28
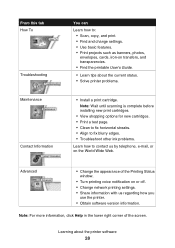
Learning about the current status. • Solve printer problems. • Install a print cartridge. Note: For more information, click Help in the lower right corner of the Printing Status window. • Turn printing voice notification on or off. ... the printable User's Guide. • Learn tips about the printer software 28 Note: Wait until scanning is complete before installing new print cartridges. • View shopping options for new cartridges. • Print a test page. • Clean to fix horizontal streaks. • Align to fix blurry edges. • Troubleshoot other ink ...
Learning about the current status. • Solve printer problems. • Install a print cartridge. Note: For more information, click Help in the lower right corner of the Printing Status window. • Turn printing voice notification on or off. ... the printable User's Guide. • Learn tips about the printer software 28 Note: Wait until scanning is complete before installing new print cartridges. • View shopping options for new cartridges. • Print a test page. • Clean to fix horizontal streaks. • Align to fix blurry edges. • Troubleshoot other ink ...
User's Guide
Page 71
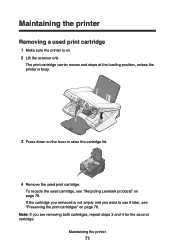
... are removing both cartridges, repeat steps 3 and 4 for the second cartridge. If the cartridge you removed is on page 79. Maintaining the printer 71 The print cartridge carrier moves and stops at the loading position, unless the printer is busy. 3 Press down on the lever to use it later, see "Recycling Lexmark products" on . 2 Lift...
... are removing both cartridges, repeat steps 3 and 4 for the second cartridge. If the cartridge you removed is on page 79. Maintaining the printer 71 The print cartridge carrier moves and stops at the loading position, unless the printer is busy. 3 Press down on the lever to use it later, see "Recycling Lexmark products" on . 2 Lift...
User's Guide
Page 72
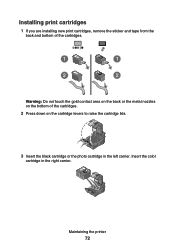
Installing print cartridges 1 If you are installing new print cartridges, remove the sticker and tape from the back and bottom of the cartridges. 1 1 2 2 Warning: Do not touch the gold contact area on the back or the metal nozzles on the bottom of the cartridges. 2 Press down on the cartridge levers to raise the cartridge lids. 3 Insert the black cartridge or the photo cartridge in the right carrier. Maintaining the printer 72 Insert the color cartridge in the left carrier.
Installing print cartridges 1 If you are installing new print cartridges, remove the sticker and tape from the back and bottom of the cartridges. 1 1 2 2 Warning: Do not touch the gold contact area on the back or the metal nozzles on the bottom of the cartridges. 2 Press down on the cartridge levers to raise the cartridge lids. 3 Insert the black cartridge or the photo cartridge in the right carrier. Maintaining the printer 72 Insert the color cartridge in the left carrier.

User's Guide
Page 73
... underneath the scanner unit. See user guide for using genuine Lexmark supplies. For more information, see "Aligning print cartridges" on page 74. Using genuine Lexmark print cartridges When you for details. • Thank you install a print cartridge, one of the following messages appears: • Non-Lexmark cartridge in RIGHT slot. Maintaining the printer 73 Note: The control...
... underneath the scanner unit. See user guide for using genuine Lexmark supplies. For more information, see "Aligning print cartridges" on page 74. Using genuine Lexmark print cartridges When you for details. • Thank you install a print cartridge, one of the following messages appears: • Non-Lexmark cartridge in RIGHT slot. Maintaining the printer 73 Note: The control...
User's Guide
Page 74
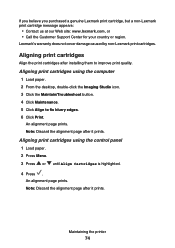
.... 3 Click the Maintain/Troubleshoot button. 4 Click Maintenance. 5 Click Align to improve print quality. An alignment page prints. If you believe you purchased a genuine Lexmark print cartridge, but a non-Lexmark print cartridge message appears: • Contact us at our Web site: www.lexmark.com, or • Call the Customer Support Center for your country or region.
.... 3 Click the Maintain/Troubleshoot button. 4 Click Maintenance. 5 Click Align to improve print quality. An alignment page prints. If you believe you purchased a genuine Lexmark print cartridge, but a non-Lexmark print cartridge message appears: • Contact us at our Web site: www.lexmark.com, or • Call the Customer Support Center for your country or region.
User's Guide
Page 75
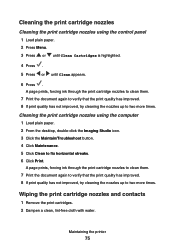
... not improved, try cleaning the nozzles up to two more times. Wiping the print cartridge nozzles and contacts 1 Remove the print cartridges. 2 Dampen a clean, lint-free cloth with water. Cleaning the print cartridge nozzles using the control panel 1 Load plain paper. 2 Press Menu. 3 Press ...Maintain/Troubleshoot button. 4 Click Maintenance. 5 Click Clean to fix horizontal streaks. 6 Click Print. A page prints, forcing ink through the print cartridge nozzles to clean them . 7 Print the document again to verify that the print quality has improved. 8 If print quality has not improved, ...
... not improved, try cleaning the nozzles up to two more times. Wiping the print cartridge nozzles and contacts 1 Remove the print cartridges. 2 Dampen a clean, lint-free cloth with water. Cleaning the print cartridge nozzles using the control panel 1 Load plain paper. 2 Press Menu. 3 Press ...Maintain/Troubleshoot button. 4 Click Maintenance. 5 Click Clean to fix horizontal streaks. 6 Click Print. A page prints, forcing ink through the print cartridge nozzles to clean them . 7 Print the document again to verify that the print quality has improved. 8 If print quality has not improved, ...
User's Guide
Page 76
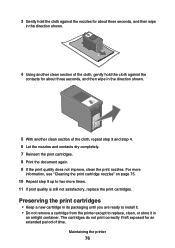
...packaging until you are ready to install it. • Do not remove a cartridge from the printer except to two more times. 11 If print quality is still not satisfactory, replace the print cartridges. For more information, see "Cleaning the print cartridge nozzles" on page 75. 10 Repeat step 9 up to replace, clean, ...or store it in an airtight container. Maintaining the printer 76 The cartridges do not print correctly if left exposed for about three seconds, and then wipe in the direction shown. 5 With another clean section of time. 3 ...
...packaging until you are ready to install it. • Do not remove a cartridge from the printer except to two more times. 11 If print quality is still not satisfactory, replace the print cartridges. For more information, see "Cleaning the print cartridge nozzles" on page 75. 10 Repeat step 9 up to replace, clean, ...or store it in an airtight container. Maintaining the printer 76 The cartridges do not print correctly if left exposed for about three seconds, and then wipe in the direction shown. 5 With another clean section of time. 3 ...
User's Guide
Page 77
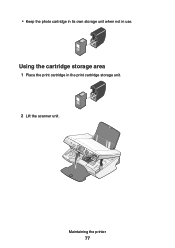
Maintaining the printer 77 Using the cartridge storage area 1 Place the print cartridge in use. • Keep the photo cartridge in its own storage unit when not in the print cartridge storage unit. 2 Lift the scanner unit.
Maintaining the printer 77 Using the cartridge storage area 1 Place the print cartridge in use. • Keep the photo cartridge in its own storage unit when not in the print cartridge storage unit. 2 Lift the scanner unit.
User's Guide
Page 78
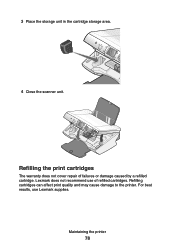
3 Place the storage unit in the cartridge storage area. 4 Close the scanner unit. Refilling cartridges can affect print quality and may cause damage to the printer. For best results, use of failures or damage caused by a refilled cartridge. Lexmark does not recommend use Lexmark supplies. Maintaining the printer 78 Refilling the print cartridges The warranty does not cover repair of refilled cartridges.
3 Place the storage unit in the cartridge storage area. 4 Close the scanner unit. Refilling cartridges can affect print quality and may cause damage to the printer. For best results, use of failures or damage caused by a refilled cartridge. Lexmark does not recommend use Lexmark supplies. Maintaining the printer 78 Refilling the print cartridges The warranty does not cover repair of refilled cartridges.


