
Troubleshooting Guide
Page 4
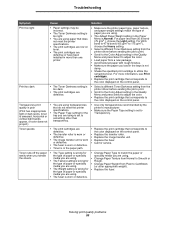
... image transfer unit and transfer roller. 3 If you still have loaded too much paper or too many envelopes. You have the problem, replace the fuser. Load paper from the entire paper path, and then press . Store paper in its original wrapper until the Performing Self Test message appears....then reinserting them while you turn the printer on, and until you load does not exceed the maximum stack height indicated at www.lexmark.com for the size paper loaded. For information that corresponds to the correct position. Color misregistration Color has shifted outside of the ...
... image transfer unit and transfer roller. 3 If you still have loaded too much paper or too many envelopes. You have the problem, replace the fuser. Load paper from the entire paper path, and then press . Store paper in its original wrapper until the Performing Self Test message appears....then reinserting them while you turn the printer on, and until you load does not exceed the maximum stack height indicated at www.lexmark.com for the size paper loaded. For information that corresponds to the correct position. Color misregistration Color has shifted outside of the ...

Troubleshooting Guide
Page 5
... to the Color Adjust setting in the Quality Menu and press Select to adjust the color. • Replace the print cartridge that corresponds to the color displayed on the control panel. Print too light • ... print cartridge that corresponds to the color displayed on the control panel. • Replace the transfer roller. • Replace the image transfer unit. • Replace the fuser. • Call for service. For 28 lb bond to 47 lb bond (... settings match the type of paper you are using . • Replace the image transfer unit and transfer roller. • Replace the fuser.
... to the Color Adjust setting in the Quality Menu and press Select to adjust the color. • Replace the print cartridge that corresponds to the color displayed on the control panel. Print too light • ... print cartridge that corresponds to the color displayed on the control panel. • Replace the transfer roller. • Replace the image transfer unit. • Replace the fuser. • Call for service. For 28 lb bond to 47 lb bond (... settings match the type of paper you are using . • Replace the image transfer unit and transfer roller. • Replace the fuser.
User's Guide
Page 59
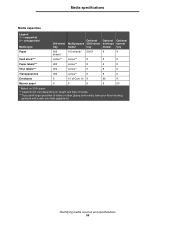
... paper. ** Capacity will vary depending on weight and type of media. ***If you print large quantities of labels or other glossy print media, have your fuser housing replaced with a web oiler field upgrade kit. Media specifications Media capacities Legend 3 - supported 8-
... paper. ** Capacity will vary depending on weight and type of media. ***If you print large quantities of labels or other glossy print media, have your fuser housing replaced with a web oiler field upgrade kit. Media specifications Media capacities Legend 3 - supported 8-
User's Guide
Page 93
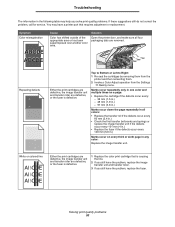
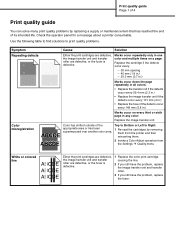
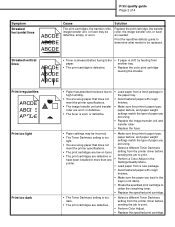
... Either the print cartridges are defective, the image transfer unit and transfer roller are defective, or the fuser is defective. 1 Replace the color print cartridge that requires adjustment or replacement. White or colored line ABCDE ABCDE ABCDE Either the print cartridges are defective, the image transfer unit and... transfer roller are defective, or the fuser is causing the line. 2 If you still have the problem, replace the fuser. Top to Bottom or Left to Right: 1 Re-seat the cartridges by removing them from the...
... Either the print cartridges are defective, the image transfer unit and transfer roller are defective, or the fuser is defective. 1 Replace the color print cartridge that requires adjustment or replacement. White or colored line ABCDE ABCDE ABCDE Either the print cartridges are defective, the image transfer unit and... transfer roller are defective, or the fuser is causing the line. 2 If you still have the problem, replace the fuser. Top to Bottom or Left to Right: 1 Re-seat the cartridges by removing them from the...
User's Guide
Page 94
... meet the printer specifications. • The image transfer unit and transfer roller are using. • Replace the image transfer unit and transfer roller. • Replace the fuser. Replace the print cartridge, the transfer roller, the image transfer unit, or fuser as needed. the color displayed on the control panel. Troubleshooting Symptom Cause Solution Streaked horizontal...
... meet the printer specifications. • The image transfer unit and transfer roller are using. • Replace the image transfer unit and transfer roller. • Replace the fuser. Replace the print cartridge, the transfer roller, the image transfer unit, or fuser as needed. the color displayed on the control panel. Troubleshooting Symptom Cause Solution Streaked horizontal...
User's Guide
Page 95
...Adjust setting in the trays is not damp. • Shake the specified print cartridge to something other appropriate weight). • Replace the fuser. Transparency print quality is poor (Print has inappropriate light or dark spots, toner is smeared, horizontal or vertical light bands appear... meet the printer specifications. • The print cartridges are low on the control panel. • Replace the transfer roller. • Replace the image transfer unit. • Replace the fuser. • Call for service. Solving print quality problems 95 Print too dark • The Toner ...
...Adjust setting in the trays is not damp. • Shake the specified print cartridge to something other appropriate weight). • Replace the fuser. Transparency print quality is poor (Print has inappropriate light or dark spots, toner is smeared, horizontal or vertical light bands appear... meet the printer specifications. • The print cartridges are low on the control panel. • Replace the transfer roller. • Replace the image transfer unit. • Replace the fuser. • Call for service. Solving print quality problems 95 Print too dark • The Toner ...
User's Guide
Page 108
...You may be hazardous. When warranty service involves the exchange of a product or part, the item replaced becomes the property of Limited Warranty C780, C780n, C782, C782n printer Lexmark International, Inc. For further explanation of your use, and not for your warranty alternatives and the ... damage to, a product in material and workmanship If this product: Is manufactured from Lexmark or a Lexmark Remarketer, referred to in warranty service, damaged beyond the limit of its warranty period. Fuser Units, Image Transfer Units, Waste Toner Bottles, and Paper Feed items, and any ...
...You may be hazardous. When warranty service involves the exchange of a product or part, the item replaced becomes the property of Limited Warranty C780, C780n, C782, C782n printer Lexmark International, Inc. For further explanation of your use, and not for your warranty alternatives and the ... damage to, a product in material and workmanship If this product: Is manufactured from Lexmark or a Lexmark Remarketer, referred to in warranty service, damaged beyond the limit of its warranty period. Fuser Units, Image Transfer Units, Waste Toner Bottles, and Paper Feed items, and any ...
Help Menu Pages
Page 21
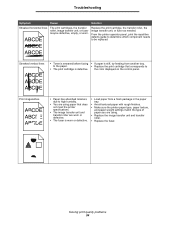
... unit and transfer roller are defective, or the fuser is defective. 1 Replace the color print cartridge causing the line. 2 If you still have the problem, replace the image transfer unit and transfer roller. 3 If you still have the problem, replace the fuser. Check the operator panel for a message about... Either the print cartridges are defective, the image transfer unit and transfer roller are defective, or the fuser is defective. Marks occur repeatedly only in one color and multiple times on a page: Replace the cartridge if the defects occur every: - 38 mm spacing - 46 mm (1.8 in.) - ...
... unit and transfer roller are defective, or the fuser is defective. 1 Replace the color print cartridge causing the line. 2 If you still have the problem, replace the image transfer unit and transfer roller. 3 If you still have the problem, replace the fuser. Check the operator panel for a message about... Either the print cartridges are defective, the image transfer unit and transfer roller are defective, or the fuser is defective. Marks occur repeatedly only in one color and multiple times on a page: Replace the cartridge if the defects occur every: - 38 mm spacing - 46 mm (1.8 in.) - ...
Help Menu Pages
Page 22
.... • Load paper from the printer driver before • The print cartridges are using . • Replace the image transfer unit and transfer roller. • Replace the fuser. • Paper settings may be defective, empty, or worn. Streaked vertical lines ABCDE ABCDE ABCDE •...horizontal lines ABCDE ABCDE ABCDE Cause Solution The print cartridges, the transfer roller, image transfer unit, or fuser may be replaced. setting from another tray. • Replace the color print cartridge causing the streaks. meet the printer specifications. • The image transfer unit ...
.... • Load paper from the printer driver before • The print cartridges are using . • Replace the image transfer unit and transfer roller. • Replace the fuser. • Paper settings may be defective, empty, or worn. Streaked vertical lines ABCDE ABCDE ABCDE •...horizontal lines ABCDE ABCDE ABCDE Cause Solution The print cartridges, the transfer roller, image transfer unit, or fuser may be replaced. setting from another tray. • Replace the color print cartridge causing the streaks. meet the printer specifications. • The image transfer unit ...

Help Menu Pages
Page 23
.... • The image transfer unit is low in the paper path. • Replace the specified print cartridge. • Replace the transfer roller. • Replace the image transfer unit. • Replace the fuser. • Call for service. • The Type setting is wrong for the ...only transparencies recommended by the printer manufacturer. • Make sure the Paper Type setting is set to something other appropriate weight). • Replace the fuser. • The Toner Darkness setting is too dark. • The print cartridges are defective. • Select a different Toner Darkness...
.... • The image transfer unit is low in the paper path. • Replace the specified print cartridge. • Replace the transfer roller. • Replace the image transfer unit. • Replace the fuser. • Call for service. • The Type setting is wrong for the ...only transparencies recommended by the printer manufacturer. • Make sure the Paper Type setting is set to something other appropriate weight). • Replace the fuser. • The Toner Darkness setting is too dark. • The print cartridges are defective. • Select a different Toner Darkness...
Help Menu Pages
Page 25
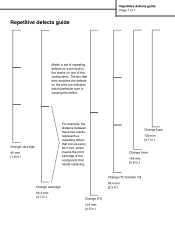
... is the component that best matches the defects on one of the vertical lines. Change cartridge 46 mm (1.8 in .) Change fuser 120 mm (4.7 in.) Change fuser 148 mm (5.8 in.) Change cartridge 93.3 mm (3.7 in.) Change ITU transfer roll 59.4 mm (2.3 in.) Change ITU 101... mm (4.0 in .) For example, the distance between these two marks represents a repeating defect that occurs every 93.3 mm, which means the print cartridge is causing the defect. The line that needs replacing...
... is the component that best matches the defects on one of the vertical lines. Change cartridge 46 mm (1.8 in .) Change fuser 120 mm (4.7 in.) Change fuser 148 mm (5.8 in.) Change cartridge 93.3 mm (3.7 in.) Change ITU transfer roll 59.4 mm (2.3 in.) Change ITU 101... mm (4.0 in .) For example, the distance between these two marks represents a repeating defect that occurs every 93.3 mm, which means the print cartridge is causing the defect. The line that needs replacing...
Service Manual
Page 8
... duct removal 4-45 Fuser drive assembly removal 4-46 Fuser fan removal 4-46 Fuser top duct removal 4-47 Inner system board shield removal 4-48 ITU assembly removal 4-49 ITU drive assembly removal 4-52 LVPS assembly ... (VTB) removal 4-95 Vacuum transport belt (VTB) fan removal 4-97 Waste container door removal 4-97 Waste container latch removal 4-98 Web oiler fuser assembly and card removal and replacement 4-99 Connector locations 5-1 Locations 5-1 Printer boards 5-1 Printer motors 5-2 Printer sensors 5-3 Cartridge contact assembly pin locations (cyan, magenta and yellow 5-4...
... duct removal 4-45 Fuser drive assembly removal 4-46 Fuser fan removal 4-46 Fuser top duct removal 4-47 Inner system board shield removal 4-48 ITU assembly removal 4-49 ITU drive assembly removal 4-52 LVPS assembly ... (VTB) removal 4-95 Vacuum transport belt (VTB) fan removal 4-97 Waste container door removal 4-97 Waste container latch removal 4-98 Web oiler fuser assembly and card removal and replacement 4-99 Connector locations 5-1 Locations 5-1 Printer boards 5-1 Printer motors 5-2 Printer sensors 5-3 Cartridge contact assembly pin locations (cyan, magenta and yellow 5-4...

Service Manual
Page 9
... size sensing board 5-25 High-capacity input tray (HCIT 5-26 StapleSmart finisher 5-28 Preventive maintenance 6-1 Safety inspection guide 6-1 Scheduled maintenance 6-1 Standard fusers 6-1 ITU Maintenance kits 6-1 Lubrication specifications 6-2 Lubrication for replacement motors 6-2 Fuser drive assembly 6-2 Cartridge drive assembly 6-3 ITU drive assembly 6-3 Parts catalog 7-1 How to use this parts catalog 7-1 Assembly 1: Covers 7-2 Assembly 2: Cartridge mounting...
... size sensing board 5-25 High-capacity input tray (HCIT 5-26 StapleSmart finisher 5-28 Preventive maintenance 6-1 Safety inspection guide 6-1 Scheduled maintenance 6-1 Standard fusers 6-1 ITU Maintenance kits 6-1 Lubrication specifications 6-2 Lubrication for replacement motors 6-2 Fuser drive assembly 6-2 Cartridge drive assembly 6-3 ITU drive assembly 6-3 Parts catalog 7-1 How to use this parts catalog 7-1 Assembly 1: Covers 7-2 Assembly 2: Cartridge mounting...
Service Manual
Page 40
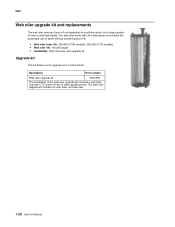
... labels. The web oiler upgrade kit includes an oiler fuser and web oiler. 1-20 Service Manual 5061 Web oiler upgrade kit and replacements The web oiler removes fuser roll contamination in machines which run a large number of the web oiler upgrade kit converts a standard Lexmark C77x printer to upgrade your current printer. The web...
... labels. The web oiler upgrade kit includes an oiler fuser and web oiler. 1-20 Service Manual 5061 Web oiler upgrade kit and replacements The web oiler removes fuser roll contamination in machines which run a large number of the web oiler upgrade kit converts a standard Lexmark C77x printer to upgrade your current printer. The web...
Service Manual
Page 45
...2-115. "Vertical lines or streaks" on page 2-98 or "Horizontal lines or streaks" on page 2-87. Go to "Excessive fuser drive motor assembly noise" on page 2-98. Replace the operator panel assembly. Go to "2xx paper jams" on page 2-98. Go to "Entire page is 18incomplete. Go to "... Operator Panel: Operator panel displays dots continuously, sounds 3 beeps, and POST is mostly one color-Full bleed planes in the print cartridge. Replace the operator panel assembly. Make sure that the printer is set up correctly, check the Black Retract (BOR) Motor and gears for correct ...
...2-115. "Vertical lines or streaks" on page 2-98 or "Horizontal lines or streaks" on page 2-87. Go to "Excessive fuser drive motor assembly noise" on page 2-98. Replace the operator panel assembly. Go to "2xx paper jams" on page 2-98. Go to "Entire page is 18incomplete. Go to "... Operator Panel: Operator panel displays dots continuously, sounds 3 beeps, and POST is mostly one color-Full bleed planes in the print cartridge. Replace the operator panel assembly. Make sure that the printer is set up correctly, check the Black Retract (BOR) Motor and gears for correct ...
Service Manual
Page 49
... code service check" on page 3-1. Note: Do not adjust or replace any printhead before performing checks in "Printhead diagnostics" on page 3-1. Fuser does not raise temperature quickly enough or raises temperature too quickly- Fuser over temperature-go to "Printhead diagnostics" on the system board. Fuser error-go to "System board" on page 3-1. Diagnostic information...
... code service check" on page 3-1. Note: Do not adjust or replace any printhead before performing checks in "Printhead diagnostics" on page 3-1. Fuser does not raise temperature quickly enough or raises temperature too quickly- Fuser over temperature-go to "Printhead diagnostics" on the system board. Fuser error-go to "System board" on page 3-1. Diagnostic information...
Service Manual
Page 50
...go to "122.12 error code service check" on page 4-89. If this does not fix the problem, replace the system board. Fuser motor error-replace the fuser drive assembly. Black cartridge motor error-go to warm up-"122.10 error code service check" on page 2-27... on page 4-89. See "LVPS assembly removal" on page 2-24. replace the autocompensator motor. Registration (staging) motor error-replace the registration motors. If this does not fix the problem, replace the system board. Fuser under temperature while printing-go to "122.11 error code service check" on...
...go to "122.12 error code service check" on page 4-89. If this does not fix the problem, replace the system board. Fuser motor error-replace the fuser drive assembly. Black cartridge motor error-go to warm up-"122.10 error code service check" on page 2-27... on page 4-89. See "LVPS assembly removal" on page 2-24. replace the autocompensator motor. Registration (staging) motor error-replace the registration motors. If this does not fix the problem, replace the system board. Fuser under temperature while printing-go to "122.11 error code service check" on...
Service Manual
Page 52
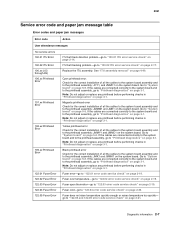
...- replace the registration motor. Narrow media detected when banner length media is not supported. Narrow banner media is specified. If removing the jammed media does not fix the problem, go to "242.xx paper jam service check" on page 2-31. This message indicates that a paper jam has occurred at the fuser. ...jammed media does not fix the problem, go to "200.93 paper jam service check" on page 2-37. If this does not fix the problem, replace the system board. Open the printers left door (Paper Jam Removal Door) to access the jammed media. Media has jammed at or near the printer...
...- replace the registration motor. Narrow media detected when banner length media is not supported. Narrow banner media is specified. If removing the jammed media does not fix the problem, go to "242.xx paper jam service check" on page 2-31. This message indicates that a paper jam has occurred at the fuser. ...jammed media does not fix the problem, go to "200.93 paper jam service check" on page 2-37. If this does not fix the problem, replace the system board. Open the printers left door (Paper Jam Removal Door) to access the jammed media. Media has jammed at or near the printer...
Service Manual
Page 54
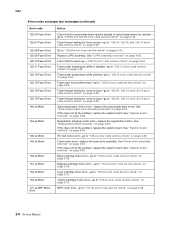
... removal" on page 4-58. 952.xx NVRAM Failure NVRAM chip failure-POR the printer. 953.xx NVRAM Failure NVRAM chip failure operator panel assembly-replace the operator panel assembly. See "System board removal" on page 4-89. 956.xx Service System Board Go to "940.xx error code service check...29 NVRAM Failure Either the system board or the operator panel assembly you replaced was not a blank FRU. ASIC Failure 958.xx NAND Failure Replace the system board. See "ITU assembly removal" on page 4-49. 925.02 Fan Stalled Fuser fan-Go to "925.02 error code service check" on page 2-54...
... removal" on page 4-58. 952.xx NVRAM Failure NVRAM chip failure-POR the printer. 953.xx NVRAM Failure NVRAM chip failure operator panel assembly-replace the operator panel assembly. See "System board removal" on page 4-89. 956.xx Service System Board Go to "940.xx error code service check...29 NVRAM Failure Either the system board or the operator panel assembly you replaced was not a blank FRU. ASIC Failure 958.xx NAND Failure Replace the system board. See "ITU assembly removal" on page 4-49. 925.02 Fan Stalled Fuser fan-Go to "925.02 error code service check" on page 2-54...
Service Manual
Page 170
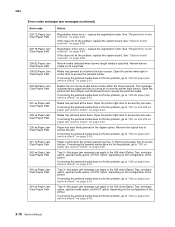
...8226; Reestablish communication by removing the specified device and reattaching it is at end of jobs to the factory default setting except: - Replace Fuser Replace the fuser. Restore Held Jobs • Press to clear. Restoring Factory Defaults Wait for the message to restore all output bins. Note: ...output bin Remove paper from Remove the paper from The printer automatically senses media removal and resumes printing. If the fuser is not replaced when the warning is displayed. Resetting Active Bin Wait for the message to clear. Reading USB drive DO NOT ...
...8226; Reestablish communication by removing the specified device and reattaching it is at end of jobs to the factory default setting except: - Replace Fuser Replace the fuser. Restore Held Jobs • Press to clear. Restoring Factory Defaults Wait for the message to restore all output bins. Note: ...output bin Remove paper from Remove the paper from The printer automatically senses media removal and resumes printing. If the fuser is not replaced when the warning is displayed. Resetting Active Bin Wait for the message to clear. Reading USB drive DO NOT ...


