Lexmark T650 Support Question
Lexmark T650 Support Question
Find answers below for this question about Lexmark T650.Need a Lexmark T650 manual? We have 9 online manuals for this item!
Question posted by KARHeph on June 5th, 2014
How To Replace A Fuser In T650 N
The person who posted this question about this Lexmark product did not include a detailed explanation. Please use the "Request More Information" button to the right if more details would help you to answer this question.
Current Answers
Answer #1: Posted by freginold on July 20th, 2014 5:52 PM
freginold

Member since:
December 20th, 2011 Points: 23,253,895

Member since:
December 20th, 2011 Points: 23,253,895
Hi, you can find the instructions for replacing the maintenance kit at the link below, and on the last page are the instructions for resetting the maintenance counter when you are done:
http://www.nuproitech.com/down/T650%20652%20654%20Maint.%20Kit%20instructions.pdf
http://www.nuproitech.com/down/T650%20652%20654%20Maint.%20Kit%20instructions.pdf
Related Lexmark T650 Manual Pages
User's Guide - Page 66
... results indicate that the following paper types are specifically designed for use with laser printers:
• Chemically treated papers used to make copies without melting or releasing...% chemically treated pulped wood. Use inks that are not affected by the temperature in the printer fuser • Preprinted papers that fail EN12281:2002 (European testing) • Paper weighing less than...
User's Guide - Page 72
... or type settings to see :
- c Click OK, and then click Print. Printing on specialty media
Tips on using letterhead
• Use letterhead designed specifically for laser printers. • Print samples on page 68. "Loading the standard or optional 250-sheet or 550-sheet tray" on page 55
Printing
72 "Loading the 2000...
User's Guide - Page 73
... that :
- bond) in weight. • To prevent print quality problems, avoid getting fingerprints on the envelopes being considered for laser printers. Tips on using transparencies
Print samples on the transparencies being considered for laser printers. Check with the manufacturer or vendor to ensure
transparencies are able to withstand temperatures up to 230°C (446...
User's Guide - Page 74
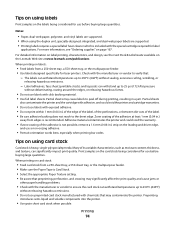
...sheets may contaminate the printer. Print samples on ...Adhesive material contaminates the printer and could void the printer and cartridge warranties....semi-liquid and volatile components into the printer.
• Use grain short card stock...; Printing labels requires a special label fuser cleaner which is Card Stock. •... Partial sheets
also contaminate the printer and the cartridge with adhesive...
User's Guide - Page 167
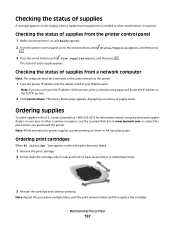
... In other countries or regions, visit the Lexmark Web Site at 1-800-539-6275 for printer supplies assume printing on the display when a replacement supply item is needed or when maintenance is on and Ready appears. 2 From the printer control panel, press the arrow buttons until Status/Supplies appears, and then press
.
3 Press...
Service Manual - Page 5
... 3-18
BASE SENSOR TEST 3-19 PRINTER SETUP 3-19
Defaults 3-19 Printed ...Fuser Temp 3-21 Fuser Page Count 3-21 Warm Up Time 3-21 Transfer 3-21 Print Contrast 3-22 Charge Roll 3-22 Gap Adjust 3-22 Auto Dark Adj 3-22 REPORTS 3-23 EVENT LOG 3-23 Display Log 3-23 Print Log 3-23 Clear Log 3-24 EXIT DIAGNOSTICS (models T650, T652, and T654 3-24 Configuration menu (CONFIG MENU) (models T650...
Service Manual - Page 6

...T650, T652, and T654 3-29 Understanding the printer control panel (model T656 3-29 Accessing service menus (model T656 3-30 Diagnostics Menu (model T656 3-31 Entering Diagnostics Menu (model T656 3-31 Available tests 3-31 Registration (printer...Edge to Edge 3-45 EP SETUP 3-45 EP Defaults 3-46 Fuser Temperature (Fuser Temp 3-46 Fuser Page Count 3-46 Warm Up Time 3-46 Transfer 3-46 Print ...
Service Manual - Page 8
...Fuser unit assembly (type 1 and type 2 3-73 Type 1 fuser unit assembly 3-73 Type 2 fuser unit assembly 3-74 Exit 3-74 Sensor (standard bin full 3-74 Drive 3-75 Main drive motor assembly 3-75 Redrive motor assembly 3-75 Electrical components and controller 3-76 Switch (printer... Sensor (pass-thru 3-87 Media transport path 3-89 Model T650 paper path, rolls, and sensors 3-89 Models T652 and...
Service Manual - Page 9
...electronic adjustment 4-3
Alignment assembly adjustment 4-4 Fuser solenoid adjustment 4-6 Gap adjustment 4-6 Removals 4-7 Replacement note: To replace a removed part, reverse the order of removal unless noted otherwise 4-7 Access door removal (T650, T652, T654 4-8 Alignment assembly removal (T650, T652, T654 4-8 Connection access cover, rear removal (T650, T652, T654 4-11 Connection bezel...
Service Manual - Page 10
... removal (T652, T654 4-21 Fuser access door assembly removal (T650, T652, T654 4-22 Fuser drive release linkage removal (T650, T652, T654 4-23 Fuser unit assembly removal (T650, T652, T654 4-23 Fuser wiper cover assembly removal (T650, T652, T654 4-24 HVPS card assembly removal (T650, T652, T654 4-24 Inner deflector removal (T650, T652, T654 4-25 Laser cover removal (T650, T652, T654 4-27...
Service Manual - Page 25
... as needed to the correct field replaceable unit (FRU) or part.
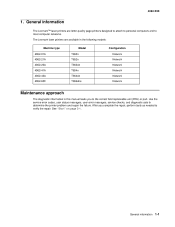
After you to verify the repair. General information 1-1 Use the service error codes, user status messages, user error messages, service checks, and diagnostic aids to most computer networks. The Lexmark laser printers are letter-quality page printers designed to attach to personal computers...
Service Manual - Page 37
...(media size) assembly removal (T650, T652, T654)" on page 4-74. 4. Ensure the media tray guides are properly set for the size paper that is no longer responding. Replace the media tray assembly if...tray. Replace the switch media size if problem remains. Error code 31 displays when the top front cover is closed and an unsupported print cartridge is properly connected. 3. The printer determines ...
Service Manual - Page 49
... when the media reaches the sensor (input).
200.12
Laser power signal error
The printhead laser power signal has failed
Possible repair actions
1. Check all...Replace the printhead if problem remains.
Replace the main drive motor assembly if problem remains. Check all connections on the printhead.
2. Replace the printhead if problem remains. Go to "Output cover assembly removal (T650...
Service Manual - Page 50
...Go to "System card assembly removal (T650, T652, T654, T656)" on page 4-76.
1.
on page 2-133.
1.
Replace the printhead if problem remains. Go to "Printhead assembly removal (T650)" on page 4-60 or "Printhead ...Error contents
Sensor (input) static jam
200.14
Sensor (input) early jam
200.15
Laser power did not settle
200.16
Main drive motor assembly load error
200.17 200.18
...
Service Manual - Page 54

... drive motor assembly has failed or caused high mechanical load due to "System card assembly removal (T650, T652, T654, T656)" on page 4-54. Go to paper jam or bind. Type 2 fuser
201.28
Image data did not cycle prior to printer restart.
Replace the printhead assembly if problem remains.
4. on the system card assembly...
Service Manual - Page 56
... on the main drive motor assembly.
3.
See "Sensor (fuser output) late jam service check." Type 2 fuser Fuser page count has exceeded life. Go to printer restart.
See "Sensor (fuser output) late jam service check." See "Sensor (fuser output) late jam service check."
on the system card assembly. Replace the main drive motor assembly if problem remains.
4062...
Service Manual - Page 57

...to printer restart.
Check all connections ...T650, T652, T654, T656)" on the system card assembly.
3.
Remove all connections on page 2-139. See "Sensor (fuser...Replace the printhead assembly if problem remains.
4. Sensor (fuser output) late jam Type 2 fuser Fuser page count has exceeded life
Description/Action Printhead write failure
The media is fully open failure Type 2 fuser Fuser...
Service Manual - Page 150
... the machine off/on page 4-76. If problem remains, replace the fuser unit assembly.
If this procedure is not followed, the printer will be returned to NVRAM mismatch failure service check. Never install and remove components listed above .
Go to "System card assembly removal (T650, T652, T654, T656)" on to reset the error condition...
Service Manual - Page 160
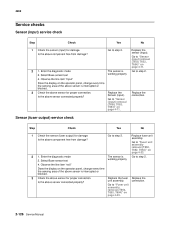
....
3 Check the above sensor for damage. Enter the diagnostic mode 2. Select Base sensor test
The sensor is
Go to step 2.
Go to step 2. Go to "Fuser unit assembly removal (T650, T652, T654)" on page 4-71.
2 1. Replace the Sensor (input).
Replace fuser unit assembly. Go to "Sensor (input) removal...
Service Manual - Page 161
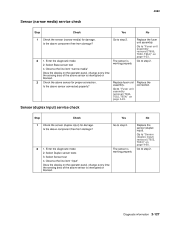
... connection.
Observe the line item "narrow media"
Does the display on page 4-68.
2 1. Is the above sensor is
Go to "Fuser unit assembly removal (T650, T652, T654)" on page 4-23.
2 1. Replace fuser unit assembly.
Diagnostic information 2-127
working properly
3. Go to step 2.
Select Sensor test
4. Select Duplex sensor tests
The sensor is interrupted or...


