Operation Guide
Page 3
... Panel 2-2 Canceling a Printing Job ...2-10 Using the Operation Panel ...2-11 Using the Menu Selection System 2-19 Status Pages ...2-20 e-MPS ...2-23 Changing the Interface Parameters 2-35 Making Default Settings ...2-42 Pagination ...2-51 Setting Print Quality ...2-58 Operating the Storage Device 2-62 Paper Handling ...2-73 Reading Life Counters ...2-86 Other Modes ...2-87 3 Fonts ...3-1 List of Fonts ...3-2 4 Options...4-1 General Information ...4-2 Network Interface ...4-6 Hard Disk ...4-8 CompactFlash (Memory) Card 4-10 USB Flash Memory ...4-11 Expansion Memory...
... Panel 2-2 Canceling a Printing Job ...2-10 Using the Operation Panel ...2-11 Using the Menu Selection System 2-19 Status Pages ...2-20 e-MPS ...2-23 Changing the Interface Parameters 2-35 Making Default Settings ...2-42 Pagination ...2-51 Setting Print Quality ...2-58 Operating the Storage Device 2-62 Paper Handling ...2-73 Reading Life Counters ...2-86 Other Modes ...2-87 3 Fonts ...3-1 List of Fonts ...3-2 4 Options...4-1 General Information ...4-2 Network Interface ...4-6 Hard Disk ...4-8 CompactFlash (Memory) Card 4-10 USB Flash Memory ...4-11 Expansion Memory...
Operation Guide
Page 10
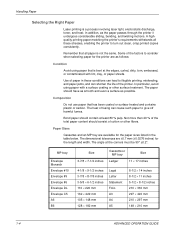
... all these conditions can lead to illegible printing, misfeeding, and paper jams, and can cause such paper to give off harmful fumes. The heat of fusing can shorten the life of the factors to turn out clean, crisp printed copies consistently. The angle at least 80 % pulp. In particular, avoid using paper that is bent at the edges, curled, dirty, torn...
... all these conditions can lead to illegible printing, misfeeding, and paper jams, and can cause such paper to give off harmful fumes. The heat of fusing can shorten the life of the factors to turn out clean, crisp printed copies consistently. The angle at least 80 % pulp. In particular, avoid using paper that is bent at the edges, curled, dirty, torn...
Operation Guide
Page 32
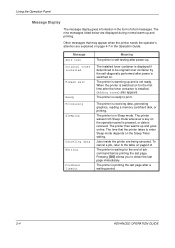
Message Self test Original toner installed Please wait Ready Processing Sleeping Canceling data Waiting FormFeed TimeOut Meaning The printer is self-testing after power is displayed if determined to be original toner container by the self-diagnostic performed after power-up and printing. Jobs inside the printer are displayed during normal warm-up . Using the Operation Panel Message Display The message display gives information in the form of -job command before printing the last page. The installed toner container...
Message Self test Original toner installed Please wait Ready Processing Sleeping Canceling data Waiting FormFeed TimeOut Meaning The printer is self-testing after power is displayed if determined to be original toner container by the self-diagnostic performed after power-up and printing. Jobs inside the printer are displayed during normal warm-up . Using the Operation Panel Message Display The message display gives information in the form of -job command before printing the last page. The installed toner container...
Operation Guide
Page 39
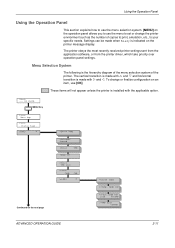
... configuration on an item, use [OK]. To change the printer environment such as the number of the printer. A4 PLAIN MENU Key RPeraidnyt PAMRenAu4 MPaLpAIN Print Status Page e-MPS > >Quick Copy >Private/ Stored >Print VMB >User ID >Print VMB List >Print Code Job >e-MPS > Continued on the next page >>Quick Copy >>Temp. The printer obeys the most recently received printer settings sent from the application software, or from the printer driver, which take priority over operation panel settings...
... configuration on an item, use [OK]. To change the printer environment such as the number of the printer. A4 PLAIN MENU Key RPeraidnyt PAMRenAu4 MPaLpAIN Print Status Page e-MPS > >Quick Copy >Private/ Stored >Print VMB >User ID >Print VMB List >Print Code Job >e-MPS > Continued on the next page >>Quick Copy >>Temp. The printer obeys the most recently received printer settings sent from the application software, or from the printer driver, which take priority over operation panel settings...
Operation Guide
Page 48
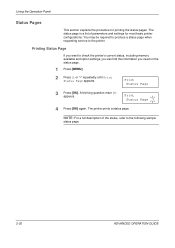
... status page is a list of the status, refer to check the printer's current status, including memory available and option settings, you can find the information you want to the following sample status page. 2-20 ADVANCED OPERATION GUIDE NOTE: For a full description of parameters and settings for printing the status pages. Printing Status Page If you need on the status page. 1 Press [MENU]. 2 Press U or V repeatedly until Print Status Page appears. A blinking question mark (?) appears. Using the Operation Panel Status Pages This...
... status page is a list of the status, refer to check the printer's current status, including memory available and option settings, you can find the information you want to the following sample status page. 2-20 ADVANCED OPERATION GUIDE NOTE: For a full description of parameters and settings for printing the status pages. Printing Status Page If you need on the status page. 1 Press [MENU]. 2 Press U or V repeatedly until Print Status Page appears. A blinking question mark (?) appears. Using the Operation Panel Status Pages This...

Operation Guide
Page 49
... on the next page. The numbers below refer to Setting RAM Disk Size on page 2-71. 4 Page Information This shows the print resolution, number of copies, and the total page count. 5 Installed Options This shows the option(s) installed in the printer, the amount of currently available memory, and the current status of total memory installed in the printer. ADVANCED OPERATION GUIDE 2-21 Hardware Information 2 FS-9530DN Page Printer STATUS PAGE Firmware Version: Released: 1 Memory 3 Page Information 4 Network Status 6 Interfaces Installed Options Emulation Error Log Toner Gauge...
... on the next page. The numbers below refer to Setting RAM Disk Size on page 2-71. 4 Page Information This shows the print resolution, number of copies, and the total page count. 5 Installed Options This shows the option(s) installed in the printer, the amount of currently available memory, and the current status of total memory installed in the printer. ADVANCED OPERATION GUIDE 2-21 Hardware Information 2 FS-9530DN Page Printer STATUS PAGE Firmware Version: Released: 1 Memory 3 Page Information 4 Network Status 6 Interfaces Installed Options Emulation Error Log Toner Gauge...
Operation Guide
Page 50
... own brand supplies. We recommend the use of remaining toner. Error information is cleared when the printer's power is displayed on page 4-7 in the printer. 11 KIR Test Pattern KIR is full. This test pattern shows the effect of the printer. Using the Operation Panel 6 Network Status This shows the IP address, Subnet Mask address, and Default Gateway address for all available emulations of the KIR (Kyocera Image Refinement) system. 2-22 ADVANCED OPERATION GUIDE
... own brand supplies. We recommend the use of remaining toner. Error information is cleared when the printer's power is displayed on page 4-7 in the printer. 11 KIR Test Pattern KIR is full. This test pattern shows the effect of the printer. Using the Operation Panel 6 Network Status This shows the IP address, Subnet Mask address, and Default Gateway address for all available emulations of the KIR (Kyocera Image Refinement) system. 2-22 ADVANCED OPERATION GUIDE

Operation Guide
Page 53
... default number of a job, simultaneously storing the job on the hard disk. A blinking question mark (?) appears before the letters. >Arlen ?Report 8 Press U or V to scroll to print the requested number of copies of print jobs that can be set. For details, refer to Changing e-MPS Configuration on the hard disk is 32. Printing Additional Copies using the printer driver. 5 Press [OK]. e-MPS > 3 Press Z. 4 Press U or V repeatedly until e-MPS > appears. The user name Harold is turned...
... default number of a job, simultaneously storing the job on the hard disk. A blinking question mark (?) appears before the letters. >Arlen ?Report 8 Press U or V to scroll to print the requested number of copies of print jobs that can be set. For details, refer to Changing e-MPS Configuration on the hard disk is 32. Printing Additional Copies using the printer driver. 5 Press [OK]. e-MPS > 3 Press Z. 4 Press U or V repeatedly until e-MPS > appears. The user name Harold is turned...
Operation Guide
Page 63
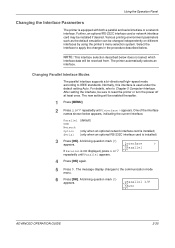
... I/F ?Auto ADVANCED OPERATION GUIDE 2-35 Select the interface to Chapter 5 Computer Interface. The new setting will be enabled thereafter. 1 Press [MENU]. 2 Press U or V repeatedly until Parallel appears. 4 Press [OK] again. 5 Press Z. The message display changes to the communication mode menu. 6 Press [OK]. Further, an optional RS-232C interface card or network interface card may be changed independently on different interfaces by using the printer's menu selection system. Parallel USB Network Option Serial (default) (only when an optional network interface card is...
... I/F ?Auto ADVANCED OPERATION GUIDE 2-35 Select the interface to Chapter 5 Computer Interface. The new setting will be enabled thereafter. 1 Press [MENU]. 2 Press U or V repeatedly until Parallel appears. 4 Press [OK] again. 5 Press Z. The message display changes to the communication mode menu. 6 Press [OK]. Further, an optional RS-232C interface card or network interface card may be changed independently on different interfaces by using the printer's menu selection system. Parallel USB Network Option Serial (default) (only when an optional network interface card is...
Operation Guide
Page 64
... (?) appears. Auto (default) Normal High speed Nibble (high) 8 Press [MENU]. NOTE: This section applies to reset the printer or turn the power off at least once. You can make a serial connection by installing the optional RS-232C interface card. One of the interface names shown below . Interface ?Serial 5 Press [OK] again. 2-36 ADVANCED OPERATION GUIDE After setting the interface, be enabled thereafter. Using the Operation Panel 7 Press U or V to display the desired mode. The display changes as...
... (?) appears. Auto (default) Normal High speed Nibble (high) 8 Press [MENU]. NOTE: This section applies to reset the printer or turn the power off at least once. You can make a serial connection by installing the optional RS-232C interface card. One of the interface names shown below . Interface ?Serial 5 Press [OK] again. 2-36 ADVANCED OPERATION GUIDE After setting the interface, be enabled thereafter. Using the Operation Panel 7 Press U or V to display the desired mode. The display changes as...
Operation Guide
Page 86
...a printing mode that reduces toner consumption during printing; KIR (Kyocera Image Refinement) Mode This printer incorporates the KIR (Kyocera Image Refinement) smoothing function. Look at the check line, the last line on a status page, to enhance the print quality: Kyocera Image Refinement (KIR), a software algorithm for increasing printout quality; Try printing the status page again. Using the Operation Panel Setting Print Quality You can monitor the KIR test pattern, the last line on a status page, to page 2-61. printing resolution; You can make the following settings to make...
...a printing mode that reduces toner consumption during printing; KIR (Kyocera Image Refinement) Mode This printer incorporates the KIR (Kyocera Image Refinement) smoothing function. Look at the check line, the last line on a status page, to enhance the print quality: Kyocera Image Refinement (KIR), a software algorithm for increasing printout quality; Try printing the status page again. Using the Operation Panel Setting Print Quality You can monitor the KIR test pattern, the last line on a status page, to page 2-61. printing resolution; You can make the following settings to make...

Operation Guide
Page 87
... follows. (The factory default setting is Off.) The EcoPrint mode setting is On ADVANCED OPERATION GUIDE 2-59 Print Quality > 3 Press Z. 4 Press U or V repeatedly until Print Quality > appears. EcoPrint setting is Off (default) EcoPrint setting is On when the printing image becomes lighter, yet very readable. Try printing the status page again. If you to reduce the amount of toner consumed on the print speed. The message display returns to a darker setting. 1 Press [MENU]. 2 Press...
... follows. (The factory default setting is Off.) The EcoPrint mode setting is On ADVANCED OPERATION GUIDE 2-59 Print Quality > 3 Press Z. 4 Press U or V repeatedly until Print Quality > appears. EcoPrint setting is Off (default) EcoPrint setting is On when the printing image becomes lighter, yet very readable. Try printing the status page again. If you to reduce the amount of toner consumed on the print speed. The message display returns to a darker setting. 1 Press [MENU]. 2 Press...
Operation Guide
Page 98
... Status List to print the whole job. Operating an Option Hard Disk By installing the option hard disk into the printer, the e-MPS function can then be used to print multiple copies of the job reducing the total amount of the memory card. If the option hard disk is not formatted, the >Format menu will automatically appear on the hard disk. To set up . Refer to the hard disk except that the RAM disk is powered up the RAM disk, the option hard disk...
... Status List to print the whole job. Operating an Option Hard Disk By installing the option hard disk into the printer, the e-MPS function can then be used to print multiple copies of the job reducing the total amount of the memory card. If the option hard disk is not formatted, the >Format menu will automatically appear on the hard disk. To set up . Refer to the hard disk except that the RAM disk is powered up the RAM disk, the option hard disk...

Operation Guide
Page 101
ADVANCED OPERATION GUIDE 2-73 The MP tray can change the MP tray mode, the paper size and type for each paper source, the sorter mode, the paper source, and paper destinations. MP Tray Mode The MP tray can be continuously fed in this mode. (This is the factory setting.) First Mode (Automatic Manual Feeding) The printer automatically feeds any paper placed on the MP tray even if another paper source is printed, paper will be used in the MP tray is...
ADVANCED OPERATION GUIDE 2-73 The MP tray can change the MP tray mode, the paper size and type for each paper source, the sorter mode, the paper source, and paper destinations. MP Tray Mode The MP tray can be continuously fed in this mode. (This is the factory setting.) First Mode (Automatic Manual Feeding) The printer automatically feeds any paper placed on the MP tray even if another paper source is printed, paper will be used in the MP tray is...
Operation Guide
Page 109
... displayed, press [OK]. 8 Press [MENU]. The output tray changes depending on an installed option. 7 When the desired paper source is displayed, press [OK]. 8 Press [MENU]. Top tray FaceDn 6 Press U or V to display the desired duplex mode. The message display returns to Ready. Paper Handling > 3 Press Z. 4 Press U or V repeatedly until Paper Handling > appears. The message display returns to Ready. ADVANCED OPERATION GUIDE 2-81 The display changes as shown below. A blinking question mark (?) appears. Using the Operation Panel...
... displayed, press [OK]. 8 Press [MENU]. The output tray changes depending on an installed option. 7 When the desired paper source is displayed, press [OK]. 8 Press [MENU]. Top tray FaceDn 6 Press U or V to display the desired duplex mode. The message display returns to Ready. Paper Handling > 3 Press Z. 4 Press U or V repeatedly until Paper Handling > appears. The message display returns to Ready. ADVANCED OPERATION GUIDE 2-81 The display changes as shown below. A blinking question mark (?) appears. Using the Operation Panel...
Operation Guide
Page 126
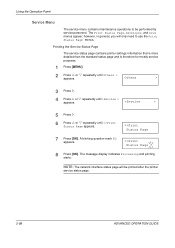
... appears. Printing the Service Status Page The service status page contains printer settings information that is more detailed than the standard status page and is therefore for mostly service purposes. 1 Press [MENU]. 2 Press U or V repeatedly until >>Print Status Page appears. >>Print Status Page 7 Press [OK]. Using the Operation Panel Service Menu The service menu contains maintenance operations to use the Print Status Page menus. A blinking question mark (?) appears. >>Print Status Page ? 8 Press [OK]. The message display indicates Processing and printing starts. however...
... appears. Printing the Service Status Page The service status page contains printer settings information that is more detailed than the standard status page and is therefore for mostly service purposes. 1 Press [MENU]. 2 Press U or V repeatedly until >>Print Status Page appears. >>Print Status Page 7 Press [OK]. Using the Operation Panel Service Menu The service menu contains maintenance operations to use the Print Status Page menus. A blinking question mark (?) appears. >>Print Status Page ? 8 Press [OK]. The message display indicates Processing and printing starts. however...

Operation Guide
Page 154
...-speed parallel line control is on . The signal goes low when you have enabled them using the O2 parameter of paper.** This signal goes high when the printer is online and low when the printer is powered on , this line returns an error status.** Not used Not used This signal goes high when the printer is offline. In Out - - When this line is high, IEEE1284 mode is busy. Power Ready Select...
...-speed parallel line control is on . The signal goes low when you have enabled them using the O2 parameter of paper.** This signal goes high when the printer is online and low when the printer is powered on , this line returns an error status.** Not used Not used This signal goes high when the printer is offline. In Out - - When this line is high, IEEE1284 mode is busy. Power Ready Select...
Operation Guide
Page 162
... printer driver on envelopes, postcards, transparency sheets, and labels. The printer goes into sleep mode from the printer's operation panel. The default setting is an abbreviation for low to enhance the printer's resolution and produce high-quality printing. TCP/IP (Transmission Control TCP/IP is used instead of protocols designed to print data created using application software. Glossary-2 ADVANCED OPERATION GUIDE This printer supports Hi-Speed USB. The maximum transfer rate is 480 Mbps and the maximum cable...
... printer driver on envelopes, postcards, transparency sheets, and labels. The printer goes into sleep mode from the printer's operation panel. The default setting is an abbreviation for low to enhance the printer's resolution and produce high-quality printing. TCP/IP (Transmission Control TCP/IP is used instead of protocols designed to print data created using application software. Glossary-2 ADVANCED OPERATION GUIDE This printer supports Hi-Speed USB. The maximum transfer rate is 480 Mbps and the maximum cable...

Operation Guide
Page 164
... 2-58 KPDL (AUTO) Emulation 2-42 font list 3-4, 3-5 L Label 1-10 Linefeed how to select 2-55 M Memory Expansion Memory 4-12 installing memory modules 4-12 on the status page 2-21 Menu map how to print 2-19 sample 2-19 Menu selection system diagram 2-11 how to use 2-19 Message display changing the language 2-87 diagram 2-2 indicators included 2-5 messages 2-4 MP (multi purpose) tray cassette mode 2-73 description Glossary-2 first mode 2-73 loading paper 1-18 paper sizes 1-4 paper types 1-13 setting the paper size 2-74 setting the paper type 2-75 N Network interface Index-2 ADVANCED...
... 2-58 KPDL (AUTO) Emulation 2-42 font list 3-4, 3-5 L Label 1-10 Linefeed how to select 2-55 M Memory Expansion Memory 4-12 installing memory modules 4-12 on the status page 2-21 Menu map how to print 2-19 sample 2-19 Menu selection system diagram 2-11 how to use 2-19 Message display changing the language 2-87 diagram 2-2 indicators included 2-5 messages 2-4 MP (multi purpose) tray cassette mode 2-73 description Glossary-2 first mode 2-73 loading paper 1-18 paper sizes 1-4 paper types 1-13 setting the paper size 2-74 setting the paper type 2-75 N Network interface Index-2 ADVANCED...

Operation Guide
Page 165
... installing interface cards 4-6 printing a network status page 2-40 protocols and parameters 2-37 Number of copies how to select 2-51 O Operation panel diagram 2-2 how to use 2-11 menu selection system 2-11 Options 4-2 Orientation how to select 2-54 Output Stack how to select 2-81 Overriding Difference between A4 and Letter description 2-82 P Page protect mode how to select 2-54 Paper media types, as Media Type indicator 2-7 minimum and maximum paper sizes 1-3 paper sizes tabled, as Paper Size indicator 2-5 Paper cassette selecting the paper feed...
... installing interface cards 4-6 printing a network status page 2-40 protocols and parameters 2-37 Number of copies how to select 2-51 O Operation panel diagram 2-2 how to use 2-11 menu selection system 2-11 Options 4-2 Orientation how to select 2-54 Output Stack how to select 2-81 Overriding Difference between A4 and Letter description 2-82 P Page protect mode how to select 2-54 Paper media types, as Media Type indicator 2-7 minimum and maximum paper sizes 1-3 paper sizes tabled, as Paper Size indicator 2-5 Paper cassette selecting the paper feed...


