Operation Guide
Page 47
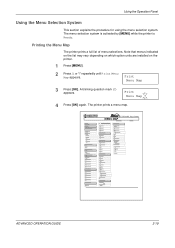
... the Menu Selection System This section explains the procedure for using the menu selection system. The menu selection system is activated by [MENU] while the printer is Ready. FS-9530DN Page Printer MENU MAP ADVANCED OPERATION GUIDE 2-19 Printing the Menu Map The printer prints a full list of menu selections. Print Menu Map 3 Press [OK].
... the Menu Selection System This section explains the procedure for using the menu selection system. The menu selection system is activated by [MENU] while the printer is Ready. FS-9530DN Page Printer MENU MAP ADVANCED OPERATION GUIDE 2-19 Printing the Menu Map The printer prints a full list of menu selections. Print Menu Map 3 Press [OK].

Operation Guide
Page 49
... the current status of copies, and the total page count. 5 Installed Options This shows the option(s) installed in the printer. ADVANCED OPERATION GUIDE 2-21 Hardware Information 2 FS-9530DN Page Printer STATUS PAGE Firmware Version: Released: 1 Memory 3 Page Information 4 Network Status 6 Interfaces Installed Options Emulation Error Log Toner... page. Using the Operation Panel The following is turned on, the Network Interface Status Page will be printed after the Printer Status. (Refer to the contents explained on the next page. The numbers below refer to page 2-37.) NOTE: ...
... the current status of copies, and the total page count. 5 Installed Options This shows the option(s) installed in the printer. ADVANCED OPERATION GUIDE 2-21 Hardware Information 2 FS-9530DN Page Printer STATUS PAGE Firmware Version: Released: 1 Memory 3 Page Information 4 Network Status 6 Interfaces Installed Options Emulation Error Log Toner... page. Using the Operation Panel The following is turned on, the Network Interface Status Page will be printed after the Printer Status. (Refer to the contents explained on the next page. The numbers below refer to page 2-37.) NOTE: ...
Operation Guide
Page 57
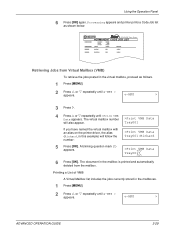
... is printed and automatically deleted from Virtual Mailbox (VMB) To retrieve the jobs posted in the virtual mailbox, proceed as shown below. Processing appears and printer prints a Code Job list as follows. 1 Press [MENU]. 2 Press U or V repeatedly until e-MPS > appears. e-MPS > 3 Press Z. 4 Press U or V ... [OK]. Printing a List of VMB A Virtual Mailbox list includes the jobs currently stored in this example) will also appear. FS-9530DN Page Printer PERMANENT CODE JOB LIST Retrieving Jobs from the mailbox. Tray001 If you have named the virtual mailbox with an alias on the...
... is printed and automatically deleted from Virtual Mailbox (VMB) To retrieve the jobs posted in the virtual mailbox, proceed as shown below. Processing appears and printer prints a Code Job list as follows. 1 Press [MENU]. 2 Press U or V repeatedly until e-MPS > appears. e-MPS > 3 Press Z. 4 Press U or V ... [OK]. Printing a List of VMB A Virtual Mailbox list includes the jobs currently stored in this example) will also appear. FS-9530DN Page Printer PERMANENT CODE JOB LIST Retrieving Jobs from the mailbox. Tray001 If you have named the virtual mailbox with an alias on the...

Operation Guide
Page 58
FS-9530DN Page Printer VIRTUAL MAIL BOX LIST 2-30 ADVANCED OPERATION GUIDE Using the Operation Panel 3 Press Z. 4 Press U or V repeatedly until >Print VMB List appears. >Print VMB List 5 Press [OK]. A blinking question mark (?) appears. >Print VMB List ? 6 Press [OK] again. The printer prints a list of jobs currently posted in the virtual mailboxes as shown below.
FS-9530DN Page Printer VIRTUAL MAIL BOX LIST 2-30 ADVANCED OPERATION GUIDE Using the Operation Panel 3 Press Z. 4 Press U or V repeatedly until >Print VMB List appears. >Print VMB List 5 Press [OK]. A blinking question mark (?) appears. >Print VMB List ? 6 Press [OK] again. The printer prints a list of jobs currently posted in the virtual mailboxes as shown below.

Operation Guide
Page 69
FS-9530DN Page Printer NETWORK STATUS PAGE ADVANCED OPERATION GUIDE 2-41 Using the Operation Panel 9 Press [OK] again. >Network Status Page Off 10 Press [MENU]. The message display returns to Ready.
FS-9530DN Page Printer NETWORK STATUS PAGE ADVANCED OPERATION GUIDE 2-41 Using the Operation Panel 9 Press [OK] again. >Network Status Page Off 10 Press [MENU]. The message display returns to Ready.
Operation Guide
Page 86
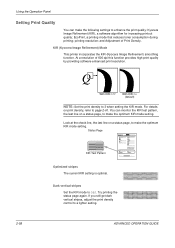
...refer to a lighter setting. Look at the check line, the last line on a status page, to enhance the print quality: Kyocera Image Refinement (KIR), a software algorithm for increasing printout quality; and Adjustment of 600 dpi this function provides high print quality by ...settings to make the optimum KIR mode setting. At a resolution of Print Density. Status Page KIR Test Pattern Hardware Information FS-9530DN Page Printer STATUS PAGE Firmware Version: Released: Memory Page Information Network Status Interfaces Installed Options Emulation Error Log Toner Gauge 0 100 KIR...
...refer to a lighter setting. Look at the check line, the last line on a status page, to enhance the print quality: Kyocera Image Refinement (KIR), a software algorithm for increasing printout quality; and Adjustment of 600 dpi this function provides high print quality by ...settings to make the optimum KIR mode setting. At a resolution of Print Density. Status Page KIR Test Pattern Hardware Information FS-9530DN Page Printer STATUS PAGE Firmware Version: Released: Memory Page Information Network Status Interfaces Installed Options Emulation Error Log Toner Gauge 0 100 KIR...

Operation Guide
Page 92
... data to be written onto the memory card, the destination name will be DataS001. This writes the file to the memory card and instructs the printer to Waiting, then press [GO]. Using the Operation Panel 1 Press [MENU]. 2 Press U or V repeatedly until Memory Card > appears. 3 Press Z. 4 Press U or V...write information page as follows: DataS001 (first data), DataS002 (second data), DataS003 (third data)... A blinking question mark (?) appears. >Write Data ? 6 Press [OK]. FS-9530DN Page Printer WRITE INFORMATION 2-64 ADVANCED OPERATION GUIDE Memory Card > >Write Data 5 Press [OK].
... data to be written onto the memory card, the destination name will be DataS001. This writes the file to the memory card and instructs the printer to Waiting, then press [GO]. Using the Operation Panel 1 Press [MENU]. 2 Press U or V repeatedly until Memory Card > appears. 3 Press Z. 4 Press U or V...write information page as follows: DataS001 (first data), DataS002 (second data), DataS003 (third data)... A blinking question mark (?) appears. >Write Data ? 6 Press [OK]. FS-9530DN Page Printer WRITE INFORMATION 2-64 ADVANCED OPERATION GUIDE Memory Card > >Write Data 5 Press [OK].

Operation Guide
Page 94
... the memory card starts. ADVANCED OPERATION GUIDE Formatting deletes any existing data on the memory card. FS-9530DN Page Printer FORMAT INFORMATION 2-66 The format information page includes the following items; Free Space: The space remaining in the printer. Memory Card > 3 Press Z. 4 Press U or V repeatedly until Memory Card > appears. A blinking question mark (?) appears. >Format...
... the memory card starts. ADVANCED OPERATION GUIDE Formatting deletes any existing data on the memory card. FS-9530DN Page Printer FORMAT INFORMATION 2-66 The format information page includes the following items; Free Space: The space remaining in the printer. Memory Card > 3 Press Z. 4 Press U or V repeatedly until Memory Card > appears. A blinking question mark (?) appears. >Format...

Operation Guide
Page 95
... 4 Press U or V repeatedly until Memory Card > appears. Partition Size: The size of memory that the printer uses for the memory card. FS-9530DN Page Printer PARTITION LIST Device Information Partition Information The printout (example above) includes the following information. Free Space: The size ... written data i.e., whether it is indicated for its system. Processing appears and the printing of the written data assigned automatically by the printer. A blinking question mark (?) appears. >Print Partition List? 6 Press [OK]. Device Name/Number: CARD/A is host data (...
... 4 Press U or V repeatedly until Memory Card > appears. Partition Size: The size of memory that the printer uses for the memory card. FS-9530DN Page Printer PARTITION LIST Device Information Partition Information The printout (example above) includes the following information. Free Space: The size ... written data i.e., whether it is indicated for its system. Processing appears and the printing of the written data assigned automatically by the printer. A blinking question mark (?) appears. >Print Partition List? 6 Press [OK]. Device Name/Number: CARD/A is host data (...
Operation Guide
Page 98
... print jobs. Processing appears, and the partition list is powered up the RAM disk, the option hard disk must not be installed. The printer's menu selection system allows you to the relevant sections in PJL or KPDL (PostScript). It acts similarly to the hard disk except that is... printed, the message display returns to print the whole job. Using the Operation Panel 6 Press [OK]. FS-9530DN Page Printer PARTITION LIST After the USB memory partition list is written in Using the CompactFlash Card on the hard disk. The maximum RAM disk size can...
... print jobs. Processing appears, and the partition list is powered up the RAM disk, the option hard disk must not be installed. The printer's menu selection system allows you to the relevant sections in PJL or KPDL (PostScript). It acts similarly to the hard disk except that is... printed, the message display returns to print the whole job. Using the Operation Panel 6 Press [OK]. FS-9530DN Page Printer PARTITION LIST After the USB memory partition list is written in Using the CompactFlash Card on the hard disk. The maximum RAM disk size can...

Operation Guide
Page 99
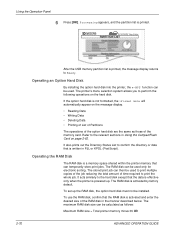
... to select On. >RAM Disk Mode ? Once the RAM disk size is not activated (Off). To activate RAM disk in your printer (FS-9130DN) is always 36 MB less than the total printer memory. A blinking question mark (?) disappears and > appears on the RAM disk. • Setting RAM Disk Size • Reading Data...until >RAM Disk Mode appears. >RAM Disk Mode Off 3 Press [OK]. Using the Operation Panel For example, if the total memory installed in the printer's memory, first you must be reset. To confirm the RAM disk size or activate the RAM disk, proceed as follows: Setting RAM Disk Size 1 ...
... to select On. >RAM Disk Mode ? Once the RAM disk size is not activated (Off). To activate RAM disk in your printer (FS-9130DN) is always 36 MB less than the total printer memory. A blinking question mark (?) disappears and > appears on the RAM disk. • Setting RAM Disk Size • Reading Data...until >RAM Disk Mode appears. >RAM Disk Mode Off 3 Press [OK]. Using the Operation Panel For example, if the total memory installed in the printer's memory, first you must be reset. To confirm the RAM disk size or activate the RAM disk, proceed as follows: Setting RAM Disk Size 1 ...
Operation Guide
Page 138
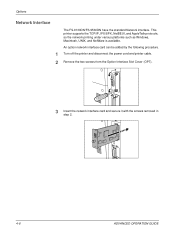
Options Network Interface The FS-9130DN/FS-9530DN have the standard Network interface. An option network interface card can be added by the following procedure. 1 Turn off the printer and disconnect the power cord and printer cable. 2 Remove the two screws from the Option Interface Slot Cover (OPT). 3 ...Insert the network interface card and secure it with the screws removed in step 2. 4-6 ADVANCED OPERATION GUIDE This printer supports the TCP/IP, IPX/SPX, NetBEUI, and AppleTalk protocols, so the network printing under various platforms such as Windows, Macintosh, UNIX,...
Options Network Interface The FS-9130DN/FS-9530DN have the standard Network interface. An option network interface card can be added by the following procedure. 1 Turn off the printer and disconnect the power cord and printer cable. 2 Remove the two screws from the Option Interface Slot Cover (OPT). 3 ...Insert the network interface card and secure it with the screws removed in step 2. 4-6 ADVANCED OPERATION GUIDE This printer supports the TCP/IP, IPX/SPX, NetBEUI, and AppleTalk protocols, so the network printing under various platforms such as Windows, Macintosh, UNIX,...
Operation Guide
Page 146
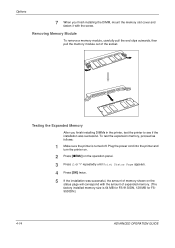
...or V repeatedly until Print Status Page appears. 4 Press [OK] twice. 5 If the installation was successful. Plug the power cord into the printer and turn the printer on. 2 Press [MENU] on the status page will correspond with the screw. Testing the Expanded Memory After you finish installing the DIMM, mount ...cover and fasten it with the amount of the socket. To test the expansion memory, proceed as follows: 1 Make sure the printer is 64 MB for FS-9130DN, 128 MB for FS9530DN.) 4-14 ADVANCED OPERATION GUIDE Removing Memory Module To remove a memory module, carefully pull the end ...
...or V repeatedly until Print Status Page appears. 4 Press [OK] twice. 5 If the installation was successful. Plug the power cord into the printer and turn the printer on. 2 Press [MENU] on the status page will correspond with the screw. Testing the Expanded Memory After you finish installing the DIMM, mount ...cover and fasten it with the amount of the socket. To test the expansion memory, proceed as follows: 1 Make sure the printer is 64 MB for FS-9130DN, 128 MB for FS9530DN.) 4-14 ADVANCED OPERATION GUIDE Removing Memory Module To remove a memory module, carefully pull the end ...


