Instruction Manual
Page 1
...-001A (KW/K0) For your Kenwood product at www.Kenwoodusa.com © 2011 Kenwood Corporation All Rights Reserved. Familiarity with installation and operation procedures will help you call upon your Kenwood dealer for information or service on the warranty card, and in the spaces designated on the product. KDC-152 CD-RECEIVER INSTRUCTION MANUAL AMPLI-TUNER...
...-001A (KW/K0) For your Kenwood product at www.Kenwoodusa.com © 2011 Kenwood Corporation All Rights Reserved. Familiarity with installation and operation procedures will help you call upon your Kenwood dealer for information or service on the warranty card, and in the spaces designated on the product. KDC-152 CD-RECEIVER INSTRUCTION MANUAL AMPLI-TUNER...
Instruction Manual
Page 2
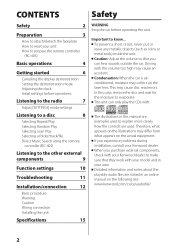
...disc read errors. If you purchase external components, check with your Kenwood dealer to explain more clearly how the controls are examples used . When you experience problems during installation, consult your Kenwood dealer. Caution: Adjust the volume so that they work with ... on the following site: www.kenwood.com/cs/ce/audiofile/ 2 This may cause an accident. Important to the other external components 9 Function settings 10 Troubleshooting 11 Installation/connection 12 Basic procedure Warning Caution Wiring connection Installing the unit Specifications 15 WARNING Stop...
...disc read errors. If you purchase external components, check with your Kenwood dealer to explain more clearly how the controls are examples used . When you experience problems during installation, consult your Kenwood dealer. Caution: Adjust the volume so that they work with ... on the following site: www.kenwood.com/cs/ce/audiofile/ 2 This may cause an accident. Important to the other external components 9 Function settings 10 Troubleshooting 11 Installation/connection 12 Basic procedure Warning Caution Wiring connection Installing the unit Specifications 15 WARNING Stop...

Instruction Manual
Page 12
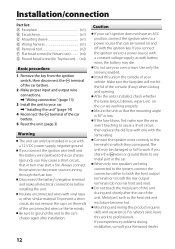
... off with the same rating. If the fuse blows, first make all electrical connections before installing the unit. Mounting and wiring this unit in the car. Caution If your Kenwood dealer. 12 Mount the unit so that in a car with vinyl tape or other similar... does not have an ACC position, connect the ignition wires to cause a short circuit, then replace the old fuse with one with the ignition key. Installation/connection Part list: A Faceplate 1) B Escutcheon 1) C Mounting sleeve 1) D Wiring harness 1) E Removal tool 2) F Flat head screw (for Nissan cars 4) G Round head ...
... off with the same rating. If the fuse blows, first make all electrical connections before installing the unit. Mounting and wiring this unit in the car. Caution If your Kenwood dealer. 12 Mount the unit so that in a car with vinyl tape or other similar... does not have an ACC position, connect the ignition wires to cause a short circuit, then replace the old fuse with one with the ignition key. Installation/connection Part list: A Faceplate 1) B Escutcheon 1) C Mounting sleeve 1) D Wiring harness 1) E Removal tool 2) F Flat head screw (for Nissan cars 4) G Round head ...

Instruction Manual
Page 14
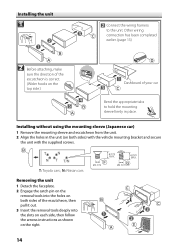
T: Toyota cars ; Installing the unit 1 Connect the wiring harness to hold the mounting sleeve firmly in place. N: Nissan cars Removing the unit 1 Detach the faceplate. 2 Engage the catch ..., then pull it out. 3 Insert the removal tools deeply into the holes on both sides of your car Bend the appropriate tabs to the unit. Installing without using the mounting sleeve (Japanese car) 1 Remove the mounting sleeve and escutcheon from the unit. 2 Align the holes in the unit (on both sides...
T: Toyota cars ; Installing the unit 1 Connect the wiring harness to hold the mounting sleeve firmly in place. N: Nissan cars Removing the unit 1 Detach the faceplate. 2 Engage the catch ..., then pull it out. 3 Insert the removal tools deeply into the holes on both sides of your car Bend the appropriate tabs to the unit. Installing without using the mounting sleeve (Japanese car) 1 Remove the mounting sleeve and escutcheon from the unit. 2 Align the holes in the unit (on both sides...
Instruction Manual
Page 15
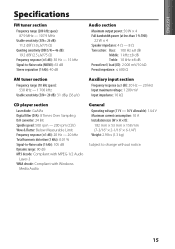
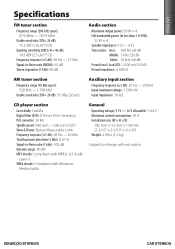
... MP3 decode: Compliant with MPEG-1/2 Audio Layer-3 WMA decode: Compliant with Windows Media Audio General Operating voltage (11 V - 16 V allowable): 14.4 V Maximum current consumption: 10 A Installation size (W × H × D): 182 mm × 53 mm × 158 mm (7-3/16" × 2-1/16" × 6-1/4") Weight: 2.9 lbs (1.3 kg) Subject to change without notice. 15
... MP3 decode: Compliant with MPEG-1/2 Audio Layer-3 WMA decode: Compliant with Windows Media Audio General Operating voltage (11 V - 16 V allowable): 14.4 V Maximum current consumption: 10 A Installation size (W × H × D): 182 mm × 53 mm × 158 mm (7-3/16" × 2-1/16" × 6-1/4") Weight: 2.9 lbs (1.3 kg) Subject to change without notice. 15
Instruction Manual
Page 44
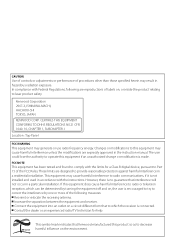
... Connect the equipment into an outlet on a circuit different from that to provide reasonable protection against harmful interference in a particular installation. The user could lose the authority to operate this equipment does cause harmful interference to laser product safety. If this equipment if...the product relating to radio or television reception, which the receiver is not installed and used in accordance with the instructions. However, there is no guarantee that Kenwood manufactured this equipment may result in hazardous radiation exposure. Consult the dealer or ...
... Connect the equipment into an outlet on a circuit different from that to provide reasonable protection against harmful interference in a particular installation. The user could lose the authority to operate this equipment does cause harmful interference to laser product safety. If this equipment if...the product relating to radio or television reception, which the receiver is not installed and used in accordance with the instructions. However, there is no guarantee that Kenwood manufactured this equipment may result in hazardous radiation exposure. Consult the dealer or ...

Owners Manual
Page 1
KDC-152 CD-RECEIVER INSTRUCTION MANUAL AMPLI-TUNER LECTEUR DE CD MODE D'EMPLOI REPRODUCTOR DE DISCOS COMPACTOS RECEPTOR DE FM/AM MANUAL DE INSTRUCCIONES Take the time ... performance from your new CD-receiver. Refer to read through this instruction manual. For your Kenwood dealer for information or service on the warranty card, and in the space provided below. Model KDC-152 Serial number Familiarity with installation and operation procedures will help you call upon your records Record the serial number, found...
KDC-152 CD-RECEIVER INSTRUCTION MANUAL AMPLI-TUNER LECTEUR DE CD MODE D'EMPLOI REPRODUCTOR DE DISCOS COMPACTOS RECEPTOR DE FM/AM MANUAL DE INSTRUCCIONES Take the time ... performance from your new CD-receiver. Refer to read through this instruction manual. For your Kenwood dealer for information or service on the warranty card, and in the space provided below. Model KDC-152 Serial number Familiarity with installation and operation procedures will help you call upon your records Record the serial number, found...

Owners Manual
Page 2
... controller (RC-405) Listening to the other external components 9 Function settings 10 Troubleshooting 11 Installation/connection 12 Basic procedure Warning Caution Wiring connection Installing the unit Specifications 15 WARNING Stop the car before operating the unit. This unit can hear... sounds outside the car. Detailed information and notes about the playable audio files are used. Caution: Adjust the volume so that they work with your model and in your Kenwood...
... controller (RC-405) Listening to the other external components 9 Function settings 10 Troubleshooting 11 Installation/connection 12 Basic procedure Warning Caution Wiring connection Installing the unit Specifications 15 WARNING Stop the car before operating the unit. This unit can hear... sounds outside the car. Detailed information and notes about the playable audio files are used. Caution: Adjust the volume so that they work with your model and in your Kenwood...
Owners Manual
Page 12
...of the unconnected wires or the terminals. If you connect the ignition wire (red) and the battery wire (yellow) to your Kenwood dealer. 12 Use only the screws provided. For safety's sake, leave this unit to which they correspond. When only two ... whether the brake lamps, blinkers, wipers, etc. Connect the speaker wires correctly to the terminals to the car's chassis again after the use your vehicle. Installation/connection Part list: A Faceplate 1) B Escutcheon 1) C Mounting sleeve 1) D Wiring harness 1) E Removal tool 2) F Flat head screw (for Nissan cars 4) G ...
...of the unconnected wires or the terminals. If you connect the ignition wire (red) and the battery wire (yellow) to your Kenwood dealer. 12 Use only the screws provided. For safety's sake, leave this unit to which they correspond. When only two ... whether the brake lamps, blinkers, wipers, etc. Connect the speaker wires correctly to the terminals to the car's chassis again after the use your vehicle. Installation/connection Part list: A Faceplate 1) B Escutcheon 1) C Mounting sleeve 1) D Wiring harness 1) E Removal tool 2) F Flat head screw (for Nissan cars 4) G ...
Owners Manual
Page 14
T: Toyota cars ; Installing without using the mounting sleeve (Japanese car) 1 Remove the mounting sleeve and escutcheon from the unit. 2 Align the holes in place. N: Nissan cars Removing the ... out. 3 Insert the removal tools deeply into the holes on both sides) with the vehicle mounting bracket and secure the unit with the supplied screws. Installing the unit 1 Connect the wiring harness to hold the mounting sleeve firmly in the unit (on the right. 14
T: Toyota cars ; Installing without using the mounting sleeve (Japanese car) 1 Remove the mounting sleeve and escutcheon from the unit. 2 Align the holes in place. N: Nissan cars Removing the ... out. 3 Insert the removal tools deeply into the holes on both sides) with the vehicle mounting bracket and secure the unit with the supplied screws. Installing the unit 1 Connect the wiring harness to hold the mounting sleeve firmly in the unit (on the right. 14
Owners Manual
Page 15
KENWOOD STEREOS CAR STEREOS ENGLISH Specifications FM tuner section Frequency range (200 kHz space): 87.9 MHz - 107.9 MHz Usable sensitivity (S/N= 26 dB): 11.2 dBf (1.0 μV/75 &#... MP3 decode: Compliant with MPEG-1/2 Audio Layer-3 WMA decode: Compliant with Windows Media Audio General Operating voltage (11 V - 16 V allowable): 14.4 V Maximum current consumption: 10 A Installation size (W × H × D): 182 mm × 53 mm × 158 mm (7-3/16" × 2-1/16" × 6-1/4") Weight: 2.9 lbs (1.3 kg) Subject to change without notice...
KENWOOD STEREOS CAR STEREOS ENGLISH Specifications FM tuner section Frequency range (200 kHz space): 87.9 MHz - 107.9 MHz Usable sensitivity (S/N= 26 dB): 11.2 dBf (1.0 μV/75 &#... MP3 decode: Compliant with MPEG-1/2 Audio Layer-3 WMA decode: Compliant with Windows Media Audio General Operating voltage (11 V - 16 V allowable): 14.4 V Maximum current consumption: 10 A Installation size (W × H × D): 182 mm × 53 mm × 158 mm (7-3/16" × 2-1/16" × 6-1/4") Weight: 2.9 lbs (1.3 kg) Subject to change without notice...


