
Instruction Manual
Page 12
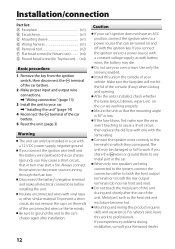
... front and rear). Do not use of the unit. The unit may die. Installation/connection Part list: A Faceplate 1) B Escutcheon 1) C Mounting sleeve 1) D Wiring harness 1) E Removal tool 2) F Flat head screw (for Nissan cars 4) G Round head screw (for Toyota cars).... (×4) Basic procedure 1 Remove the key from the... "Installing the unit" (page 14) 4 Reconnect the · terminal of the console (if any metal part in the console of your Kenwood dealer. 12 If you share the · wires or ground them to the car's chassis again after the use your own screws. Make sure...
... front and rear). Do not use of the unit. The unit may die. Installation/connection Part list: A Faceplate 1) B Escutcheon 1) C Mounting sleeve 1) D Wiring harness 1) E Removal tool 2) F Flat head screw (for Nissan cars 4) G Round head screw (for Toyota cars).... (×4) Basic procedure 1 Remove the key from the... "Installing the unit" (page 14) 4 Reconnect the · terminal of the console (if any metal part in the console of your Kenwood dealer. 12 If you share the · wires or ground them to the car's chassis again after the use your own screws. Make sure...

Instruction Manual
Page 14
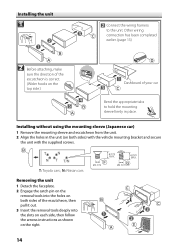
... the removal tools into the holes on both sides of your car Bend the appropriate tabs to the unit. Installing the unit 1 Connect the wiring harness to hold the mounting sleeve firmly in the unit (on both sides) with the vehicle mounting bracket and secure the unit with the supplied screws.
... the removal tools into the holes on both sides of your car Bend the appropriate tabs to the unit. Installing the unit 1 Connect the wiring harness to hold the mounting sleeve firmly in the unit (on both sides) with the vehicle mounting bracket and secure the unit with the supplied screws.
Owners Manual
Page 12
...and shortly after installation. When only two speakers are working properly. Mounting and wiring this unit during installation, consult your Kenwood dealer. 12 Mount the unit so that in the car. If the fuse blows, first make all electrical connections before.... Metal part such as with vinyl tape or other similar material. Installation/connection Part list: A Faceplate 1) B Escutcheon 1) C Mounting sleeve 1) D Wiring harness 1) E Removal tool 2) F Flat head screw (for Nissan cars 4) G Round head screw (for Toyota cars).... (×4) Basic procedure 1 Remove the ...
...and shortly after installation. When only two speakers are working properly. Mounting and wiring this unit during installation, consult your Kenwood dealer. 12 Mount the unit so that in the car. If the fuse blows, first make all electrical connections before.... Metal part such as with vinyl tape or other similar material. Installation/connection Part list: A Faceplate 1) B Escutcheon 1) C Mounting sleeve 1) D Wiring harness 1) E Removal tool 2) F Flat head screw (for Nissan cars 4) G Round head screw (for Toyota cars).... (×4) Basic procedure 1 Remove the ...
Owners Manual
Page 14
... the escutcheon is correct. (Wider hooks on both sides of your car Bend the appropriate tabs to the unit. Installing the unit 1 Connect the wiring harness to hold the mounting sleeve firmly in the unit (on the top side.) Dashboard of the escutcheon, then pull it out. 3 Insert the removal tools...
... the escutcheon is correct. (Wider hooks on both sides of your car Bend the appropriate tabs to the unit. Installing the unit 1 Connect the wiring harness to hold the mounting sleeve firmly in the unit (on the top side.) Dashboard of the escutcheon, then pull it out. 3 Insert the removal tools...


