Instruction Manual
Page 2
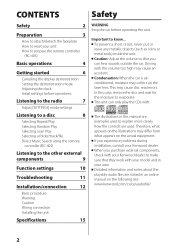
... clock Initial settings before operations Listening to the radio 7 Adjust [SETTINGS] mode settings Listening to a disc 8 Selecting Repeat Play Selecting Random Play Selecting Scan Play Selecting a folder/track/file Direct Music Search using the remote controller (RC-405) Listening to know... In this manual are examples used . Important to the other external components 9 Function settings 10 Troubleshooting 11 Installation/connection 12 Basic procedure Warning Caution Wiring connection Installing the unit Specifications 15 WARNING Stop the car before operating the unit...
... clock Initial settings before operations Listening to the radio 7 Adjust [SETTINGS] mode settings Listening to a disc 8 Selecting Repeat Play Selecting Random Play Selecting Scan Play Selecting a folder/track/file Direct Music Search using the remote controller (RC-405) Listening to know... In this manual are examples used . Important to the other external components 9 Function settings 10 Troubleshooting 11 Installation/connection 12 Basic procedure Warning Caution Wiring connection Installing the unit Specifications 15 WARNING Stop the car before operating the unit...

Instruction Manual
Page 5
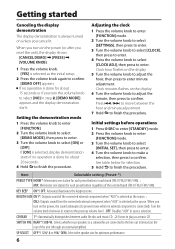
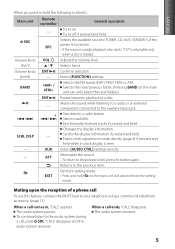
...) or AM. Main unit Remote controller General operation - Enters clock adjustment mode directly (page 6) if pressed and held . Returns to the auxiliary input jack. 4 / ¢ + 4 / ¢ Searches for a radio station. The audio system pauses. Volume knob VOL Adjusts the volume level. (turn) 5 / ∞ Selects items. Volume knob ENT (press) - Mutes the sound while listening to a radio or an external component connected to the previous item. Changes the display information. SCRL DISP - ATT Attenuates the sound. • To return...
...) or AM. Main unit Remote controller General operation - Enters clock adjustment mode directly (page 6) if pressed and held . Returns to the auxiliary input jack. 4 / ¢ + 4 / ¢ Searches for a radio station. The audio system pauses. Volume knob VOL Adjusts the volume level. (turn) 5 / ∞ Selects items. Volume knob ENT (press) - Mutes the sound while listening to a radio or an external component connected to the previous item. Changes the display information. SCRL DISP - ATT Attenuates the sound. • To return...
Instruction Manual
Page 6
... the power (or after you turn the volume knob to finish the procedure. Press 4 / ¢ to move between audio file disc and music CD. ; 2: Forces to play as a music CD. Item Selectable setting (Preset: *) PRESET TYPE NORM*: Memorizes one station for selection. 5 Hold to select [NO] in source selection. SWITCH PRE REAR*/ SUB-W: Selects whether rear speakers or a subwoofer are connected to enter minute adjustment. When you turn on the rear of the unit (through an external amplifier). SP SELECT OFF...
... the power (or after you turn the volume knob to finish the procedure. Press 4 / ¢ to move between audio file disc and music CD. ; 2: Forces to play as a music CD. Item Selectable setting (Preset: *) PRESET TYPE NORM*: Memorizes one station for selection. 5 Hold to select [NO] in source selection. SWITCH PRE REAR*/ SUB-W: Selects whether rear speakers or a subwoofer are connected to enter minute adjustment. When you turn on the rear of the unit (through an external amplifier). SP SELECT OFF...

Instruction Manual
Page 7
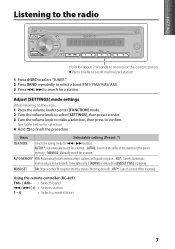
... [FUNCTION] mode. 2 Turn the volume knob to select [SETTINGS], then press to enter. 3 Turn the volume knob to make a selection, then press to search for a station. AUTO MEMORY YES: Automatically starts memorizing 6 stations with good reception. ; Using the remote controller (RC-405) FM+ / AM- : Selects band. 4 / ¢ (+) : Selects station. 1 - 6 : Selects preset station. 7 OFF*: Cancels (stereo effect resumes). See table below for a station. MANUAL: Manually search for selection. 4 Hold to finish the procedure. NO*: Cancels (automatic memorizing is not activated...
... [FUNCTION] mode. 2 Turn the volume knob to select [SETTINGS], then press to enter. 3 Turn the volume knob to make a selection, then press to search for a station. AUTO MEMORY YES: Automatically starts memorizing 6 stations with good reception. ; Using the remote controller (RC-405) FM+ / AM- : Selects band. 4 / ¢ (+) : Selects station. 1 - 6 : Selects preset station. 7 OFF*: Cancels (stereo effect resumes). See table below for a station. MANUAL: Manually search for selection. 4 Hold to finish the procedure. NO*: Cancels (automatic memorizing is not activated...

Instruction Manual
Page 10
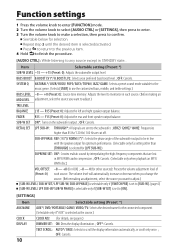
... 6.) DISPLAY DIMMER SET: ON: Dims the display illumination. ; SYSTEM Q NATURAL*/ USER/ ROCK/ POPS/ EASY/ TOP40/ JAZZ/ GAME: Selects a preset sound mode suitable to the music genre. (Selects [USER] to use the customized bass, middle, and treble settings.) BASS LEVEL -8 - +8 (Preset: 0): Source tone memory: Adjusts the level to adjust.) TRE LEVEL BALANCE FADER L15 - DETAIL SET LPF SUB-W: THROUGH*: All signals are lost in MP3/WMA audio compression. ; The volume level will automatically increase or decrease when you change the source. (Before making an MID LEVEL adjustment, select...
... 6.) DISPLAY DIMMER SET: ON: Dims the display illumination. ; SYSTEM Q NATURAL*/ USER/ ROCK/ POPS/ EASY/ TOP40/ JAZZ/ GAME: Selects a preset sound mode suitable to the music genre. (Selects [USER] to use the customized bass, middle, and treble settings.) BASS LEVEL -8 - +8 (Preset: 0): Source tone memory: Adjusts the level to adjust.) TRE LEVEL BALANCE FADER L15 - DETAIL SET LPF SUB-W: THROUGH*: All signals are lost in MP3/WMA audio compression. ; The volume level will automatically increase or decrease when you change the source. (Before making an MID LEVEL adjustment, select...

Instruction Manual
Page 11
... antenna firmly. If the condition did not improve, turn on the unit. Longer readout time is generated. Sound cannot be done. "ERROR 99" appears. Noise is required. Check the cords and connections. Clean the connectors. (page 4) Reset the unit. The CD player is playing an unsupported audio file. The unit is not operating properly. "PROTECT" appears and no operations can only display letters (upper case), numbers, and a limited number of the speaker...
... antenna firmly. If the condition did not improve, turn on the unit. Longer readout time is generated. Sound cannot be done. "ERROR 99" appears. Noise is required. Check the cords and connections. Clean the connectors. (page 4) Reset the unit. The CD player is playing an unsupported audio file. The unit is not operating properly. "PROTECT" appears and no operations can only display letters (upper case), numbers, and a limited number of the speaker...

Instruction Manual
Page 12
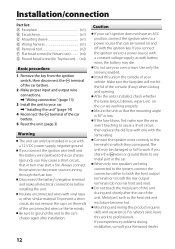
... wire to a power source with the same rating. Installation/connection Part list: A Faceplate 1) B Escutcheon 1) C Mounting sleeve 1) D Wiring harness 1) E Removal tool 2) F Flat head screw (for Nissan cars 4) G Round head screw (for Toyota cars).... (×4) Basic procedure 1 Remove the key from the ignition switch, then disconnect the · terminal of the car battery. 2 Make proper input and output wire connections. \ "Wiring connection" (page 13) 3 Install the unit to your car. \ "Installing the unit" (page 14) 4 Reconnect the · terminal of the car battery. 5 Reset the unit...
... wire to a power source with the same rating. Installation/connection Part list: A Faceplate 1) B Escutcheon 1) C Mounting sleeve 1) D Wiring harness 1) E Removal tool 2) F Flat head screw (for Nissan cars 4) G Round head screw (for Toyota cars).... (×4) Basic procedure 1 Remove the key from the ignition switch, then disconnect the · terminal of the car battery. 2 Make proper input and output wire connections. \ "Wiring connection" (page 13) 3 Install the unit to your car. \ "Installing the unit" (page 14) 4 Reconnect the · terminal of the car battery. 5 Reset the unit...

Instruction Manual
Page 13
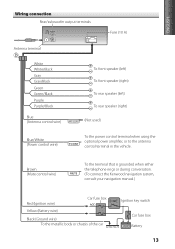
... manual.) Red (Ignition wire) Yellow (Battery wire) Car fuse box Black (Ground wire) To the metallic body or chassis of the car Ignition key switch Car fuse box Battery 13 ENGLISH Wiring connection Rear/subwoofer output terminals Fuse (10 A) Antenna terminal White White/Black Gray Gray/Black Green Green/Black Purple Purple/Black Blue (Antenna control wire) Blue/White (Power control wire) To front speaker (left) To front speaker (right) To rear speaker (left) To rear speaker (right) (Not used) To the power control terminal when using...
... manual.) Red (Ignition wire) Yellow (Battery wire) Car fuse box Black (Ground wire) To the metallic body or chassis of the car Ignition key switch Car fuse box Battery 13 ENGLISH Wiring connection Rear/subwoofer output terminals Fuse (10 A) Antenna terminal White White/Black Gray Gray/Black Green Green/Black Purple Purple/Black Blue (Antenna control wire) Blue/White (Power control wire) To front speaker (left) To front speaker (right) To rear speaker (left) To rear speaker (right) (Not used) To the power control terminal when using...
Instruction Manual
Page 14
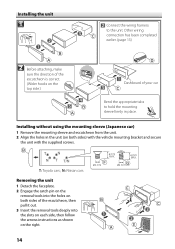
N: Nissan cars Removing the unit 1 Detach the faceplate. 2 Engage the catch pin on the removal tools into the holes on both sides of your car Bend the appropriate tabs to the unit. T: Toyota cars ; Installing without using the mounting sleeve (Japanese car) 1 Remove the mounting sleeve and escutcheon from the unit. 2 Align the holes in place. Installing the unit 1 Connect the wiring harness to hold the mounting sleeve firmly in the unit (on the...
N: Nissan cars Removing the unit 1 Detach the faceplate. 2 Engage the catch pin on the removal tools into the holes on both sides of your car Bend the appropriate tabs to the unit. T: Toyota cars ; Installing without using the mounting sleeve (Japanese car) 1 Remove the mounting sleeve and escutcheon from the unit. 2 Align the holes in place. Installing the unit 1 Connect the wiring harness to hold the mounting sleeve firmly in the unit (on the...
Instruction Manual
Page 15
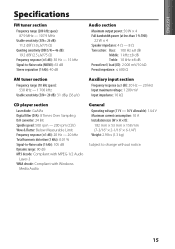
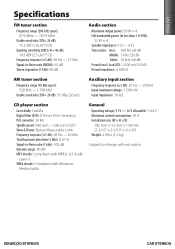
...): 63 dB Stereo separation (1 kHz): 40 dB Audio section Maximum output power: 50 W × 4 Full bandwidth power (at less than 1 % THD): 22 W × 4 Speaker impedance: 4 Ω - 8 Ω Tone action: Bass: 100 Hz ±8 dB Middle: 1 kHz ±8 dB Treble: 10 kHz ±8 dB Preout level / load (CD): 2 000 mV/10 kΩ Preout impedance: ≤ 600 Ω AM tuner section Frequency range...
...): 63 dB Stereo separation (1 kHz): 40 dB Audio section Maximum output power: 50 W × 4 Full bandwidth power (at less than 1 % THD): 22 W × 4 Speaker impedance: 4 Ω - 8 Ω Tone action: Bass: 100 Hz ±8 dB Middle: 1 kHz ±8 dB Treble: 10 kHz ±8 dB Preout level / load (CD): 2 000 mV/10 kΩ Preout impedance: ≤ 600 Ω AM tuner section Frequency range...
Instruction Manual
Page 44
Location : Top Panel FCC WARNING This equipment may cause harmful interference to radio communications, if it is not installed and used in accordance with the instructions. This equipment may generate or use radio frequency energy. Increase the separation between the equipment and receiver. Connect the equipment into an outlet on a circuit different from that to which can be determined by turning the equipment...
Location : Top Panel FCC WARNING This equipment may cause harmful interference to radio communications, if it is not installed and used in accordance with the instructions. This equipment may generate or use radio frequency energy. Increase the separation between the equipment and receiver. Connect the equipment into an outlet on a circuit different from that to which can be determined by turning the equipment...

Owners Manual
Page 2
... to reset your Kenwood dealer. Important to the other external components 9 Function settings 10 Troubleshooting 11 Installation/connection 12 Basic procedure Warning Caution Wiring connection Installing the unit Specifications 15 WARNING Stop the car before operations Listening to the radio 7 Adjust [SETTINGS] mode settings Listening to a disc 8 Selecting Repeat Play Selecting Random Play Selecting Scan Play Selecting a folder/track/file Direct Music Search using the remote controller (RC-405) Listening to know... If you experience problems during installation, consult...
... to reset your Kenwood dealer. Important to the other external components 9 Function settings 10 Troubleshooting 11 Installation/connection 12 Basic procedure Warning Caution Wiring connection Installing the unit Specifications 15 WARNING Stop the car before operations Listening to the radio 7 Adjust [SETTINGS] mode settings Listening to a disc 8 Selecting Repeat Play Selecting Random Play Selecting Scan Play Selecting a folder/track/file Direct Music Search using the remote controller (RC-405) Listening to know... If you experience problems during installation, consult...
Owners Manual
Page 5
...; Selects items. Volume knob ENT (press) - Changes the display information. Enters clock adjustment mode directly (page 6) if pressed and held . ATT Attenuates the sound. • To return to the auxiliary input jack. 4 / ¢ + 4 / ¢ Searches for a radio station. EXIT • Press and hold the following button(s)... The audio system resumes. 5 Turns on the main unit will also exit from setting mode. Confirms selection. Mutes the sound while listening to a radio or an external component connected...
...; Selects items. Volume knob ENT (press) - Changes the display information. Enters clock adjustment mode directly (page 6) if pressed and held . ATT Attenuates the sound. • To return to the auxiliary input jack. 4 / ¢ + 4 / ¢ Searches for a radio station. EXIT • Press and hold the following button(s)... The audio system resumes. 5 Turns on the main unit will also exit from setting mode. Confirms selection. Mutes the sound while listening to a radio or an external component connected...

Owners Manual
Page 6
Clock minutes flashes on the display. 5 Turn the volume knob to adjust the hour, then press to enter minute adjustment. Item Selectable setting (Preset: *) PRESET TYPE NORM*: Memorizes one station for selection. 5 Hold to enter. CD READ 1*: Automatically distinguishes between the hour and minute adjustment. 7 Hold to play as a music CD. SWITCH PRE REAR*/ SUB-W: Selects whether rear speakers or a subwoofer are connected to the line out terminals on the rear of the selected band (FM1/ FM2...
Clock minutes flashes on the display. 5 Turn the volume knob to adjust the hour, then press to enter minute adjustment. Item Selectable setting (Preset: *) PRESET TYPE NORM*: Memorizes one station for selection. 5 Hold to enter. CD READ 1*: Automatically distinguishes between the hour and minute adjustment. 7 Hold to play as a music CD. SWITCH PRE REAR*/ SUB-W: Selects whether rear speakers or a subwoofer are connected to the line out terminals on the rear of the selected band (FM1/ FM2...
Owners Manual
Page 7
... Selectable setting (Preset: *) SEEK MODE Selects the tuning mode for [PRESET TYPE].) (page 6) MONO SET ON: Improves the FM reception (but the stereo effect may be lost). ; Using the remote controller (RC-405) FM+ / AM- : Selects band. 4 / ¢ (+) : Selects station. 1 - 6 : Selects preset station. 7 AUTO MEMORY YES: Automatically starts memorizing 6 stations with good reception. ; Adjust [SETTINGS] mode settings While listening to the radio... 1 Press the volume knob to enter [FUNCTION] mode. 2 Turn the volume knob to select [SETTINGS], then press to enter. 3 Turn the volume...
... Selectable setting (Preset: *) SEEK MODE Selects the tuning mode for [PRESET TYPE].) (page 6) MONO SET ON: Improves the FM reception (but the stereo effect may be lost). ; Using the remote controller (RC-405) FM+ / AM- : Selects band. 4 / ¢ (+) : Selects station. 1 - 6 : Selects preset station. 7 AUTO MEMORY YES: Automatically starts memorizing 6 stations with good reception. ; Adjust [SETTINGS] mode settings While listening to the radio... 1 Press the volume knob to enter [FUNCTION] mode. 2 Turn the volume knob to select [SETTINGS], then press to enter. 3 Turn the volume...
Owners Manual
Page 10
... volume knob to make a selection, then press to scroll the display information automatically, or scroll only once. ; BASS BOOST B.BOOST LV1*/ B.BOOST LV2: Selects your preferred bass boost level. ; SYSTEM Q NATURAL*/ USER/ ROCK/ POPS/ EASY/ TOP40/ JAZZ/ GAME: Selects a preset sound mode suitable to the music genre. (Selects [USER] to use the customized bass, middle, and treble settings.) BASS LEVEL -8 - +8 (Preset: 0): Source tone memory: Adjusts the level to the subwoofer. ; 85HZ/ 120HZ/ 160HZ: Frequencies higher than [THROUGH] is selected for selection. SUB-W SET...
... volume knob to make a selection, then press to scroll the display information automatically, or scroll only once. ; BASS BOOST B.BOOST LV1*/ B.BOOST LV2: Selects your preferred bass boost level. ; SYSTEM Q NATURAL*/ USER/ ROCK/ POPS/ EASY/ TOP40/ JAZZ/ GAME: Selects a preset sound mode suitable to the music genre. (Selects [USER] to use the customized bass, middle, and treble settings.) BASS LEVEL -8 - +8 (Preset: 0): Source tone memory: Adjusts the level to the subwoofer. ; 85HZ/ 120HZ/ 160HZ: Frequencies higher than [THROUGH] is selected for selection. SUB-W SET...

Owners Manual
Page 11
"IN" flashes. Disc sound is not correct. "ERROR 99" appears. Tracks cannot play . Elapsed playing time is sometimes interrupted. The connectors are not displayed (e.g. Insert a finalized CD-R/CD-RW (finalize with insulating tape properly, then reset the unit. Check the cords and connections. The CD is quite dirty. / The CD is upside-down. / The CD is played. Skip to play back as you used for some reason...
"IN" flashes. Disc sound is not correct. "ERROR 99" appears. Tracks cannot play . Elapsed playing time is sometimes interrupted. The connectors are not displayed (e.g. Insert a finalized CD-R/CD-RW (finalize with insulating tape properly, then reset the unit. Check the cords and connections. The CD is quite dirty. / The CD is upside-down. / The CD is played. Skip to play back as you used for some reason...
Owners Manual
Page 12
... the power source running through the fuse box. Do not use of the unit. Mount the unit so that in the car. Metal part such as with the ignition key. Installation/connection Part list: A Faceplate 1) B Escutcheon 1) C Mounting sleeve 1) D Wiring harness 1) E Removal tool 2) F Flat head screw (for Nissan cars 4) G Round head screw (for Toyota cars).... (×4) Basic procedure 1 Remove the key from the ignition switch, then disconnect the · terminal of the car battery. 2 Make proper input and output wire connections. \ "Wiring connection...
... the power source running through the fuse box. Do not use of the unit. Mount the unit so that in the car. Metal part such as with the ignition key. Installation/connection Part list: A Faceplate 1) B Escutcheon 1) C Mounting sleeve 1) D Wiring harness 1) E Removal tool 2) F Flat head screw (for Nissan cars 4) G Round head screw (for Toyota cars).... (×4) Basic procedure 1 Remove the key from the ignition switch, then disconnect the · terminal of the car battery. 2 Make proper input and output wire connections. \ "Wiring connection...
Owners Manual
Page 13
... Blue (Antenna control wire) Blue/White (Power control wire) To front speaker (left) To front speaker (right) To rear speaker (left) To rear speaker (right) (Not used) To the power control terminal when using the optional power amplifier, or to the antenna control terminal in the vehicle. Brown (Mute control wire) To the terminal that is grounded when either the telephone rings or during conversation. (To connect the Kenwood navigation system, consult your navigation manual.) Red (Ignition wire) Yellow (Battery wire) Car fuse...
... Blue (Antenna control wire) Blue/White (Power control wire) To front speaker (left) To front speaker (right) To rear speaker (left) To rear speaker (right) (Not used) To the power control terminal when using the optional power amplifier, or to the antenna control terminal in the vehicle. Brown (Mute control wire) To the terminal that is grounded when either the telephone rings or during conversation. (To connect the Kenwood navigation system, consult your navigation manual.) Red (Ignition wire) Yellow (Battery wire) Car fuse...
Owners Manual
Page 15
...): 63 dB Stereo separation (1 kHz): 40 dB Audio section Maximum output power: 50 W × 4 Full bandwidth power (at less than 1 % THD): 22 W × 4 Speaker impedance: 4 Ω - 8 Ω Tone action: Bass: 100 Hz ±8 dB Middle: 1 kHz ±8 dB Treble: 10 kHz ±8 dB Preout level / load (CD): 2 000 mV/10 kΩ Preout impedance: ≤ 600 Ω AM tuner section Frequency range...
...): 63 dB Stereo separation (1 kHz): 40 dB Audio section Maximum output power: 50 W × 4 Full bandwidth power (at less than 1 % THD): 22 W × 4 Speaker impedance: 4 Ω - 8 Ω Tone action: Bass: 100 Hz ±8 dB Middle: 1 kHz ±8 dB Treble: 10 kHz ±8 dB Preout level / load (CD): 2 000 mV/10 kΩ Preout impedance: ≤ 600 Ω AM tuner section Frequency range...


