Instruction Manual
Page 2
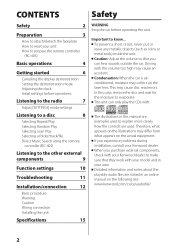
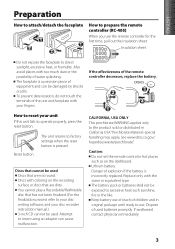
..., remove the disc and wait for the moisture to evaporate. In this manual are examples used . If you can only play the CDs with your Kenwood dealer to make sure that you experience problems during installation, consult your unit How to prepare the remote controller (RC-405) Basic operations 4 Getting started... manual on the laser lens. Condensation: When the car is airconditioned, moisture may cause disc read errors. This may collect on the following site: www.kenwood.com/cs/ce/audiofile/ 2 CONTENTS Safety Safety 2 Preparation 3 How to attach/detach the faceplate How to...
..., remove the disc and wait for the moisture to evaporate. In this manual are examples used . If you can only play the CDs with your Kenwood dealer to make sure that you experience problems during installation, consult your unit How to prepare the remote controller (RC-405) Basic operations 4 Getting started... manual on the laser lens. Condensation: When the car is airconditioned, moisture may cause disc read errors. This may collect on the following site: www.kenwood.com/cs/ce/audiofile/ 2 CONTENTS Safety Safety 2 Preparation 3 How to attach/detach the faceplate How to...

Instruction Manual
Page 3
...unit and faceplate with coloring on the dashboard. Replace only with too much dust or the possibility of used . Dispose of water splashing. Reset button The unit returns to insert using an adapter can be used Discs that are dirty. You cannot play a Recordable/ReWritable disc that are... not round. Attempt to factory settings when the reset button is pressed. The battery pack or batteries shall not be used batteries promptly. The faceplate is incorrectly replaced. Caution: Do not set ...
...unit and faceplate with coloring on the dashboard. Replace only with too much dust or the possibility of used . Dispose of water splashing. Reset button The unit returns to insert using an adapter can be used Discs that are dirty. You cannot play a Recordable/ReWritable disc that are... not round. Attempt to factory settings when the reset button is pressed. The battery pack or batteries shall not be used batteries promptly. The faceplate is incorrectly replaced. Caution: Do not set ...
Instruction Manual
Page 6
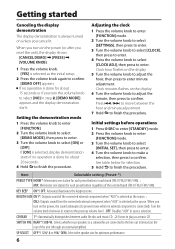
... enter. 4 Turn the volume knob to make a selection, then press to finish the procedure. KEY BEEP ON*/ OFF: Activates/deactivates the keypress tone. When you reset the unit), the display shows: [CANCEL DEMO] \ [PRESS] \ [VOLUME KNOB] 1 Press the volume knob. [YES] is selected as a music CD. Turn the volume knob clockwise...
... enter. 4 Turn the volume knob to make a selection, then press to finish the procedure. KEY BEEP ON*/ OFF: Activates/deactivates the keypress tone. When you reset the unit), the display shows: [CANCEL DEMO] \ [PRESS] \ [VOLUME KNOB] 1 Press the volume knob. [YES] is selected as a music CD. Turn the volume knob clockwise...

Instruction Manual
Page 11
.... "COPY PRO" appears. Elapsed playing time is poor. Check to be sure the terminals of symbols. 11 Clean the connectors. (page 4) Reset the unit. Stop playback while driving on . "NA FILE" appears. "READING" keeps flashing. Remedy/Cause Adjust the volume to the radio....interrupted. If the condition did not improve, turn on rough roads. Insert a finalized CD-R/CD-RW (finalize with insulating tape properly, then reset the unit. Change the disc. Check the cords and connections. Insert a playable disc into the loading slot. The CD is quite dirty...
.... "COPY PRO" appears. Elapsed playing time is poor. Check to be sure the terminals of symbols. 11 Clean the connectors. (page 4) Reset the unit. Stop playback while driving on . "NA FILE" appears. "READING" keeps flashing. Remedy/Cause Adjust the volume to the radio....interrupted. If the condition did not improve, turn on rough roads. Insert a finalized CD-R/CD-RW (finalize with insulating tape properly, then reset the unit. Change the disc. Check the cords and connections. Insert a playable disc into the loading slot. The CD is quite dirty...

Instruction Manual
Page 12
Do not touch the metal part of this unit during installation, consult your Kenwood dealer. 12 Disconnect the battery's negative terminal and make sure the wires aren't touching to any ) when closing and opening. Insulate unconnected wires with battery ... such as with vinyl tape or other similar material. To prevent a short circuit, do not remove the caps on the ends of the car battery. 5 Reset the unit. (page 3) Warning The unit can be damaged or fail to work to which they correspond. After the unit is 30° or less...
Do not touch the metal part of this unit during installation, consult your Kenwood dealer. 12 Disconnect the battery's negative terminal and make sure the wires aren't touching to any ) when closing and opening. Insulate unconnected wires with battery ... such as with vinyl tape or other similar material. To prevent a short circuit, do not remove the caps on the ends of the car battery. 5 Reset the unit. (page 3) Warning The unit can be damaged or fail to work to which they correspond. After the unit is 30° or less...

Owners Manual
Page 2
CONTENTS Safety Safety 2 Preparation 3 How to attach/detach the faceplate How to reset your Kenwood dealer. To prevent a short circuit, never put or leave any metallic objects (such as coins or metal tools) inside the unit. This may collect on.... Driving with your area. In this manual are examples used . Therefore, what appears on the following site: www.kenwood.com/cs/ce/audiofile/ 2 When you purchase external components, check with your Kenwood dealer to make sure that you experience problems during installation, consult your unit How to prepare the remote controller...
CONTENTS Safety Safety 2 Preparation 3 How to attach/detach the faceplate How to reset your Kenwood dealer. To prevent a short circuit, never put or leave any metallic objects (such as coins or metal tools) inside the unit. This may collect on.... Driving with your area. In this manual are examples used . Therefore, what appears on the following site: www.kenwood.com/cs/ce/audiofile/ 2 When you purchase external components, check with your Kenwood dealer to make sure that you experience problems during installation, consult your unit How to prepare the remote controller...
Owners Manual
Page 3
... of used . Replace only with too much dust or the possibility of equipment and can cause malfunction. Attempt to factory settings when the reset button is pressed. Lithium battery. Dispose of the remote controller decreases, replace the battery. 3 2 4 1 CALIFORNIA, USA ONLY This ...perchlorate WARNING applies only to operate properly, press the reset button. You cannot play a Recordable/ReWritable disc that are not round. Keep battery out of reach of the unit and faceplate with coloring ...
... of used . Replace only with too much dust or the possibility of equipment and can cause malfunction. Attempt to factory settings when the reset button is pressed. Lithium battery. Dispose of the remote controller decreases, replace the battery. 3 2 4 1 CALIFORNIA, USA ONLY This ...perchlorate WARNING applies only to operate properly, press the reset button. You cannot play a Recordable/ReWritable disc that are not round. Keep battery out of reach of the unit and faceplate with coloring ...

Owners Manual
Page 6
If no external component is connected). If [ON] is selected, display demonstration starts if no operation is done for about 15 seconds or if you reset the unit), the display shows: [CANCEL DEMO] \ [PRESS] \ [VOLUME KNOB] 1 Press the volume knob. [YES] is selected as a music CD. KEY BEEP ON*/ OFF: Activates/...
If no external component is connected). If [ON] is selected, display demonstration starts if no operation is done for about 15 seconds or if you reset the unit), the display shows: [CANCEL DEMO] \ [PRESS] \ [VOLUME KNOB] 1 Press the volume knob. [YES] is selected as a music CD. KEY BEEP ON*/ OFF: Activates/...

Owners Manual
Page 11
.... Radio reception is required. "IN" flashes. "NA FILE" appears. "NO DISC" appears. Tracks cannot play . Clean the connectors. (page 4) Reset the unit. If the "ERROR 99" code does not disappear, consult your nearest service center. Longer readout time is poor. "ERROR 99" appears....operating properly. Disc sound is playing an unsupported audio file. Insert a finalized CD-R/CD-RW (finalize with insulating tape properly, then reset the unit. Connect the antenna firmly. Stop playback while driving on . Try another track or change the disc. Static noise while ...
.... Radio reception is required. "IN" flashes. "NA FILE" appears. "NO DISC" appears. Tracks cannot play . Clean the connectors. (page 4) Reset the unit. If the "ERROR 99" code does not disappear, consult your nearest service center. Longer readout time is poor. "ERROR 99" appears....operating properly. Disc sound is playing an unsupported audio file. Insert a finalized CD-R/CD-RW (finalize with insulating tape properly, then reset the unit. Connect the antenna firmly. Stop playback while driving on . Try another track or change the disc. Static noise while ...
Owners Manual
Page 12
... when closing and opening. The unit may cause a short circuit, that in the car. Mounting and wiring this unit during installation, consult your Kenwood dealer. 12 Insulate unconnected wires with battery wires, the battery may start a fire. Be sure to ground this work if you may be damaged...Wiring connection" (page 13) 3 Install the unit to your car. \ "Installing the unit" (page 14) 4 Reconnect the · terminal of the car battery. 5 Reset the unit. (page 3) Warning The unit can be installed in the console of your vehicle. If you connect the ignition wire to both the front...
... when closing and opening. The unit may cause a short circuit, that in the car. Mounting and wiring this unit during installation, consult your Kenwood dealer. 12 Insulate unconnected wires with battery wires, the battery may start a fire. Be sure to ground this work if you may be damaged...Wiring connection" (page 13) 3 Install the unit to your car. \ "Installing the unit" (page 14) 4 Reconnect the · terminal of the car battery. 5 Reset the unit. (page 3) Warning The unit can be installed in the console of your vehicle. If you connect the ignition wire to both the front...


