
Instruction Manual
Page 12
... the fuse blows, first make all electrical connections before installing the unit. Do not touch the metal part of this unit during installation, consult your Kenwood dealer. 12 For safety's sake, leave this unit to which they correspond. Installation/connection Part list: A Faceplate 1)... B Escutcheon 1) C Mounting sleeve 1) D Wiring harness 1) E Removal tool 2) F Flat head screw (for Nissan cars 4) G Round head...
... the fuse blows, first make all electrical connections before installing the unit. Do not touch the metal part of this unit during installation, consult your Kenwood dealer. 12 For safety's sake, leave this unit to which they correspond. Installation/connection Part list: A Faceplate 1)... B Escutcheon 1) C Mounting sleeve 1) D Wiring harness 1) E Removal tool 2) F Flat head screw (for Nissan cars 4) G Round head...
Owners Manual
Page 12
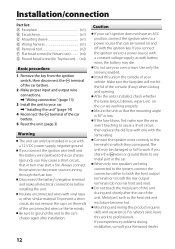
... battery may die. Be sure to ground this product requires skills and experience. Install this unit during installation, consult your Kenwood dealer. 12 Mount the unit so that can only be installed in the console of your vehicle. Disconnect the battery's ...etc. Installation/connection Part list: A Faceplate 1) B Escutcheon 1) C Mounting sleeve 1) D Wiring harness 1) E Removal tool 2) F Flat head screw (for Nissan cars 4) G Round head screw (for Toyota cars).... (×4) Basic procedure 1 Remove the key from the ignition switch, then disconnect the · terminal of the ...
... battery may die. Be sure to ground this product requires skills and experience. Install this unit during installation, consult your Kenwood dealer. 12 Mount the unit so that can only be installed in the console of your vehicle. Disconnect the battery's ...etc. Installation/connection Part list: A Faceplate 1) B Escutcheon 1) C Mounting sleeve 1) D Wiring harness 1) E Removal tool 2) F Flat head screw (for Nissan cars 4) G Round head screw (for Toyota cars).... (×4) Basic procedure 1 Remove the key from the ignition switch, then disconnect the · terminal of the ...


