Kenwood KDC-152 Support Question
Kenwood KDC-152 Support Question
Find answers below for this question about Kenwood KDC-152.Need a Kenwood KDC-152 manual? We have 2 online manuals for this item!
Question posted by Insha on August 4th, 2014
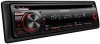
How To Remove A Kdc-152 Kenwood Head Unit
The person who posted this question about this Kenwood product did not include a detailed explanation. Please use the "Request More Information" button to the right if more details would help you to answer this question.
Current Answers
Related Kenwood KDC-152 Manual Pages
Instruction Manual - Page 1
... read through this instruction manual.
Familiarity with installation and operation procedures will help you call upon your Kenwood product at www.Kenwoodusa.com
© 2011 Kenwood Corporation All Rights Reserved. For your new CD-receiver. KDC-152
CD-RECEIVER
INSTRUCTION MANUAL
AMPLI-TUNER LECTEUR DE CD
MODE D'EMPLOI
REPRODUCTOR DE DISCOS COMPACTOS RECEPTOR DE...
Instruction Manual - Page 2
...unit. When you purchase external components, check with your Kenwood dealer to make sure that you experience problems during installation, consult your unit... the actual equipment. This unit can hear sounds outside the...faceplate How to reset your Kenwood dealer. If you can...and in this case, remove the disc and wait...unit
Specifications
15
WARNING Stop the car before operating the unit...
Instruction Manual - Page 3
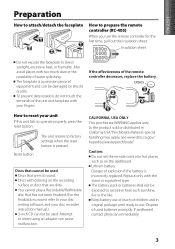
...the remote controller for the first time, pull out the insulation sheet. How to reset your unit If this unit fails to excessive heat such sunshine, fire or the like.
Discs that cannot be exposed ...The battery pack or batteries shall not be used Discs that are not round. Reset button
The unit returns to the product sold or distributed in hot places such as on the recording surface or ...
Instruction Manual - Page 4

...etc. Do not use any accessories for the disc. When removing discs from this precaution may not function properly if the connectors between the unit and faceplate are dirty.
on it. IN: A disc ... Do not use any solvents. Connector (on the panel with a dry silicon or soft cloth. Remove the rims from the center of the disc. Display window
Ejects the disc
Volume knob
Detaches the ...
Instruction Manual - Page 5

... your telephone using a commercial telephone accessory. (page 13)
When a call ends, "CALL" disappear.
"CALL" disappear and the audio system resumes. The audio system resumes.
5 Main unit
Remote controller
General operation
- Selects track/file. AUD Enters [AUDIO CTRL] settings directly.
- Mutes the sound while listening to a radio or an external component connected to the previous...
Instruction Manual - Page 6
Clock minutes flashes on the rear of the unit (through an external amplifier). Press 4 / ¢ to move between audio file disc and music CD. ; 2: Forces to play as the source...., then press to confirm. If no operation is selected as the source. Clock hour flashes on unless you reset the unit), the display shows:
[CANCEL DEMO] \ [PRESS] \ [VOLUME KNOB]
1 Press the volume knob. [YES] is...
Instruction Manual - Page 8
...IN" indicator goes off.)
Press to make a selection.
If "SCAN OFF" is selected, the unit resumes normal play is available.
8 Selecting Scan Play Press number button 2 (SCAN) repeatedly to... make a selection. Selecting Repeat Play Press number button 4 (REP) repeatedly to fast-forwards/reverses. Audio CD : TRAC (track) REPEAT, REPEAT OFF
MP3/WMA : FILE REPEAT, FOLD (folder) REPEAT,...
Instruction Manual - Page 11

... poor.
If "PROTECT" does not disappear, consult your nearest service center. Connect the antenna firmly. The unit is scratched a lot. The CD is quite dirty. / The CD is upside-down. / The CD is playing an unsupported audio file. A copy-protected file is required. Longer readout time is played. "PROTECT" appears and no...
Instruction Manual - Page 12

...1) C Mounting sleeve 1) D Wiring harness 1) E Removal tool 2) F Flat head screw (for Nissan cars 4) G Round head screw (for Toyota cars).... (×4)
Basic procedure
1 Remove the key from the ignition switch, then disconnect the · terminal of the car battery.
2 Make proper input and output wire connections. \ "Wiring connection" (page 13)
3 Install the unit to your Kenwood dealer.
12
Instruction Manual - Page 14

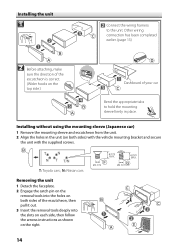
... ; Installing without using the mounting sleeve (Japanese car)
1 Remove the mounting sleeve and escutcheon from the unit. 2 Align the holes in place.
Installing the unit
1
Connect the wiring harness to hold the mounting sleeve firmly in the unit (on the right.
14
N: Nissan cars
Removing the unit 1 Detach the faceplate. 2 Engage the catch pin on the...
Owners Manual - Page 1

... back of the unit, in the space provided below. KDC-152
CD-RECEIVER
INSTRUCTION MANUAL
AMPLI-TUNER LECTEUR DE CD
MODE D'EMPLOI
REPRODUCTOR DE DISCOS COMPACTOS RECEPTOR DE FM/AM
MANUAL DE INSTRUCCIONES
Take the time to the model and serial numbers whenever you obtain the best performance from your Kenwood dealer for information...
Owners Manual - Page 2

... the car before operating the unit. CONTENTS
Safety
Safety
2
Preparation
3
How to attach/detach the faceplate How to reset your Kenwood dealer. Caution: Adjust the volume so that you purchase external components, check with your Kenwood dealer to make sure that they work with :
The illustrations in this case, remove the disc and wait...
Owners Manual - Page 4

... touch the recording surface of the disc and move outward. Clean from this precaution may not function properly if the connectors between the unit and faceplate are dirty. Remove the rims from the center hole and disc edge before inserting a disc.
4 Basic operations
Loading slot
Remote sensor Do not expose to damage...
Owners Manual - Page 5
...button(s)... "CD" is selectable only
when a disc is ready, playback also starts. Selects track/file.
The audio system pauses.
BAND
*AM- /
#FM+
Selects the FM bands (FM1/ FM2/ FM3) or AM...
power is turned on .
"CALL" disappear and the audio system resumes. ENGLISH
When you press or hold on the main unit can only select the next folders.)
ENT
Pauses/resumes playback...
Owners Manual - Page 6

...connected external component when "AUX" is selected as the source. Press 4 / ¢ to move between audio file disc and music CD. ; 2: Forces to play as the source. ;
When you turn on ... 9/6/ OEM: Selects the speaker size for each preset button in each preset button regardless of the unit (through an external amplifier). When you turn the volume knob to select [NO] in source selection...
Owners Manual - Page 8

...3 (ALL RDM) to make a selection.
To return to the root folder (or first track for audio CD), press BAND. Audio CD : DISC RANDOM, RANDOM OFF MP3/WMA : FOLD (folder) RANDOM,
ALL RANDOM, RANDOM OFF ...2 Insert a disc into the loading slot. Audio CD : TRAC (track) SCAN, SCAN OFF MP3/WMA : FILE SCAN, SCAN OFF
If scan play is selected, the unit resumes normal play of the music in the disc...
Owners Manual - Page 11

...).
Remedy/Cause Adjust the volume to another disc instead. Pull the antenna out all . The unit is scratched a lot. The CD is quite dirty. / The CD is upside-down. / The CD is playing an unsupported audio file.
This unit can be heard. "NO DISC" appears. Change the disc. Longer readout time is not...
Owners Manual - Page 12
...the metal part of this unit during installation, consult your Kenwood dealer.
12 For safety's sake, leave this unit to the power source ...unit. Installation/connection
Part list: A Faceplate 1) B Escutcheon 1) C Mounting sleeve 1) D Wiring harness 1) E Removal tool 2) F Flat head screw (for Nissan cars 4) G Round head screw (for Toyota cars).... (×4)
Basic procedure
1 Remove...
Owners Manual - Page 14
... on the right.
14 Installing without using the mounting sleeve (Japanese car)
1 Remove the mounting sleeve and escutcheon from the unit. 2 Align the holes in place. Installing the unit
1
Connect the wiring harness to hold the mounting sleeve firmly in the unit (on both sides of your car
Bend the appropriate tabs to the...
Owners Manual - Page 15
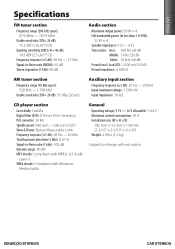
... dB): 30 Hz - 15 kHz Signal-to-Noise ratio (MONO): 63 dB Stereo separation (1 kHz): 40 dB
Audio section
Maximum output power: 50 W × 4 Full bandwidth power (at less than 1 % THD):
22 W...(1 kHz): 105 dB Dynamic range: 90 dB MP3 decode: Compliant with MPEG-1/2 Audio
Layer-3 WMA decode: Compliant with Windows
Media Audio
General Operating voltage (11 V - 16 V allowable): 14.4 V Maximum current ...
Similar Questions


Is There A Way To Get My Kenwood Kdc-he942u Head Unit Out Of Protect Mode?
My KDC-HD942U head unit has gone into protect mode due to changing the car battery. This unit was so...
My KDC-HD942U head unit has gone into protect mode due to changing the car battery. This unit was so...
(Posted by blondepinkamanda 9 years ago)


Kenwood Kdc 152
how do you stop your kenwood kdc 152 deck from saying call in the middle of a song?
how do you stop your kenwood kdc 152 deck from saying call in the middle of a song?
(Posted by Anonymous-90937 11 years ago)