Instruction Manual
Page 2
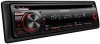
... may cause disc read errors. CONTENTS Safety Safety 2 Preparation 3 How to attach/detach the faceplate How to reset your Kenwood dealer. This unit can hear sounds outside the car. When you experience problems during installation, consult your unit How to prepare... the remote controller (RC-405) Basic operations 4 Getting started 6 Canceling the display demonstration Setting the demonstration mode Adjusting the clock Initial settings before operations Listening to the radio 7 Adjust [SETTINGS] mode settings Listening to a disc 8 Selecting...
... may cause disc read errors. CONTENTS Safety Safety 2 Preparation 3 How to attach/detach the faceplate How to reset your Kenwood dealer. This unit can hear sounds outside the car. When you experience problems during installation, consult your unit How to prepare... the remote controller (RC-405) Basic operations 4 Getting started 6 Canceling the display demonstration Setting the demonstration mode Adjusting the clock Initial settings before operations Listening to the radio 7 Adjust [SETTINGS] mode settings Listening to a disc 8 Selecting...

Instruction Manual
Page 5
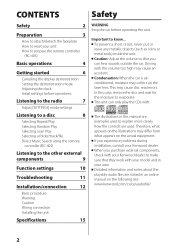
...phone call To use this feature, connect the MUTE lead to your telephone using a commercial telephone accessory. (page 13) When a call comes in clock display screen. - Fast-forwards/reverses tracks if pressed and held . The audio system pauses. To continue listen to the auxiliary input jack. 4 /...AUX, STANDBY), if the SRC power is turned on . "CD" is selectable only when a disc is ready, playback also starts. Changes the display information. Muting upon the reception of a disc. - Enters [FUNCTION] settings. Volume knob VOL Adjusts the volume level. (turn) 5 / &#...
...phone call To use this feature, connect the MUTE lead to your telephone using a commercial telephone accessory. (page 13) When a call comes in clock display screen. - Fast-forwards/reverses tracks if pressed and held . The audio system pauses. To continue listen to the auxiliary input jack. 4 /...AUX, STANDBY), if the SRC power is turned on . "CD" is selectable only when a disc is ready, playback also starts. Changes the display information. Muting upon the reception of a disc. - Enters [FUNCTION] settings. Volume knob VOL Adjusts the volume level. (turn) 5 / &#...
Instruction Manual
Page 6
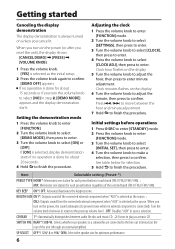
...INITIAL SET], then press to enter. 4 Turn the volume knob to make a selection, then press to the previous volume level. ; Clock hour flashes on the display. 6 Turn the volume knob to adjust the minute, then press to confirm. See table below for optimum performance. 6 KEY BEEP ON...*/ OFF: Activates/deactivates the keypress tone. Turn the volume knob clockwise to return to confirm. Clock minutes flashes on the display. 5 Turn the volume knob to adjust the hour, then press to enter minute adjustment. BUILTIN AUX ON1*: Outputs sound of...
...INITIAL SET], then press to enter. 4 Turn the volume knob to make a selection, then press to the previous volume level. ; Clock hour flashes on the display. 6 Turn the volume knob to adjust the minute, then press to confirm. See table below for optimum performance. 6 KEY BEEP ON...*/ OFF: Activates/deactivates the keypress tone. Turn the volume knob clockwise to return to confirm. Clock minutes flashes on the display. 5 Turn the volume knob to adjust the hour, then press to enter minute adjustment. BUILTIN AUX ON1*: Outputs sound of...

Instruction Manual
Page 10
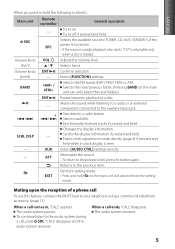
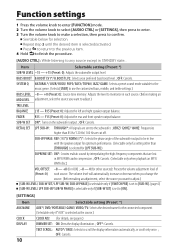
... the volume knob to select [AUDIO CTRL] or [SETTINGS], then press to enter. 3 Turn the volume knob to make a selection, then press to scroll the display information automatically, or scroll only once. ; SUB-W PHASE: REV (180°)/ NORM (0°)*: Selects the phase angle of (Preset: 0) each source. (Before making an adjustment.... (Selectable only when playback an MP3/ WMA disc.) VOL OFFSET: -8 - +8 (for AUX) ; -8 - 0 (for selection. Repeat step 3 until the desired item is selected as the source.) CLOCK CLOCK ADJ: (For details, see page 6.) DISPLAY DIMMER SET: ON: Dims the...
... the volume knob to select [AUDIO CTRL] or [SETTINGS], then press to enter. 3 Turn the volume knob to make a selection, then press to scroll the display information automatically, or scroll only once. ; SUB-W PHASE: REV (180°)/ NORM (0°)*: Selects the phase angle of (Preset: 0) each source. (Before making an adjustment.... (Selectable only when playback an MP3/ WMA disc.) VOL OFFSET: -8 - +8 (for AUX) ; -8 - 0 (for selection. Repeat step 3 until the desired item is selected as the source.) CLOCK CLOCK ADJ: (For details, see page 6.) DISPLAY DIMMER SET: ON: Dims the...

Owners Manual
Page 2
... controller (RC-405) Listening to explain more clearly how the controls are stated in an online manual on the following site: www.kenwood.com/cs/ce/audiofile/ 2 When you purchase external components, check with your model and in this case, remove the disc and...to reset your unit How to prepare the remote controller (RC-405) Basic operations 4 Getting started 6 Canceling the display demonstration Setting the demonstration mode Adjusting the clock Initial settings before operating the unit. Therefore, what appears on the laser lens. Detailed information and notes about the...
... controller (RC-405) Listening to explain more clearly how the controls are stated in an online manual on the following site: www.kenwood.com/cs/ce/audiofile/ 2 When you purchase external components, check with your model and in this case, remove the disc and...to reset your unit How to prepare the remote controller (RC-405) Basic operations 4 Getting started 6 Canceling the display demonstration Setting the demonstration mode Adjusting the clock Initial settings before operating the unit. Therefore, what appears on the laser lens. Detailed information and notes about the...
Owners Manual
Page 5
... using a commercial telephone accessory. (page 13) When a call comes in clock display screen. - Confirms selection. BAND *AM- / #FM+ Selects the FM bands (FM1/ FM2/ FM3) or AM. Changes the display information. Enters clock adjustment mode directly (page 6) if pressed and held . ENGLISH When you... on. "CD" is selectable only when a disc is ready, playback also starts. Muting upon the reception of a disc. - Scrolls the display information if pressed and held while in , "CALL" appears. EXIT • Press and hold the following button(s)... "CALL" disappear and the audio ...
... using a commercial telephone accessory. (page 13) When a call comes in clock display screen. - Confirms selection. BAND *AM- / #FM+ Selects the FM bands (FM1/ FM2/ FM3) or AM. Changes the display information. Enters clock adjustment mode directly (page 6) if pressed and held . ENGLISH When you... on. "CD" is selectable only when a disc is ready, playback also starts. Muting upon the reception of a disc. - Scrolls the display information if pressed and held while in , "CALL" appears. EXIT • Press and hold the following button(s)... "CALL" disappear and the audio ...

Owners Manual
Page 6
...done for each band (FM1/ FM2/ FM3/ AM). ; When you turn on the display. 5 Turn the volume knob to adjust the hour, then press to select [NO] in source selection. Adjusting the clock 1 Press the volume knob to enter [FUNCTION] mode. 2 Turn the volume knob ... again to play as the source. CD READ 1*: Automatically distinguishes between the hour and minute adjustment. 7 Hold to finish the procedure. Clock minutes flashes on unless you reset the unit), the display shows: [CANCEL DEMO] \ [PRESS] \ [VOLUME KNOB] 1 Press the volume knob. [YES] is connected). SP SELECT OFF*/ 5/4/...
...done for each band (FM1/ FM2/ FM3/ AM). ; When you turn on the display. 5 Turn the volume knob to adjust the hour, then press to select [NO] in source selection. Adjusting the clock 1 Press the volume knob to enter [FUNCTION] mode. 2 Turn the volume knob ... again to play as the source. CD READ 1*: Automatically distinguishes between the hour and minute adjustment. 7 Hold to finish the procedure. Clock minutes flashes on unless you reset the unit), the display shows: [CANCEL DEMO] \ [PRESS] \ [VOLUME KNOB] 1 Press the volume knob. [YES] is connected). SP SELECT OFF*/ 5/4/...
Owners Manual
Page 10
...Cancels. OFF*: Cancels. Press to return to the previous item. 4 Hold to finish the procedure. [AUDIO CTRL] : While listening to scroll the display information automatically, or scroll only once. ; Item Selectable setting (Preset: *) SUB-W LEVEL -15 - +15 (Preset: 0): Adjusts the subwoofer output...with the speaker output for the connected component. (Selectable only if "AUX" is selected as the source.) CLOCK CLOCK ADJ: (For details, see page 6.) DISPLAY DIMMER SET: ON: Dims the display illumination. ; R15 - SUB-W PHASE: REV (180°)/ NORM (0°)*: Selects the phase angle ...
...Cancels. OFF*: Cancels. Press to return to the previous item. 4 Hold to finish the procedure. [AUDIO CTRL] : While listening to scroll the display information automatically, or scroll only once. ; Item Selectable setting (Preset: *) SUB-W LEVEL -15 - +15 (Preset: 0): Adjusts the subwoofer output...with the speaker output for the connected component. (Selectable only if "AUX" is selected as the source.) CLOCK CLOCK ADJ: (For details, see page 6.) DISPLAY DIMMER SET: ON: Dims the display illumination. ; R15 - SUB-W PHASE: REV (180°)/ NORM (0°)*: Selects the phase angle ...


