Instruction Manual
Page 2
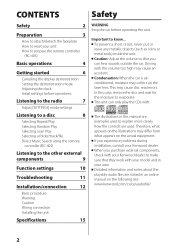
..., check with your Kenwood dealer to make sure that you experience problems during installation, consult your unit How to prepare the remote controller (RC-405) Basic operations 4 Getting started 6 Canceling the display demonstration Setting the demonstration mode Adjusting the clock Initial settings before operations...unit can hear sounds outside the car. CONTENTS Safety Safety 2 Preparation 3 How to attach/detach the faceplate How to reset your Kenwood dealer. This may cause an accident. To prevent a short circuit, never put or leave any metallic objects (such as coins ...
..., check with your Kenwood dealer to make sure that you experience problems during installation, consult your unit How to prepare the remote controller (RC-405) Basic operations 4 Getting started 6 Canceling the display demonstration Setting the demonstration mode Adjusting the clock Initial settings before operations...unit can hear sounds outside the car. CONTENTS Safety Safety 2 Preparation 3 How to attach/detach the faceplate How to reset your Kenwood dealer. This may cause an accident. To prevent a short circuit, never put or leave any metallic objects (such as coins ...

Instruction Manual
Page 5
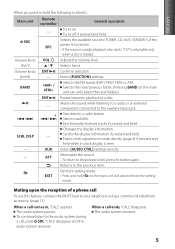
...use this feature, connect the MUTE lead to your telephone using a commercial telephone accessory. (page 13) When a call comes in clock display screen. - Mutes the sound while listening to a radio or an external component connected to the audio system during a call ends...disappear. AUD Enters [AUDIO CTRL] settings directly. - EXIT • Press and hold the following button(s)... Scrolls the display information if pressed and held . Enters clock adjustment mode directly (page 6) if pressed and held . The audio system pauses. Selects the next/previous folder. (...
...use this feature, connect the MUTE lead to your telephone using a commercial telephone accessory. (page 13) When a call comes in clock display screen. - Mutes the sound while listening to a radio or an external component connected to the audio system during a call ends...disappear. AUD Enters [AUDIO CTRL] settings directly. - EXIT • Press and hold the following button(s)... Scrolls the display information if pressed and held . Enters clock adjustment mode directly (page 6) if pressed and held . The audio system pauses. Selects the next/previous folder. (...
Instruction Manual
Page 6
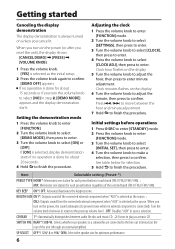
Clock minutes flashes on the power, the sound attenuates (to confirm. Item Selectable setting (Preset: *) PRESET TYPE NORM*: Memorizes one station for each band (FM1/ FM2/ FM3/ AM). ; When you turn on the display. 6 Turn the volume knob to adjust the minute, then press to prevent noise when no...DEMO MODE], then press to enter. 3 Turn the volume knob to the line out terminals on the display. 5 Turn the volume knob to adjust the hour, then press to finish the procedure. Adjusting the clock 1 Press the volume knob to enter [FUNCTION] mode. 2 Turn the volume knob to select [...
Clock minutes flashes on the power, the sound attenuates (to confirm. Item Selectable setting (Preset: *) PRESET TYPE NORM*: Memorizes one station for each band (FM1/ FM2/ FM3/ AM). ; When you turn on the display. 6 Turn the volume knob to adjust the minute, then press to prevent noise when no...DEMO MODE], then press to enter. 3 Turn the volume knob to the line out terminals on the display. 5 Turn the volume knob to adjust the hour, then press to finish the procedure. Adjusting the clock 1 Press the volume knob to enter [FUNCTION] mode. 2 Turn the volume knob to select [...

Instruction Manual
Page 10
Repeat step 3 until the desired item is selected as the source.) CLOCK CLOCK ADJ: (For details, see page 6.) DISPLAY DIMMER SET: ON: Dims the display illumination. ; Press to return to the previous item. 4 Hold to finish the procedure. [AUDIO CTRL] : While listening to any source except in MP3/WMA audio ... the volume knob to select [AUDIO CTRL] or [SETTINGS], then press to enter. 3 Turn the volume knob to make a selection, then press to scroll the display information automatically, or scroll only once. ;
Repeat step 3 until the desired item is selected as the source.) CLOCK CLOCK ADJ: (For details, see page 6.) DISPLAY DIMMER SET: ON: Dims the display illumination. ; Press to return to the previous item. 4 Hold to finish the procedure. [AUDIO CTRL] : While listening to any source except in MP3/WMA audio ... the volume knob to select [AUDIO CTRL] or [SETTINGS], then press to enter. 3 Turn the volume knob to make a selection, then press to scroll the display information automatically, or scroll only once. ;

Owners Manual
Page 2
...metal tools) inside the unit. This may cause an accident. Caution: Adjust the volume so that they work with your Kenwood dealer to evaporate. Condensation: When the car is airconditioned, moisture may differ from what appears on the illustrations may collect ...reset your unit How to prepare the remote controller (RC-405) Basic operations 4 Getting started 6 Canceling the display demonstration Setting the demonstration mode Adjusting the clock Initial settings before operations Listening to the radio 7 Adjust [SETTINGS] mode settings Listening to a disc 8 ...
...metal tools) inside the unit. This may cause an accident. Caution: Adjust the volume so that they work with your Kenwood dealer to evaporate. Condensation: When the car is airconditioned, moisture may differ from what appears on the illustrations may collect ...reset your unit How to prepare the remote controller (RC-405) Basic operations 4 Getting started 6 Canceling the display demonstration Setting the demonstration mode Adjusting the clock Initial settings before operations Listening to the radio 7 Adjust [SETTINGS] mode settings Listening to a disc 8 ...
Owners Manual
Page 5
...] settings. Mutes the sound while listening to a radio or an external component connected to the previous item. Changes the display information. SCRL DISP - Enters clock adjustment mode directly (page 6) if pressed and held . Muting upon the reception of a disc. - Turns off if... auxiliary input jack. 4 / ¢ + 4 / ¢ Searches for a radio station. Exit from the setting mode. When a call comes in clock display screen. - "CD" is selectable only when a disc is ready, playback also starts. ATT Attenuates the sound. • To return to the audio system...
...] settings. Mutes the sound while listening to a radio or an external component connected to the previous item. Changes the display information. SCRL DISP - Enters clock adjustment mode directly (page 6) if pressed and held . Muting upon the reception of a disc. - Turns off if... auxiliary input jack. 4 / ¢ + 4 / ¢ Searches for a radio station. Exit from the setting mode. When a call comes in clock display screen. - "CD" is selectable only when a disc is ready, playback also starts. ATT Attenuates the sound. • To return to the audio system...

Owners Manual
Page 6
... [DEMO MODE], then press to enter. 3 Turn the volume knob to select [NO] in step 2, [DEMO MODE] appears and the display demonstration starts. Adjusting the clock 1 Press the volume knob to enter [FUNCTION] mode. 2 Turn the volume knob to select [SETTINGS], then press to enter. 3 Turn... × 9/6/ OEM: Selects the speaker size for each band (FM1/ FM2/ FM3/ AM). ; Clock hour flashes on the rear of the selected band (FM1/ FM2/ FM3/ AM). Clock minutes flashes on unless you reset the unit), the display shows: [CANCEL DEMO] \ [PRESS] \ [VOLUME KNOB] 1 Press the volume knob. [YES] ...
... [DEMO MODE], then press to enter. 3 Turn the volume knob to select [NO] in step 2, [DEMO MODE] appears and the display demonstration starts. Adjusting the clock 1 Press the volume knob to enter [FUNCTION] mode. 2 Turn the volume knob to select [SETTINGS], then press to enter. 3 Turn... × 9/6/ OEM: Selects the speaker size for each band (FM1/ FM2/ FM3/ AM). ; Clock hour flashes on the rear of the selected band (FM1/ FM2/ FM3/ AM). Clock minutes flashes on unless you reset the unit), the display shows: [CANCEL DEMO] \ [PRESS] \ [VOLUME KNOB] 1 Press the volume knob. [YES] ...
Owners Manual
Page 10
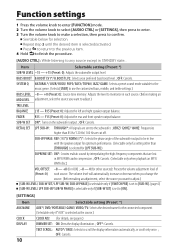
Repeat step 3 until the desired item is selected as the source.) CLOCK CLOCK ADJ: (For details, see page 6.) DISPLAY DIMMER SET: ON: Dims the display illumination. ; OFF: Cancels. SYSTEM Q NATURAL*/ USER/ ROCK/ POPS/ EASY/ TOP40/ JAZZ/ GAME: Selects a preset sound mode suitable... SET LPF SUB-W: THROUGH*: All signals are sent to the subwoofer. ; 85HZ/ 120HZ/ 160HZ: Frequencies higher than [THROUGH] is set to scroll the display information automatically, or scroll only once. ; OFF: Cancels. 10 OFF: Cancels. Item Selectable setting (Preset: *) SUB-W LEVEL -15 - +15 (...
Repeat step 3 until the desired item is selected as the source.) CLOCK CLOCK ADJ: (For details, see page 6.) DISPLAY DIMMER SET: ON: Dims the display illumination. ; OFF: Cancels. SYSTEM Q NATURAL*/ USER/ ROCK/ POPS/ EASY/ TOP40/ JAZZ/ GAME: Selects a preset sound mode suitable... SET LPF SUB-W: THROUGH*: All signals are sent to the subwoofer. ; 85HZ/ 120HZ/ 160HZ: Frequencies higher than [THROUGH] is set to scroll the display information automatically, or scroll only once. ; OFF: Cancels. 10 OFF: Cancels. Item Selectable setting (Preset: *) SUB-W LEVEL -15 - +15 (...


