Instruction Manual
Page 1
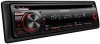
...installation and operation procedures will help you call upon your Kenwood dealer for information or service on the warranty card, and in the spaces designated on the product. For your records Record the serial number, found on the back of the unit, in the space provided below. Model KDC-152... Serial number US Residents Only Register Online Register your Kenwood product at www.Kenwoodusa.com © 2011 Kenwood Corporation All Rights Reserved. Refer to read through this instruction manual. KDC-152 CD-RECEIVER INSTRUCTION MANUAL AMPLI-TUNER ...
...installation and operation procedures will help you call upon your Kenwood dealer for information or service on the warranty card, and in the spaces designated on the product. For your records Record the serial number, found on the back of the unit, in the space provided below. Model KDC-152... Serial number US Residents Only Register Online Register your Kenwood product at www.Kenwoodusa.com © 2011 Kenwood Corporation All Rights Reserved. Refer to read through this instruction manual. KDC-152 CD-RECEIVER INSTRUCTION MANUAL AMPLI-TUNER ...
Instruction Manual
Page 2
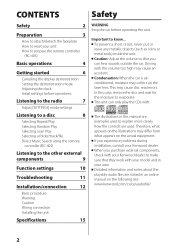
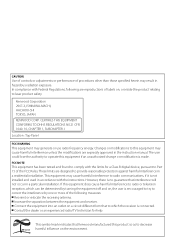
...) Listening to the other external components 9 Function settings 10 Troubleshooting 11 Installation/connection 12 Basic procedure Warning Caution Wiring connection Installing the unit Specifications 15 WARNING Stop the car before operating the unit. ...Important to know... Condensation: When the car is airconditioned, moisture may cause disc read errors. Caution: Adjust the volume so that they work with the volume too high may differ from what appears on the following site: www.kenwood...
...) Listening to the other external components 9 Function settings 10 Troubleshooting 11 Installation/connection 12 Basic procedure Warning Caution Wiring connection Installing the unit Specifications 15 WARNING Stop the car before operating the unit. ...Important to know... Condensation: When the car is airconditioned, moisture may cause disc read errors. Caution: Adjust the volume so that they work with the volume too high may differ from what appears on the following site: www.kenwood...

Instruction Manual
Page 12
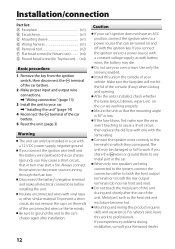
... to the terminals to the power source running through the fuse box. Do not touch the metal part of this unit during installation, consult your Kenwood dealer. 12 Mounting and wiring this work if you share the · wires or ground them to any ) when closing and... not use of the unit. If you connect the ignition wire (red) and the battery wire (yellow) to the car chassis (ground), you may die. Installation/connection Part list: A Faceplate 1) B Escutcheon 1) C Mounting sleeve 1) D Wiring harness 1) E Removal tool 2) F Flat head screw (for Nissan cars 4) G Round head screw (...
... to the terminals to the power source running through the fuse box. Do not touch the metal part of this unit during installation, consult your Kenwood dealer. 12 Mounting and wiring this work if you share the · wires or ground them to any ) when closing and... not use of the unit. If you connect the ignition wire (red) and the battery wire (yellow) to the car chassis (ground), you may die. Installation/connection Part list: A Faceplate 1) B Escutcheon 1) C Mounting sleeve 1) D Wiring harness 1) E Removal tool 2) F Flat head screw (for Nissan cars 4) G Round head screw (...

Instruction Manual
Page 14
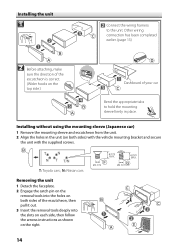
...out. 3 Insert the removal tools deeply into the holes on both sides) with the vehicle mounting bracket and secure the unit with the supplied screws. Installing without using the mounting sleeve (Japanese car) 1 Remove the mounting sleeve and escutcheon from the unit. 2 Align the holes in place. N: Nissan ...Engage the catch pin on the removal tools into the slots on each side, then follow the arrows instructions as shown on the right. 14 Installing the unit 1 Connect the wiring harness to hold the mounting sleeve firmly in the unit (on both sides of your car Bend the appropriate...
...out. 3 Insert the removal tools deeply into the holes on both sides) with the vehicle mounting bracket and secure the unit with the supplied screws. Installing without using the mounting sleeve (Japanese car) 1 Remove the mounting sleeve and escutcheon from the unit. 2 Align the holes in place. N: Nissan ...Engage the catch pin on the removal tools into the slots on each side, then follow the arrows instructions as shown on the right. 14 Installing the unit 1 Connect the wiring harness to hold the mounting sleeve firmly in the unit (on both sides of your car Bend the appropriate...
Instruction Manual
Page 15
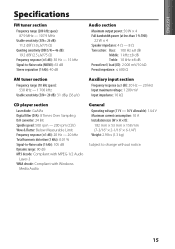
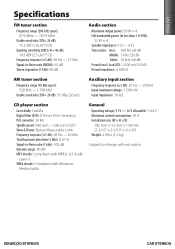
... MP3 decode: Compliant with MPEG-1/2 Audio Layer-3 WMA decode: Compliant with Windows Media Audio General Operating voltage (11 V - 16 V allowable): 14.4 V Maximum current consumption: 10 A Installation size (W × H × D): 182 mm × 53 mm × 158 mm (7-3/16" × 2-1/16" × 6-1/4") Weight: 2.9 lbs (1.3 kg) Subject to change without notice. 15
... MP3 decode: Compliant with MPEG-1/2 Audio Layer-3 WMA decode: Compliant with Windows Media Audio General Operating voltage (11 V - 16 V allowable): 14.4 V Maximum current consumption: 10 A Installation size (W × H × D): 182 mm × 53 mm × 158 mm (7-3/16" × 2-1/16" × 6-1/4") Weight: 2.9 lbs (1.3 kg) Subject to change without notice. 15
Instruction Manual
Page 44
...this equipment if an unauthorized change or modification is not installed and used in a particular installation. Kenwood Corporation 2967-3, ISHIKAWA-MACHI, HACHIOJI-SHI TOKYO, JAPAN KENWOOD CORP. These limits are expressly approved in a residential installation. If this product so as to provide reasonable protection... FCC NOTE This equipment has been tested and found to comply with the instructions. This symbol mark indicates that Kenwood manufactured this equipment does cause harmful interference to radio or television reception, which the receiver is no guarantee that ...
...this equipment if an unauthorized change or modification is not installed and used in a particular installation. Kenwood Corporation 2967-3, ISHIKAWA-MACHI, HACHIOJI-SHI TOKYO, JAPAN KENWOOD CORP. These limits are expressly approved in a residential installation. If this product so as to provide reasonable protection... FCC NOTE This equipment has been tested and found to comply with the instructions. This symbol mark indicates that Kenwood manufactured this equipment does cause harmful interference to radio or television reception, which the receiver is no guarantee that ...

Owners Manual
Page 1
Model KDC-152 Serial number Familiarity with installation and operation procedures will help you call upon your Kenwood dealer for information or service on the warranty card, and in the space provided below. For your new CD-receiver. Refer to read through this instruction manual. KDC-152 CD-RECEIVER INSTRUCTION MANUAL AMPLI-TUNER LECTEUR DE CD MODE...
Model KDC-152 Serial number Familiarity with installation and operation procedures will help you call upon your Kenwood dealer for information or service on the warranty card, and in the space provided below. For your new CD-receiver. Refer to read through this instruction manual. KDC-152 CD-RECEIVER INSTRUCTION MANUAL AMPLI-TUNER LECTEUR DE CD MODE...

Owners Manual
Page 2
..., moisture may cause an accident. Therefore, what appears on the illustrations may cause disc read errors. When you experience problems during installation, consult your unit How to prepare the remote controller (RC-405) Basic operations 4 Getting started 6 Canceling the display demonstration Setting... connection Installing the unit Specifications 15 WARNING Stop the car before operating the unit. Caution: Adjust the volume so that they work with your model and in your area. Driving with : The illustrations in an online manual on the following site: www.kenwood.com/cs...
..., moisture may cause an accident. Therefore, what appears on the illustrations may cause disc read errors. When you experience problems during installation, consult your unit How to prepare the remote controller (RC-405) Basic operations 4 Getting started 6 Canceling the display demonstration Setting... connection Installing the unit Specifications 15 WARNING Stop the car before operating the unit. Caution: Adjust the volume so that they work with your model and in your area. Driving with : The illustrations in an online manual on the following site: www.kenwood.com/cs...
Owners Manual
Page 12
.... If you share the · wires or ground them to any ) when closing and opening. Install this unit to the car's chassis again after the use your Kenwood dealer. 12 After the unit is 30° or less. Connect the speaker wires correctly to the... same rating. When only two speakers are working properly. If you may start a fire. Metal part such as with a 12 V DC power supply, negative ground. Installation/connection Part list: A Faceplate 1) B Escutcheon 1) C Mounting sleeve 1) D Wiring harness 1) E Removal tool 2) F Flat head screw (for Nissan cars 4) G Round head screw...
.... If you share the · wires or ground them to any ) when closing and opening. Install this unit to the car's chassis again after the use your Kenwood dealer. 12 After the unit is 30° or less. Connect the speaker wires correctly to the... same rating. When only two speakers are working properly. If you may start a fire. Metal part such as with a 12 V DC power supply, negative ground. Installation/connection Part list: A Faceplate 1) B Escutcheon 1) C Mounting sleeve 1) D Wiring harness 1) E Removal tool 2) F Flat head screw (for Nissan cars 4) G Round head screw...
Owners Manual
Page 14
Installing without using the mounting sleeve (Japanese car) 1 Remove the mounting sleeve and escutcheon from the unit. 2 Align the holes in place. Other wiring connection has ... each side, then follow the arrows instructions as shown on the top side.) Dashboard of the escutcheon is correct. (Wider hooks on the right. 14 Installing the unit 1 Connect the wiring harness to hold the mounting sleeve firmly in the unit (on both sides of the escutcheon, then pull it out...
Installing without using the mounting sleeve (Japanese car) 1 Remove the mounting sleeve and escutcheon from the unit. 2 Align the holes in place. Other wiring connection has ... each side, then follow the arrows instructions as shown on the top side.) Dashboard of the escutcheon is correct. (Wider hooks on the right. 14 Installing the unit 1 Connect the wiring harness to hold the mounting sleeve firmly in the unit (on both sides of the escutcheon, then pull it out...
Owners Manual
Page 15
... MP3 decode: Compliant with MPEG-1/2 Audio Layer-3 WMA decode: Compliant with Windows Media Audio General Operating voltage (11 V - 16 V allowable): 14.4 V Maximum current consumption: 10 A Installation size (W × H × D): 182 mm × 53 mm × 158 mm (7-3/16" × 2-1/16" × 6-1/4") Weight: 2.9 lbs (1.3 kg) Subject to change without notice...
... MP3 decode: Compliant with MPEG-1/2 Audio Layer-3 WMA decode: Compliant with Windows Media Audio General Operating voltage (11 V - 16 V allowable): 14.4 V Maximum current consumption: 10 A Installation size (W × H × D): 182 mm × 53 mm × 158 mm (7-3/16" × 2-1/16" × 6-1/4") Weight: 2.9 lbs (1.3 kg) Subject to change without notice...


