Instruction Manual
Page 4
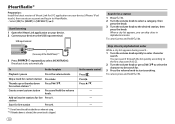
... BASICS GETTING STARTED USB / iPod / ANDROID RADIO AUX Pandora® iHeartRadio® SiriusXM® Radio BLUETOOTH® AUDIO SETTINGS DISPLAY SETTINGS MORE INFORMATION TROUBLESHOOTING SPECIFICATIONS INSTALLATION / CONNECTION BEFORE USE 2 Warning 3 Do not operate any metallic objects (such as coins or metal tools) inside the unit, to prevent a short 11 circuit. 14...
... BASICS GETTING STARTED USB / iPod / ANDROID RADIO AUX Pandora® iHeartRadio® SiriusXM® Radio BLUETOOTH® AUDIO SETTINGS DISPLAY SETTINGS MORE INFORMATION TROUBLESHOOTING SPECIFICATIONS INSTALLATION / CONNECTION BEFORE USE 2 Warning 3 Do not operate any metallic objects (such as coins or metal tools) inside the unit, to prevent a short 11 circuit. 14...
Instruction Manual
Page 7
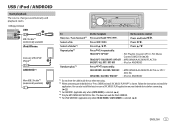
Follow the instructions to install JVC MUSIC PLAY APP" is selected. ( 6) ENGLISH 5 TRACK RPT/ RPT OFF : JVC Playlist Creator (JPC) / JVC Music Control (JMC) file ( 24) TRACK RPT/ FOLDER RPT/ RPT OFF : MP3/WMA/AAC/WAV/FLAC file ONE RPT/ ALL... 6) *4 Only for iPod/ ANDROID. *5 For iPod/ ANDROID: Applicable only when [HEAD MODE]/ [AUTO MODE] is shown. Press repeatedly. Press . You can also install the latest version of the iPod/ iPhone)*1 ANDROID*2 Micro USB 2.0 cable*1 (commercially available) To Reverse / Fast-forward*3 Select a file Select a folder*4 Repeat play*5...
Follow the instructions to install JVC MUSIC PLAY APP" is selected. ( 6) ENGLISH 5 TRACK RPT/ RPT OFF : JVC Playlist Creator (JPC) / JVC Music Control (JMC) file ( 24) TRACK RPT/ FOLDER RPT/ RPT OFF : MP3/WMA/AAC/WAV/FLAC file ONE RPT/ ALL... 6) *4 Only for iPod/ ANDROID. *5 For iPod/ ANDROID: Applicable only when [HEAD MODE]/ [AUTO MODE] is shown. Press repeatedly. Press . You can also install the latest version of the iPod/ iPhone)*1 ANDROID*2 Micro USB 2.0 cable*1 (commercially available) To Reverse / Fast-forward*3 Select a file Select a folder*4 Repeat play*5...
Instruction Manual
Page 11
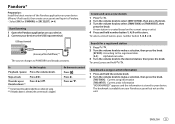
... the volume knob to the desired station, then press the knob. To On the faceplate Playback / pause Press the volume knob. Press . Pandora® Preparation: Install the latest version of the iPod/iPhone)*1 The source changes to PANDORA and broadcast starts. ENGLISH 9 thumbs down*2 *1 Do not leave the cable inside the...
... the volume knob to the desired station, then press the knob. To On the faceplate Playback / pause Press the volume knob. Press . Pandora® Preparation: Install the latest version of the iPod/iPhone)*1 The source changes to PANDORA and broadcast starts. ENGLISH 9 thumbs down*2 *1 Do not leave the cable inside the...
Instruction Manual
Page 12
...faceplate Playback / pause Press the volume knob. Skip a track for live Press 1. Press I. USB input terminal (Accessory of iHeart Link for JVC application on your device (iPhone/ iPod touch), then create an account and log in to iHeartRadio. • Select [ON] for [IHEART]... in alphabetical order. iHeartRadio® Preparation: Install the latest version of the iPod/iPhone)*1 3 Press repeatedly to enter character search. for custom station*2 Create a new/custom station Press and ...
...faceplate Playback / pause Press the volume knob. Skip a track for live Press 1. Press I. USB input terminal (Accessory of iHeart Link for JVC application on your device (iPhone/ iPod touch), then create an account and log in to iHeartRadio. • Select [ON] for [IHEART]... in alphabetical order. iHeartRadio® Preparation: Install the latest version of the iPod/iPhone)*1 3 Press repeatedly to enter character search. for custom station*2 Create a new/custom station Press and ...
Instruction Manual
Page 16
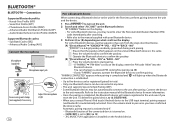
...) - For some Bluetooth devices, you have confirmed the device name. Ensure that the passkey which appears on the unit and Bluetooth device is installed on the Android device. NO" Press the volume knob to start pairing. • If "PAIRING" "PIN 0000" scrolls on the Bluetooth... Supported Bluetooth codecs - "PAIRING COMPLETED" appears when pairing is established. • Up to turn on the unit. 2 Search and select "JVC UNIT" on the display, enter the PIN code "0000" into the Bluetooth device. Automatic pairing request is automatically activated. Refer to the instruction ...
...) - For some Bluetooth devices, you have confirmed the device name. Ensure that the passkey which appears on the unit and Bluetooth device is installed on the Android device. NO" Press the volume knob to start pairing. • If "PAIRING" "PIN 0000" scrolls on the Bluetooth... Supported Bluetooth codecs - "PAIRING COMPLETED" appears when pairing is established. • Up to turn on the unit. 2 Search and select "JVC UNIT" on the display, enter the PIN code "0000" into the Bluetooth device. Automatic pairing request is automatically activated. Refer to the instruction ...
Instruction Manual
Page 27
...Custom station name creation is over. The skip limit has been reached. Make sure you have installed the latest version of Thumbs Up/Down has failed. Registration of the iHeart Link for JVC application on the Android device. Turn off the developer options on the Android device. •...from a country which Pandora is unsuccessful. You try to unit. ( 23) ANDROID Cannot playback at [AUTO MODE]. • Make sure JVC MUSIC PLAY APP is installed on the Android device and start playback. • If in [Account Settings] is selected. Pandora "NO SKIPS" The skip limit has ...
...Custom station name creation is over. The skip limit has been reached. Make sure you have installed the latest version of Thumbs Up/Down has failed. Registration of the iHeart Link for JVC application on the Android device. Turn off the developer options on the Android device. •...from a country which Pandora is unsuccessful. You try to unit. ( 23) ANDROID Cannot playback at [AUTO MODE]. • Make sure JVC MUSIC PLAY APP is installed on the Android device and start playback. • If in [Account Settings] is selected. Pandora "NO SKIPS" The skip limit has ...
Instruction Manual
Page 29
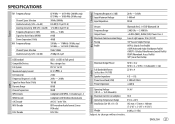
...; 2 500 mV/10 kΩ ≤ 600 Ω Operating Voltage (10.5 V - 16 V allowable) 14.4 V General Maximum Current Consumption 10 A Operating Temperature Range 0°C to +40°C Installation Size (W × H × D) 182 mm × 53 mm × 108 mm (7-3/16" × 2-1/8" × 4-5/16") Weight 0.60 kg (1.4 lbs) Subject to change without notice.
...; 2 500 mV/10 kΩ ≤ 600 Ω Operating Voltage (10.5 V - 16 V allowable) 14.4 V General Maximum Current Consumption 10 A Operating Temperature Range 0°C to +40°C Installation Size (W × H × D) 182 mm × 53 mm × 108 mm (7-3/16" × 2-1/8" × 4-5/16") Weight 0.60 kg (1.4 lbs) Subject to change without notice.
Instruction Manual
Page 30
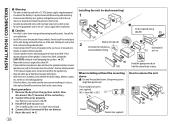
... fuse box which provides 12 V DC power supply and is installed, check whether the brake lamps, blinkers, wipers, etc. See Installing the unit (in-dash mounting). 4 Connect the terminal of the car battery. 5 Reset the unit. ( 3) Installing the unit (in parallel. • Connect speakers with a ...circuit. • Be sure to ground this unit to the car's chassis again after use of the unit. When installing without the mounting sleeve Use only the specified screws. INSTALLATION / CONNECTION Warning • The unit can only be used with a 12 V DC power supply, negative ground. &#...
... fuse box which provides 12 V DC power supply and is installed, check whether the brake lamps, blinkers, wipers, etc. See Installing the unit (in-dash mounting). 4 Connect the terminal of the car battery. 5 Reset the unit. ( 3) Installing the unit (in parallel. • Connect speakers with a ...circuit. • Be sure to ground this unit to the car's chassis again after use of the unit. When installing without the mounting sleeve Use only the specified screws. INSTALLATION / CONNECTION Warning • The unit can only be used with a 12 V DC power supply, negative ground. &#...
Instruction Manual
Page 31
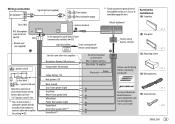
Part list for installation (A) Faceplate Fuse (10 A) Antenna terminal Vehicle dashboard MIC (Microphone input terminal) ( 14) Remote wire (not supplied) Ignition switch Car fuse block Separate red wire Make ... purchased) (D) Wiring harness For more information: Metra Electronics: www.metraonline.com Scosche Industries: www.scosche.com (E) Extraction key ENGLISH 29 For setting, 21. Wiring connection JVC Amplifier*1 Signal cord (not supplied) Front output Rear/subwoofer output *1 Firmly connect the ground wire of the amplifier to the car's chassis to avoid damaging...
Part list for installation (A) Faceplate Fuse (10 A) Antenna terminal Vehicle dashboard MIC (Microphone input terminal) ( 14) Remote wire (not supplied) Ignition switch Car fuse block Separate red wire Make ... purchased) (D) Wiring harness For more information: Metra Electronics: www.metraonline.com Scosche Industries: www.scosche.com (E) Extraction key ENGLISH 29 For setting, 21. Wiring connection JVC Amplifier*1 Signal cord (not supplied) Front output Rear/subwoofer output *1 Firmly connect the ground wire of the amplifier to the car's chassis to avoid damaging...


