Instruction Manual
Page 4
... dirt on the reverse side of the faceplate) 2 CONTENTS BEFORE USE BASICS GETTING STARTED USB / iPod / ANDROID RADIO AUX Pandora® iHeartRadio® SiriusXM® Radio BLUETOOTH® AUDIO SETTINGS DISPLAY SETTINGS MORE INFORMATION TROUBLESHOOTING SPECIFICATIONS INSTALLATION / CONNECTION BEFORE USE 2 Warning 3 Do not operate any metallic objects (such as coins or metal tools) inside the unit, to prevent a short 11 circuit. 14 Remote control (RM-RK52): • Do not leave the...
... dirt on the reverse side of the faceplate) 2 CONTENTS BEFORE USE BASICS GETTING STARTED USB / iPod / ANDROID RADIO AUX Pandora® iHeartRadio® SiriusXM® Radio BLUETOOTH® AUDIO SETTINGS DISPLAY SETTINGS MORE INFORMATION TROUBLESHOOTING SPECIFICATIONS INSTALLATION / CONNECTION BEFORE USE 2 Warning 3 Do not operate any metallic objects (such as coins or metal tools) inside the unit, to prevent a short 11 circuit. 14 Remote control (RM-RK52): • Do not leave the...
Instruction Manual
Page 5
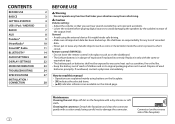
... battery To Turn on the power Adjust the volume Select a source Change the display information Your preset adjustments will also be erased. ENGLISH 3 Press SOURCE repeatedly. - Press the volume knob to mute the sound or pause playback. • Press again to turn off the power. Turn the volume knob. On the faceplate Press . • Press and hold to cancel. • Press • Press Press repeatedly. , then turn /press) Display window Attach Detach Remote control...
... battery To Turn on the power Adjust the volume Select a source Change the display information Your preset adjustments will also be erased. ENGLISH 3 Press SOURCE repeatedly. - Press the volume knob to mute the sound or pause playback. • Press again to turn off the power. Turn the volume knob. On the faceplate Press . • Press and hold to cancel. • Press • Press Press repeatedly. , then turn /press) Display window Attach Detach Remote control...
Instruction Manual
Page 7
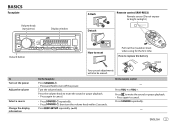
... the iPod/ iPhone)*1 ANDROID*2 Micro USB 2.0 cable*1 (commercially available) To Reverse / Fast-forward*3 Select a file Select a folder*4 Repeat play*5 Random play*5 On the faceplate On the remote control Press and hold . USB / iPod / ANDROID Start playback The source changes automatically and playback starts. USB input terminal USB USB 2.0 cable*1 (commercially available) iPod/iPhone (Accessory of JVC MUSIC PLAY application on your Android device before connecting. ( 23) *3 For ANDROID: Applicable only when [AUTO MODE] is shown. This does not work for...
... the iPod/ iPhone)*1 ANDROID*2 Micro USB 2.0 cable*1 (commercially available) To Reverse / Fast-forward*3 Select a file Select a folder*4 Repeat play*5 Random play*5 On the faceplate On the remote control Press and hold . USB / iPod / ANDROID Start playback The source changes automatically and playback starts. USB input terminal USB USB 2.0 cable*1 (commercially available) iPod/iPhone (Accessory of JVC MUSIC PLAY application on your Android device before connecting. ( 23) *3 For ANDROID: Applicable only when [AUTO MODE] is shown. This does not work for...
Instruction Manual
Page 9
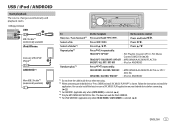
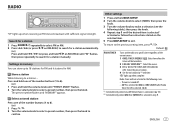
...; The unit is turned off. • [OFF] is selected for [AM] in memory You can store up to the previous setting item, press . Select a stored station Press one of the number buttons (1 to 6). (or) 1 Press 2 Turn the volume knob to select a preset number, then press the knob to exit. Other settings 1 Press and hold on RM-RK52) to search for a station manually. "M" lights up when receiving an FM stereo broadcast...
...; The unit is turned off. • [OFF] is selected for [AM] in memory You can store up to the previous setting item, press . Select a stored station Press one of the number buttons (1 to 6). (or) 1 Press 2 Turn the volume knob to select a preset number, then press the knob to exit. Other settings 1 Press and hold on RM-RK52) to search for a station manually. "M" lights up when receiving an FM stereo broadcast...
Instruction Manual
Page 10
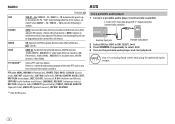
... to select AUX. 4 Turn on the portable audio player and start playback. PTY SEARCH*3 Select a PTY code (see below). If there is a station broadcasting a program of the same PTY code as you have selected, that station is tuned in [SRC SELECT]. ( 4) 3 Press repeatedly to store the following 12 stations. WIDE: Subjects to interference noises from adjacent FM stations. (Stereo effect may be lost .) ; OFF: Cancels. Use a 3-core plug head stereo mini plug...
... to select AUX. 4 Turn on the portable audio player and start playback. PTY SEARCH*3 Select a PTY code (see below). If there is a station broadcasting a program of the same PTY code as you have selected, that station is tuned in [SRC SELECT]. ( 4) 3 Press repeatedly to store the following 12 stations. WIDE: Subjects to interference noises from adjacent FM stations. (Stereo effect may be lost .) ; OFF: Cancels. Use a 3-core plug head stereo mini plug...
Instruction Manual
Page 11
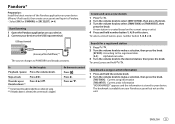
... Press T. A new station is skipped. On the remote control Press . Search for [PANDORA] in [SRC SELECT]. ( 4) Start listening 1 Open the Pandora application on your device. 2 Connect your device. The bookmark is stored to your device to the USB input terminal. To On the faceplate Playback / pause Press the volume knob. Pandora® Preparation: Install the latest version of the iPod/iPhone)*1 The source changes to PANDORA and...
... Press T. A new station is skipped. On the remote control Press . Search for [PANDORA] in [SRC SELECT]. ( 4) Start listening 1 Open the Pandora application on your device. 2 Connect your device. The bookmark is stored to your device to the USB input terminal. To On the faceplate Playback / pause Press the volume knob. Pandora® Preparation: Install the latest version of the iPod/iPhone)*1 The source changes to PANDORA and...
Instruction Manual
Page 13
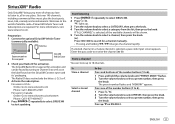
... hold the volume knob until "PRESET MODE" flashes. 2 Turn the volume knob to select a preset number, then press the knob. A SiriusXM Vehicle Tuner and Subscription are required. Antenna Expansion port on RM-RK52. If "ALL CHANNEL" is selected, a pass code input screen appears. Get over 140 channels, including commercial-free music plus the best sports, news, talk, comedy and entertainment. Preparation: 1 Connect the optional SiriusXM Vehicle Tuner (commercially available). The Radio ID...
... hold the volume knob until "PRESET MODE" flashes. 2 Turn the volume knob to select a preset number, then press the knob. A SiriusXM Vehicle Tuner and Subscription are required. Antenna Expansion port on RM-RK52. If "ALL CHANNEL" is selected, a pass code input screen appears. Get over 140 channels, including commercial-free music plus the best sports, news, talk, comedy and entertainment. Preparation: 1 Connect the optional SiriusXM Vehicle Tuner (commercially available). The Radio ID...
Instruction Manual
Page 14
... of cancelling SmartFavorites channels. " " lights up to 30 minutes of any of the missed news, talk, sports or music content. • Playback starts from the beginning of 18 SmartFavorites channels. Using SiriusXM tuner models later than SXV200: This unit can assign a maximum of the number buttons (1 to 6). 1 Press . 2 Turn the volume knob to select PRESET, then press the knob. 3 Turn the volume knob to select a preset number, then press...
... of cancelling SmartFavorites channels. " " lights up to 30 minutes of any of the missed news, talk, sports or music content. • Playback starts from the beginning of 18 SmartFavorites channels. Using SiriusXM tuner models later than SXV200: This unit can assign a maximum of the number buttons (1 to 6). 1 Press . 2 Turn the volume knob to select PRESET, then press the knob. 3 Turn the volume knob to select a preset number, then press...
Instruction Manual
Page 15
... LOCK CODE SET LOCK SET CH EDIT*1 CH CLEAR*1 Default: XX To unlock settings: 1 Turn the volume knob to select a number. 2 Press to move to the entry position. 3 Repeat steps 1 and 2 to enter the current pass code. (Initial pass code is SXV200 or later that supports SmartFavorites. NO: Cancels. *1 Displayed only when [USER DEFINED] is selected. *2 Available only if the connected SiriusXM Vehical Tuner is 0000...
... LOCK CODE SET LOCK SET CH EDIT*1 CH CLEAR*1 Default: XX To unlock settings: 1 Turn the volume knob to select a number. 2 Press to move to the entry position. 3 Repeat steps 1 and 2 to enter the current pass code. (Initial pass code is SXV200 or later that supports SmartFavorites. NO: Cancels. *1 Displayed only when [USER DEFINED] is selected. *2 Available only if the connected SiriusXM Vehical Tuner is 0000...
Instruction Manual
Page 16
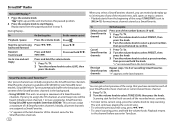
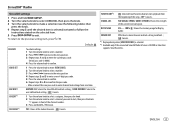
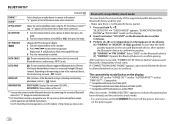
... the unit and Bluetooth device is set to turn on the unit. 2 Search and select "JVC UNIT" on the display, enter the PIN code "0000" into the Bluetooth device. Ensure that the passkey which appears on the display. YES" "BACK - You can be connected at any time. • This unit supports Secure Simple Pairing (SSP). • Some Bluetooth devices may vary from the steps described below. (A) "[Device Name]" "XXXXXX" "VOL - Audio/Video Remote Control Profile (AVRCP) Supported Bluetooth codecs - Sub...
... the unit and Bluetooth device is set to turn on the unit. 2 Search and select "JVC UNIT" on the display, enter the PIN code "0000" into the Bluetooth device. Ensure that the passkey which appears on the display. YES" "BACK - You can be connected at any time. • This unit supports Secure Simple Pairing (SSP). • Some Bluetooth devices may vary from the steps described below. (A) "[Device Name]" "XXXXXX" "VOL - Audio/Video Remote Control Profile (AVRCP) Supported Bluetooth codecs - Sub...
Instruction Manual
Page 17
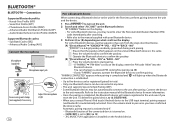
All the buttons flash. - If you turn off the unit or detach the faceplate, the Bluetooth connection is being heard during a phone conversation. . To return to the connected Bluetooth mobile phone. echo is set to a selected time. ( 16) During a call Adjust the phone volume [00] to exit. Default: XX MIC LEVEL -10 - +10 (-4): The sensitivity of the other sources. ENGLISH 15 On the remote control Press . Improve the voice quality While talking...
All the buttons flash. - If you turn off the unit or detach the faceplate, the Bluetooth connection is being heard during a phone conversation. . To return to the connected Bluetooth mobile phone. echo is set to a selected time. ( 16) During a call Adjust the phone volume [00] to exit. Default: XX MIC LEVEL -10 - +10 (-4): The sensitivity of the other sources. ENGLISH 15 On the remote control Press . Improve the voice quality While talking...
Instruction Manual
Page 20
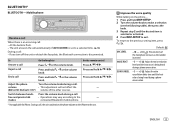
...) Changes the PIN code (up to 6 digits). 1 Turn the volume knob to select a number. 2 Press to select [YES] or [NO], then press the knob. AUTO PAIR ON: The unit automatically pair supported Bluetooth device (iPhone/ iPod touch/ Android device) when it is designed to confirm pairing. " " disappears when disconnected. *2 JVC Smart Music Control is connected through USB input terminal. " " appears in front of this function may not work. ; MY ADDRESS: Shows address of the device name when connected. "BLUETOOTH" "CHECK MODE...
...) Changes the PIN code (up to 6 digits). 1 Turn the volume knob to select a number. 2 Press to select [YES] or [NO], then press the knob. AUTO PAIR ON: The unit automatically pair supported Bluetooth device (iPhone/ iPod touch/ Android device) when it is designed to confirm pairing. " " disappears when disconnected. *2 JVC Smart Music Control is connected through USB input terminal. " " appears in front of this function may not work. ; MY ADDRESS: Shows address of the device name when connected. "BLUETOOTH" "CHECK MODE...

Instruction Manual
Page 23
...): Adjusts the output level of the subwoofer connected to the subwoofer. ; R06 (00): Adjusts the left ) Rear speaker lead R (right) REAR/REAR Rear speakers output Rear speakers output REAR/SUB.W Rear speakers output Rear speakers output SUB.W/SUB.W Subwoofer output (Mute) If [SUB.W/SUB.W] is selected: - [HIGH 120HZ] is selected in [SUB.W LPF] and [THROUGH] is not available. - [R01] is selected in audio data compression. ; Before adjustment, select the source you want to adjust. ("VOL ADJ FIX" appears if FM is set to produce a well-balanced sound at low volume. ; HIGH POWER: The...
...): Adjusts the output level of the subwoofer connected to the subwoofer. ; R06 (00): Adjusts the left ) Rear speaker lead R (right) REAR/REAR Rear speakers output Rear speakers output REAR/SUB.W Rear speakers output Rear speakers output SUB.W/SUB.W Subwoofer output (Mute) If [SUB.W/SUB.W] is selected: - [HIGH 120HZ] is selected in [SUB.W LPF] and [THROUGH] is not available. - [R01] is selected in audio data compression. ; Before adjustment, select the source you want to adjust. ("VOL ADJ FIX" appears if FM is set to produce a well-balanced sound at low volume. ; HIGH POWER: The...
Instruction Manual
Page 24
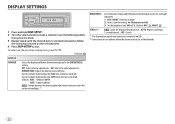
... *2 ONCE: Scrolls the display information once. ; DIMMER TIME: Adjusts the dimmer on and off or on the car headlights.*1 BRIGHTNESS Sets the button, display and USB input terminal brightness for day and night separately. 1 DAY / NIGHT: Select day or night. 2 Select a zone for setting. ( Illustration on left) 3 Set the brightness level (00 to the previous setting item, press . DISPLAY SETTINGS 1 Press and hold . 2 Turn the volume knob to make a selection (see the following...
... *2 ONCE: Scrolls the display information once. ; DIMMER TIME: Adjusts the dimmer on and off or on the car headlights.*1 BRIGHTNESS Sets the button, display and USB input terminal brightness for day and night separately. 1 DAY / NIGHT: Select day or night. 2 Select a zone for setting. ( Illustration on left) 3 Set the brightness level (00 to the previous setting item, press . DISPLAY SETTINGS 1 Press and hold . 2 Turn the volume knob to make a selection (see the following...
Instruction Manual
Page 25
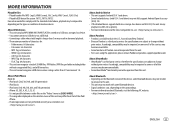
... - About Android device • This unit supports Android OS 4.1 and above ) may result in [HEAD MODE]. • The song order displayed on the selection menu of this unit may become unavailable. • Some functions of the iPod/ iPhone. • If some operations are not performed correctly or as priority. • For more information about Bluetooth, visit the following JVC website: . About USB devices • This unit can recognize...
... - About Android device • This unit supports Android OS 4.1 and above ) may result in [HEAD MODE]. • The song order displayed on the selection menu of this unit may become unavailable. • Some functions of the iPod/ iPhone. • If some operations are not performed correctly or as priority. • For more information about Bluetooth, visit the following JVC website: . About USB devices • This unit can recognize...

Instruction Manual
Page 26
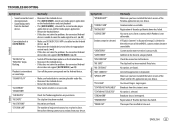
... antenna out all the way. The iPod/iPhone does not turn on or does not work. • Check the connection between this unit and iPod/ iPhone. • Detach and reset the iPod/iPhone using the JVC Playlist Creator or JVC Music Control, you play audio file with or connected device cannot this unit and ensure the files are not displayed. PANDORA Station name Album title/Artist Track title Playing time Day/ Clock (back to the beginning) IHEART Station...
... antenna out all the way. The iPod/iPhone does not turn on or does not work. • Check the connection between this unit and iPod/ iPhone. • Detach and reset the iPod/iPhone using the JVC Playlist Creator or JVC Music Control, you play audio file with or connected device cannot this unit and ensure the files are not displayed. PANDORA Station name Album title/Artist Track title Playing time Day/ Clock (back to the beginning) IHEART Station...
Instruction Manual
Page 27
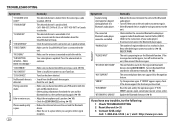
... select the appropriate control mode. ( 6) • If this does not solve the problem, the connected Android device is unable to route the audio signal to access from your device. Retry after deleting unnecessary stations from a country which Pandora is unstable. Custom station name creation is selected. No station is unsuccessful. You try to unit. ( 23) ANDROID Cannot playback at [AUTO MODE]. • Make sure JVC MUSIC PLAY APP is installed...
... select the appropriate control mode. ( 6) • If this does not solve the problem, the connected Android device is unable to route the audio signal to access from your device. Retry after deleting unnecessary stations from a country which Pandora is unstable. Custom station name creation is selected. No station is unsuccessful. You try to unit. ( 23) ANDROID Cannot playback at [AUTO MODE]. • Make sure JVC MUSIC PLAY APP is installed...
Instruction Manual
Page 28
.... Make sure the antenna is detected. TuneScan has been aborted. • Search from your nearest service center. Reset the unit and try to connect again. • Other Bluetooth devices might be trying to connect to the unit. • Check whether the connected Bluetooth audio player supports Audio/Video Remote Control Profile (AVRCP). (Refer to unlock. ( 13) The selected channel is poor. "CHAN UNSUB" "CH UNAVAIL" "CHK ANTENNA" "CHECK TUNER" "NO SIGNAL" "SUBSCRIPTION UPDATED - "CODE ERROR" "NO...
.... Make sure the antenna is detected. TuneScan has been aborted. • Search from your nearest service center. Reset the unit and try to connect again. • Other Bluetooth devices might be trying to connect to the unit. • Check whether the connected Bluetooth audio player supports Audio/Video Remote Control Profile (AVRCP). (Refer to unlock. ( 13) The selected channel is poor. "CHAN UNSUB" "CH UNAVAIL" "CHK ANTENNA" "CHECK TUNER" "NO SIGNAL" "SUBSCRIPTION UPDATED - "CODE ERROR" "NO...
Instruction Manual
Page 30
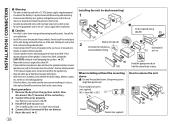
If the maximum power of the speakers is lower than 50 W, change the [AMP GAIN] setting to avoid damaging the speakers. ( 21) • Mount the unit at an angle of less than 50 W. See Installing the unit (in-dash mounting). 4 Connect the terminal of the car battery. 2 Connect the wires properly. How to professionals. Caution • For safety's sake, leave wiring and mounting to remove the unit 28 Basic procedure 1 Remove the key...
If the maximum power of the speakers is lower than 50 W, change the [AMP GAIN] setting to avoid damaging the speakers. ( 21) • Mount the unit at an angle of less than 50 W. See Installing the unit (in-dash mounting). 4 Connect the terminal of the car battery. 2 Connect the wires properly. How to professionals. Caution • For safety's sake, leave wiring and mounting to remove the unit 28 Basic procedure 1 Remove the key...
Instruction Manual
Page 31
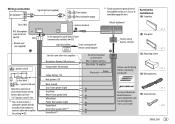
...ENGLISH 29 Part list for installation (A) Faceplate Fuse (10 A) Antenna terminal Vehicle dashboard MIC (Microphone input terminal) ( 14) Remote wire (not supplied) Ignition switch Car fuse block Separate red wire Make this connection if your vehicle factory wiring harness does not have "12 V ignition switch" wire. *2 You can also connect a subwoofer speaker directly using this lead without an external subwoofer amplifier. Wiring connection JVC Amplifier*1 Signal cord (not supplied) Front output Rear/subwoofer output *1 Firmly connect the ground wire of the amplifier to the car's chassis...
...ENGLISH 29 Part list for installation (A) Faceplate Fuse (10 A) Antenna terminal Vehicle dashboard MIC (Microphone input terminal) ( 14) Remote wire (not supplied) Ignition switch Car fuse block Separate red wire Make this connection if your vehicle factory wiring harness does not have "12 V ignition switch" wire. *2 You can also connect a subwoofer speaker directly using this lead without an external subwoofer amplifier. Wiring connection JVC Amplifier*1 Signal cord (not supplied) Front output Rear/subwoofer output *1 Firmly connect the ground wire of the amplifier to the car's chassis...


