Instruction Manual
Page 2
... autorizada para que a mesma seja devolvida ao fabricante ou importador. special handling may generate or use in a particular installation. CALIFORNIA, USA ONLY This product contains a CR Coin Cell Lithium Battery which can be used in the instruction manual. Changes or modifications to radio communications, if it is connected. • Consult the dealer or an experienced radio/TV technician for a Class B digital device...
... autorizada para que a mesma seja devolvida ao fabricante ou importador. special handling may generate or use in a particular installation. CALIFORNIA, USA ONLY This product contains a CR Coin Cell Lithium Battery which can be used in the instruction manual. Changes or modifications to radio communications, if it is connected. • Consult the dealer or an experienced radio/TV technician for a Class B digital device...
Instruction Manual
Page 4
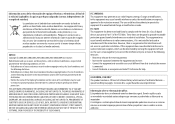
... bear no responsibility for KD-X31MBS) BLUETOOTH® AUDIO SETTINGS DISPLAY SETTINGS MORE INFORMATION TROUBLESHOOTING SPECIFICATIONS INSTALLATION / CONNECTION BEFORE USE 2 Warning Do not operate any metallic objects (such as coins or metal tools) inside the unit, to prevent a short circuit. Dispose of explosion if replaced incorrectly. Remote control (RM-RK52): 11 • Do not leave the remote control in danger of used . CONTENTS BEFORE USE BASICS GETTING STARTED USB / iPod RADIO AUX Pandora® iHeartRadio...
... bear no responsibility for KD-X31MBS) BLUETOOTH® AUDIO SETTINGS DISPLAY SETTINGS MORE INFORMATION TROUBLESHOOTING SPECIFICATIONS INSTALLATION / CONNECTION BEFORE USE 2 Warning Do not operate any metallic objects (such as coins or metal tools) inside the unit, to prevent a short circuit. Dispose of explosion if replaced incorrectly. Remote control (RM-RK52): 11 • Do not leave the remote control in danger of used . CONTENTS BEFORE USE BASICS GETTING STARTED USB / iPod RADIO AUX Pandora® iHeartRadio...
Instruction Manual
Page 5
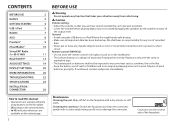
... reset Pull out the insulation sheet when using for the first time. How to turn off the power. Do this (on the power Adjust the volume Select a source Change the display information Your preset adjustments will also be erased. Press DISP repeatedly. ( 21) • Press and hold to replace the battery To Turn on the remote control) ( not available ) Press VOL + or VOL -. Press SOURCE repeatedly. ( not available ) ENGLISH | 3 BASICS Faceplate Volume...
... reset Pull out the insulation sheet when using for the first time. How to turn off the power. Do this (on the power Adjust the volume Select a source Change the display information Your preset adjustments will also be erased. Press DISP repeatedly. ( 21) • Press and hold to replace the battery To Turn on the remote control) ( not available ) Press VOL + or VOL -. Press SOURCE repeatedly. ( not available ) ENGLISH | 3 BASICS Faceplate Volume...
Instruction Manual
Page 9
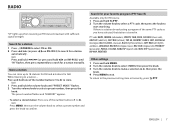
... (Spanish talk), MUSC ESP (Spanish music), HIP HOP, WEATHER Other settings 1 Press and hold H/I on RM-RK52) until "PRESET MODE" flashes. 2 Turn the volume knob to select a preset number, then press the knob. RADIO "ST" lights up to 18 stations for FM and 6 stations for a station manually. If there is a station broadcasting a program of the number buttons (1 to 6). (or) Press MENU, then turn the volume knob to select a preset number and press the knob to confirm.
... (Spanish talk), MUSC ESP (Spanish music), HIP HOP, WEATHER Other settings 1 Press and hold H/I on RM-RK52) until "PRESET MODE" flashes. 2 Turn the volume knob to select a preset number, then press the knob. RADIO "ST" lights up to 18 stations for FM and 6 stations for a station manually. If there is a station broadcasting a program of the number buttons (1 to 6). (or) Press MENU, then turn the volume knob to select a preset number and press the knob to confirm.
Instruction Manual
Page 10
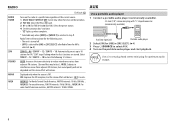
... / SSM 13 - 18: Automatically presets up when complete. * Selectable only when [ONCE] or [WEEKLY] is FM. Use a portable audio player 1 Connect a portable audio player (commercially available). 3.5 mm (1/8") stereo mini plug with "L" shaped connector (commercially available) Auxiliary input jack Portable audio player 2 Select [ON] for [AUX] in step 1. Displayed only when the source is selected in [SRC SELECT]. ( 4) 3 Press B/SOURCE to reduce interference noises from adjacent FM stations, but the stereo effect will remain. AREA...
... / SSM 13 - 18: Automatically presets up when complete. * Selectable only when [ONCE] or [WEEKLY] is FM. Use a portable audio player 1 Connect a portable audio player (commercially available). 3.5 mm (1/8") stereo mini plug with "L" shaped connector (commercially available) Auxiliary input jack Portable audio player 2 Select [ON] for [AUX] in step 1. Displayed only when the source is selected in [SRC SELECT]. ( 4) 3 Press B/SOURCE to reduce interference noises from adjacent FM stations, but the stereo effect will remain. AREA...

Instruction Manual
Page 11
... device. 2 Connect your device. Pandora® Preparation: Install the latest version of the iPod/iPhone)* The source changes to PANDORA and broadcast starts. * Do not leave the cable inside the car when not using. Skip a track Press T (or press I on the current song or artist. A new station is skipped. Bookmark a song or artist information 1 Press and hold the volume knob. 2 Turn the volume knob to select...
... device. 2 Connect your device. Pandora® Preparation: Install the latest version of the iPod/iPhone)* The source changes to PANDORA and broadcast starts. * Do not leave the cable inside the car when not using. Skip a track Press T (or press I on the current song or artist. A new station is skipped. Bookmark a song or artist information 1 Press and hold the volume knob. 2 Turn the volume knob to select...
Instruction Manual
Page 13
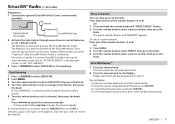
...-438-9677. 3 Press B/SOURCE to select SIRIUS XM to select a preset number, then press the knob. Start listening 1 Press B/SOURCE to select SIRIUS XM. 2 Press MENU. 3 Turn the volume knob to select a CATEGORY, then press the knob. 4 Turn the volume knob to search for KD-X31MBS) Preparation: 1 Connect the optional SiriusXM Vehicle Tuner (commercially available). For users in Canada: To activate SiriusXM Canada service go to 18 channels. To select a stored channel: Press one of...
...-438-9677. 3 Press B/SOURCE to select SIRIUS XM to select a preset number, then press the knob. Start listening 1 Press B/SOURCE to select SIRIUS XM. 2 Press MENU. 3 Turn the volume knob to select a CATEGORY, then press the knob. 4 Turn the volume knob to search for KD-X31MBS) Preparation: 1 Connect the optional SiriusXM Vehicle Tuner (commercially available). For users in Canada: To activate SiriusXM Canada service go to 18 channels. To select a stored channel: Press one of...
Instruction Manual
Page 14
... to 3. SiriusXM® Radio Default: XX There are two types of lock functions available: • SiriusXM-defined: When [MATURE CH] is set to [ON] • User-defined: Using [CHANNEL EDIT] when [MATURE CH] is set to [OFF] CH LOCK CODE SET CH EDIT * CH CLEAR* MATURE CH SIGNAL LVL BUF USAGE SXM RESET To unlock settings: 1 Turn the volume knob to select a number. 2 Press S/ T to...
... to 3. SiriusXM® Radio Default: XX There are two types of lock functions available: • SiriusXM-defined: When [MATURE CH] is set to [ON] • User-defined: Using [CHANNEL EDIT] when [MATURE CH] is set to [OFF] CH LOCK CODE SET CH EDIT * CH CLEAR* MATURE CH SIGNAL LVL BUF USAGE SXM RESET To unlock settings: 1 Turn the volume knob to select a number. 2 Press S/ T to...
Instruction Manual
Page 15
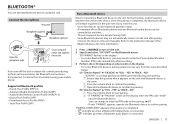
... volume knob to the unit manually. If you may need to enter the Personal Identification Number (PIN) code immediately after pairing. You can operate Bluetooth devices using this unit. Connect the microphone Rear panel Microphone (supplied) Microphone input jack Adjust the microphone angle Secure using your mobile phone. Press the volume knob to confirm the passkey. (B) "[Device Name]" "VOL - Operate the Bluetooth device to confirm the passkey. "BT PAIRING" flashes on the unit and Bluetooth device is connected. Continue the conversation using cord...
... volume knob to the unit manually. If you may need to enter the Personal Identification Number (PIN) code immediately after pairing. You can operate Bluetooth devices using this unit. Connect the microphone Rear panel Microphone (supplied) Microphone input jack Adjust the microphone angle Secure using your mobile phone. Press the volume knob to confirm the passkey. (B) "[Device Name]" "VOL - Operate the Bluetooth device to confirm the passkey. "BT PAIRING" flashes on the unit and Bluetooth device is connected. Continue the conversation using cord...
Instruction Manual
Page 16
... J/K/H/I. • When [AUTO ANSWER] is set to indicate that the same passkey appears on the unit and Bluetooth device, then operate the Bluetooth device to the connected Bluetooth mobile phone. Turn the volume knob during a call automatically. ( 16) Press and hold . BLUETOOTH® Bluetooth compatibility check mode You can check the connectivity of the other sources. "SEARCH NOW USING PHONE" "PIN IS 0000" scrolls on the display. 2 Search and select "JVC UNIT" on the Bluetooth device within 3 minutes...
... J/K/H/I. • When [AUTO ANSWER] is set to indicate that the same passkey appears on the unit and Bluetooth device, then operate the Bluetooth device to the connected Bluetooth mobile phone. Turn the volume knob during a call automatically. ( 16) Press and hold . BLUETOOTH® Bluetooth compatibility check mode You can check the connectivity of the other sources. "SEARCH NOW USING PHONE" "PIN IS 0000" scrolls on the display. 2 Search and select "JVC UNIT" on the Bluetooth device within 3 minutes...

Instruction Manual
Page 17
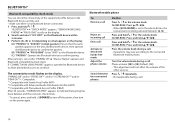
... a phone number. • ">" indicates call While talking on the phone.... 1 Press and hold MENU. 2 Turn the volume knob to make a selection (see the following table), then press the knob. 3 Press MENU to exit. Default: XX MIC LEVEL -20 - +08 (0): The sensitivity of the microphone increases as the number increased. BLUETOOTH® Improve the sound quality during a call received, " NOISE RDCT -05 - -20 (-10): Adjust the...
... a phone number. • ">" indicates call While talking on the phone.... 1 Press and hold MENU. 2 Turn the volume knob to make a selection (see the following table), then press the knob. 3 Press MENU to exit. Default: XX MIC LEVEL -20 - +08 (0): The sensitivity of the microphone increases as the number increased. BLUETOOTH® Improve the sound quality during a call received, " NOISE RDCT -05 - -20 (-10): Adjust the...
Instruction Manual
Page 19
... phone number in step 3 is stored. Bluetooth mode settings 1 Press and hold one of the device name set as priority device. To return to connect or disconnect. Default: XX PHONE AUDIO Selects the phone or audio device to the previous setting item or hierarchy, press G PTY. APPLICATION Shows the connected phone name using the JVC Smart Music Control*1 app. DELETE PAIR 1 Turn the volume knob to select a device to delete, then press the knob. 2 Turn the volume knob to view JVC car receiver...
... phone number in step 3 is stored. Bluetooth mode settings 1 Press and hold one of the device name set as priority device. To return to connect or disconnect. Default: XX PHONE AUDIO Selects the phone or audio device to the previous setting item or hierarchy, press G PTY. APPLICATION Shows the connected phone name using the JVC Smart Music Control*1 app. DELETE PAIR 1 Turn the volume knob to select a device to delete, then press the knob. 2 Turn the volume knob to view JVC car receiver...
Instruction Manual
Page 20
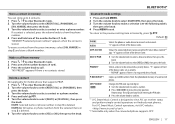
... Bluetooth audio player. ( 13) 3 Press B/SOURCE to select IHEARTRADIO. Internet radio via Bluetooth connection. ( 13) 3 Press B/SOURCE to select PANDORA. The source switches and broadcast starts automatically. • You can operate iHeartRadio in [SRC SELECT]. ( 4) You can listen to iHeartRadio on the connected device. To Do this unit. 1 Open the Pandora application on your smart phone (Android OS) through Bluetooth on RM-RK52). YES: Initializes all the Bluetooth settings (including stored pairing...
... Bluetooth audio player. ( 13) 3 Press B/SOURCE to select IHEARTRADIO. Internet radio via Bluetooth connection. ( 13) 3 Press B/SOURCE to select PANDORA. The source switches and broadcast starts automatically. • You can operate iHeartRadio in [SRC SELECT]. ( 4) You can listen to iHeartRadio on the connected device. To Do this unit. 1 Open the Pandora application on your smart phone (Android OS) through Bluetooth on RM-RK52). YES: Initializes all the Bluetooth settings (including stored pairing...

Instruction Manual
Page 21
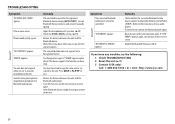
... POWER: Limits the maximum volume level to the FM volume level). ENGLISH | 19 AUDIO SETTINGS 1 Press and hold MENU. 2 Turn the volume knob to +06 (00) Q: Q FIX (Q FIX) AUDIO BASS BOOST +01 / +02: Selects your own sound settings. SUB.W *2 ON / OFF: Turns on the rear panel (through an external amplifier). *1 Displayed only when [L/O MODE] is set to [SUB.W] and [SUB.W] is set to [ON]. *2 Displayed only when [L/O MODE] is set the fader level to exit. F06 (00): Adjusts the front and rear speaker output balance...
... POWER: Limits the maximum volume level to the FM volume level). ENGLISH | 19 AUDIO SETTINGS 1 Press and hold MENU. 2 Turn the volume knob to +06 (00) Q: Q FIX (Q FIX) AUDIO BASS BOOST +01 / +02: Selects your own sound settings. SUB.W *2 ON / OFF: Turns on the rear panel (through an external amplifier). *1 Displayed only when [L/O MODE] is set to [SUB.W] and [SUB.W] is set to [ON]. *2 Displayed only when [L/O MODE] is set the fader level to exit. F06 (00): Adjusts the front and rear speaker output balance...
Instruction Manual
Page 22
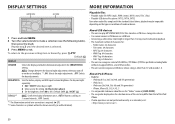
... folder without unsupported files), and of this unit may be blanked). Default: XX DISPLAY DIMMER Selects the display and button illumination adjusted in [HEAD MODE]. • The song order displayed on the car headlights.*1 ; BRIGHTNESS Sets the button, display and USB input terminal brightness for day and night separately. 1 DAY / NIGHT: Select day or night. 2 Select a zone for - OFF: Cancels. *1 The illumination control wire connection is longer than 5 V and exceeds 1 A. Repeat...
... folder without unsupported files), and of this unit may be blanked). Default: XX DISPLAY DIMMER Selects the display and button illumination adjusted in [HEAD MODE]. • The song order displayed on the car headlights.*1 ; BRIGHTNESS Sets the button, display and USB input terminal brightness for day and night separately. 1 DAY / NIGHT: Select day or night. 2 Select a zone for - OFF: Cancels. *1 The illumination control wire connection is longer than 5 V and exceeds 1 A. Repeat...
Instruction Manual
Page 24
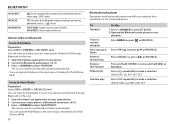
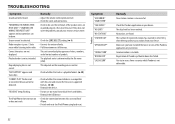
... format. ( 20) "CANNOT PLAY" flashes and/ or connected device cannot be selected. "MISWIRING CHK WIRING THEN RESET UNIT" / "WARNING CHK WIRING THEN RESET UNIT" appears and no operations can only display uppercase letters, numbers, and a limited number of symbols. No stations are not displayed. Source cannot be detected. • Check whether the connected device is determined by the file name (USB). Correct characters are found. Check the [SRC SELECT] setting. ( 4) Radio reception is not...
... format. ( 20) "CANNOT PLAY" flashes and/ or connected device cannot be selected. "MISWIRING CHK WIRING THEN RESET UNIT" / "WARNING CHK WIRING THEN RESET UNIT" appears and no operations can only display uppercase letters, numbers, and a limited number of symbols. No stations are not displayed. Source cannot be detected. • Check whether the connected device is determined by the file name (USB). Correct characters are found. Check the [SRC SELECT] setting. ( 4) Radio reception is not...
Instruction Manual
Page 25
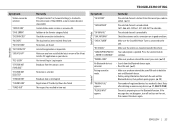
... pass code. ( 12) No Bluetooth device is checked in time-out. You haven't log in again. Broadcast from the station is updated. "CHECK TUNER" Make sure the SiriusXM Vehicle Tuner is impossible. The unit is preparing to the application is connected to the favorite category failed. Link to use the Bluetooth function. SiriusXM® Radio "CH UNAVAIL" The selected channel is unsuccessful. The number of iHeartRADIO, custom stations become...
... pass code. ( 12) No Bluetooth device is checked in time-out. You haven't log in again. Broadcast from the station is updated. "CHECK TUNER" Make sure the SiriusXM Vehicle Tuner is impossible. The unit is preparing to the application is connected to the favorite category failed. Link to use the Bluetooth function. SiriusXM® Radio "CH UNAVAIL" The selected channel is unsuccessful. The number of iHeartRADIO, custom stations become...
Instruction Manual
Page 26
... be controlled. If "H/W ERROR" appears again, consult your audio player.) • Disconnect and connect the Bluetooth player again. Reset the unit and try the following: 1 Check TROUBLESHOOTING 2 Reset the unit ( 3) 3 Contact (USA only) Call: 1-800-252-5722 ( or ) visit: http://www.jvc.com 24 Update the Bluetooth firmware. ( 4) If you try to the unit. Sound is poor. "BT ERROR PLS UPDATE" appears. You may have any troubles, try the operation again. "NOT SUPPORT...
... be controlled. If "H/W ERROR" appears again, consult your audio player.) • Disconnect and connect the Bluetooth player again. Reset the unit and try the following: 1 Check TROUBLESHOOTING 2 Reset the unit ( 3) 3 Contact (USA only) Call: 1-800-252-5722 ( or ) visit: http://www.jvc.com 24 Update the Bluetooth firmware. ( 4) If you try to the unit. Sound is poor. "BT ERROR PLS UPDATE" appears. You may have any troubles, try the operation again. "NOT SUPPORT...

Instruction Manual
Page 28
... round head screws (not supplied) M5 × 8 mm (M5 × 3/8") How to professionals. Do not touch the metal parts of this unit to the car's chassis again after use of the car battery. 2 Connect the wires properly. Consult the car audio dealer. • Install this unit in -dash mounting) Hook on the car are working properly. • If the fuse blows, first make sure the wires are not touching car's chassis, then replace...
... round head screws (not supplied) M5 × 8 mm (M5 × 3/8") How to professionals. Do not touch the metal parts of this unit to the car's chassis again after use of the car battery. 2 Connect the wires properly. Consult the car audio dealer. • Install this unit in -dash mounting) Hook on the car are working properly. • If the fuse blows, first make sure the wires are not touching car's chassis, then replace...

Instruction Manual
Page 29
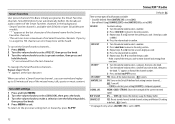
... connection JVC Amplifier Signal cord (not supplied) Fuse (10 A) KD-X310BT Front output Rear/subwoofer output KD-X31MBS Rear/subwoofer output Antenna terminal Vehicle dashboard Part list for installation (A) Faceplate Microphone input jack ( 13) Remote wire (not supplied) Ignition switch Car fuse block Separate red wire Make this connection if your vehicle factory wiring harness does not have "12 V ignition switch" wire. (For KD-X31MBS) To the optional SiriusXM Vehicle Tuner (commercially available) ( 11) Light blue/yellow (For KD-X31MBS) STEERING WHEEL REMOTE Join the same color...
... connection JVC Amplifier Signal cord (not supplied) Fuse (10 A) KD-X310BT Front output Rear/subwoofer output KD-X31MBS Rear/subwoofer output Antenna terminal Vehicle dashboard Part list for installation (A) Faceplate Microphone input jack ( 13) Remote wire (not supplied) Ignition switch Car fuse block Separate red wire Make this connection if your vehicle factory wiring harness does not have "12 V ignition switch" wire. (For KD-X31MBS) To the optional SiriusXM Vehicle Tuner (commercially available) ( 11) Light blue/yellow (For KD-X31MBS) STEERING WHEEL REMOTE Join the same color...


