Instruction Manual
Page 24
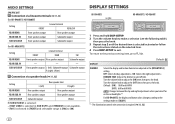
... and off time. OFF: Selects the day adjustments. ; DIMMER TIME: Adjusts the dimmer on [COLOR]. *1 The illumination control wire connection is selected/activated or follow the instructions stated on the selected item. 4 Press to make a selection (see the following table..., 32) Setting L (left ): Subwoofer output Subwoofer output R (right): (Mute) Connection via lineout terminals ( 31, 32) (For KD-R960BTS / KD-R860BT) Setting FRONT Lineout terminal REAR/SW REAR/REAR Front speakers output Rear speakers output REAR/SUB.W Front speakers output Subwoofer output SUB.W/SUB.W...
... and off time. OFF: Selects the day adjustments. ; DIMMER TIME: Adjusts the dimmer on [COLOR]. *1 The illumination control wire connection is selected/activated or follow the instructions stated on the selected item. 4 Press to make a selection (see the following table..., 32) Setting L (left ): Subwoofer output Subwoofer output R (right): (Mute) Connection via lineout terminals ( 31, 32) (For KD-R960BTS / KD-R860BT) Setting FRONT Lineout terminal REAR/SW REAR/REAR Front speakers output Rear speakers output REAR/SUB.W Front speakers output Subwoofer output SUB.W/SUB.W...
Instruction Manual
Page 28
... MODE]. ( 24) "NO DEVICE" or "READING" • Switch off , then check to unit. ( 24) Cannot playback at [AUTO • Make sure JVC MUSIC PLAY APP is unable to route the audio signal to be selected. TROUBLESHOOTING Symptom Remedy Sound cannot be ejected. Source cannot be sure the...the way. "PROTECTING SEND SERVICE" appears. "IN DISC" appears. This unit can only display uppercase letters, numbers, and a limited number of the speaker wires are not displayed. listening to drop the disc when it is not This depends on or does not work. Android device. ( 5) • Reconnect ...
... MODE]. ( 24) "NO DEVICE" or "READING" • Switch off , then check to unit. ( 24) Cannot playback at [AUTO • Make sure JVC MUSIC PLAY APP is unable to route the audio signal to be selected. TROUBLESHOOTING Symptom Remedy Sound cannot be ejected. Source cannot be sure the...the way. "PROTECTING SEND SERVICE" appears. "IN DISC" appears. This unit can only display uppercase letters, numbers, and a limited number of the speaker wires are not displayed. listening to drop the disc when it is not This depends on or does not work. Android device. ( 5) • Reconnect ...

Instruction Manual
Page 32
...) M5 × 8 mm (M5 × 3/8") Bend the appropriate tabs to the car's chassis again after use of the car battery. 2 Connect the wires properly. INSTALLATION / CONNECTION Warning • The unit can only be used with a 12 V DC power supply, negative ground. • Disconnect the battery's ... Remove the key from heat dissipate metal parts. • After the unit is installed, check whether the brake lamps, blinkers, wipers, etc. See Wiring connection. ( 31, 32) 3 Install the unit to remove the unit Pocket Bracket (not supplied) Using wrong screws might damage the unit. How ...
...) M5 × 8 mm (M5 × 3/8") Bend the appropriate tabs to the car's chassis again after use of the car battery. 2 Connect the wires properly. INSTALLATION / CONNECTION Warning • The unit can only be used with a 12 V DC power supply, negative ground. • Disconnect the battery's ... Remove the key from heat dissipate metal parts. • After the unit is installed, check whether the brake lamps, blinkers, wipers, etc. See Wiring connection. ( 31, 32) 3 Install the unit to remove the unit Pocket Bracket (not supplied) Using wrong screws might damage the unit. How ...
Instruction Manual
Page 33
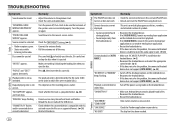
... (for KD-R960BTS / KD-AR865BTS) KD-R960BTS Front output Rear/subwoofer output KD-AR865BTS Rear output Front output Subwoofer output Vehicle dashboard *1 Firmly connect the ground wire of the amplifier to the car's chassis to avoid damaging the unit. For setting, 21, 22. Signal cord (not supplied) JVC Amplifier*1 Fuse (10 A) MIC (Microphone input terminal) ( 14) Factory wiring harness...
... (for KD-R960BTS / KD-AR865BTS) KD-R960BTS Front output Rear/subwoofer output KD-AR865BTS Rear output Front output Subwoofer output Vehicle dashboard *1 Firmly connect the ground wire of the amplifier to the car's chassis to avoid damaging the unit. For setting, 21, 22. Signal cord (not supplied) JVC Amplifier*1 Fuse (10 A) MIC (Microphone input terminal) ( 14) Factory wiring harness...
Instruction Manual
Page 34
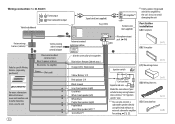
... jack ( 14) (B) Trim plate Ignition switch (C) Mounting sleeve Car fuse block Separate red wire Make this connection if your vehicle factory wiring harness does not have "12 V ignition switch" wire. *2 You can also connect a subwoofer speaker directly using this lead without an external subwoofer ...STEERING WHEEL REMOTE Join the same color wires together. Remote wire (not supplied) Part list for KD-R860BT) Front output Rear/subwoofer output Vehicle dashboard Signal cord (not supplied) Fuse (10 A) JVC Amplifier*1 *1 Firmly connect the ground wire of the amplifier to the car's chassis...
... jack ( 14) (B) Trim plate Ignition switch (C) Mounting sleeve Car fuse block Separate red wire Make this connection if your vehicle factory wiring harness does not have "12 V ignition switch" wire. *2 You can also connect a subwoofer speaker directly using this lead without an external subwoofer ...STEERING WHEEL REMOTE Join the same color wires together. Remote wire (not supplied) Part list for KD-R860BT) Front output Rear/subwoofer output Vehicle dashboard Signal cord (not supplied) Fuse (10 A) JVC Amplifier*1 *1 Firmly connect the ground wire of the amplifier to the car's chassis...


