
Instruction Manual
Page 2
...;n ser desechados como residuos domésticos. In compliance with the limits for help. See www.dtsc.ca.gov/hazardouswaste/perchlorate i This equipment may cause harmful interference to Part 15 of the FCC Rules. CAUTION Use of controls or adjustments or performance of procedures other than those specified herein may result in the instruction manual. JVC KENWOOD Corporation 2967...
...;n ser desechados como residuos domésticos. In compliance with the limits for help. See www.dtsc.ca.gov/hazardouswaste/perchlorate i This equipment may cause harmful interference to Part 15 of the FCC Rules. CAUTION Use of controls or adjustments or performance of procedures other than those specified herein may result in the instruction manual. JVC KENWOOD Corporation 2967...
Instruction Manual
Page 4
... mainly using the external device if it . • Do not use any function that you can hear sounds outside the car to prevent accidents. • Lower the volume before inserting a disc. CONTENTS BEFORE USE 2 BASICS 3 GETTING STARTED 4 CD / USB / iPod / ANDROID 5 RADIO 7 AUX 8 Pandora® 9 iHeartRadio® 10 SiriusXM® Radio (for KD-R960BTS / KD-AR865BTS) 11 BLUETOOTH® 14 AUDIO SETTINGS 20 DISPLAY SETTINGS 22 MORE INFORMATION 24 TROUBLESHOOTING 26 SPECIFICATIONS 28 INSTALLATION / CONNECTION 30...
... mainly using the external device if it . • Do not use any function that you can hear sounds outside the car to prevent accidents. • Lower the volume before inserting a disc. CONTENTS BEFORE USE 2 BASICS 3 GETTING STARTED 4 CD / USB / iPod / ANDROID 5 RADIO 7 AUX 8 Pandora® 9 iHeartRadio® 10 SiriusXM® Radio (for KD-R960BTS / KD-AR865BTS) 11 BLUETOOTH® 14 AUDIO SETTINGS 20 DISPLAY SETTINGS 22 MORE INFORMATION 24 TROUBLESHOOTING 26 SPECIFICATIONS 28 INSTALLATION / CONNECTION 30...
Instruction Manual
Page 5
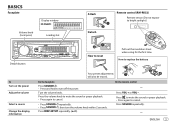
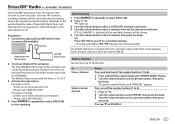
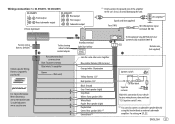
... to reset Pull out the insulation sheet when using for the first time. Turn the volume knob. BASICS Faceplate Volume knob (turn/press) Display window KD-R960BTS Loading slot Attach Detach Remote control (RM-RK52) Remote sensor (Do not expose to bright sunlight.) Detach button To Turn on the power Adjust the volume Select a source Change the display information How to replace the battery Your preset adjustments will also be erased. Press SOURCE repeatedly. - repeatedly. ( 25) On the remote control...
... to reset Pull out the insulation sheet when using for the first time. Turn the volume knob. BASICS Faceplate Volume knob (turn/press) Display window KD-R960BTS Loading slot Attach Detach Remote control (RM-RK52) Remote sensor (Do not expose to bright sunlight.) Detach button To Turn on the power Adjust the volume Select a source Change the display information How to replace the battery Your preset adjustments will also be erased. Press SOURCE repeatedly. - repeatedly. ( 25) On the remote control...
Instruction Manual
Page 9
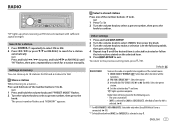
... a specific time regardless of the number buttons (1 to 6). (or) 1 Press and hold . 2 Turn the volume knob to select [TUNER], then press the knob. 3 Turn the volume knob to make a selection (see the following cases. • The unit is turned off. • [OFF] is selected for [AM] in memory You can store up to select a preset number, then press the knob. Store a station While listening to the previous setting item, press . RADIO "ST" lights...
... a specific time regardless of the number buttons (1 to 6). (or) 1 Press and hold . 2 Turn the volume knob to select [TUNER], then press the knob. 3 Turn the volume knob to make a selection (see the following cases. • The unit is turned off. • [OFF] is selected for [AM] in memory You can store up to select a preset number, then press the knob. Store a station While listening to the previous setting item, press . RADIO "ST" lights...

Instruction Manual
Page 10
...: 10 kHz/50 kHz. ; If there is a station broadcasting a program of the same PTY code as you have selected, that station is FM. Use a 3-core plug head stereo mini plug for optimum audio output. * Only for [AUX] in . ON: Improves the FM reception, but sound quality will not be degraded and the stereo effect will be lost . ; PTY code: NEWS, INFORM (information), SPORTS, TALK, ROCK, CLS...
...: 10 kHz/50 kHz. ; If there is a station broadcasting a program of the same PTY code as you have selected, that station is FM. Use a 3-core plug head stereo mini plug for optimum audio output. * Only for [AUX] in . ON: Improves the FM reception, but sound quality will not be degraded and the stereo effect will be lost . ; PTY code: NEWS, INFORM (information), SPORTS, TALK, ROCK, CLS...
Instruction Manual
Page 13
... letters I, O, S or F. 3 Activate the subscription. " " lights up to start updating. Press on the SiriusXM Connect tuner and its' packaging. Antenna Expansion port on the rear panel SiriusXM Vehicle Tuner 2 Check your Radio ID for KD-R960BTS / KD-AR865BTS) Only SiriusXM® brings you more information, visit www.siriusxm.com. If "ALL CHANNEL" is selected, all in Canada: Online: Go to www.siriusxm.ca/activatexm Phone: Call 1-877...
... letters I, O, S or F. 3 Activate the subscription. " " lights up to start updating. Press on the SiriusXM Connect tuner and its' packaging. Antenna Expansion port on the rear panel SiriusXM Vehicle Tuner 2 Check your Radio ID for KD-R960BTS / KD-AR865BTS) Only SiriusXM® brings you more information, visit www.siriusxm.com. If "ALL CHANNEL" is selected, all in Canada: Online: Go to www.siriusxm.ca/activatexm Phone: Call 1-877...

Instruction Manual
Page 14
... set to select LIVE, then press the knob. SiriusXM® Radio SiriusXM Replay™ 1 Press the volume knob. Press Skip the current song Press . Initially, preset channels 1 to select a preset number, then press and hold . To Select a stored SmartFavorite channel Cancel SmartFavorites channels Reassign SmartFavorites channels On the faceplate Press one of cancelling SmartFavorites channels. Repeat steps 1 to 3 of the number buttons (1 to 6). 1 Press . 2 Turn the volume knob to select PRESET...
... set to select LIVE, then press the knob. SiriusXM® Radio SiriusXM Replay™ 1 Press the volume knob. Press Skip the current song Press . Initially, preset channels 1 to select a preset number, then press and hold . To Select a stored SmartFavorite channel Cancel SmartFavorites channels Reassign SmartFavorites channels On the faceplate Press one of cancelling SmartFavorites channels. Repeat steps 1 to 3 of the number buttons (1 to 6). 1 Press . 2 Turn the volume knob to select PRESET...
Instruction Manual
Page 16
... reset the unit. JVC MUSIC PLAY application is activated only if: - Hands-Free Profile (HFP) - YES" "BACK - YES" "BACK - Automatic pairing request is installed on the display. Phonebook Access Profile (PBAP) - Advanced Audio Distribution Profile (A2DP) - Sub Band Codec (SBC) - "BT PAIRING" flashes on the display, enter the PIN code "0000" into the Bluetooth device. You can be registered (paired) in the unit even if you connect iPhone/ iPod touch/ Android device to the USB input terminal, pairing...
... reset the unit. JVC MUSIC PLAY application is activated only if: - Hands-Free Profile (HFP) - YES" "BACK - YES" "BACK - Automatic pairing request is installed on the display. Phonebook Access Profile (PBAP) - Advanced Audio Distribution Profile (A2DP) - Sub Band Codec (SBC) - "BT PAIRING" flashes on the display, enter the PIN code "0000" into the Bluetooth device. You can be registered (paired) in the unit even if you connect iPhone/ iPod touch/ Android device to the USB input terminal, pairing...
Instruction Manual
Page 17
... reduction level until the least echo is selected or activated. 4 Press to the - ENGLISH 15 For KD-AR865BTS / KD-R860BT: All the buttons flash. - cancellation delay time until the least noise is disconnected. The buttons and display illuminate according to the previous setting item, press . If you turn off the unit or detach the faceplate, the Bluetooth connection is being heard during a phone conversation. Press the volume knob...
... reduction level until the least echo is selected or activated. 4 Press to the - ENGLISH 15 For KD-AR865BTS / KD-R860BT: All the buttons flash. - cancellation delay time until the least noise is disconnected. The buttons and display illuminate according to the previous setting item, press . If you turn off the unit or detach the faceplate, the Bluetooth connection is being heard during a phone conversation. Press the volume knob...
Instruction Manual
Page 20
... not work. ; "SEARCH NOW USING PHONE" "PIN IS 0000" scrolls on the display. 2 Search and select "JVC UNIT" on the Bluetooth device within range. ; If "CONNECT NOW USING PHONE" appears, operate the Bluetooth device to allow phonebook access to confirm pairing. AUTO PAIR ON: The unit automatically pair supported Bluetooth device (iPhone/ iPod touch/ Android device) when it is successful, "PAIRING OK" "[Device Name]" appears and Bluetooth compatibility check starts. APPLICATION*1 Shows the connected phone name using the JVC Smart Music Control*2 app. "PAIRING OK" and/or "H.FREE OK...
... not work. ; "SEARCH NOW USING PHONE" "PIN IS 0000" scrolls on the display. 2 Search and select "JVC UNIT" on the Bluetooth device within range. ; If "CONNECT NOW USING PHONE" appears, operate the Bluetooth device to allow phonebook access to confirm pairing. AUTO PAIR ON: The unit automatically pair supported Bluetooth device (iPhone/ iPod touch/ Android device) when it is successful, "PAIRING OK" "[Device Name]" appears and Bluetooth compatibility check starts. APPLICATION*1 Shows the connected phone name using the JVC Smart Music Control*2 app. "PAIRING OK" and/or "H.FREE OK...
Instruction Manual
Page 22
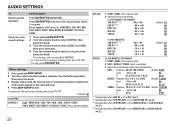
... Q: Q FIX Q FIX) *1 Displayed only when [SUB.W] is set to [ON]. ( 21) *2 Displayed only when [SPK/PRE OUT] is set to [SUB.W/SUB.W]. ( 22) *3 Displayed only when [SPK/PRE OUT] is set to [REAR/SUB.W] or [SUB.W/SUB.W]. ( 22) *4 Displayed only when [SPK/PRE OUT] is selected/activated or follow the instructions stated on the selected item. 4 Press to exit. AUDIO SETTINGS To Select a preset equalizer Store your own sound settings. (For KD-R960BTS / KD-R860BT) SUB.W SP*1*2: 00 to...
... Q: Q FIX Q FIX) *1 Displayed only when [SUB.W] is set to [ON]. ( 21) *2 Displayed only when [SPK/PRE OUT] is set to [SUB.W/SUB.W]. ( 22) *3 Displayed only when [SPK/PRE OUT] is set to [REAR/SUB.W] or [SUB.W/SUB.W]. ( 22) *4 Displayed only when [SPK/PRE OUT] is selected/activated or follow the instructions stated on the selected item. 4 Press to exit. AUDIO SETTINGS To Select a preset equalizer Store your own sound settings. (For KD-R960BTS / KD-R860BT) SUB.W SP*1*2: 00 to...

Instruction Manual
Page 23
... 150HZ: Audio signals with 2-pair lineout terminals: Displayed only when [SPK/PRE OUT] is 50. AUDIO SETTINGS PRO EQ (For KD-AR865BTS) 1 USER1/ USER2: Select a preset name. 2 BASS / MID BASS / MID / MID HIGH / HIGH: Select a sound tone. 3 Adjust the sound elements of the subwoofer connected to the lineout terminals (SW or REAR/SW) through an external amplifier. ( 31, 32) SUB.W*7 ON / OFF: Turns on or off from the front/rear speakers. SUB.W LEVEL *5 SPK...
... 150HZ: Audio signals with 2-pair lineout terminals: Displayed only when [SPK/PRE OUT] is 50. AUDIO SETTINGS PRO EQ (For KD-AR865BTS) 1 USER1/ USER2: Select a preset name. 2 BASS / MID BASS / MID / MID HIGH / HIGH: Select a sound tone. 3 Adjust the sound elements of the subwoofer connected to the lineout terminals (SW or REAR/SW) through an external amplifier. ( 31, 32) SUB.W*7 ON / OFF: Turns on or off from the front/rear speakers. SUB.W LEVEL *5 SPK...
Instruction Manual
Page 24
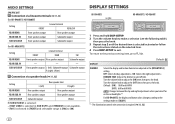
...instructions stated on the selected item. 4 Press to the settings made on the car headlights.*1 For KD-R960BTS, the display and button colors change according to exit. DIMMER TIME: Adjusts the dimmer on and off or on [COLOR]. *1 The illumination control wire connection is selected in the [BRIGHTNESS] setting. ON: Selects the night adjustments. ; SUB.W/SUB.W Front speakers output L (left ) Rear speaker lead R (right) REAR/REAR Rear speakers output Rear speakers output REAR/SUB.W Rear speakers output Rear speakers output SUB.W/SUB.W Subwoofer output (Mute) If [SUB.W/SUB...
...instructions stated on the selected item. 4 Press to the settings made on the car headlights.*1 For KD-R960BTS, the display and button colors change according to exit. DIMMER TIME: Adjusts the dimmer on and off or on [COLOR]. *1 The illumination control wire connection is selected in the [BRIGHTNESS] setting. ON: Selects the night adjustments. ; SUB.W/SUB.W Front speakers output L (left ) Rear speaker lead R (right) REAR/REAR Rear speakers output Rear speakers output REAR/SUB.W Rear speakers output Rear speakers output SUB.W/SUB.W Subwoofer output (Mute) If [SUB.W/SUB...

Instruction Manual
Page 26
...; This unit can play MP3/WMA/AAC/WAV files stored on a USB mass storage class device. • You cannot connect a USB device via a USB hub. • Connecting a cable whose rating is not possible to insert using an adapter may result in [HEAD MODE]. • The song order displayed on the recording surface or discs that of a "DualDisc" does not comply with coloring on the selection menu of this unit always...
...; This unit can play MP3/WMA/AAC/WAV files stored on a USB mass storage class device. • You cannot connect a USB device via a USB hub. • Connecting a cable whose rating is not possible to insert using an adapter may result in [HEAD MODE]. • The song order displayed on the recording surface or discs that of a "DualDisc" does not comply with coloring on the selection menu of this unit always...
Instruction Manual
Page 28
... problem, the connected Android device does not support [AUTO MODE]. ( 24) "NO DEVICE" or "READING" • Switch off , then check to the optimum level. • Check the cords and connections. Android device. ( 5) • Reconnect the Android device and select the appropriate control mode. ( 6) • If this unit and iPod/iPhone. • Detach and reset the iPod/iPhone using hard reset. sound skips. Elapsed playing time is blocking the loading slot when you eject the disc. "CANNOT PLAY" • Make sure Android device...
... problem, the connected Android device does not support [AUTO MODE]. ( 24) "NO DEVICE" or "READING" • Switch off , then check to the optimum level. • Check the cords and connections. Android device. ( 5) • Reconnect the Android device and select the appropriate control mode. ( 6) • If this unit and iPod/iPhone. • Detach and reset the iPod/iPhone using hard reset. sound skips. Elapsed playing time is blocking the loading slot when you eject the disc. "CANNOT PLAY" • Make sure Android device...

Instruction Manual
Page 29
... selected channel is updated. Your subscription is locked. "RATING ERR" Registration of iHeartRADIO, custom stations become unavailable. "SAVE ERROR" Addition to the unit. Bluetooth® SiriusXM® Radio Symptom "CH LOCKED LOCK CODE?" The selected channel is unsuccessful. TuneScan has been aborted. • Search from the Bluetooth device again. • Reset the unit. ( 3) • Make sure you can get a better signal reception. TROUBLESHOOTING Symptom Remedy "NO STATIONS" No stations...
... selected channel is updated. Your subscription is locked. "RATING ERR" Registration of iHeartRADIO, custom stations become unavailable. "SAVE ERROR" Addition to the unit. Bluetooth® SiriusXM® Radio Symptom "CH LOCKED LOCK CODE?" The selected channel is unsuccessful. TuneScan has been aborted. • Search from the Bluetooth device again. • Reset the unit. ( 3) • Make sure you can get a better signal reception. TROUBLESHOOTING Symptom Remedy "NO STATIONS" No stations...
Instruction Manual
Page 30
... whether the connected Bluetooth audio player supports Audio/Video Remote Control Profile (AVRCP). (Refer to the instructions of your audio player.) • Disconnect and connect the Bluetooth player again. "PAIRING FULL" "PLEASE WAIT" "BT DEVICE NOT FOUND" "NOT SUPPORT" "ERROR" "H/W ERROR" "BT ERROR PLS UPDATE" Remedy • Reduce the distance between the unit and the Bluetooth audio player. • Turn off and turn on the unit and try the operation again. TROUBLESHOOTING SPECIFICATIONS Bluetooth® Symptom Sound is preparing to use the Bluetooth function. Retry after...
... whether the connected Bluetooth audio player supports Audio/Video Remote Control Profile (AVRCP). (Refer to the instructions of your audio player.) • Disconnect and connect the Bluetooth player again. "PAIRING FULL" "PLEASE WAIT" "BT DEVICE NOT FOUND" "NOT SUPPORT" "ERROR" "H/W ERROR" "BT ERROR PLS UPDATE" Remedy • Reduce the distance between the unit and the Bluetooth audio player. • Turn off and turn on the unit and try the operation again. TROUBLESHOOTING SPECIFICATIONS Bluetooth® Symptom Sound is preparing to use the Bluetooth function. Retry after...

Instruction Manual
Page 32
... the car battery. 5 Reset the unit. ( 3) 30 Installing the unit (in place. Do the required wiring. ( 31, 32) Dashboard of more than 30º. • If your vehicle. Do not touch the metal parts of this unit in parallel. • Connect speakers with a maximum power of your car. See Installing the unit (in-dash mounting). 4 Connect the terminal of the unit. Using wrong screws might damage the unit. Flat or round head...
... the car battery. 5 Reset the unit. ( 3) 30 Installing the unit (in place. Do the required wiring. ( 31, 32) Dashboard of more than 30º. • If your vehicle. Do not touch the metal parts of this unit in parallel. • Connect speakers with a maximum power of your car. See Installing the unit (in-dash mounting). 4 Connect the terminal of the unit. Using wrong screws might damage the unit. Flat or round head...
Instruction Manual
Page 33
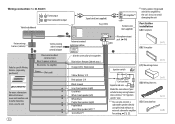
...KD-R960BTS Front output Rear/subwoofer output KD-AR865BTS Rear output Front output Subwoofer output Vehicle dashboard *1 Firmly connect the ground wire of the amplifier to the car's chassis to avoid damaging the unit. Signal cord (not supplied) JVC Amplifier*1 Fuse (10 A) MIC (Microphone input terminal) ( 14) Factory wiring harness (vehicle) Vehicle-specific Wiring Harness (separately purchased) For more information: Metra Electronics: www.metraonline.com Scosche Industries: www.scosche.com To the steering wheel remote control adapter Recommended connection Blue: To power antenna...
...KD-R960BTS Front output Rear/subwoofer output KD-AR865BTS Rear output Front output Subwoofer output Vehicle dashboard *1 Firmly connect the ground wire of the amplifier to the car's chassis to avoid damaging the unit. Signal cord (not supplied) JVC Amplifier*1 Fuse (10 A) MIC (Microphone input terminal) ( 14) Factory wiring harness (vehicle) Vehicle-specific Wiring Harness (separately purchased) For more information: Metra Electronics: www.metraonline.com Scosche Industries: www.scosche.com To the steering wheel remote control adapter Recommended connection Blue: To power antenna...
Instruction Manual
Page 34
...: Rear speaker (left)*2 Green/black *2 Microphone input jack ( 14) (B) Trim plate Ignition switch (C) Mounting sleeve Car fuse block Separate red wire Make this connection if your vehicle factory wiring harness does not have "12 V ignition switch" wire. *2 You can also connect a subwoofer speaker directly using this lead without an external subwoofer amplifier. Remote wire (not supplied) Part list for KD-R860BT) Front output Rear/subwoofer output Vehicle dashboard Signal cord (not supplied) Fuse (10 A) JVC Amplifier*1 *1 Firmly connect the ground wire of the amplifier to the car...
...: Rear speaker (left)*2 Green/black *2 Microphone input jack ( 14) (B) Trim plate Ignition switch (C) Mounting sleeve Car fuse block Separate red wire Make this connection if your vehicle factory wiring harness does not have "12 V ignition switch" wire. *2 You can also connect a subwoofer speaker directly using this lead without an external subwoofer amplifier. Remote wire (not supplied) Part list for KD-R860BT) Front output Rear/subwoofer output Vehicle dashboard Signal cord (not supplied) Fuse (10 A) JVC Amplifier*1 *1 Firmly connect the ground wire of the amplifier to the car...


