Instruction Manual
Page 10
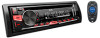
..., AM/ FM intervals: 10 kHz/50 kHz. ; Use a Bluetooth® device 1 Connect the Bluetooth adapter, KS-BTA100 (separately purchased). OFF: Cancels. Blue/white Black Brown Wiring harness of the unit ( 23) Blue/white: Remote Black: Ground Brown: Tel muting Auxiliary input jack 2 Register (pair) the Bluetooth device with "L" shaped connector (commercially...
..., AM/ FM intervals: 10 kHz/50 kHz. ; Use a Bluetooth® device 1 Connect the Bluetooth adapter, KS-BTA100 (separately purchased). OFF: Cancels. Blue/white Black Brown Wiring harness of the unit ( 23) Blue/white: Remote Black: Ground Brown: Tel muting Auxiliary input jack 2 Register (pair) the Bluetooth device with "L" shaped connector (commercially...
Instruction Manual
Page 18
ON: Selects the night adjustments. ; DIMMER TIME: Adjusts the dimmer on [COLOR]. *1 The illumination control wire connection is required. ( 23) Turn the volume knob to adjust the [OFF] time, then press the knob. (Default: [ON]: 18:00 or 6:00 PM [OFF.... Default: XX DISPLAY DIMMER Selects the display and button illumination adjusted in [FADER] and selectable range is [R06] to [00] 16 DISPLAY SETTINGS KD-AR765S / KD-R760 KD-AR565 KD-R660 / KD-R460 1 Press and hold . 2 Turn the volume knob to make a selection (see the following table), then press the knob. 3 Repeat step 2 until ...
ON: Selects the night adjustments. ; DIMMER TIME: Adjusts the dimmer on [COLOR]. *1 The illumination control wire connection is required. ( 23) Turn the volume knob to adjust the [OFF] time, then press the knob. (Default: [ON]: 18:00 or 6:00 PM [OFF.... Default: XX DISPLAY DIMMER Selects the display and button illumination adjusted in [FADER] and selectable range is [R06] to [00] 16 DISPLAY SETTINGS KD-AR765S / KD-R760 KD-AR565 KD-R660 / KD-R460 1 Press and hold . 2 Turn the volume knob to make a selection (see the following table), then press the knob. 3 Repeat step 2 until ...
Instruction Manual
Page 22
...ejected. Source cannot be heard. • Adjust the volume to unit. ( 18) ANDROID Cannot playback at [AUTO • Make sure JVC MUSIC PLAY APP is ejected. Press , then insert the disc correctly. turn on the recording process earlier. sound skips. "PROTECTING SEND SERVICE.... "PLEASE" and "EJECT" appear alternately. correct. This unit can only display uppercase letters, numbers, and a limited number of the speaker wires are insulated properly. Elapsed playing time is determined by the file name (USB) or the order in supported formats. ( 18) • ...
...ejected. Source cannot be heard. • Adjust the volume to unit. ( 18) ANDROID Cannot playback at [AUTO • Make sure JVC MUSIC PLAY APP is ejected. Press , then insert the disc correctly. turn on the recording process earlier. sound skips. "PROTECTING SEND SERVICE.... "PLEASE" and "EJECT" appear alternately. correct. This unit can only display uppercase letters, numbers, and a limited number of the speaker wires are insulated properly. Elapsed playing time is determined by the file name (USB) or the order in supported formats. ( 18) • ...

Instruction Manual
Page 24
... connect them in place. Basic procedure 1 Remove the key from heat dissipate metal parts. • After the unit is lower than 50 W. Do the required wiring. ( 23) Dashboard of the car battery. 5 Reset the unit. ( 3) 22 Installing the unit (in-dash mounting) Hook on and off by the ignition key....has the same rating. See Installing the unit (in the console of less than 30º. • If your vehicle wiring harness does not have the ignition terminal, connect Ignition wire (red) to the terminal on the vehicle's fuse box which provides 12 V DC power supply and is turned on ...
... connect them in place. Basic procedure 1 Remove the key from heat dissipate metal parts. • After the unit is lower than 50 W. Do the required wiring. ( 23) Dashboard of the car battery. 5 Reset the unit. ( 3) 22 Installing the unit (in-dash mounting) Hook on and off by the ignition key....has the same rating. See Installing the unit (in the console of less than 30º. • If your vehicle wiring harness does not have the ignition terminal, connect Ignition wire (red) to the terminal on the vehicle's fuse box which provides 12 V DC power supply and is turned on ...

Instruction Manual
Page 25
.../white: To amplifier Antenna terminal Light blue/yellow STEERING WHEEL REMOTE Join the same color wires together. Wiring connection KD-AR765S KD-R760 / KD-R660 KD-AR565 / KD-R460 Front/ rear/ subwoofer output Vehicle dashboard Signal cord (not supplied) Fuse (10 A) JVC Amplifier*1 *1 Firmly connect the ground wire of the amplifier to the car's chassis to avoid damaging the unit.
.../white: To amplifier Antenna terminal Light blue/yellow STEERING WHEEL REMOTE Join the same color wires together. Wiring connection KD-AR765S KD-R760 / KD-R660 KD-AR565 / KD-R460 Front/ rear/ subwoofer output Vehicle dashboard Signal cord (not supplied) Fuse (10 A) JVC Amplifier*1 *1 Firmly connect the ground wire of the amplifier to the car's chassis to avoid damaging the unit.


