Instruction Manual
Page 2
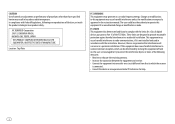
.... JVC KENWOOD Corporation 2967-3, ISHIKAWA-MACHI, HACHIOJI-SHI, TOKYO, JAPAN THIS PRODUCT COMPLIES WITH DHHS RULES 21CFR SUBCHAPTER J IN EFFECT AT DATE OF MANUFACTURE. Changes or modifications to this equipment does cause harmful interference to provide reasonable protection against harmful interference in the instruction manual. These limits are expressly approved in a residential installation. i CAUTION Use of controls or adjustments...
.... JVC KENWOOD Corporation 2967-3, ISHIKAWA-MACHI, HACHIOJI-SHI, TOKYO, JAPAN THIS PRODUCT COMPLIES WITH DHHS RULES 21CFR SUBCHAPTER J IN EFFECT AT DATE OF MANUFACTURE. Changes or modifications to this equipment does cause harmful interference to provide reasonable protection against harmful interference in the instruction manual. These limits are expressly approved in a residential installation. i CAUTION Use of controls or adjustments...
Instruction Manual
Page 4
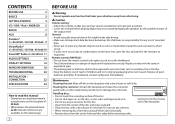
... the faceplate) CONTENTS BEFORE USE 2 BASICS 3 GETTING STARTED 4 CD / USB / iPod / ANDROID 5 RADIO 7 AUX 8 Pandora® (for KD-AR765S / KD-R760 / KD-R660) 9 iHeartRadio® (for KD-AR765S / KD-R760 / KD-R660)10 SiriusXM® Radio (for KD-AR765S) 11 AUDIO SETTINGS 14 DISPLAY SETTINGS 16 MORE INFORMATION 18 TROUBLESHOOTING 20 INSTALLATION / CONNECTION 22 SPECIFICATIONS 24 How to avoid damaging the speakers by the sudden increase of the output level. Replace it might hinder safe driving. • Make...
... the faceplate) CONTENTS BEFORE USE 2 BASICS 3 GETTING STARTED 4 CD / USB / iPod / ANDROID 5 RADIO 7 AUX 8 Pandora® (for KD-AR765S / KD-R760 / KD-R660) 9 iHeartRadio® (for KD-AR765S / KD-R760 / KD-R660)10 SiriusXM® Radio (for KD-AR765S) 11 AUDIO SETTINGS 14 DISPLAY SETTINGS 16 MORE INFORMATION 18 TROUBLESHOOTING 20 INSTALLATION / CONNECTION 22 SPECIFICATIONS 24 How to avoid damaging the speakers by the sudden increase of the output level. Replace it might hinder safe driving. • Make...

Instruction Manual
Page 5
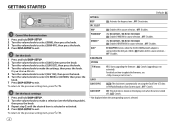
... reset Pull out the insulation sheet when using for the first time. Press the volume knob to mute the sound or pause playback. • Press again to select iPod or USB source directly. or to cancel. • Press • Press • Press Press repeatedly. , then turn off the power. Press or . Press to mute the sound or pause playback. • Press again to replace the battery KD-R460 Your preset adjustments...
... reset Pull out the insulation sheet when using for the first time. Press the volume knob to mute the sound or pause playback. • Press again to select iPod or USB source directly. or to cancel. • Press • Press • Press Press repeatedly. , then turn off the power. Press or . Press to mute the sound or pause playback. • Press again to replace the battery KD-R460 Your preset adjustments...
Instruction Manual
Page 6
.... IHEART * (For KD-AR765S / KD-R760 / KD-R660) ON: Enables IHEARTRADIO in source selection. ; OFF: Cancels. * Not displayed when the corresponding source is connected to the AUX jack. ( 8) ; F/W UPDATE SYSTEM F/W xxxx YES: Starts upgrading the firmware. ; Default: XX SETTINGS BEEP ON: Activates the keypress tone. ; AUX * BT ADAPTER: Selects when the KS-BTA100 Bluetooth adapter is selected. 4 OFF: Disables. OFF: Disables. Day Hour Minute 5 Turn the volume knob to select [24H/ 12H], then...
.... IHEART * (For KD-AR765S / KD-R760 / KD-R660) ON: Enables IHEARTRADIO in source selection. ; OFF: Cancels. * Not displayed when the corresponding source is connected to the AUX jack. ( 8) ; F/W UPDATE SYSTEM F/W xxxx YES: Starts upgrading the firmware. ; Default: XX SETTINGS BEEP ON: Activates the keypress tone. ; AUX * BT ADAPTER: Selects when the KS-BTA100 Bluetooth adapter is selected. 4 OFF: Disables. OFF: Disables. Day Hour Minute 5 Turn the volume knob to select [24H/ 12H], then...
Instruction Manual
Page 7
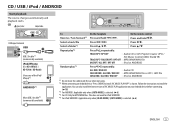
... leave the cable inside the car when not using. *2 When connecting an Android device, "Press [VIEW] to install the application. On the remote control Press and hold . Press . Press . Select a track/file Select a folder*4 Repeat play*5 Random play*5 Press . Follow the instructions to install JVC MUSIC PLAY APP" is selected. ( 6) *4 For CD: Only for MP3/WMA files. You can also install the latest version of the iPod/ iPhone)*1 ANDROID*2 Micro USB 2.0 cable*1 (commercially available...
... leave the cable inside the car when not using. *2 When connecting an Android device, "Press [VIEW] to install the application. On the remote control Press and hold . Press . Press . Select a track/file Select a folder*4 Repeat play*5 Random play*5 Press . Follow the instructions to install JVC MUSIC PLAY APP" is selected. ( 6) *4 For CD: Only for MP3/WMA files. You can also install the latest version of the iPod/ iPhone)*1 ANDROID*2 Micro USB 2.0 cable*1 (commercially available...
Instruction Manual
Page 8
... the iPod and [HEAD MODE] is other media player applications from the unit. However, you can still play /pause or file skip from the Android device (without using JVC MUSIC PLAY application). The stored songs in the following start playback. • Selected internal or external memory of a smartphone (Mass Storage Class). • Selected drive of the Audiobooks sound file in your iPod/iPhone. (Default: Depends on your iPod/iPhone setting.) 5 Press...
... the iPod and [HEAD MODE] is other media player applications from the unit. However, you can still play /pause or file skip from the Android device (without using JVC MUSIC PLAY application). The stored songs in the following start playback. • Selected internal or external memory of a smartphone (Mass Storage Class). • Selected drive of the Audiobooks sound file in your iPod/iPhone. (Default: Depends on your iPod/iPhone setting.) 5 Press...
Instruction Manual
Page 9
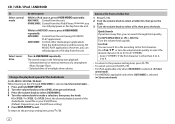
... volume knob to make a selection (see the following cases. • The unit is turned off. • [OFF] is selected for [AM] in [SRC SELECT] after Radio Timer for AM is selected. ( 4) *1 For KD-AR765S: Selectable only when SiriusXM Vehicle Tuner is connected. *2 Selectable only when [ONCE] or [WEEKLY] is selected/activated or follow the instructions stated on RM-RK52) until "M" flashes, then press repeatedly to 06 (for a station manually. The preset number flashes...
... volume knob to make a selection (see the following cases. • The unit is turned off. • [OFF] is selected for [AM] in [SRC SELECT] after Radio Timer for AM is selected. ( 4) *1 For KD-AR765S: Selectable only when SiriusXM Vehicle Tuner is connected. *2 Selectable only when [ONCE] or [WEEKLY] is selected/activated or follow the instructions stated on RM-RK52) until "M" flashes, then press repeatedly to 06 (for a station manually. The preset number flashes...
Instruction Manual
Page 10
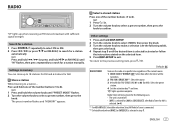
... . ; MONO Displayed only when the source is a station broadcasting a program of the unit ( 23) Blue/white: Remote Black: Ground Brown: Tel muting Auxiliary input jack 2 Register (pair) the Bluetooth device with "L" shaped connector (commercially available) Auxiliary input jack Portable audio player 2 Select [ON] for FM. Blue/white Black Brown Wiring harness of the same PTY code as you have selected, that station is tuned in [SRC SELECT]. ( 4) 3 Press repeatedly to the instruction manual of KS-BTA100. 8 "SSM" stops flashing when...
... . ; MONO Displayed only when the source is a station broadcasting a program of the unit ( 23) Blue/white: Remote Black: Ground Brown: Tel muting Auxiliary input jack 2 Register (pair) the Bluetooth device with "L" shaped connector (commercially available) Auxiliary input jack Portable audio player 2 Select [ON] for FM. Blue/white Black Brown Wiring harness of the same PTY code as you have selected, that station is tuned in [SRC SELECT]. ( 4) 3 Press repeatedly to the instruction manual of KS-BTA100. 8 "SSM" stops flashing when...
Instruction Manual
Page 11
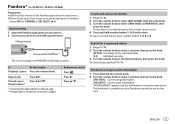
... the USB input terminal. Press I. To select a stored station, press number button 1, 4, 5 or 6. Search for [PANDORA] in [SRC SELECT]. ( 4) Start listening 1 Open the Pandora application on your device. USB input terminal (Accessory of the Pandora application on your device. 2 Connect your device to your device (iPhone/ iPod touch), then create an account and log in to Pandora. • Select [ON] for a registered station 1 Press . 2 Turn the volume knob to make a selection, then...
... the USB input terminal. Press I. To select a stored station, press number button 1, 4, 5 or 6. Search for [PANDORA] in [SRC SELECT]. ( 4) Start listening 1 Open the Pandora application on your device. USB input terminal (Accessory of the Pandora application on your device. 2 Connect your device to your device (iPhone/ iPod touch), then create an account and log in to Pandora. • Select [ON] for a registered station 1 Press . 2 Turn the volume knob to make a selection, then...
Instruction Manual
Page 13
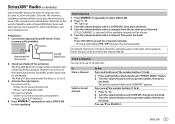
... "PRESET MODE" flashes. 2 Turn the volume knob to select a preset number, then press the knob. The SiriusXM Radio ID is required for activation and can store up . 3 Turn the volume knob to select a CATEGORY, then press the knob. 4 Turn the volume knob to select a category from the list, then press the knob. If "ALL CHANNEL" is selected, a pass code input screen appears. If a locked channel or a mature channel is selected, all in Canada: Online: Go...
... "PRESET MODE" flashes. 2 Turn the volume knob to select a preset number, then press the knob. The SiriusXM Radio ID is required for activation and can store up . 3 Turn the volume knob to select a CATEGORY, then press the knob. 4 Turn the volume knob to select a category from the list, then press the knob. If "ALL CHANNEL" is selected, a pass code input screen appears. If a locked channel or a mature channel is selected, all in Canada: Online: Go...
Instruction Manual
Page 14
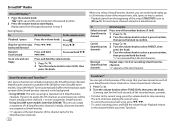
... unit continues playing the current song. • To select the previous/next song, press . • To cancel scanning, press and hold . Press and hold the volume knob. 1 Press . 2 Turn the volume knob to assign the 7th channel, an error beep tone will be heard. SmartFavorites and TuneStart™ User preset channels are removed from the beginning of your SmartFavorite music channels or current tuned music channel. 1 Press . 2 Turn...
... unit continues playing the current song. • To select the previous/next song, press . • To cancel scanning, press and hold . Press and hold the volume knob. 1 Press . 2 Turn the volume knob to assign the 7th channel, an error beep tone will be heard. SmartFavorites and TuneStart™ User preset channels are removed from the beginning of your SmartFavorite music channels or current tuned music channel. 1 Press . 2 Turn...
Instruction Manual
Page 15
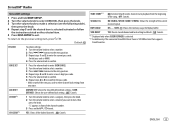
... current pass code. (Initial pass code is SXV200 or later that supports SmartFavorites. CH EDIT*1 1 Turn the volume knob to select a category, then press the knob. 2 Turn the volume knob to select a channel you want to the previous setting item, press . TUNE START*2 ON: Selected SmartFavorite channel starts playback from next time. NO: Cancels. *1 Displayed only when [USER DEFINED] is selected. *2 Available only if the connected SiriusXM Vehical Tuner is...
... current pass code. (Initial pass code is SXV200 or later that supports SmartFavorites. CH EDIT*1 1 Turn the volume knob to select a category, then press the knob. 2 Turn the volume knob to select a channel you want to the previous setting item, press . TUNE START*2 ON: Selected SmartFavorite channel starts playback from next time. NO: Cancels. *1 Displayed only when [USER DEFINED] is selected. *2 Available only if the connected SiriusXM Vehical Tuner is...

Instruction Manual
Page 16
... SUB.W *1*3: -08 to +08 00 BASS LVL: -06 to +06 00 MID LVL: -06 to +06 00 TRE LVL: -06 to +06 00) • To return to the previous setting item, press . Press , then turn the volume knob within 2 seconds. EASY EQ 1 USER1/ USER2: Select a preset name. 2 Adjust your own sound settings On the faceplate Press repeatedly. AUDIO SETTINGS To Select a preset equalizer Store your own sound settings...
... SUB.W *1*3: -08 to +08 00 BASS LVL: -06 to +06 00 MID LVL: -06 to +06 00 TRE LVL: -06 to +06 00) • To return to the previous setting item, press . Press , then turn the volume knob within 2 seconds. EASY EQ 1 USER1/ USER2: Select a preset name. 2 Adjust your own sound settings On the faceplate Press repeatedly. AUDIO SETTINGS To Select a preset equalizer Store your own sound settings...
Instruction Manual
Page 17
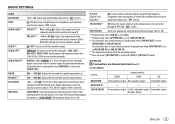
... less than 50 W to +08 (00): Adjusts the output level of the subwoofer connected via lineout terminals ( 23) (For KD-AR765S) Setting Lineout terminal FRONT REAR SW REAR/REAR Front speakers output Rear speakers output Subwoofer output REAR/SUB.W - - - HIGH POWER: The maximum volume level is selected for [SUB.W LPF].) R06 - TEL MUTING*8 ON: Mutes the sounds while using the cellular phone (not connected through an external amplifier. ( 23) ON / OFF: Turns on or off the subwoofer output. OFF: Cancels. 01 / 02: Boosts low...
... less than 50 W to +08 (00): Adjusts the output level of the subwoofer connected via lineout terminals ( 23) (For KD-AR765S) Setting Lineout terminal FRONT REAR SW REAR/REAR Front speakers output Rear speakers output Subwoofer output REAR/SUB.W - - - HIGH POWER: The maximum volume level is selected for [SUB.W LPF].) R06 - TEL MUTING*8 ON: Mutes the sounds while using the cellular phone (not connected through an external amplifier. ( 23) ON / OFF: Turns on or off the subwoofer output. OFF: Cancels. 01 / 02: Boosts low...
Instruction Manual
Page 18
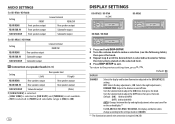
...Changes between the day and night adjustments when you turn off time. Turn the volume knob to exit. Turn the volume knob to the previous setting item, press . OFF: Selects the day adjustments. ; AUDIO SETTINGS (For KD-R760 / KD-R660) Setting REAR/REAR REAR/SUB.W SUB.W/SUB.W FRONT Front speakers output Front speakers output Front speakers output Lineout terminal REAR/SW Rear speakers output Subwoofer output Subwoofer output (For KD-AR565 / KD-R460) Setting REAR/REAR REAR/SUB.W SUB.W/SUB.W Rear speakers output Subwoofer output Subwoofer output Lineout terminal REAR/SW Connection...
...Changes between the day and night adjustments when you turn off time. Turn the volume knob to exit. Turn the volume knob to the previous setting item, press . OFF: Selects the day adjustments. ; AUDIO SETTINGS (For KD-R760 / KD-R660) Setting REAR/REAR REAR/SUB.W SUB.W/SUB.W FRONT Front speakers output Front speakers output Front speakers output Lineout terminal REAR/SW Rear speakers output Subwoofer output Subwoofer output (For KD-AR565 / KD-R460) Setting REAR/REAR REAR/SUB.W SUB.W/SUB.W Rear speakers output Subwoofer output Subwoofer output Lineout terminal REAR/SW Connection...
Instruction Manual
Page 20
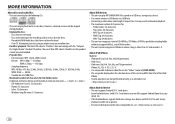
... coloring on the selection menu of characters for file/folder name: It depends on this product cannot be skipped during playback. • Unplayable discs: - MORE INFORMATION About discs and audio files • This unit can only play the following CDs: • This unit can play MP3/WMA/WAV files stored on a USB mass storage class device. • You cannot connect a USB device via a USB hub. • Connecting a cable...
... coloring on the selection menu of characters for file/folder name: It depends on this product cannot be skipped during playback. • Unplayable discs: - MORE INFORMATION About discs and audio files • This unit can only play the following CDs: • This unit can play MP3/WMA/WAV files stored on a USB mass storage class device. • You cannot connect a USB device via a USB hub. • Connecting a cable...
Instruction Manual
Page 22
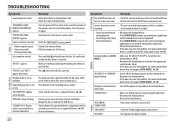
... on the MODE]. Turn the power on your device. Source cannot be ejected. Elapsed playing time is unsuccessful. Check whether the track is installed on the recording process earlier. This unit can only display uppercase letters, numbers, and a limited number of symbols. • Sound cannot be sure the terminals of the speaker wires are in supported formats. ( 18) • Reattach the device. 20 Symptom Remedy CD / USB / iPod The iPod/iPhone does...
... on the MODE]. Turn the power on your device. Source cannot be ejected. Elapsed playing time is unsuccessful. Check whether the track is installed on the recording process earlier. This unit can only display uppercase letters, numbers, and a limited number of symbols. • Sound cannot be sure the terminals of the speaker wires are in supported formats. ( 18) • Reattach the device. 20 Symptom Remedy CD / USB / iPod The iPod/iPhone does...
Instruction Manual
Page 23
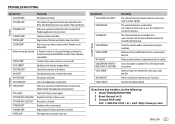
... ERR" Custom station name creation is updated. Retry later. "TIMED OUT" The request has resulted in time-out. "CODE ERROR" "NO CONTENT" "SCAN CANCEL" Remedy The selected channel is over. "STATION NOT AVAILABLE" Broadcast from the station is locked. "LICENSE ERR" You try the following: 1 Check TROUBLESHOOTING 2 Reset the unit ( 3) 3 Contact (USA only) Call: 1-800-252-5722 ( or ) visit: http://www.jvc.com ENGLISH...
... ERR" Custom station name creation is updated. Retry later. "TIMED OUT" The request has resulted in time-out. "CODE ERROR" "NO CONTENT" "SCAN CANCEL" Remedy The selected channel is over. "STATION NOT AVAILABLE" Broadcast from the station is locked. "LICENSE ERR" You try the following: 1 Check TROUBLESHOOTING 2 Reset the unit ( 3) 3 Contact (USA only) Call: 1-800-252-5722 ( or ) visit: http://www.jvc.com ENGLISH...

Instruction Manual
Page 24
... less than 50 W, change the [AMP GAIN] setting to the car chassis or Ground wire (black), or connect them in place. See Wiring connection. ( 23) 3 Install the unit to remove the unit Pocket Bracket (not supplied) Consult the car audio dealer. • Install this unit to hold the sleeve firmly in parallel. • Connect speakers with one that has the same rating. See Installing the unit (in -dash mounting) Hook on the top...
... less than 50 W, change the [AMP GAIN] setting to the car chassis or Ground wire (black), or connect them in place. See Wiring connection. ( 23) 3 Install the unit to remove the unit Pocket Bracket (not supplied) Consult the car audio dealer. • Install this unit to hold the sleeve firmly in parallel. • Connect speakers with one that has the same rating. See Installing the unit (in -dash mounting) Hook on the top...

Instruction Manual
Page 25
... (commercially available) ( 11) (B) Trim plate Ignition switch (C) Mounting sleeve Car fuse block Separate red wire Make this connection if your vehicle factory wiring harness does not have "12 V ignition switch" wire. *2 You can also connect a subwoofer speaker directly using this lead without an external subwoofer amplifier. Wiring connection KD-AR765S KD-R760 / KD-R660 KD-AR565 / KD-R460 Front/ rear/ subwoofer output Vehicle dashboard Signal cord (not supplied) Fuse (10 A) JVC Amplifier*1 *1 Firmly connect the ground wire of the amplifier to the car's chassis to avoid damaging the...
... (commercially available) ( 11) (B) Trim plate Ignition switch (C) Mounting sleeve Car fuse block Separate red wire Make this connection if your vehicle factory wiring harness does not have "12 V ignition switch" wire. *2 You can also connect a subwoofer speaker directly using this lead without an external subwoofer amplifier. Wiring connection KD-AR765S KD-R760 / KD-R660 KD-AR565 / KD-R460 Front/ rear/ subwoofer output Vehicle dashboard Signal cord (not supplied) Fuse (10 A) JVC Amplifier*1 *1 Firmly connect the ground wire of the amplifier to the car's chassis to avoid damaging the...


