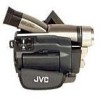
Instruction Manual
Page 2
...● The rating plate (serial number plate) and safety caution are listed in the Table Of Contents on its bottom. Using This Instruction Manual •All major sections and subsections are on pages 55 through 57 before use of this device may present a risk of fire or explosion... to be used battery promptly. Ⅲ Keep away from children. Ⅲ Do not disassemble and do not dispose of this digital video camera. before use of in the literature accompanying the appliance. The AA-V20U AC Power Adapter/Charger should be used in different countries.) However,...
...● The rating plate (serial number plate) and safety caution are listed in the Table Of Contents on its bottom. Using This Instruction Manual •All major sections and subsections are on pages 55 through 57 before use of this device may present a risk of fire or explosion... to be used battery promptly. Ⅲ Keep away from children. Ⅲ Do not disassemble and do not dispose of this digital video camera. before use of in the literature accompanying the appliance. The AA-V20U AC Power Adapter/Charger should be used in different countries.) However,...
Instruction Manual
Page 3
... sources, refer to insert the plug into a grounding-type power outlet. Overloading Do not overload wall outlets, extension cords, or integral convenience receptacles as this manual for its operating instructions. Power Lines An outside antenna system should not be located in the vicinity of the polarized plug. (B) Your product may be...
... sources, refer to insert the plug into a grounding-type power outlet. Overloading Do not overload wall outlets, extension cords, or integral convenience receptacles as this manual for its operating instructions. Power Lines An outside antenna system should not be located in the vicinity of the polarized plug. (B) Your product may be...
Instruction Manual
Page 7
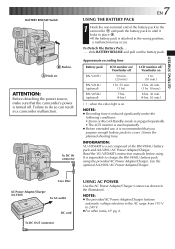
...-V856U (optional) LCD monitor on/ Viewfinder off 50 min. (25 min.) 1 hr. 55 min. (1 hr.) 7 hrs. (4 hrs.) LCD monitor off . Read the VU-V856KIT's instruction manuals before using the provided AC Power Adapter/Charger. NOTES: ● The provided AC Power Adapter/Charger features automatic voltage selection in a camcorder malfunction. INFORMATION: VU...
...-V856U (optional) LCD monitor on/ Viewfinder off 50 min. (25 min.) 1 hr. 55 min. (1 hr.) 7 hrs. (4 hrs.) LCD monitor off . Read the VU-V856KIT's instruction manuals before using the provided AC Power Adapter/Charger. NOTES: ● The provided AC Power Adapter/Charger features automatic voltage selection in a camcorder malfunction. INFORMATION: VU...
Instruction Manual
Page 13
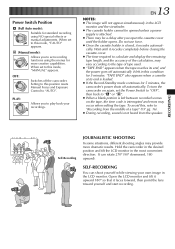
...Position AY OFF (Full Auto mode): Suitable for 5 minutes, the camcorder's power shuts off automatically. When set recording M functions using NO special effects or manual adjustments. To turn the camcorder on again, set to "Recording from the middle of tape used. ● "TAPE END" appears when the tape reaches ... OFF: PLAY OFF A M Switches off the camcorder. When set the Power Switch to "OFF", then back to "AUTO". To avoid this position resets Manual Focus and Exposure Control to " " or " ". ● When a blank portion is left in the LCD monitor. cally.
...Position AY OFF (Full Auto mode): Suitable for 5 minutes, the camcorder's power shuts off automatically. When set recording M functions using NO special effects or manual adjustments. To turn the camcorder on again, set to "Recording from the middle of tape used. ● "TAPE END" appears when the tape reaches ... OFF: PLAY OFF A M Switches off the camcorder. When set the Power Switch to "OFF", then back to "AUTO". To avoid this position resets Manual Focus and Exposure Control to " " or " ". ● When a blank portion is left in the LCD monitor. cally.
Instruction Manual
Page 14
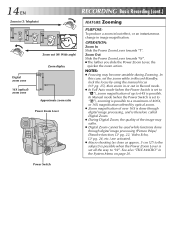
... (Picture Wipe/ Dissolve function, ੬ pg. 22, Video Echo, ੬ pg. 24, etc.) are activated. ● Macro shooting (as close as approx. 5 cm (2") to "W". In Manual mode (when the Power Switch is set to " "), zooming is possible to a maximum of 400X, or 16X magnification offered by using the... manual focus (੬ pg. 25), then zoom in or out in Record mode. ● In Full Auto mode (when the Power Switch is set to " "), zoom ...
... (Picture Wipe/ Dissolve function, ੬ pg. 22, Video Echo, ੬ pg. 24, etc.) are activated. ● Macro shooting (as close as approx. 5 cm (2") to "W". In Manual mode (when the Power Switch is set to " "), zooming is possible to a maximum of 400X, or 16X magnification offered by using the... manual focus (੬ pg. 25), then zoom in or out in Record mode. ● In Full Auto mode (when the Power Switch is set to " "), zoom ...
Instruction Manual
Page 15
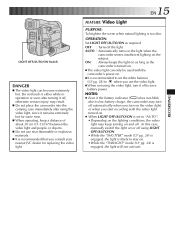
... : Automatically turns on the light when the camcorder senses insufficient lighting on . ● When LIGHT OFF/AUTO/ON is too dim. In this case, manually switch the light on or off to low battery charge, the camcorder may turn off automatically when you turn it remains extremely hot for replacing... case immediately after using the video light, since it off using the video light, turn on the video light, or when you consult your nearest JVC dealer for some time. Ⅲ When operating, keep turning on . •While the "TWILIGHT" mode (੬ pg. 24) is engaged, the light will ...
... : Automatically turns on the light when the camcorder senses insufficient lighting on . ● When LIGHT OFF/AUTO/ON is too dim. In this case, manually switch the light on or off to low battery charge, the camcorder may turn off automatically when you turn it remains extremely hot for replacing... case immediately after using the video light, since it off using the video light, turn on the video light, or when you consult your nearest JVC dealer for some time. Ⅲ When operating, keep turning on . •While the "TWILIGHT" mode (੬ pg. 24) is engaged, the light will ...
Instruction Manual
Page 18
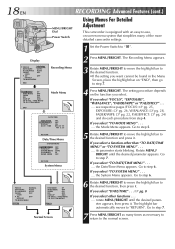
...MENU/BRIGHT to move the highlight bar to the desired function, then press it . eter appears, then press it . The Recording Menu appears. 4 FOCUS MANUAL EXPOSURE AUTO W. If you select "TO DATE/TIME MENU the Date/Time Menu appears. MODE OFF OFF 32kHz 06 OFF RETURN System Menu 5 Rotate MENU.... Mode Menu DATE/TIME INDICATION 4 ON SCREEN DISPLAY DATE / TIME ON OFF ON DEC 25 ' 99 PM 5 : 30 4 Press MENU/BRIGHT. FOCUS MANUAL EXPOSURE AUTO W. see respective pages (FOCUS: ੬ pg. 25, EXPOSURE: ੬ pg. 26, W.BALANCE: ੬ pg. 28, FADER/WIPE: ...
...MENU/BRIGHT to move the highlight bar to the desired function, then press it . eter appears, then press it . The Recording Menu appears. 4 FOCUS MANUAL EXPOSURE AUTO W. If you select "TO DATE/TIME MENU the Date/Time Menu appears. MODE OFF OFF 32kHz 06 OFF RETURN System Menu 5 Rotate MENU.... Mode Menu DATE/TIME INDICATION 4 ON SCREEN DISPLAY DATE / TIME ON OFF ON DEC 25 ' 99 PM 5 : 30 4 Press MENU/BRIGHT. FOCUS MANUAL EXPOSURE AUTO W. see respective pages (FOCUS: ੬ pg. 25, EXPOSURE: ੬ pg. 26, W.BALANCE: ੬ pg. 28, FADER/WIPE: ...
Instruction Manual
Page 19
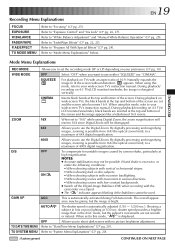
...CONTINUED ON NEXT PAGE When using this mode, refer to use the Digital Zoom. DIS OFF To compensate for unstable images caused by camera-shake, particularly at the top and bottom of 64X digital magnification. 400X Allows you to this mode, " " is elongated vertically. ... is automatically adjusted (1/30 - 1/200 sec.). The overall appearance may not be disengaged. 64X Allows you to your wide-screen TV's instruction manual. Naturally expands the image to "Mode Menu Explanations" below. During playback on a tripod. ● The " " indicator appears blinking if the...
...CONTINUED ON NEXT PAGE When using this mode, refer to use the Digital Zoom. DIS OFF To compensate for unstable images caused by camera-shake, particularly at the top and bottom of 64X digital magnification. 400X Allows you to this mode, " " is elongated vertically. ... is automatically adjusted (1/30 - 1/200 sec.). The overall appearance may not be disengaged. 64X Allows you to your wide-screen TV's instruction manual. Naturally expands the image to "Mode Menu Explanations" below. During playback on a tripod. ● The " " indicator appears blinking if the...
Instruction Manual
Page 24
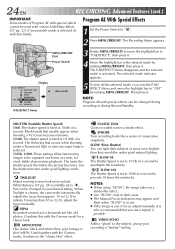
...NOTES: ● When using "SLOW", the image takes on a strobe-like effect. ● Use "SLOW" only in dark areas. ● The Manual Focus indication may appear and flash when "SLOW" is fixed at 1/60th of a second. STROBE Your recording looks like old photos. Program AE With Special... Display P. It is also recommended that usually appear when shooting a TV screen become narrower. 1/100-The shutter speed is out of focus, adjust manually. Used together with certain Fade/Wipe Effects (੬ pg. 23). SLOW (Slow Shutter) You can be captured one frame at 1/100th of a...
...NOTES: ● When using "SLOW", the image takes on a strobe-like effect. ● Use "SLOW" only in dark areas. ● The Manual Focus indication may appear and flash when "SLOW" is fixed at 1/60th of a second. STROBE Your recording looks like old photos. Program AE With Special... Display P. It is also recommended that usually appear when shooting a TV screen become narrower. 1/100-The shutter speed is out of focus, adjust manually. Used together with certain Fade/Wipe Effects (੬ pg. 23). SLOW (Slow Shutter) You can be captured one frame at 1/100th of a...
Instruction Manual
Page 25
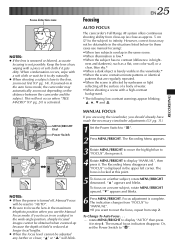
...in the upper left corner. Focusing EN25 AUTO FOCUS The camcorder's Full Range AF system offers continuous shooting ability from "FOCUS" to "MANUAL". •If you should already have made the necessary viewfinder adjustments (੬ pg. 11). 1 Set the Power Switch to the lens...two subjects overlap in the same scene. •When illumination is not possible. To focus on a farther subject, rotate MENU/BRIGHT downward. The manual focus indicators disappear. When condensation occurs, wipe with a piece of water. •When shooting a scene with a high-contrast background. * The...
...in the upper left corner. Focusing EN25 AUTO FOCUS The camcorder's Full Range AF system offers continuous shooting ability from "FOCUS" to "MANUAL". •If you should already have made the necessary viewfinder adjustments (੬ pg. 11). 1 Set the Power Switch to the lens...two subjects overlap in the same scene. •When illumination is not possible. To focus on a farther subject, rotate MENU/BRIGHT downward. The manual focus indicators disappear. When condensation occurs, wipe with a piece of water. •When shooting a scene with a high-contrast background. * The...
Instruction Manual
Page 26
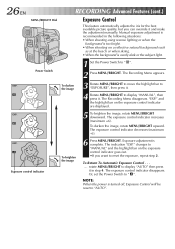
...MENU/BRIGHT. Exposure adjustment is recommended in step 4. EXP. 5 To brighten the image, rotate MENU/BRIGHT downward. rotate MENU/BRIGHT to display "MANUAL", then press it. The exposure control indicator disappears. To darken the image 3 Rotate MENU/BRIGHT to move the highlight bar to "EXPOSURE", ...then press it. 6 4 Rotate MENU/BRIGHT to display "AUTO" then press it and make the adjustment manually. The Recording Menu disappears. NOTE: When the power is overly dark or the subject light. 26 EN MENU/BRIGHT Dial RECORDING Advanced Features ...
...MENU/BRIGHT. Exposure adjustment is recommended in step 4. EXP. 5 To brighten the image, rotate MENU/BRIGHT downward. rotate MENU/BRIGHT to display "MANUAL", then press it. The exposure control indicator disappears. To darken the image 3 Rotate MENU/BRIGHT to move the highlight bar to "EXPOSURE", ...then press it. 6 4 Rotate MENU/BRIGHT to display "AUTO" then press it and make the adjustment manually. The Recording Menu disappears. NOTE: When the power is overly dark or the subject light. 26 EN MENU/BRIGHT Dial RECORDING Advanced Features ...
Instruction Manual
Page 27
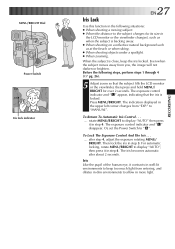
... the following situations: ● When shooting a moving subject. ● When the distance to the subject changes (so its size in step 4. rotate MENU/BRIGHT to "MANUAL". Or, set the Power Switch to display "AUTO", then press it contracts in the upper left corner changes from you, the image will not darken...
... the following situations: ● When shooting a moving subject. ● When the distance to the subject changes (so its size in step 4. rotate MENU/BRIGHT to "MANUAL". Or, set the Power Switch to display "AUTO", then press it contracts in the upper left corner changes from you, the image will not darken...
Instruction Manual
Page 28
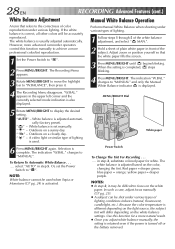
... function for white. White balance is set the Power Switch to achieve a more natural result. ● Once you adjust white balance manually, the setting is retained even if the power is used when Sepia or Monotone (੬ pg. 24) is complete. Selection is ... 2, it . White balance is correct, all other colors will differ depending on a cloudy day. Red paper = deeper green; The indication "W.BAL." Perform Manual White Balance when shooting under various types of lighting. 1 Follow steps 1 through 5 of the white balance adjustment, and select " MAN.". 2 Hold a sheet...
... function for white. White balance is set the Power Switch to achieve a more natural result. ● Once you adjust white balance manually, the setting is retained even if the power is used when Sepia or Monotone (੬ pg. 24) is complete. Selection is ... 2, it . White balance is correct, all other colors will differ depending on a cloudy day. Red paper = deeper green; The indication "W.BAL." Perform Manual White Balance when shooting under various types of lighting. 1 Follow steps 1 through 5 of the white balance adjustment, and select " MAN.". 2 Hold a sheet...

Instruction Manual
Page 32
... connectors Use optional Video and Audio cables. To S-Video Output S-Video cable (optional) To S-VIDEO IN TV VCR B. Connection to your VCR and TV instruction manuals. C.onnCeoctnionn etoctaioTVn otroVaCRTeVquoiprpeVdCwRitheqanuSip-VpIDeEdO wINiathndaAn/VS-inVpIuDt EO INconannecdtoArs/V input connectors Use optional S-Video and Audio cables. To TV or VCR White to AUDIO L IN...
... connectors Use optional Video and Audio cables. To S-Video Output S-Video cable (optional) To S-VIDEO IN TV VCR B. Connection to your VCR and TV instruction manuals. C.onnCeoctnionn etoctaioTVn otroVaCRTeVquoiprpeVdCwRitheqanuSip-VpIDeEdO wINiathndaAn/VS-inVpIuDt EO INconannecdtoArs/V input connectors Use optional S-Video and Audio cables. To TV or VCR White to AUDIO L IN...
Instruction Manual
Page 33
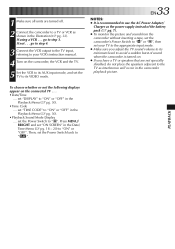
... the camcorder without inserting a tape, set the camcorder's Power Switch to " " or " ", then set the Power Switch to step 3. If not . . . set your VCR's instruction manual. 4 Turn on the connected TV . . . • Date/Time .... go to " ". If using a VCR . . . Then, set "ON SCREEN" in the illustration (੬ pg. 32). set "TIME...
... the camcorder without inserting a tape, set the camcorder's Power Switch to " " or " ", then set the Power Switch to step 3. If not . . . set your VCR's instruction manual. 4 Turn on the connected TV . . . • Date/Time .... go to " ". If using a VCR . . . Then, set "ON SCREEN" in the illustration (੬ pg. 32). set "TIME...
Instruction Manual
Page 34
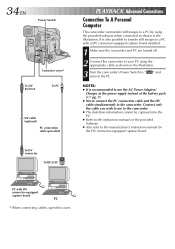
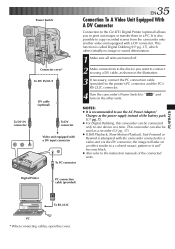
...It is recommended to use to the camcorder. ● The date/time information cannot be captured into the PC. ● Refer to the instruction manuals of the battery pack (੬ pg. 7). ● Never connect the PC connection cable and the DV cable simultaneously to the camcorder. Connect only ...wish to use the AC Power Adapter/ Charger as the power supply instead of the provided Software. ● Also refer to the manufacturer's instruction manual for the DV connector-equipped capture board. " and NOTES: ● It is also possible to transfer still images to a PC with DV ...
...It is recommended to use to the camcorder. ● The date/time information cannot be captured into the PC. ● Refer to the instruction manuals of the battery pack (੬ pg. 7). ● Never connect the PC connection cable and the DV cable simultaneously to the camcorder. Connect only ...wish to use the AC Power Adapter/ Charger as the power supply instead of the provided Software. ● Also refer to the manufacturer's instruction manual for the DV connector-equipped capture board. " and NOTES: ● It is also possible to transfer still images to a PC with DV ...
Instruction Manual
Page 35
.... Digital Printer PC connection cable (provided) PLAYBACK To RS-232C PC * When connecting cables, open this camcorder can also be connected only to the instruction manuals of the battery pack (੬ pg. 7). ● For Digital Dubbing, this cover. This function is recommended to use the AC Power Adapter/ Charger as a recorder...
.... Digital Printer PC connection cable (provided) PLAYBACK To RS-232C PC * When connecting cables, open this camcorder can also be connected only to the instruction manuals of the battery pack (੬ pg. 7). ● For Digital Dubbing, this cover. This function is recommended to use the AC Power Adapter/ Charger as a recorder...
Instruction Manual
Page 42
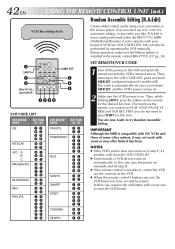
... in the remote control RM-V711U (੬ pg. 38). 3 SHIFT 1 6 RM-V711U (provided) TW 789` MBR SET 2 4 5 VCR CODE LIST VCR BRAND NAME GE HITACHI JVC A B C MAGNAVOX MITSUBISHI NEC PHILIPS BUTTONS (A) (B) 1 1 9 2 9 ` 9 4 6 6 6 3 9 1 9 6 9 3 9 5 1 1 7 1 7 6 6 7 6 8 3 7 3 8 1 9 9 5 1 1 9 4 9 1 9 6 1 2 VCR BRAND NAME BUTTONS (A) (B) PHILIPS 3 3 7 2 PANASONIC 1 3 1 7 1 1 9 4 1 8 RCA 9 2 9 4 6 6 6 3 9 ` SANYO 3 6 3 5 SHARP 1 5 1...Although the MBR is not able to control the VCR, use the controls on manually and try Random Assemble Editing. In this one to reset the VCR brand....
... in the remote control RM-V711U (੬ pg. 38). 3 SHIFT 1 6 RM-V711U (provided) TW 789` MBR SET 2 4 5 VCR CODE LIST VCR BRAND NAME GE HITACHI JVC A B C MAGNAVOX MITSUBISHI NEC PHILIPS BUTTONS (A) (B) 1 1 9 2 9 ` 9 4 6 6 6 3 9 1 9 6 9 3 9 5 1 1 7 1 7 6 6 7 6 8 3 7 3 8 1 9 9 5 1 1 9 4 9 1 9 6 1 2 VCR BRAND NAME BUTTONS (A) (B) PHILIPS 3 3 7 2 PANASONIC 1 3 1 7 1 1 9 4 1 8 RCA 9 2 9 4 6 6 6 3 9 ` SANYO 3 6 3 5 SHARP 1 5 1...Although the MBR is not able to control the VCR, use the controls on manually and try Random Assemble Editing. In this one to reset the VCR brand....
Instruction Manual
Page 45
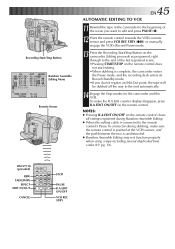
... all the way to edit and press PAUSE (6). 12 Point the remote control towards the VCR's remote sensor and press VCR REC STBY (q6), or manually engage the VCR's Record-Pause mode. 13 Press the Recording Start/Stop Button on the camcorder. To make sure the remote control is pointed at...
... all the way to edit and press PAUSE (6). 12 Point the remote control towards the VCR's remote sensor and press VCR REC STBY (q6), or manually engage the VCR's Record-Pause mode. 13 Press the Recording Start/Stop Button on the camcorder. To make sure the remote control is pointed at...

Instruction Manual
Page 48
REFER MANUAL" appears. Original track is output on both "L" and "R" channels in stereo. Recording sound 32 kHz Display FULL SOUND SOUND 2 SOUND 1 Output sound Original and new ...
REFER MANUAL" appears. Original track is output on both "L" and "R" channels in stereo. Recording sound 32 kHz Display FULL SOUND SOUND 2 SOUND 1 Output sound Original and new ...


