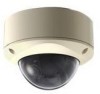
JVC TK-C215VP12U - CCTV Camera - Vandal Support and Manuals
Get Help and Manuals for this JVC item
View All Support Options Below
Free JVC TK-C215VP12U manuals!
Problems with JVC TK-C215VP12U?
Ask a Question
Free JVC TK-C215VP12U manuals!
Problems with JVC TK-C215VP12U?
Ask a Question
Popular JVC TK-C215VP12U Manual Pages
Instructions - Page 1
Model No. TK-C215VP4U/E,TK-C215VP12U/E
Serial No. which is located on the body.
LST0519-001A DOME CAMERA
TK-C215VP4U/E TK-C215VP12U/E
INSTRUCTIONS
For Customer Use: Enter below the Serial No. Retain this information for future reference.
Instructions - Page 5
...such as follows:
TK-C215VP4U TK-C215VP4E TK-C215VP12U TK-C215VP12E
In this manual, each model number is described without the last letter (U/E) which allow setting of the monitoring screen size under normal circumstances and during use.
: Pages or items to refer to B&W image when the scene is getting dark.
This instruction manual covers total 4 different models in common as functions...
Instructions - Page 6
... proper use of this product ... 7 Name of Parts 9 Setting the Switches and the Lens
(TK-C215VP4U/E 12 Setting the Switches and the Lens
(TK-C215VP12U/E 14
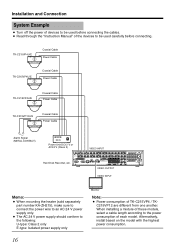
Installation and Connection
System Example 16 About Connection Cables 17
Video signal cables 17 DC 12 V or AC 24 V
power supply cable 17 Electrical Specifications of
Alarm Input Terminals 18 The right...
Instructions - Page 7
... AGC function is not a malfunction. (TK-C215VP12U/E only)
7 When switching between the...) may increase the noises in the image and color changes .
ⅷ Do not install this unit at a dark place and the screen may appear grainy. These are due ..., leave this unit at room temperature for the camera that is set to Wide and the tilt angle set close to ±70°, a portion of this unit may...
Instructions - Page 8
... use of operations. The service lives given below are replaced before performing maintenance.
ⅷ Clean the dome cover using a cloth that the replacement of consumable parts is dipped into a neutral detergent diluted with water, followed by wiping with thinner or benzene may vary depending on consumable parts
(TK-C215VP12U/E only)
The following parts are consumable and should be...
Instructions - Page 10
... should conform to the following:
U-type: Class 2 only E-type: Isolated power supply only ● For inquiries on the heater, consult your
nearby JVC dealer. Introduction
Name of Parts (continued)
Camera (continued)
G
L K J TK-C215VP12U/E only I AC 24 V/DC 12 V Power Supply Wire
DC 12 V Input: Red (+12 V), Black (GND) AC 24 V Input: Nonpolar
Note:
●...
Instructions - Page 13
... in the case of field becomes shallower, thus enabling focus to AOFFB. U type: 60 Hz only E type: 50 Hz only (Default setting: INT)
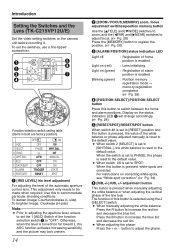
4. [WHT.BAL.] ATW/MANUAL selection switch.
G Zoom adjustment ring
Move this to the left /right to AONB increases the iris aperture by 1 stop and the object will open up...
Instructions - Page 14
...
Press this button is pressed when manually adjusting the white balance or when ...instructions on the camera unit before mounting it. To darken image: Counterclockwise (L side) To brighten image: Clockwise (H side)
Note:
● Prior to adjusting the aperture level, ensure to AOFFB. F [R/B,+/-] R/B, +/- Introduction
Setting the Switches and the Lens (TK-C215VP12U/E)
Set the video setting...
Instructions - Page 15
... seconds. RESET: The [RESET/SPOT] button E is used as [+/-] adjustment buttons. (Default setting: WHT.BAL.)
3. [SYNC] Synchronization system selection
switch. SPOT: The [RESET/SPOT] button E is used as [R/B] adjustment buttons.
When switching between multiple cameras using . (A pg. 18 AElectrical Specifications of Alarm Input TerminalsB) (A pg. 25 AAdjusting the video imageB)
TRIGGER: Upon...
Instructions - Page 16
... supply only
Monitor
Note:
● Power consumption of TK-C215VP4 / TKC215VP12 are different from one another. Alternatively, install based on the model with the highest power consumption.
16
TK-C215VP4U/E
Coaxial Cable Power Cable
TK-C215VP4U/E
Coaxial Cable Power Cable
TK-C215VP4U/E
Coaxial Cable Power Cable
TK-C215VP12U/E
Coaxial Cable Power Cable
Alarm Signal (METAL CONTACT...
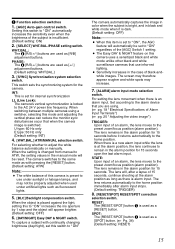
Instructions - Page 20

... sure to touch the metal surface of the [MONITOR] terminal to malfunction.
20 Setting the switches
Set the switches for video images. (APg. 12 eSetting the Switches and the Lens (TK-C215VP4U/E)f) (APg. 14 eSetting the Switches and the Lens (TK-C215VP12U/E)f)
Inner
2
Dome
Fall Prevention Wire
Wrench (Supplied)
Clip(x 3)
3 LL PHASE
1 2
O N2
3
4
4
5 6
WHT.
7
BAL...
Instructions - Page 21
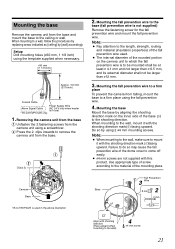
... direction (Face upward when mounting to remove the
camera unit from the base. Setup Drill mounting holes (R30 mm, 1 1/8 inch) using 2 R4 mm mounting...place using a screwdriver. Mounting the fall prevention wire used in use)
*TK-C215VP12U/E only
1. Mounting the fall prevention wire to a firm
place
To ...replacing areas indicated as [ceiling] by using the template supplied when necessary.
Instructions - Page 22
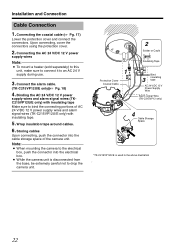
...
supply wires and alarm signal wires (TKC215VP12U/E only) with insulating tape.
5. Wrap insulation tape around cables.
6. Note:
● When mounting the camera to the electrical box, push the connector into the cable storage space of AC 24 V/DC 12 V power supply wires and alarm signal wires (TK-C215VP12U/E only) with insulating tape Make...
Instructions - Page 26
...button. Memo:
● Set by tightening each of the...
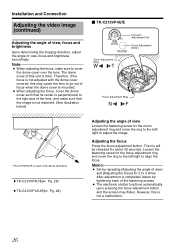
T
Focus Adjustment Ring
N
F
Optical Axis *TK-C215VP4U/E is used in the above illustration
ࡗTK-C215VP4U/E(A Pg. 26) ࡗTK-C215VP12U/E(A Pg. 28)
Adjusting the angle of view
Loosen... the left /right to cover the dome cover over the lens.
Installation and Connection
Adjusting the video image (continued)
Adjusting the angle of view...
Instructions - Page 40

© 2006 Victor Company of Japan, Limited
LST0519-001A
TK-C215VP4U/E TK-C215VP12U/E DOME CAMERA
JVC TK-C215VP12U Reviews
We have not received any reviews for JVC yet.