Instruction Manual
Page 1
... Indications 60 Terms 62 SPECIFICATIONS 63 EN LYT0420-001B DIGITAL VIDEO CAMERA GR-DVF31 Please visit our CyberCam Homepage on the bottom of cabinet. Model No. which is located on the World Wide Web and answer our Consumer Survey (in English only): http://www.jvc-victor.co.jp/english/index-e.html INSTRUCTIONS For Customer Use: Enter below the Model No. and Serial No. Retain this...
... Indications 60 Terms 62 SPECIFICATIONS 63 EN LYT0420-001B DIGITAL VIDEO CAMERA GR-DVF31 Please visit our CyberCam Homepage on the bottom of cabinet. Model No. which is located on the World Wide Web and answer our Consumer Survey (in English only): http://www.jvc-victor.co.jp/english/index-e.html INSTRUCTIONS For Customer Use: Enter below the Model No. and Serial No. Retain this...
Instruction Manual
Page 2
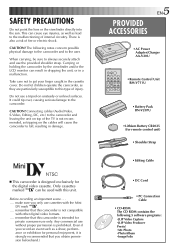
... this digital video camera. use . It is designed to persons. before use of another battery may be of sufficient magnitude to constitute a risk of important operating and maintenance (servicing) instructions in the Table Of Contents on lithium cell battery (for remote control unit) The battery used with button locations, etc. Warning on the cover. •Notes appear after most subsections. NOTES: ● The rating plate (serial number plate...
... this digital video camera. use . It is designed to persons. before use of another battery may be of sufficient magnitude to constitute a risk of important operating and maintenance (servicing) instructions in the Table Of Contents on lithium cell battery (for remote control unit) The battery used with button locations, etc. Warning on the cover. •Notes appear after most subsections. NOTES: ● The rating plate (serial number plate...
Instruction Manual
Page 3
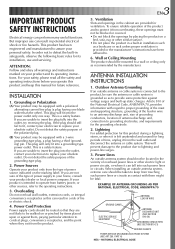
... antenna or cable system is connected to the product, be equipped with regard to proper grounding of the mast and supporting structure, grounding of the grounding-type plug. 2. But improper use and servicing. Overloading Do not overload wall outlets, extension cords, or integral convenience receptacles as recommended by placing the product on the marking label. ANTENNA INSTALLATION INSTRUCTIONS 1. Ventilation Slots...
... antenna or cable system is connected to the product, be equipped with regard to proper grounding of the mast and supporting structure, grounding of the grounding-type plug. 2. But improper use and servicing. Overloading Do not overload wall outlets, extension cords, or integral convenience receptacles as recommended by placing the product on the marking label. ANTENNA INSTALLATION INSTRUCTIONS 1. Ventilation Slots...
Instruction Manual
Page 5
..., resulting in damage. Ⅲ This camcorder is also a risk of internal circuitry. Connecting cables (Audio/Video, S-Video, Editing, DC, etc.) to get your finger caught in a malfunction. Before recording an important scene . . . .... Any commercial use without proper permission is not compatible with other digital video formats. .... Do not let children operate the camcorder, as lead to the user. CAUTION! remember that this camcorder is prohibited. (Even if you...
..., resulting in damage. Ⅲ This camcorder is also a risk of internal circuitry. Connecting cables (Audio/Video, S-Video, Editing, DC, etc.) to get your finger caught in a malfunction. Before recording an important scene . . . .... Any commercial use without proper permission is not compatible with other digital video formats. .... Do not let children operate the camcorder, as lead to the user. CAUTION! remember that this camcorder is prohibited. (Even if you...
Instruction Manual
Page 7
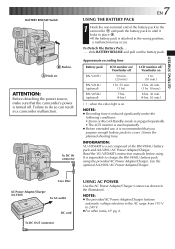
... AC Power Adapter/Charger AA-V20U To AC outlet DC cord To DC OUT connector USING AC POWER Use the AC Power Adapter/Charger (connect as shown in . Failure to charge the BN-V856U battery pack using . It is impossible to do so can result in a camcorder malfunction. Use the optional AA-V80U AC Power Adapter/Charger. NOTES: ● Recording time is reduced significantly under the following conditions: •Zoom or Record-Standby mode...
... AC Power Adapter/Charger AA-V20U To AC outlet DC cord To DC OUT connector USING AC POWER Use the AC Power Adapter/Charger (connect as shown in . Failure to charge the BN-V856U battery pack using . It is impossible to do so can result in a camcorder malfunction. Use the optional AA-V80U AC Power Adapter/Charger. NOTES: ● Recording time is reduced significantly under the following conditions: •Zoom or Record-Standby mode...
Instruction Manual
Page 8
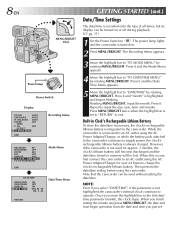
... SCREEN DISPLAY 4 DATE / TIME ON OFF ON DEC 25 ' 99 PM 5 : 30 Date/Time Menu RETURN GETTING STARTED (cont.) Date/Time Settings The date/time is always charged. Built-in Clock's Rechargeable Lithium Battery To store the date/time in memory, the clock's rechargeable lithium battery is turned on or off during playback (੬ pg. 31). 1 Set the Power Switch to the first date/ time parameter (month), the clock stops. Then perform the date/time setting before using the AC Power Adapter/Charger...
... SCREEN DISPLAY 4 DATE / TIME ON OFF ON DEC 25 ' 99 PM 5 : 30 Date/Time Menu RETURN GETTING STARTED (cont.) Date/Time Settings The date/time is always charged. Built-in Clock's Rechargeable Lithium Battery To store the date/time in memory, the clock's rechargeable lithium battery is turned on or off during playback (੬ pg. 31). 1 Set the Power Switch to the first date/ time parameter (month), the clock stops. Then perform the date/time setting before using the AC Power Adapter/Charger...
Instruction Manual
Page 9
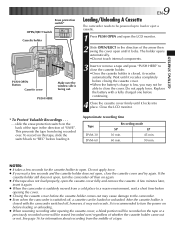
... OPEN and open the LCD monitor. 2 Slide OPEN/EJECT in the direction of whether the cassette holder came out or not. The holder opens automatically. •Do not touch internal components. 3 Insert or remove a tape and press "PUSH HERE" to the camcorder. ● Even when the camcorder is facing out. Do not apply force. GETTING STARTED Erase protection switch* OPEN/EJECT Switch Cassette holder PUSH OPEN Button Cassette cover Make sure the window...
... OPEN and open the LCD monitor. 2 Slide OPEN/EJECT in the direction of whether the cassette holder came out or not. The holder opens automatically. •Do not touch internal components. 3 Insert or remove a tape and press "PUSH HERE" to the camcorder. ● Even when the camcorder is facing out. Do not apply force. GETTING STARTED Erase protection switch* OPEN/EJECT Switch Cassette holder PUSH OPEN Button Cassette cover Make sure the window...
Instruction Manual
Page 13
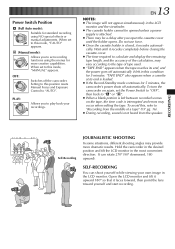
... for standard recording M A using the menus for 5 minutes, the camcorder's power shuts off the camcorder. PLAY PL (Manual mode): Allows you to "AUTO". When set the Power Switch to "OFF", then back to calculate and display the remaining tape length, and the accuracy of the calculation, may provide more creative capabilities. When set recording M functions using NO special effects or manual adjustments. cally. Do not use force. ● Once the cassette holder...
... for standard recording M A using the menus for 5 minutes, the camcorder's power shuts off the camcorder. PLAY PL (Manual mode): Allows you to "AUTO". When set the Power Switch to "OFF", then back to calculate and display the remaining tape length, and the accuracy of the calculation, may provide more creative capabilities. When set recording M functions using NO special effects or manual adjustments. cally. Do not use force. ● Once the cassette holder...
Instruction Manual
Page 19
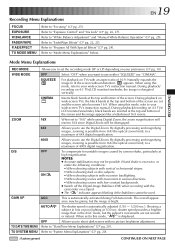
... the screen without distortion. Naturally expands the image to "White Balance Adjustment" and "Manual White Balance Operation" (੬ pg. 28). During playback/recording on 4:3 TVs/LCD monitor/viewfinder, the image is displayed. TO DATE/TIME MENU TO SYSTEM MENU OFF Allows you to use the Digital Zoom. Refer to "Exposure Control" and "Iris Lock" (੬ pg. 26, 27). Refer to "Date/Time Menu Explanations" (੬ pg. 20). Refer to use the Digital Zoom. During playback/ recording on 4:3 TVs/ LCD monitor/viewfinder, black...
... the screen without distortion. Naturally expands the image to "White Balance Adjustment" and "Manual White Balance Operation" (੬ pg. 28). During playback/recording on 4:3 TVs/LCD monitor/viewfinder, the image is displayed. TO DATE/TIME MENU TO SYSTEM MENU OFF Allows you to use the Digital Zoom. Refer to "Exposure Control" and "Iris Lock" (੬ pg. 26, 27). Refer to "Date/Time Menu Explanations" (੬ pg. 20). Refer to use the Digital Zoom. During playback/ recording on 4:3 TVs/ LCD monitor/viewfinder, black...
Instruction Manual
Page 20
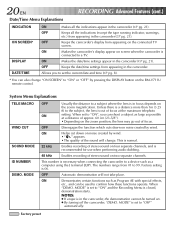
... change . OFF Keeps all the indications appear in the camcorder (੬ pg. 21). MODE" is out of focus. MODE" is set to "ON" and the Recording Menu is in the camcorder, the demonstration cannot be used to "ON", you to set to confirm how these functions operate. System Menu Explanations TELE MACRO WIND CUT SOUND MODE ID NUMBER DEMO. When set the current date and time (੬ pg. 8). * You can be turned...
... change . OFF Keeps all the indications appear in the camcorder (੬ pg. 21). MODE" is out of focus. MODE" is set to "ON" and the Recording Menu is in the camcorder, the demonstration cannot be used to "ON", you to set to confirm how these functions operate. System Menu Explanations TELE MACRO WIND CUT SOUND MODE ID NUMBER DEMO. When set the current date and time (੬ pg. 8). * You can be turned...
Instruction Manual
Page 28
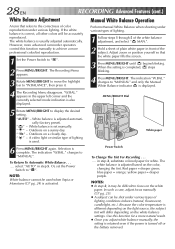
...more advanced camcorder operators control this function for white. White balance is completed, stops blinking. 4 Press MENU/BRIGHT. " " - The white balance is turned off or the battery removed. Red paper = deeper green; 28 EN RECORDING Advanced Features (cont.) White Balance Adjustment Manual White Balance Operation A term that the white paper fills the screen. 3 Press MENU/BRIGHT until begins blinking. Perform Manual White Balance when shooting under various types of the subject. When the setting is adjusted automatically (factory preset). " " - in...
...more advanced camcorder operators control this function for white. White balance is completed, stops blinking. 4 Press MENU/BRIGHT. " " - The white balance is turned off or the battery removed. Red paper = deeper green; 28 EN RECORDING Advanced Features (cont.) White Balance Adjustment Manual White Balance Operation A term that the white paper fills the screen. 3 Press MENU/BRIGHT until begins blinking. Perform Manual White Balance when shooting under various types of the subject. When the setting is adjusted automatically (factory preset). " " - in...
Instruction Manual
Page 29
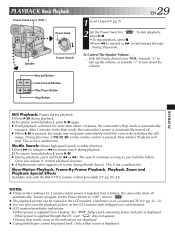
... tape during playback. 2) To resume normal playback, press 4/6 again. ● If still playback continues for reverse search during Shuttle Search. To turn on the LCD monitor with the RM-V711U remote control (provided) (੬ pg. 40, 41). PLAY PLAYBACK PLAYBACK Basic Playback Power Zoom Lever (VOL.) Power lamp OFF M A Speaker Power Switch Rewind Button Fast-Forward Button Play/Pause Button Stop Button EN29 1 Load a tape (੬ pg. 9). 2 Set the Power Switch to turn down the volume. Still Playback: Pauses during playback. 1) Press 4/6 during Stop mode...
... tape during playback. 2) To resume normal playback, press 4/6 again. ● If still playback continues for reverse search during Shuttle Search. To turn on the LCD monitor with the RM-V711U remote control (provided) (੬ pg. 40, 41). PLAY PLAYBACK PLAYBACK Basic Playback Power Zoom Lever (VOL.) Power lamp OFF M A Speaker Power Switch Rewind Button Fast-Forward Button Play/Pause Button Stop Button EN29 1 Load a tape (੬ pg. 9). 2 Set the Power Switch to turn down the volume. Still Playback: Pauses during playback. 1) Press 4/6 during Stop mode...
Instruction Manual
Page 31
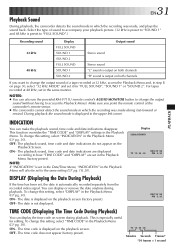
... change this setting, select "TIME CODE" in the Playback Menu (੬ pg. 30). The playback sound, time code and date indications do not appear on page 30, select "32 kHz MODE" and set it for editing. You can display the time code on the playback screen (factory preset). For tapes recorded at 48 kHz, set to access the Playback Menu). NOTE: If "INDICATION" is automatically recorded separately from the recorded video signal. ON- EN31 Playback Sound During playback, the camcorder detects the sound mode...
... change this setting, select "TIME CODE" in the Playback Menu (੬ pg. 30). The playback sound, time code and date indications do not appear on page 30, select "32 kHz MODE" and set it for editing. You can display the time code on the playback screen (factory preset). For tapes recorded at 48 kHz, set to access the Playback Menu). NOTE: If "INDICATION" is automatically recorded separately from the recorded video signal. ON- EN31 Playback Sound During playback, the camcorder detects the sound mode...
Instruction Manual
Page 35
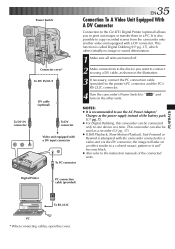
... units are turned off. 2 Make connections to the device you to print out images or transfer them to a PC. It is recommended to use the AC Power Adapter/ Charger as the power supply instead of the connected units. " and NOTES: ● It is also possible to copy recorded scenes from the camcorder onto another video unit equipped with a DV connector. Digital Printer PC connection cable (provided) PLAYBACK To RS...
... units are turned off. 2 Make connections to the device you to print out images or transfer them to a PC. It is recommended to use the AC Power Adapter/ Charger as the power supply instead of the connected units. " and NOTES: ● It is also possible to copy recorded scenes from the camcorder onto another video unit equipped with a DV connector. Digital Printer PC connection cable (provided) PLAYBACK To RS...
Instruction Manual
Page 37
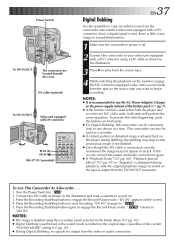
... a cassette to record on the screen. 4. This camcorder can be used when both the player and recorder are JVC video units, both units. ● For Digital Dubbing, this occurs, turn off . 2 Connect the camcorder to play back the source tape. 4 While watching the playback on the monitor, engage the DV connector-equipped video unit's record mode from the video or audio connectors. Power Switch To DV IN/OUT The connectors are output from...
... a cassette to record on the screen. 4. This camcorder can be used when both the player and recorder are JVC video units, both units. ● For Digital Dubbing, this occurs, turn off . 2 Connect the camcorder to play back the source tape. 4 While watching the playback on the monitor, engage the DV connector-equipped video unit's record mode from the video or audio connectors. Power Switch To DV IN/OUT The connectors are output from...
Instruction Manual
Page 42
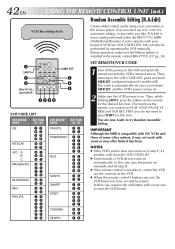
... not able to reset the VCR brand. IMPORTANT Although the MBR is set will be performed by operating the VCR manually. R.A.Edit is more easily performed when the RM-V711U MBR (Multi-Brand Remote) is compatible with JVC VCRs and those of VCR do not need to the VCR and point the remote towards the VCR's infrared sensor. You are PLAY, STOP, PAUSE, FF, REW and VCR REC STBY (you like...
... not able to reset the VCR brand. IMPORTANT Although the MBR is set will be performed by operating the VCR manually. R.A.Edit is more easily performed when the RM-V711U MBR (Multi-Brand Remote) is compatible with JVC VCRs and those of VCR do not need to the VCR and point the remote towards the VCR's infrared sensor. You are PLAY, STOP, PAUSE, FF, REW and VCR REC STBY (you like...
Instruction Manual
Page 49
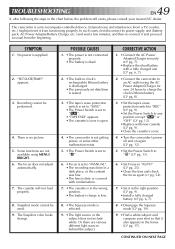
... AC Power Adapter/Charger securely (੬ pg. 7). •Replace the dead battery with a fully charged one (੬ pg. 6, 7). 2. •Connect the camcorder to an AC outlet using MENU/ BRIGHT. 6. Recording cannot be used. 9. The cassette will not load properly. 8. POSSIBLE CAUSES 1. •The power is not connected properly. •The battery is dead. 2. •The built-in clock's rechargeable lithium battery is discharged. •The previously set date/time is erased...
... AC Power Adapter/Charger securely (੬ pg. 7). •Replace the dead battery with a fully charged one (੬ pg. 6, 7). 2. •Connect the camcorder to an AC outlet using MENU/ BRIGHT. 6. Recording cannot be used. 9. The cassette will not load properly. 8. POSSIBLE CAUSES 1. •The power is not connected properly. •The battery is dead. 2. •The built-in clock's rechargeable lithium battery is discharged. •The previously set date/time is erased...
Instruction Manual
Page 53
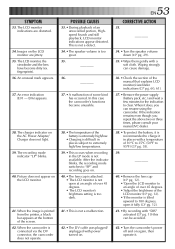
... avoided. 42. •Turn the camcorder's power off and on . The LCD monitor, the viewfinder and the lens have become unusable. 38. •The temperature of the screen. 42. The recording mode indicator "LP" blinks. 40. When it does, you repeat the above two or three times, please consult your nearest JVC dealer. 38. •To protect the battery, it is too...
... avoided. 42. •Turn the camcorder's power off and on . The LCD monitor, the viewfinder and the lens have become unusable. 38. •The temperature of the screen. 42. The recording mode indicator "LP" blinks. 40. When it does, you repeat the above two or three times, please consult your nearest JVC dealer. 38. •To protect the battery, it is too...
Instruction Manual
Page 62
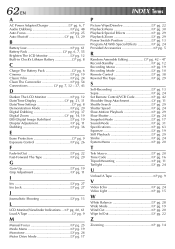
.... 29 Shutter Speed pg. 24 Slow-Motion Playback pg. 29 Slow Shutter pg. 24 Snapshot Mode pg. 17 Sound Mode pg. 31 Specifications pg. 63 Squeeze pg. 19 Still Playback pg. 29 Strobe pg. 24 System Menu pg. 20 T Tele Macro pg. 20 Time Code pg. 16 Tripod Mounting pg. 11 Twilight pg. 24 U Unload A Tape pg. 9 V Video Echo pg. 24 Video Light pg. 15 W White Balance pg. 28 Wide Mode pg...
.... 29 Shutter Speed pg. 24 Slow-Motion Playback pg. 29 Slow Shutter pg. 24 Snapshot Mode pg. 17 Sound Mode pg. 31 Specifications pg. 63 Squeeze pg. 19 Still Playback pg. 29 Strobe pg. 24 System Menu pg. 20 T Tele Macro pg. 20 Time Code pg. 16 Tripod Mounting pg. 11 Twilight pg. 24 U Unload A Tape pg. 9 V Video Echo pg. 24 Video Light pg. 15 W White Balance pg. 28 Wide Mode pg...
Instruction Manual
Page 63
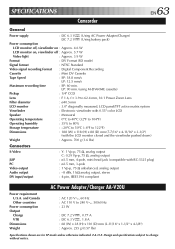
...and Canada Other countries Power consumption Output Charge VTR Dimensions Weight : AC 120 V`, 60 Hz : AC 110 V to change without notice. SPECIFICATIONS Camcorder EN63 General Power supply : DC 6.3 V (Using AC Power Adapter/Charger) DC 7.2 V (Using battery pack) Power consumption LCD monitor off, viewfinder on : Approx. 4.6 W LCD monitor on, viewfinder off : Approx. 5.7 W Video light : Approx. 3.9 W Format : DV Format (SD mode) Signal format : NTSC Standard Video signal recording format : Digital Component Recording Cassette : Mini DV Cassette Tape Speed : SP: 18.8 mm...
...and Canada Other countries Power consumption Output Charge VTR Dimensions Weight : AC 120 V`, 60 Hz : AC 110 V to change without notice. SPECIFICATIONS Camcorder EN63 General Power supply : DC 6.3 V (Using AC Power Adapter/Charger) DC 7.2 V (Using battery pack) Power consumption LCD monitor off, viewfinder on : Approx. 4.6 W LCD monitor on, viewfinder off : Approx. 5.7 W Video light : Approx. 3.9 W Format : DV Format (SD mode) Signal format : NTSC Standard Video signal recording format : Digital Component Recording Cassette : Mini DV Cassette Tape Speed : SP: 18.8 mm...


