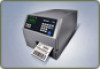
PX4i and PX6i High Performance Printer User's Manual
Page 7
... 101 Upgrading Firmware 102 Downloading Fonts and Graphics 104 4 Troubleshooting and Maintaining the Printer 105 Troubleshooting the Printer 106 Contacting Product Support 106 Understanding Error Messages 107 Troubleshooting Printer Problems and Finding Solutions 111 Resetting the Printer 117 Adjusting the Printer 118 Adjusting the Pressure Arm 118 Adjusting the Label Stop Sensor ... 141 USB Host Interface 142 Ethernet Interface 142 Parallel IEEE 1284 Interface 143 Media Specifications 144 Accessories for the Printer 155 PX4i and PX6i High Performance Printer User's Manual vii
... 101 Upgrading Firmware 102 Downloading Fonts and Graphics 104 4 Troubleshooting and Maintaining the Printer 105 Troubleshooting the Printer 106 Contacting Product Support 106 Understanding Error Messages 107 Troubleshooting Printer Problems and Finding Solutions 111 Resetting the Printer 117 Adjusting the Printer 118 Adjusting the Pressure Arm 118 Adjusting the Label Stop Sensor ... 141 USB Host Interface 142 Ethernet Interface 142 Parallel IEEE 1284 Interface 143 Media Specifications 144 Accessories for the Printer 155 PX4i and PX6i High Performance Printer User's Manual vii
PX4i and PX6i High Performance Printer User's Manual
Page 13
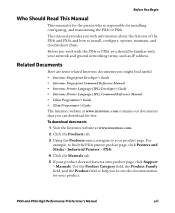
...Intermec Fingerprint Command Reference Manual • Intermec Printer Language (IPL) Developer's Guide • Intermec Printer Language (IPL) Command Reference Manual • DSim Programmer's Guide • ZSim Programmer's Guide The Intermec website at www.intermec.com. 2 Click the Products tab. 3 Using the Products menu, navigate to find the PX4i printer product page, click Printers and Media > Industrial Printers > PX4i...install, configure, operate, maintain, and troubleshoot them. To download documents 1 Visit the Intermec website at www.intermec.com contains our documents that you ...
...Intermec Fingerprint Command Reference Manual • Intermec Printer Language (IPL) Developer's Guide • Intermec Printer Language (IPL) Command Reference Manual • DSim Programmer's Guide • ZSim Programmer's Guide The Intermec website at www.intermec.com. 2 Click the Products tab. 3 Using the Products menu, navigate to find the PX4i printer product page, click Printers and Media > Industrial Printers > PX4i...install, configure, operate, maintain, and troubleshoot them. To download documents 1 Visit the Intermec website at www.intermec.com contains our documents that you ...
PX4i and PX6i High Performance Printer User's Manual
Page 20
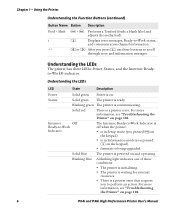
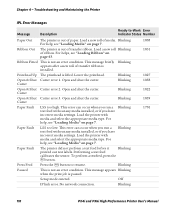
... upgraded. For more information, see "Troubleshooting the Printer" on page 106. For more information, see "Troubleshooting the Printer" on the keypad). • firmware is communicating. Using the Printer Understanding the Function Buttons (continued) Button Name Button Description Feed + Shift i < > F + S Performs a Testfeed (feeds a blank label and adjusts the media feed). Intermec Off Ready-to-Work Indicator The...
... upgraded. For more information, see "Troubleshooting the Printer" on page 106. For more information, see "Troubleshooting the Printer" on the keypad). • firmware is communicating. Using the Printer Understanding the Function Buttons (continued) Button Name Button Description Feed + Shift i < > F + S Performs a Testfeed (feeds a blank label and adjusts the media feed). Intermec Off Ready-to-Work Indicator The...
PX4i and PX6i High Performance Printer User's Manual
Page 119
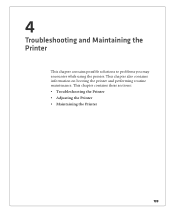
This chapter also contains information on booting the printer and performing routine maintenance. 4 Troubleshooting and Maintaining the Printer This chapter contains possible solutions to problems you may encounter while using the printer. This chapter contains these sections: • Troubleshooting the Printer • Adjusting the Printer • Maintaining the Printer 105
This chapter also contains information on booting the printer and performing routine maintenance. 4 Troubleshooting and Maintaining the Printer This chapter contains possible solutions to problems you may encounter while using the printer. This chapter contains these sections: • Troubleshooting the Printer • Adjusting the Printer • Maintaining the Printer 105

PX4i and PX6i High Performance Printer User's Manual
Page 120
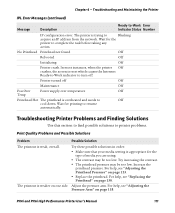
... may need to an Intermec Product Support representative in the printer menu system or on a test print page. 106 PX4i and PX6i High Performance Printer User's Manual Contacting Product Support Before contacting Intermec Product Support, you encounter. Before calling Intermec Product Support, make sure you have printer operation, print quality, or printer communication problems at intermec.custhelp.com to...
... may need to an Intermec Product Support representative in the printer menu system or on a test print page. 106 PX4i and PX6i High Performance Printer User's Manual Contacting Product Support Before contacting Intermec Product Support, you encounter. Before calling Intermec Product Support, make sure you have printer operation, print quality, or printer communication problems at intermec.custhelp.com to...
PX4i and PX6i High Performance Printer User's Manual
Page 121
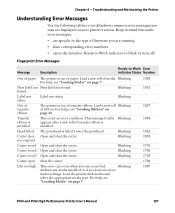
..."Loading Ribbon" on page 7. Load a new roll Blinking of media. Troubleshooting and Maintaining the Printer Understanding Error Messages Use the following tables to the type of firmware you have corresponding error numbers. • cause the Intermec Ready-to-Work indicator to -Work Error Indicator Status Number Out of transfer ... incorrect media settings. Blinking For help , see displayed on page 7. 1005 1031 1027 1058 1022 1059 1701 1702 1703 1704 1007 PX4i and PX6i High Performance Printer User's Manual 107 Blinking Cutter error3 Open and shut the cutter.
..."Loading Ribbon" on page 7. Load a new roll Blinking of media. Troubleshooting and Maintaining the Printer Understanding Error Messages Use the following tables to the type of firmware you have corresponding error numbers. • cause the Intermec Ready-to-Work indicator to -Work Error Indicator Status Number Out of transfer ... incorrect media settings. Blinking For help , see displayed on page 7. 1005 1031 1027 1058 1022 1059 1701 1702 1703 1704 1007 PX4i and PX6i High Performance Printer User's Manual 107 Blinking Cutter error3 Open and shut the cutter.
PX4i and PX6i High Performance Printer User's Manual
Page 122
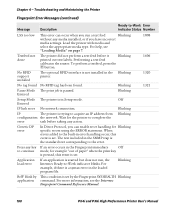
Troubleshooting and Maintaining the Printer Fingerprint Error Messages (continued) Message Description Ready-to-Work Error Indicator Status Number LSS too low This error can enable error handling for the printer to acquire an IP address from configuration the network. Testfeed not done The printer did..., you can occur when you have incorrect media settings. For help, see the Intermec Fingerprint Command Reference Manual. 1008 1606 1320 1321 108 PX4i and PX6i High Performance Printer User's Manual Blinking Pause Mode The print job is set . Performing a test feed...
Troubleshooting and Maintaining the Printer Fingerprint Error Messages (continued) Message Description Ready-to-Work Error Indicator Status Number LSS too low This error can enable error handling for the printer to acquire an IP address from configuration the network. Testfeed not done The printer did..., you can occur when you have incorrect media settings. For help, see the Intermec Fingerprint Command Reference Manual. 1008 1606 1320 1321 108 PX4i and PX6i High Performance Printer User's Manual Blinking Pause Mode The print job is set . Performing a test feed...
PX4i and PX6i High Performance Printer User's Manual
Page 123
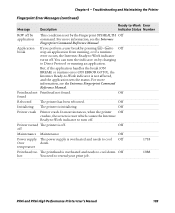
...Troubleshooting and Maintaining the Printer Fingerprint Error Messages (continued) Message Description Ready-to Direct Protocol or running , or if a runtime error occurs, the Intermec Ready-to turn the indicator on by the Fingerprint SYSHEALTH Off command. You can turn off. Off found . Printer turned The printer...overheated and needs to resend your print job. 1718 1088 PX4i and PX6i High Performance Printer User's Manual 109 But, if the application handles the break (ON BREAK) or runtime error (ON ERROR GOTO), the Intermec Ready-to cool down . Chapter 4 - If you perform...
...Troubleshooting and Maintaining the Printer Fingerprint Error Messages (continued) Message Description Ready-to Direct Protocol or running , or if a runtime error occurs, the Intermec Ready-to turn the indicator on by the Fingerprint SYSHEALTH Off command. You can turn off. Off found . Printer turned The printer...overheated and needs to resend your print job. 1718 1088 PX4i and PX6i High Performance Printer User's Manual 109 But, if the application handles the break (ON BREAK) or runtime error (ON ERROR GOTO), the Intermec Ready-to cool down . Chapter 4 - If you perform...
PX4i and PX6i High Performance Printer User's Manual
Page 124
... any media installed, or if you have incorrect media settings. Blinking Paper Fault LSS too low. Setup mode entered. Troubleshooting and Maintaining the Printer IPL Error Messages Message Description Ready-to resume. Load a new roll of paper. Printhead Up The printhead is not ...have incorrect media settings. To perform a testfeed, press the A button. Blinking 1005 1031 1027 1058 1022 1059 1701 110 PX4i and PX6i High Performance Printer User's Manual For helps, see "Loading Media" on page 7. This message briefly Blinking appears after a new roll of transfer...
... any media installed, or if you have incorrect media settings. Blinking Paper Fault LSS too low. Setup mode entered. Troubleshooting and Maintaining the Printer IPL Error Messages Message Description Ready-to resume. Load a new roll of paper. Printhead Up The printhead is not ...have incorrect media settings. To perform a testfeed, press the A button. Blinking 1005 1031 1027 1058 1022 1059 1701 110 PX4i and PX6i High Performance Printer User's Manual For helps, see "Loading Media" on page 7. This message briefly Blinking appears after a new roll of transfer...
PX4i and PX6i High Performance Printer User's Manual
Page 125
... off . Try increasing the contrast. • The printhead pressure may be too low. The printout is weak, overall. PX4i and PX6i High Performance Printer User's Manual 111 For help , see "Adjusting the Printhead Pressure" on page 130. Adjust the pressure arm. Try these...is reset which causes the Intermec Ready-to-Work indicator to turn off Off Maintenance Off Psu Over Power supply over temperature Off Temp Printhead Hot The printhead is trying to complete the task before taking any action. Troubleshooting and Maintaining the Printer IPL Error Messages (continued...
... off . Try increasing the contrast. • The printhead pressure may be too low. The printout is weak, overall. PX4i and PX6i High Performance Printer User's Manual 111 For help , see "Adjusting the Printhead Pressure" on page 130. Adjust the pressure arm. Try these...is reset which causes the Intermec Ready-to-Work indicator to turn off Off Maintenance Off Psu Over Power supply over temperature Off Temp Printhead Hot The printhead is trying to complete the task before taking any action. Troubleshooting and Maintaining the Printer IPL Error Messages (continued...
PX4i and PX6i High Performance Printer User's Manual
Page 126
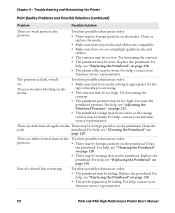
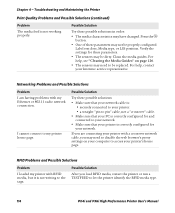
... the printhead pressure. For help , see "Replacing the Printhead" on the media. For help , contact your Intermec service representative. 112 PX4i and PX6i High Performance Printer User's Manual Try these possible solutions in order: • There may be foreign particles on page 130. ...Make sure that you are compatible. • Make sure that your media setting is excessive bleeding on the printout. Troubleshooting and Maintaining the Printer Print Quality Problems and Possible Solutions (continued) Problem Possible Solution There are weak spots on the media. • Make...
... the printhead pressure. For help , see "Replacing the Printhead" on the media. For help , contact your Intermec service representative. 112 PX4i and PX6i High Performance Printer User's Manual Try these possible solutions in order: • There may be foreign particles on page 130. ...Make sure that you are compatible. • Make sure that your media setting is excessive bleeding on the printout. Troubleshooting and Maintaining the Printer Print Quality Problems and Possible Solutions (continued) Problem Possible Solution There are weak spots on the media. • Make...
PX4i and PX6i High Performance Printer User's Manual
Page 127
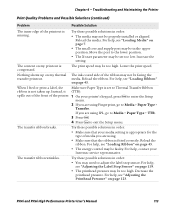
...solutions in order: • The media may be faulty. Troubleshooting and Maintaining the Printer Print Quality Problems and Possible Solutions (continued) Problem Possible Solution The inner edge of the printer. 1 On your Intermec service representative. For help , see "Loading Ribbon" on ...page 119. • The printhead pressure may need to Media > Paper Type > Transfer. PX4i and PX6i High Performance Printer User's Manual 113 Nothing shows...
...solutions in order: • The media may be faulty. Troubleshooting and Maintaining the Printer Print Quality Problems and Possible Solutions (continued) Problem Possible Solution The inner edge of the printer. 1 On your Intermec service representative. For help , see "Loading Ribbon" on ...page 119. • The printhead pressure may need to Media > Paper Type > Transfer. PX4i and PX6i High Performance Printer User's Manual 113 Nothing shows...
PX4i and PX6i High Performance Printer User's Manual
Page 128
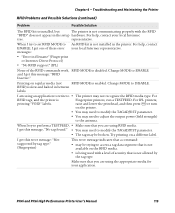
...you may need to let the printer identify the RFID media type. 114 PX4i and PX6i High Performance Printer User's Manual Possible Solution Try...printer with a crossover network cable, you load RFID media, restart the printer or run a TESTFEED to be properly configured: Label rest dots, Media type, or LSS position. Networking Problems and Possible Solutions Problem I cannot connect to access your Intermec...not be replaced. For help , contact your printer's home page. Troubleshooting and Maintaining the Printer Print Quality Problems and Possible Solutions (continued) Problem...
...you may need to let the printer identify the RFID media type. 114 PX4i and PX6i High Performance Printer User's Manual Possible Solution Try...printer with a crossover network cable, you load RFID media, restart the printer or run a TESTFEED to be properly configured: Label rest dots, Media type, or LSS position. Networking Problems and Possible Solutions Problem I cannot connect to access your Intermec...not be replaced. For help , contact your printer's home page. Troubleshooting and Maintaining the Printer Print Quality Problems and Possible Solutions (continued) Problem...
PX4i and PX6i High Performance Printer User's Manual
Page 129
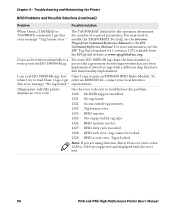
... data segment that is not installed in the printer. When I get one of these error messages: • "Error in filename" (Fingerprint or Intermec Direct Protocol) • "No RFID support" (IPL) An RFID kit is not available on the printer. • You may need to modify the... or turn on the RFID media. • is disabled. PX4i and PX6i High Performance Printer User's Manual 115 For RFID tags, and the printer is slow and halted in the setup hardware. Troubleshooting and Maintaining the Printer RFID Problems and Possible Solutions (continued) Problem Possible Solution The ...
... data segment that is not installed in the printer. When I get one of these error messages: • "Error in filename" (Fingerprint or Intermec Direct Protocol) • "No RFID support" (IPL) An RFID kit is not available on the printer. • You may need to modify the... or turn on the RFID media. • is disabled. PX4i and PX6i High Performance Printer User's Manual 115 For RFID tags, and the printer is slow and halted in the setup hardware. Troubleshooting and Maintaining the Printer RFID Problems and Possible Solutions (continued) Problem Possible Solution The ...
PX4i and PX6i High Performance Printer User's Manual
Page 130
... EPC Tag Data Standard (v1.1, revision 1.27) available from being rewritten has not been implemented. Note: If you are using Intermec Direct Protocol, error codes 1320 to troubleshoot the problem: 1320 No RFID support installed. 1321 No tag found ." Chapter 4 - You may need to read ISO 18000... 18000-6B tag chips, the functionality to tags with the error text. 116 PX4i and PX6i High Performance Printer User's Manual Switch to write protected ISO 18000-6B tag. For more information, see the Intermec Fingerprint Command Reference Manual or the IPL Command Reference Manual. To when I try...
... EPC Tag Data Standard (v1.1, revision 1.27) available from being rewritten has not been implemented. Note: If you are using Intermec Direct Protocol, error codes 1320 to troubleshoot the problem: 1320 No RFID support installed. 1321 No tag found ." Chapter 4 - You may need to read ISO 18000... 18000-6B tag chips, the functionality to tags with the error text. 116 PX4i and PX6i High Performance Printer User's Manual Switch to write protected ISO 18000-6B tag. For more information, see the Intermec Fingerprint Command Reference Manual or the IPL Command Reference Manual. To when I try...
PX4i and PX6i High Performance Printer User's Manual
Page 131
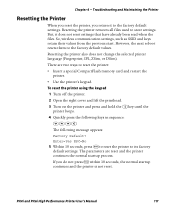
... message appears: Factory Default? Chapter 4 - Troubleshooting and Maintaining the Printer Resetting the Printer When you reset the printer, you do not press E within 10 seconds, the normal startup continues and the printer is not reset. However, the next reboot resets... them to store settings. Enter=Yes ESC=No 5 Within 10 seconds, press E to reset the printer to the factory default settings. PX4i...
... message appears: Factory Default? Chapter 4 - Troubleshooting and Maintaining the Printer Resetting the Printer When you reset the printer, you do not press E within 10 seconds, the normal startup continues and the printer is not reset. However, the next reboot resets... them to store settings. Enter=Yes ESC=No 5 Within 10 seconds, press E to reset the printer to the factory default settings. PX4i...
PX4i and PX6i High Performance Printer User's Manual
Page 132
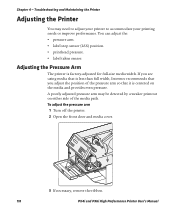
...To adjust the pressure arm 1 Turn off the printer. 2 Open the front door and media cover. 3 If necessary, remove the ribbon. 118 PX4i and PX6i High Performance Printer User's Manual A poorly adjusted pressure arm may need to adjust your printer to accommodate your printing needs or improve performance. ... are using media that is less than full width, Intermec recommends that you adjust the position of the pressure arm so that it is factory-adjusted for full-size media width. Troubleshooting and Maintaining the Printer Adjusting the Printer You may be detected by a weaker printout on the...
...To adjust the pressure arm 1 Turn off the printer. 2 Open the front door and media cover. 3 If necessary, remove the ribbon. 118 PX4i and PX6i High Performance Printer User's Manual A poorly adjusted pressure arm may need to adjust your printer to accommodate your printing needs or improve performance. ... are using media that is less than full width, Intermec recommends that you adjust the position of the pressure arm so that it is factory-adjusted for full-size media width. Troubleshooting and Maintaining the Printer Adjusting the Printer You may be detected by a weaker printout on the...
PX4i and PX6i High Performance Printer User's Manual
Page 133
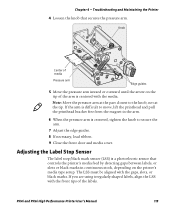
... of media Pressure arm Edge guides 5 Move the pressure arm inward or outward until the arrow on the printer's media type setup. The LSS must be aligned with the media. If you are using irregularly shaped labels.... If the arm is centered with the gaps, slots, or black marks. Chapter 4 - Troubleshooting and Maintaining the Printer 4 Loosen the knob that controls the printer's media feed by detecting gaps between labels, or slots or black marks in the arm. 6... is centered, tighten the knob to the knob, not at the tip. PX4i and PX6i High Performance Printer User's Manual 119
... of media Pressure arm Edge guides 5 Move the pressure arm inward or outward until the arrow on the printer's media type setup. The LSS must be aligned with the media. If you are using irregularly shaped labels.... If the arm is centered with the gaps, slots, or black marks. Chapter 4 - Troubleshooting and Maintaining the Printer 4 Loosen the knob that controls the printer's media feed by detecting gaps between labels, or slots or black marks in the arm. 6... is centered, tighten the knob to the knob, not at the tip. PX4i and PX6i High Performance Printer User's Manual 119
PX4i and PX6i High Performance Printer User's Manual
Page 134
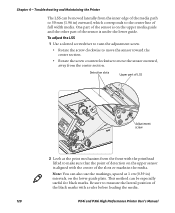
... media path to 50 mm (1.96 in the media. One part of the sensor is aligned with a ruler before loading the media. 120 PX4i and PX6i High Performance Printer User's Manual Detection slots Upper part of LSS Adjustment screw 2 Look at 1 cm (0.39 in) intervals, on the upper media guide and the... screwdriver to turn the adjustment screw. • Rotate the screw clockwise to move the sensor outward, away from the inner edge of full width media. Troubleshooting and Maintaining the Printer The LSS can be especially useful for black marks. Chapter 4 -
... media path to 50 mm (1.96 in the media. One part of the sensor is aligned with a ruler before loading the media. 120 PX4i and PX6i High Performance Printer User's Manual Detection slots Upper part of LSS Adjustment screw 2 Look at 1 cm (0.39 in) intervals, on the upper media guide and the... screwdriver to turn the adjustment screw. • Rotate the screw clockwise to move the sensor outward, away from the inner edge of full width media. Troubleshooting and Maintaining the Printer The LSS can be especially useful for black marks. Chapter 4 -
PX4i and PX6i High Performance Printer User's Manual
Page 135
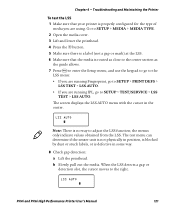
LSS AUTO PX4i and PX6i High Performance Printer User's Manual 121 Go to SETUP > MEDIA > MEDIA TYPE. 2 Open the media cover. 3 Lift and lower the printhead. 4 Press the A button. 5 Make sure there is a label (not a gap or mark) at the LSS. 6 Make sure that your printer is no way to adjust the... the LSS. When the LSS detects a gap or detection slot, the cursor moves to SETUP > TEST/SERVICE > LSS TEST > LSS AUTO. Troubleshooting and Maintaining the Printer To test the LSS 1 Make sure that the media is defective in the center. The screen displays the LSS AUTO menu with the cursor...
LSS AUTO PX4i and PX6i High Performance Printer User's Manual 121 Go to SETUP > MEDIA > MEDIA TYPE. 2 Open the media cover. 3 Lift and lower the printhead. 4 Press the A button. 5 Make sure there is a label (not a gap or mark) at the LSS. 6 Make sure that your printer is no way to adjust the... the LSS. When the LSS detects a gap or detection slot, the cursor moves to SETUP > TEST/SERVICE > LSS TEST > LSS AUTO. Troubleshooting and Maintaining the Printer To test the LSS 1 Make sure that the media is defective in the center. The screen displays the LSS AUTO menu with the cursor...


