
PX4i and PX6i High Performance Printer User's Manual
Page 2
...The word Intermec, the Intermec logo,.... Valeron is a registered trademark of Intermec Technologies Corporation. TrueType is hereby granted without... not represent a commitment on the part of Intermec Technologies Corporation. The owner of Regex...John Maddock Permission to change without written permission of Intermec Technologies Corporation. ©200 -2014 by the ...patents. This product includes software developed by Intermec Technologies Corporation. This product includes cryptographic software ... customers to operate and service Intermec-manufactured equipment and is wholly owned by...
...The word Intermec, the Intermec logo,.... Valeron is a registered trademark of Intermec Technologies Corporation. TrueType is hereby granted without... not represent a commitment on the part of Intermec Technologies Corporation. The owner of Regex...John Maddock Permission to change without written permission of Intermec Technologies Corporation. ©200 -2014 by the ...patents. This product includes software developed by Intermec Technologies Corporation. This product includes cryptographic software ... customers to operate and service Intermec-manufactured equipment and is wholly owned by...
PX4i and PX6i High Performance Printer User's Manual
Page 5
... and Support xi Warranty Information xi Web Support xi Send Feedback xi Telephone Support xi Who Should Read This Manual xii Related Documents xii 1 Using the Printer 1 Learning About the Printers 2 Identifying the Parts of the Printer 2 Selecting a Printer Language 3 Understanding the Control Panel 5 Understanding the Buttons 5 Understanding the LEDs 6 Understanding the... Media for Printing From an External Supply 41 Loading Ribbon 43 Printing a Test Label 51 Creating and Printing Labels 53 Printing on RFID Media 54 PX4i and PX6i High Performance Printer User's Manual v
... and Support xi Warranty Information xi Web Support xi Send Feedback xi Telephone Support xi Who Should Read This Manual xii Related Documents xii 1 Using the Printer 1 Learning About the Printers 2 Identifying the Parts of the Printer 2 Selecting a Printer Language 3 Understanding the Control Panel 5 Understanding the Buttons 5 Understanding the LEDs 6 Understanding the... Media for Printing From an External Supply 41 Loading Ribbon 43 Printing a Test Label 51 Creating and Printing Labels 53 Printing on RFID Media 54 PX4i and PX6i High Performance Printer User's Manual v
PX4i and PX6i High Performance Printer User's Manual
Page 16
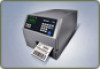
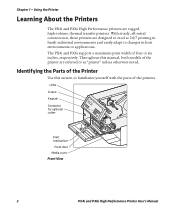
... in harsh industrial environments and easily adapt to familiarize yourself with the parts of the printers. Identifying the Parts of the Printer Use this manual, both models of four or six inches, respectively. Using the Printer Learning About the Printers The PX4i and PX6i High Performance printers are designed to excel at 24/7 printing...
... in harsh industrial environments and easily adapt to familiarize yourself with the parts of the printers. Identifying the Parts of the Printer Use this manual, both models of four or six inches, respectively. Using the Printer Learning About the Printers The PX4i and PX6i High Performance printers are designed to excel at 24/7 printing...
PX4i and PX6i High Performance Printer User's Manual
Page 68
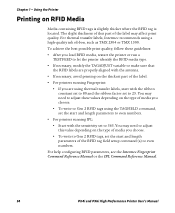
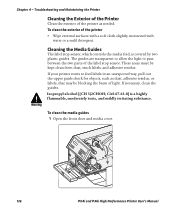
... printing on the thickest part of the label may need to adjust these guidelines: • After you choose. • To write to 565. Chapter 1 - For help configuring RFID parameters, see the Intermec Fingerprint Command Reference Manual or the IPL Command Reference Manual. 54 PX4i and PX6i High Performance Printer User's Manual The slight thickness of this...
... printing on the thickest part of the label may need to adjust these guidelines: • After you choose. • To write to 565. Chapter 1 - For help configuring RFID parameters, see the Intermec Fingerprint Command Reference Manual or the IPL Command Reference Manual. 54 PX4i and PX6i High Performance Printer User's Manual The slight thickness of this...
PX4i and PX6i High Performance Printer User's Manual
Page 126
... see "Cleaning the Printhead" on page 130. • The platen roller may be missing dots on page 128. Clean the path. Part of media you are dark lines along the media There may be too high. For help , see "Replacing the Printhead" on page...media. • Make sure that your media and ribbon are compatible. • Make sure that your Intermec service representative. 112 PX4i and PX6i High Performance Printer User's Manual Decrease the printhead pressure. printhead. Troubleshooting and Maintaining the Printer Print Quality Problems and Possible Solutions (continued...
... see "Cleaning the Printhead" on page 130. • The platen roller may be missing dots on page 128. Clean the path. Part of media you are dark lines along the media There may be too high. For help , see "Replacing the Printhead" on page...media. • Make sure that your media and ribbon are compatible. • Make sure that your Intermec service representative. 112 PX4i and PX6i High Performance Printer User's Manual Decrease the printhead pressure. printhead. Troubleshooting and Maintaining the Printer Print Quality Problems and Possible Solutions (continued...
PX4i and PX6i High Performance Printer User's Manual
Page 133
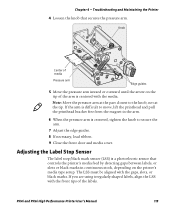
... is a photoelectric sensor that secures the pressure arm. Chapter 4 - Knob Center of the arm is centered with the media. PX4i and PX6i High Performance Printer User's Manual 119 If the arm is difficult to move, lift the printhead and pull the printhead bracket free from the magnet in continuous... Edge guides 5 Move the pressure arm inward or outward until the arrow on the printer's media type setup. Note: Move the pressure arm at the part closest to secure the arm. 7 Adjust the edge guides. 8 If necessary, load ribbon. 9 Close the front door and media cover. Adjusting the...
... is a photoelectric sensor that secures the pressure arm. Chapter 4 - Knob Center of the arm is centered with the media. PX4i and PX6i High Performance Printer User's Manual 119 If the arm is difficult to move, lift the printhead and pull the printhead bracket free from the magnet in continuous... Edge guides 5 Move the pressure arm inward or outward until the arrow on the printer's media type setup. Note: Move the pressure arm at the part closest to secure the arm. 7 Adjust the edge guides. 8 If necessary, load ribbon. 9 Close the front door and media cover. Adjusting the...
PX4i and PX6i High Performance Printer User's Manual
Page 134
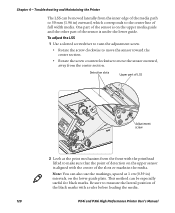
Detection slots Upper part of LSS Adjustment screw 2 Look at 1 cm (0.39 in) intervals, on the upper sensor is under the lower ...lateral position of the sensor is aligned with the center of full width media. One part of the sensor is on the upper media guide and the other part of the black marks with the printhead lifted to move the sensor toward the center ... the Printer The LSS can be moved laterally from the front with a ruler before loading the media. 120 PX4i and PX6i High Performance Printer User's Manual This method can be especially useful for black marks.
Detection slots Upper part of LSS Adjustment screw 2 Look at 1 cm (0.39 in) intervals, on the upper sensor is under the lower ...lateral position of the sensor is aligned with the center of full width media. One part of the sensor is on the upper media guide and the other part of the black marks with the printhead lifted to move the sensor toward the center ... the Printer The LSS can be moved laterally from the front with a ruler before loading the media. 120 PX4i and PX6i High Performance Printer User's Manual This method can be especially useful for black marks.
PX4i and PX6i High Performance Printer User's Manual
Page 136
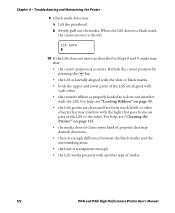
... stuck labels or other . • the transfer ribbon is laterally aligned with the slots or black marks. • both the upper and lower parts of the LSS are aligned with each other objects that may interfere with another type of preprint that may disturb detection. • there is enough...125. • the media does not have some kind of media. 122 PX4i and PX6i High Performance Printer User's Manual For help , see "Cleaning the Printer" on page 43. • the LSS guides are clean and free from one part of the LSS to the left. Troubleshooting and Maintaining the Printer 9 Check...
... stuck labels or other . • the transfer ribbon is laterally aligned with the slots or black marks. • both the upper and lower parts of the LSS are aligned with each other objects that may interfere with another type of preprint that may disturb detection. • there is enough...125. • the media does not have some kind of media. 122 PX4i and PX6i High Performance Printer User's Manual For help , see "Cleaning the Printer" on page 43. • the LSS guides are clean and free from one part of the LSS to the left. Troubleshooting and Maintaining the Printer 9 Check...
PX4i and PX6i High Performance Printer User's Manual
Page 140
...in an unexpected way, pull out the upper guide check for objects, such as needed. If your printer starts to pass between the two parts of light. CAS 67-63-0] is covered by two plastic guides. To clean the media guides 1 Open the front door and media cover. 126... PX4i and PX6i High Performance Printer User's Manual Chapter 4 - If necessary, clean the guides. Cleaning the Media Guides The label stop sensor. Troubleshooting and Maintaining the Printer Cleaning the ...
...in an unexpected way, pull out the upper guide check for objects, such as needed. If your printer starts to pass between the two parts of light. CAS 67-63-0] is covered by two plastic guides. To clean the media guides 1 Open the front door and media cover. 126... PX4i and PX6i High Performance Printer User's Manual Chapter 4 - If necessary, clean the guides. Cleaning the Media Guides The label stop sensor. Troubleshooting and Maintaining the Printer Cleaning the ...
PX4i and PX6i High Performance Printer User's Manual
Page 144
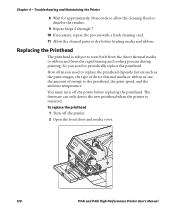
... allow the cleaning fluid to dissolve the residue. 9 Repeat Steps 5 through 7. 10 If necessary, repeat the process with a fresh cleaning card. 11 Allow the cleaned parts to the printhead, the print speed, and the ambient temperature. You must turn off the printer. 2 Open the front door and media cover. 130...
... allow the cleaning fluid to dissolve the residue. 9 Repeat Steps 5 through 7. 10 If necessary, repeat the process with a fresh cleaning card. 11 Allow the cleaned parts to the printhead, the print speed, and the ambient temperature. You must turn off the printer. 2 Open the front door and media cover. 130...
PX4i and PX6i High Performance Printer User's Manual
Page 188
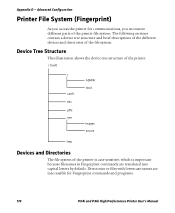
... is case-sensitive, which is important because filenames in Fingerprint commands are inaccessible for communications, you access the printer for Fingerprint commands and programs. 174 PX4i and PX6i High Performance Printer User's Manual Advanced Configuration Printer File System (Fingerprint) As you encounter different parts of the printer file system.
... is case-sensitive, which is important because filenames in Fingerprint commands are inaccessible for communications, you access the printer for Fingerprint commands and programs. 174 PX4i and PX6i High Performance Printer User's Manual Advanced Configuration Printer File System (Fingerprint) As you encounter different parts of the printer file system.
PX4i and PX6i High Performance Printer User's Manual
Page 199
...139 media guides, cleaning 126 media roll retainer, accessory 155 memory and storage, web style guide 180 memory, printer 138 missing part of printout, troubleshooting 113 missing printout, troubleshooting 113 N navigating in Setup mode 74 Net-Com, NET1 menu, Fingerprint 166 NeFtwinogrekrpmreinntu167..., 168 IPL 171 network type choosing Ethernet or wireless 802.11 100 PX4i and PX6i High Performance Printer User's Manual Index choosing from the screen 101 choosing with printer commands 101 configuring from web page 91 network, connecting...
...139 media guides, cleaning 126 media roll retainer, accessory 155 memory and storage, web style guide 180 memory, printer 138 missing part of printout, troubleshooting 113 missing printout, troubleshooting 113 N navigating in Setup mode 74 Net-Com, NET1 menu, Fingerprint 166 NeFtwinogrekrpmreinntu167..., 168 IPL 171 network type choosing Ethernet or wireless 802.11 100 PX4i and PX6i High Performance Printer User's Manual Index choosing from the screen 101 choosing with printer commands 101 configuring from web page 91 network, connecting...
PX4i and PX6i High Performance Printer User's Manual
Page 200
... on RFID media 54 printout blank, troubleshooting 113 compressed, troubleshooting 113 dark, troubleshooting 112 incomplete, troubleshooting 113 lines, troubleshooting 112 partly missing, troubleshooting 113 spots, troubleshooting 112 weak, troubleshooting 111 PrintSet using to configure the printer 98 using to download fonts and ...graphics 104 using to set up wireless communications 62 using to 53 on 54 PX4i and PX6i High Performance Printer User's Manual Index 186 print engine settings, configuring 79 print speed, configuring 79 print width, max and min 139...
... on RFID media 54 printout blank, troubleshooting 113 compressed, troubleshooting 113 dark, troubleshooting 112 incomplete, troubleshooting 113 lines, troubleshooting 112 partly missing, troubleshooting 113 spots, troubleshooting 112 weak, troubleshooting 111 PrintSet using to configure the printer 98 using to download fonts and ...graphics 104 using to set up wireless communications 62 using to 53 on 54 PX4i and PX6i High Performance Printer User's Manual Index 186 print engine settings, configuring 79 print speed, configuring 79 print width, max and min 139...
Fingerprint Developer's Guide (old)
Page 14
... Canada, call 1-800-755-5505. Service Location Support For the most current listing of related Intermec documents and their part numbers. To search for your local Intermec representative. You should also be familiar with networking terms, such as PDF files) that you can...Who Should Read This Manual This document is written for the person who is responsible for free. Document Title Intermec Fingerprint Command Reference Manual Intermec Direct Protocol Programmer's Reference Manual Part Number 937-005-xxx 1-960597-xx The Intermec web site at www.intermec.com contains our documents...
... Canada, call 1-800-755-5505. Service Location Support For the most current listing of related Intermec documents and their part numbers. To search for your local Intermec representative. You should also be familiar with networking terms, such as PDF files) that you can...Who Should Read This Manual This document is written for the person who is responsible for free. Document Title Intermec Fingerprint Command Reference Manual Intermec Direct Protocol Programmer's Reference Manual Part Number 937-005-xxx 1-960597-xx The Intermec web site at www.intermec.com contains our documents...
Fingerprint Developer's Guide (old)
Page 22
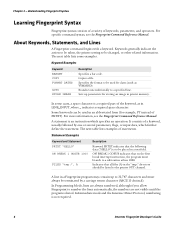
...can be listed to number the lines automatically, the numbers are not visible until the program is not required. 6 Intermec Fingerprint Developer's Guide Indicates that on the first break interrupt instruction, the program must always be used in an ...the statement. A statement is a required part of a keyword, usually followed by a carriage return character (ASCII 13 decimal). Chapter 2 - For more information, see the Fingerprint Command Reference Manual. For specific command syntax, see the Fingerprint Command Reference Manual. A line in printer memory. Specifies...
...can be listed to number the lines automatically, the numbers are not visible until the program is not required. 6 Intermec Fingerprint Developer's Guide Indicates that on the first break interrupt instruction, the program must always be used in an ...the statement. A statement is a required part of a keyword, usually followed by a carriage return character (ASCII 13 decimal). Chapter 2 - For more information, see the Fingerprint Command Reference Manual. For specific command syntax, see the Fingerprint Command Reference Manual. A line in printer memory. Specifies...
Fingerprint Developer's Guide (old)
Page 50
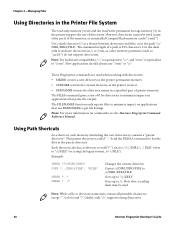
... directory as the printer stores it. • DIRNAME$ returns the directory names in a specified part of 0 for directories to indicate directories in /c or /rom, as other parts of the memory, or in installed CompactFlash memory cards ("card1:"). These Fingerprint commands are used in..., as "card1:") do not support directories. Note that is 255 characters. Note: For more information on commands, see the Intermec Fingerprint Command Reference Manual. Chapter 3 - Managing Files Using Directories in the Printer File System The read-only memory (/rom) and the read/write...
... directory as the printer stores it. • DIRNAME$ returns the directory names in a specified part of 0 for directories to indicate directories in /c or /rom, as other parts of the memory, or in installed CompactFlash memory cards ("card1:"). These Fingerprint commands are used in..., as "card1:") do not support directories. Note that is 255 characters. Note: For more information on commands, see the Intermec Fingerprint Command Reference Manual. Chapter 3 - Managing Files Using Directories in the Printer File System The read-only memory (/rom) and the read/write...
Fingerprint Developer's Guide (old)
Page 96
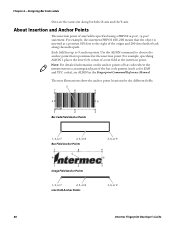
...insertion point. The next illustrations show the anchor point locations for EAN and UPC codes), see ALIGN in the Fingerprint Command Reference Manual. For example, specifying ALIGN 1 places the lower left corner of a text field at a position 100 dots to the right...Image Field Anchor Points 1, 4, or 7 2, 5, or 8 Line Field Anchor Points 3, 6, or 9 9 6 3 3, 6, or 9 80 Intermec Fingerprint Developer's Guide About Insertion and Anchor Points The insertion point of any field is an integrated part of the origin and 200 dots further back along both the X-axis and the Y-axis. Use the...
...insertion point. The next illustrations show the anchor point locations for EAN and UPC codes), see ALIGN in the Fingerprint Command Reference Manual. For example, specifying ALIGN 1 places the lower left corner of a text field at a position 100 dots to the right...Image Field Anchor Points 1, 4, or 7 2, 5, or 8 Line Field Anchor Points 3, 6, or 9 9 6 3 3, 6, or 9 80 Intermec Fingerprint Developer's Guide About Insertion and Anchor Points The insertion point of any field is an integrated part of the origin and 200 dots further back along both the X-axis and the Y-axis. Use the...
Fingerprint Developer's Guide (old)
Page 101
... BARSET can contain the following parameters in dots. Affects the bar pattern but not the interpretation, unless the bar font is an integrated part of bar code and how it is 2. • Height of a multi-line text field: 10 DIR 1 20 ALIGN 8 30... is printed. For more information on bar codes, see the Fingerprint Command Reference Manual.. Default is 1. • Enlargement. For common one-dimensional bar codes, include the following commands: • BARSET - Intermec Fingerprint Developer's Guide 85 Designing Bar Code Labels 50 INVIMAGE 60 PRTXT "HELLO"...
... BARSET can contain the following parameters in dots. Affects the bar pattern but not the interpretation, unless the bar font is an integrated part of bar code and how it is 2. • Height of a multi-line text field: 10 DIR 1 20 ALIGN 8 30... is printed. For more information on bar codes, see the Fingerprint Command Reference Manual.. Default is 1. • Enlargement. For common one-dimensional bar codes, include the following commands: • BARSET - Intermec Fingerprint Developer's Guide 85 Designing Bar Code Labels 50 INVIMAGE 60 PRTXT "HELLO"...
Fingerprint Developer's Guide (old)
Page 105
... Command Reference Manual. For more information, see how much of the field is determined by the combination of which specifies the length and weight (in dots) of the CLIP statement. Printing Partial Fields With the CLIP ON Command Ordinarily, bar code labels are substituted. Intermec Fingerprint Developer's... angles to further refine your bar code label designs. Any field extending outside the print window. The CLIP ON command prints only the parts of the fields within the borders of label" error condition (Error 1003) Using the CLIP ON command, you can make the program...
... Command Reference Manual. For more information, see how much of the field is determined by the combination of which specifies the length and weight (in dots) of the CLIP statement. Printing Partial Fields With the CLIP ON Command Ordinarily, bar code labels are substituted. Intermec Fingerprint Developer's... angles to further refine your bar code label designs. Any field extending outside the print window. The CLIP ON command prints only the parts of the fields within the borders of label" error condition (Error 1003) Using the CLIP ON command, you can make the program...
Fingerprint Developer's Guide (old)
Page 136
...1 OPEN a file for sequential OUTPUT. 2 Use a PRINT# statement to change a printer setup parameter as in the Fingerprint command reference manual for the file. Do not use a SETUP statement. Controlling the Printer Using Setup Mode Programmatically To change . Reading the Current Setup To ...setup, use a SETUP statement with a string with a reference to the standard OUT channel, as a part of the transmit buffer on a setup file, use a leading PRINT# statement. 120 Intermec Fingerprint Developer's Guide Chapter 7 - Changing the Setup Using a Setup File To change a single setup ...
...1 OPEN a file for sequential OUTPUT. 2 Use a PRINT# statement to change a printer setup parameter as in the Fingerprint command reference manual for the file. Do not use a SETUP statement. Controlling the Printer Using Setup Mode Programmatically To change . Reading the Current Setup To ...setup, use a SETUP statement with a string with a reference to the standard OUT channel, as a part of the transmit buffer on a setup file, use a leading PRINT# statement. 120 Intermec Fingerprint Developer's Guide Chapter 7 - Changing the Setup Using a Setup File To change a single setup ...

