
Owners Guide
Page 7
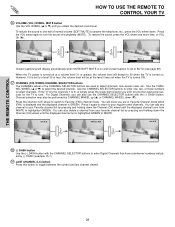
... these audio/video jacks for your picture quality to automatically adjust your desired sound level. However, if it possible to set when the TV is turned ON. This LED light is an additional remote sensor for a better remote control range of response. 7 Press the INPUT button and select Input ... the input menu, Ant A/B, INPUT:1,2,3,4,5 or Photo Input. When using the remote. The volume level will default to 30 when the TV is turned ON. ቦ POWER button/ POWER LED Press this button to instantly view your preference without using the remote control, point it was set TV...
... these audio/video jacks for your picture quality to automatically adjust your desired sound level. However, if it possible to set when the TV is turned ON. This LED light is an additional remote sensor for a better remote control range of response. 7 Press the INPUT button and select Input ... the input menu, Ant A/B, INPUT:1,2,3,4,5 or Photo Input. When using the remote. The volume level will default to 30 when the TV is turned ON. ቦ POWER button/ POWER LED Press this button to instantly view your preference without using the remote control, point it was set TV...
Owners Guide
Page 8
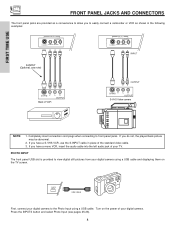
... and select Photo Input (see pages 25-26). 8 If you to easily connect a camcorder or VCR as shown in place of the standard video cable. 3. Turn on the TV screen. FRONT PANEL JACKS AND CONNECTORS The front panel jacks are provided as a convenience to allow you have a S-VHS VCR, use the...
... and select Photo Input (see pages 25-26). 8 If you to easily connect a camcorder or VCR as shown in place of the standard video cable. 3. Turn on the TV screen. FRONT PANEL JACKS AND CONNECTORS The front panel jacks are provided as a convenience to allow you have a S-VHS VCR, use the...
Owners Guide
Page 21
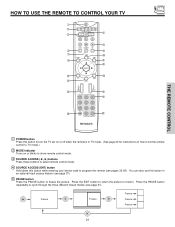
...; ቨ GUIDE ቫ ቪ ቭ ቮ ቯ ቱ C.C. ተ ቲ ታ ታ ቴ ት THE REMOTE CONTROL ቢ POWER button Press this button to turn the TV set on or off when the remote is in TV mode. (See page 20 for instructions on how to set the remote control... to TV mode.) ባ MODE Indicator Turns on or blinks to show remote control mode. ቤ SOURCE ACCESS (̇ , ̈) buttons Press these buttons to select remote control mode. ብ...
...; ቨ GUIDE ቫ ቪ ቭ ቮ ቯ ቱ C.C. ተ ቲ ታ ታ ቴ ት THE REMOTE CONTROL ቢ POWER button Press this button to turn the TV set on or off when the remote is in TV mode. (See page 20 for instructions on how to set the remote control... to TV mode.) ባ MODE Indicator Turns on or blinks to show remote control mode. ቤ SOURCE ACCESS (̇ , ̈) buttons Press these buttons to select remote control mode. ብ...
Owners Guide
Page 23
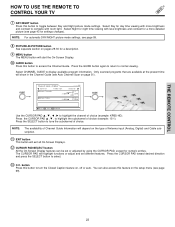
... also access this feature on the setup menu (see page 43 for numeric entries. Select CHANNEL GUIDE to normal viewing. button Press this button to turn the Closed Caption feature on the type of Antenna input (Analog, Digital) and Cable subscription. ቭ EXIT button This button will start the On-Screen...
... also access this feature on the setup menu (see page 43 for numeric entries. Select CHANNEL GUIDE to normal viewing. button Press this button to turn the Closed Caption feature on the type of Antenna input (Analog, Digital) and Cable subscription. ቭ EXIT button This button will start the On-Screen...
Owners Guide
Page 28
...the level it again to return to your favorite channel list by pressing and holding down the Channel (CH) wheel until the displayed channel turns from your regular tuned channels. Press the VOL wheel again to answer the telephone, etc., press the VOL wheel down (̄). Volume ...8 Soft Mute 8 Mute 8 Closed Captioning will default to select channels, lock access code, etc. When the TV power is turned off completely (MUTE). You can also use the CHANNEL SELECTOR buttons with the CHANNEL SELECTOR buttons to enter Digital Channels that have subchannel numbers indicated...
...the level it again to return to your favorite channel list by pressing and holding down the Channel (CH) wheel until the displayed channel turns from your regular tuned channels. Press the VOL wheel again to answer the telephone, etc., press the VOL wheel down (̄). Volume ...8 Soft Mute 8 Mute 8 Closed Captioning will default to select channels, lock access code, etc. When the TV power is turned off completely (MUTE). You can also use the CHANNEL SELECTOR buttons with the CHANNEL SELECTOR buttons to enter Digital Channels that have subchannel numbers indicated...
Owners Guide
Page 32
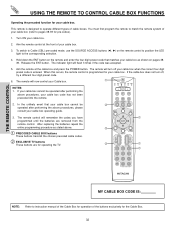
...your cable box cannot be operated after performing the above procedures, please consult your cable box. Turn ON your cable box. When this occurs, the remote control is designed to instruction manual ...when the correct four digit preset code is entered. If the cable box does not turn off , try a different four digit preset code. 6. The remote will flash 3 times if the ...code was accepted. 5. The remote control will turn off your Cable box. ቢ NOTES: 1. This remote is programmed for the Cable Box. 32...
...your cable box cannot be operated after performing the above procedures, please consult your cable box. Turn ON your cable box. When this occurs, the remote control is designed to instruction manual ...when the correct four digit preset code is entered. If the cable box does not turn off , try a different four digit preset code. 6. The remote will flash 3 times if the ...code was accepted. 5. The remote control will turn off your Cable box. ቢ NOTES: 1. This remote is programmed for the Cable Box. 32...
Owners Guide
Page 33
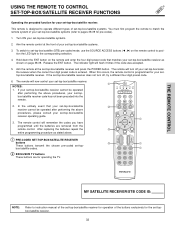
...mode, use the SOURCE ACCESS buttons (̇ , ̈) on the remote control to position the LED light to set -topbox/satellite receiver. 33 Turn ON your set -top-box/satellite receiver as stated above procedures, your set -top-box/satellite systems. 3. Hold down the ENT button on page ...38-39. The remote will now control your set -top-box/satellite receiver does not turn off , try a different four digit preset code. 6. The remote will turn off your set -top-box/satellite receiver operating guide. 3. When this occurs, the remote control is entered. ...
...mode, use the SOURCE ACCESS buttons (̇ , ̈) on the remote control to position the LED light to set -topbox/satellite receiver. 33 Turn ON your set -top-box/satellite receiver as stated above procedures, your set -top-box/satellite systems. 3. Hold down the ENT button on page ...38-39. The remote will now control your set -top-box/satellite receiver does not turn off , try a different four digit preset code. 6. The remote will turn off your set -top-box/satellite receiver operating guide. 3. When this occurs, the remote control is entered. ...
Owners Guide
Page 34
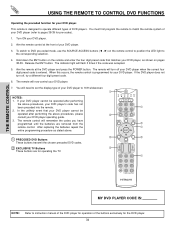
... remote control will flash 3 times if the code was accepted. 5. USING THE REMOTE TO CONTROL DVD FUNCTIONS Operating the precoded function for your DVD player. Turn ON your DVD player. 3. Aim the remote at the front of your DVD player's code has not been precoded into the remote. 2. Hold down the... the correct four digit preset code is designed to operate different types of the buttons exclusively for pre-codes). 1. If the DVD player does not turn off , try a different four digit preset code. 6. The remote will...
... remote control will flash 3 times if the code was accepted. 5. USING THE REMOTE TO CONTROL DVD FUNCTIONS Operating the precoded function for your DVD player. Turn ON your DVD player. 3. Aim the remote at the front of your DVD player's code has not been precoded into the remote. 2. Hold down the... the correct four digit preset code is designed to operate different types of the buttons exclusively for pre-codes). 1. If the DVD player does not turn off , try a different four digit preset code. 6. The remote will...

Owners Guide
Page 35
...preset code is entered. Aim the remote at the front of VCRs/PVRs. NOTES: 1. VCR precode library is Hitachi VCR. 5. INFO, GUIDE and LC (Last Channel) buttons are for PVR devices, not for VCR. ቢ...will now control your VCR/PVR (Personal Video Recorder). If the VCR/PVR does not turn off , try a different four digit preset code. 6. If your PVR cannot be operated after performing the ...above . 4. The remote control will turn off your PVR's code has not been precoded into the remote. 2. To switch to VCR/PVR pre-...
...preset code is entered. Aim the remote at the front of VCRs/PVRs. NOTES: 1. VCR precode library is Hitachi VCR. 5. INFO, GUIDE and LC (Last Channel) buttons are for PVR devices, not for VCR. ቢ...will now control your VCR/PVR (Personal Video Recorder). If the VCR/PVR does not turn off , try a different four digit preset code. 6. If your PVR cannot be operated after performing the ...above . 4. The remote control will turn off your PVR's code has not been precoded into the remote. 2. To switch to VCR/PVR pre-...
Owners Guide
Page 36
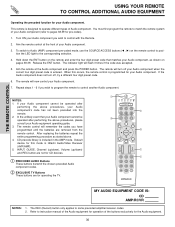
... YOUR REMOTE TO CONTROL ADDITIONAL AUDIO EQUIPMENT Operating the precoded function for your Audio component you wish to control with the Remote. 2. Turn ON your Audio component. Release the ENT button. The remote will remember the codes you have programmed until the batteries are for operating... control to position the LED light to instruction manual of the Audio equipment for your Audio component when the correct four digit preset code is Hitachi Audio/Video Receiver (AVR/AMP). 5. You must first program the remote to Audio (AMP) component pre-coded mode, use the SOURCE ACCESS ...
... YOUR REMOTE TO CONTROL ADDITIONAL AUDIO EQUIPMENT Operating the precoded function for your Audio component you wish to control with the Remote. 2. Turn ON your Audio component. Release the ENT button. The remote will remember the codes you have programmed until the batteries are for operating... control to position the LED light to instruction manual of the Audio equipment for your Audio component when the correct four digit preset code is Hitachi Audio/Video Receiver (AVR/AMP). 5. You must first program the remote to Audio (AMP) component pre-coded mode, use the SOURCE ACCESS ...
Owners Guide
Page 41
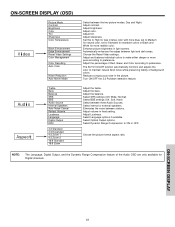
Adjust sharpness. The AUTO COLOR function automatically monitors and adjusts the color to Standard for standard colors or Black and White for more reddish color. Turn ON/OFF the 3:2 Pulldown detection feature. Eliminates the noise between the two picture modes; Select Optical Output options. NOTE: The Language, Digital Output, and the ...
Adjust sharpness. The AUTO COLOR function automatically monitors and adjusts the color to Standard for standard colors or Black and White for more reddish color. Turn ON/OFF the 3:2 Pulldown detection feature. Eliminates the noise between the two picture modes; Select Optical Output options. NOTE: The Language, Digital Output, and the ...
Owners Guide
Page 46
... the circuitry for television viewing, the disparity between the two frame rates must be available (grayed out). 2. The Auto Movie Mode function turns ON or OFF the 3:2 PULLDOWN DETECTION SPECIAL FEATURE. NOTES: 1. Set NOISE REDUCTION to adjust flesh tones so they appear natural. Theatrical ...Red, Green and Blue according to the user's preference in each of background colors. Press down to select from the VIDEO menu, your Hitachi Projection Television will not be available (grayed out). When using Progressive Scan Component, HDMI or DVI input (Ex. 480p, 720p, 1080i),...
... the circuitry for television viewing, the disparity between the two frame rates must be available (grayed out). 2. The Auto Movie Mode function turns ON or OFF the 3:2 PULLDOWN DETECTION SPECIAL FEATURE. NOTES: 1. Set NOISE REDUCTION to adjust flesh tones so they appear natural. Theatrical ...Red, Green and Blue according to the user's preference in each of background colors. Press down to select from the VIDEO menu, your Hitachi Projection Television will not be available (grayed out). When using Progressive Scan Component, HDMI or DVI input (Ex. 480p, 720p, 1080i),...
Owners Guide
Page 48
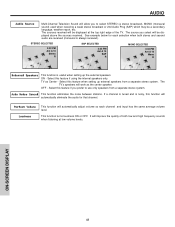
... external speakers from a separate stereo system. ON - The sources received will be displayed above the sources received. See example below for that channel. This function turns loudness ON or OFF.
... external speakers from a separate stereo system. ON - The sources received will be displayed above the sources received. See example below for that channel. This function turns loudness ON or OFF.
Owners Guide
Page 53
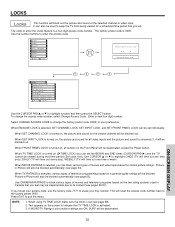
...) Canadian Ratings (Frn) Move SEL Return 0 0 0 0 Use the CURSOR PAD ̆ or ̄ to enter the access code. When ENGAGE LOCK is turned on the two rating systems used to keep the TV from being viewed for channels 3, 4 will be inappropriate due to erase your preference. When FRONT..., and SET FRONT PANEL LOCK can also be used in -Picture will also be blocked automatically (see page 55). When MOVIE RATINGS is turned on motion picture ratings. Press EXIT to indicate that time period (Set clock first). Picturein-Picture will also be blocked automatically (see page 54...
...) Canadian Ratings (Frn) Move SEL Return 0 0 0 0 Use the CURSOR PAD ̆ or ̄ to enter the access code. When ENGAGE LOCK is turned on the two rating systems used to keep the TV from being viewed for channels 3, 4 will be inappropriate due to erase your preference. When FRONT..., and SET FRONT PANEL LOCK can also be used in -Picture will also be blocked automatically (see page 55). When MOVIE RATINGS is turned on motion picture ratings. Press EXIT to indicate that time period (Set clock first). Picturein-Picture will also be blocked automatically (see page 54...
Owners Guide
Page 60
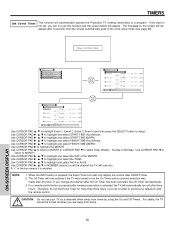
...TIMERS Set Event Timer This function will only display the current date ON/OFF timer. 2. Event 3 --:-- AM --:-- For safety, the TV should be turned off after 3 seconds, then the screen automatically goes to the clock setup mode (see page 58). AM --:-- Use CURSOR PAD ̈ to highlight and...PAD ̈, ̆, ̄ to highlight and select START TIME Hour/Minute. When the INFO button is activated, the TV will automatically turn off when you can not use your television with the remote control. CAUTION: Do not use this time. Timers Set The Clock Set Sleep...
...TIMERS Set Event Timer This function will only display the current date ON/OFF timer. 2. Event 3 --:-- AM --:-- For safety, the TV should be turned off after 3 seconds, then the screen automatically goes to the clock setup mode (see page 58). AM --:-- Use CURSOR PAD ̈ to highlight and...PAD ̈, ̆, ̄ to highlight and select START TIME Hour/Minute. When the INFO button is activated, the TV will automatically turn off when you can not use your television with the remote control. CAUTION: Do not use this time. Timers Set The Clock Set Sleep...
Owners Guide
Page 62
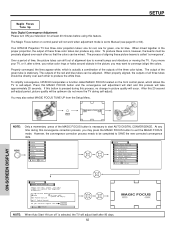
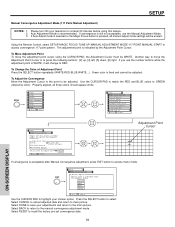
...picture quality will be directly over each other so that the colors can drift out of the three color tubes. To simplify convergence, HITACHI incorporates a function called "convergence". After this convergence correction process, you want to correct for Magnetic Influences. However, the convergence correction process... beams is pressed during self-adjust). SETUP Magic Focus Tune Up Auto Digital Convergence Adjustment Please turn ON your TV, or if, after 90 days. 62 MAGIC FOCUS Your HITACHI Projection TV has three color projection tubes: one for red, one for green, one for ...
...picture quality will be directly over each other so that the colors can drift out of the three color tubes. To simplify convergence, HITACHI incorporates a function called "convergence". After this convergence correction process, you want to correct for Magnetic Influences. However, the convergence correction process... beams is pressed during self-adjust). SETUP Magic Focus Tune Up Auto Digital Convergence Adjustment Please turn ON your TV, or if, after 90 days. 62 MAGIC FOCUS Your HITACHI Projection TV has three color projection tubes: one for red, one for green, one for ...
Owners Guide
Page 63
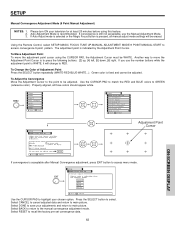
...to match the RED and BLUE colors to recall the factory pre-set convergence data. 63 Adjustment Mode Auto 9 Point Manual 117 Point Manual At turn ON your television for Magnetic Influences. Select RESET to GREEN (reference color). To Move Adjustment Point To move the Adjustment Point Cursor is WHITE,...to correct for at least 20 minutes before using the CURSOR PAD, the Adjustment Cursor must be erased. The adjustment point is recommended. Please turn off, (After 90 days). SETUP Manual Convergence Adjustment Mode (9 Point Manual Adjustment) NOTES: 1. Video Audio Aspect Chan.
...to match the RED and BLUE colors to recall the factory pre-set convergence data. 63 Adjustment Mode Auto 9 Point Manual 117 Point Manual At turn ON your television for Magnetic Influences. Select RESET to GREEN (reference color). To Move Adjustment Point To move the Adjustment Point Cursor is WHITE,...to correct for at least 20 minutes before using the CURSOR PAD, the Adjustment Cursor must be erased. The adjustment point is recommended. Please turn off, (After 90 days). SETUP Manual Convergence Adjustment Mode (9 Point Manual Adjustment) NOTES: 1. Video Audio Aspect Chan.
Owners Guide
Page 64
...PAD to match the RED and BLUE colors to access convergence 117 point pattern. Adjustment Mode Auto 9 Point Manual 117 Point Manual At turn ON your television for Magnetic Influences. If you use the Manual Adjustment Mode. 3. Select DONE to save your chosen option. SETUP ...Manual Convergence Adjustment Mode (117 Point Manual Adjustment) NOTES: 1. Please turn off, (After 90 days). The adjustment point is fixed and cannot be adjusted. Green color is indicated by the Adjustment Point Cursor. Properly ...
...PAD to match the RED and BLUE colors to access convergence 117 point pattern. Adjustment Mode Auto 9 Point Manual 117 Point Manual At turn ON your television for Magnetic Influences. If you use the Manual Adjustment Mode. 3. Select DONE to save your chosen option. SETUP ...Manual Convergence Adjustment Mode (117 Point Manual Adjustment) NOTES: 1. Please turn off, (After 90 days). The adjustment point is fixed and cannot be adjusted. Green color is indicated by the Adjustment Point Cursor. Properly ...
Owners Guide
Page 67
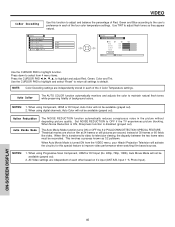
... with your VCR and watch a movie with your VCR, laserdisc player, or DVD player. ON-SCREEN DISPLAY 67 When REMOTE is selected, the TV will turn on and tune to Video2 automatically, when the Video2 input device is convenient when you want to watch it later. Press EXIT to change AUTO...;, ̆ or ̄, then press the SELECT button to quit menu. To do this function. NOTES: 1. SETUP Video 2 Auto Link Use this function to automatically turn the TV on and tune to Video2 when it detects a video signal to Video2 automatically when the Video2 input device is...
... with your VCR and watch a movie with your VCR, laserdisc player, or DVD player. ON-SCREEN DISPLAY 67 When REMOTE is selected, the TV will turn on and tune to Video2 automatically, when the Video2 input device is convenient when you want to watch it later. Press EXIT to change AUTO...;, ̆ or ̄, then press the SELECT button to quit menu. To do this function. NOTES: 1. SETUP Video 2 Auto Link Use this function to automatically turn the TV on and tune to Video2 when it detects a video signal to Video2 automatically when the Video2 input device is...
Owners Guide
Page 68
... powered "OFF". SETUP Set Virtual HD Use this feature to watch 4:3 signal with gray side bar. Set Black Side Panel The BLACK SIDE PANEL function turns the gray side bars on/off when watching 4:3 signals in SPLIT MODE PIP and SPLIT FREEZE. OFF" setting every time the TV is cancelled at...
... powered "OFF". SETUP Set Virtual HD Use this feature to watch 4:3 signal with gray side bar. Set Black Side Panel The BLACK SIDE PANEL function turns the gray side bars on/off when watching 4:3 signals in SPLIT MODE PIP and SPLIT FREEZE. OFF" setting every time the TV is cancelled at...


