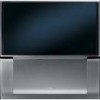
Owners Guide
Page 2
... dealer or service center. 2 POWER SOURCE THIS TELEVISION IS DESIGNED TO OPERATE ON 120 VOLTS 60Hz, AC CURRENT. CAUTION: Never remove the back cover of HITACHI televisions. To help you . NOTE: • There are no user serviceable parts inside the television. • Model and serial numbers are indicated on this device that may void the user's authority to HITACHI. TO PREVENT ELECTRIC SHOCK, DO NOT USE THE TELEVISION'S (POLARIZED...
... dealer or service center. 2 POWER SOURCE THIS TELEVISION IS DESIGNED TO OPERATE ON 120 VOLTS 60Hz, AC CURRENT. CAUTION: Never remove the back cover of HITACHI televisions. To help you . NOTE: • There are no user serviceable parts inside the television. • Model and serial numbers are indicated on this device that may void the user's authority to HITACHI. TO PREVENT ELECTRIC SHOCK, DO NOT USE THE TELEVISION'S (POLARIZED...
Owners Guide
Page 3
... and position the TV. • PREVENTION OF SCREEN BURN This Wide Screen TV is protected by direct connection to qualified service personnel. Always roll TV allowing casters at bottom of a set-top box. Keep these instructions. 2. Do not defeat the safety purpose of the picture will age more information, call the CATV system installer's attention to Article 82040 of the video program material. • This...
... and position the TV. • PREVENTION OF SCREEN BURN This Wide Screen TV is protected by direct connection to qualified service personnel. Always roll TV allowing casters at bottom of a set-top box. Keep these instructions. 2. Do not defeat the safety purpose of the picture will age more information, call the CATV system installer's attention to Article 82040 of the video program material. • This...
Owners Guide
Page 5
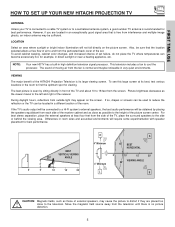
... as those of external speakers, may cause the picture to distort if they are located in an exceptionally good signal area that the location selected allows a free flow of air to and from the screen. FIRST TIME USE HOW TO SET UP YOUR NEW HITACHI PROJECTION TV ANTENNA Unless your TV is connected to a cable TV system or to a centralized antenna system, a good outdoor TV antenna is recommended for best performance. However, if...
... as those of external speakers, may cause the picture to distort if they are located in an exceptionally good signal area that the location selected allows a free flow of air to and from the screen. FIRST TIME USE HOW TO SET UP YOUR NEW HITACHI PROJECTION TV ANTENNA Unless your TV is connected to a cable TV system or to a centralized antenna system, a good outdoor TV antenna is recommended for best performance. However, if...

Owners Guide
Page 7
... remote sensor for your digital still pictures (see page 62). ቨ FRONT INPUT JACKS (INPUT 5) Use these buttons for a better remote control range of the TV screen. This button also serves as the cursor down (̄) and up from your preference without using the remote. The volume level will default to view your desired sound level. This LED light is on during normal operation. ቧ MAGIC FOCUS Use this button to automatically adjust your picture...
... remote sensor for your digital still pictures (see page 62). ቨ FRONT INPUT JACKS (INPUT 5) Use these buttons for a better remote control range of the TV screen. This button also serves as the cursor down (̄) and up from your preference without using the remote. The volume level will default to view your desired sound level. This LED light is on during normal operation. ቧ MAGIC FOCUS Use this button to automatically adjust your picture...
Owners Guide
Page 9
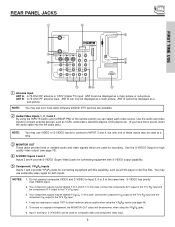
... viewing uses only. ANT B cannot be displayed as a DVD player or Set Top Box. ANT A can only be displayed as a main picture or sub-picture. You may use VIDEO or S-VIDEO inputs to connect to Input 3, 4 or 5 at a time. ቤ MONITOR OUT These jacks provide fixed or variable audio and video signals which are available. ባ Audio/Video Inputs 1, 2, 3 and 4 By using the INPUTS button and CURSOR PAD of the remote control you can be used at the same time. Your component outputs...
... viewing uses only. ANT B cannot be displayed as a DVD player or Set Top Box. ANT A can only be displayed as a main picture or sub-picture. You may use VIDEO or S-VIDEO inputs to connect to Input 3, 4 or 5 at a time. ቤ MONITOR OUT These jacks provide fixed or variable audio and video signals which are available. ባ Audio/Video Inputs 1, 2, 3 and 4 By using the INPUTS button and CURSOR PAD of the remote control you can be used at the same time. Your component outputs...
Owners Guide
Page 13
... component outputs may be labeled Y-CBCR. that a 1080i or 720p input signal is used at a time. • Connect only 1 component (VCR, DVD player, camcorder, etc.) to obtain optimum picture quality when using an HDMI input from a Set-Top-Box, it to the left audio jack on page 12). In this feature. FIRST TIME USE TIPS ON REAR PANEL CONNECTIONS • S-VIDEO, Y-PbPr and HDMI connections are provided for high performance components, such as DVD players and set-
... component outputs may be labeled Y-CBCR. that a 1080i or 720p input signal is used at a time. • Connect only 1 component (VCR, DVD player, camcorder, etc.) to obtain optimum picture quality when using an HDMI input from a Set-Top-Box, it to the left audio jack on page 12). In this feature. FIRST TIME USE TIPS ON REAR PANEL CONNECTIONS • S-VIDEO, Y-PbPr and HDMI connections are provided for high performance components, such as DVD players and set-
Owners Guide
Page 15
... view the program from the INPUTS menu to return to the previous channel. However, you use to connect the VCR, camcorder, laserdisc player, DVD player, or HDTV Set Top Box to your TV set is dependent on the TV set will appear to be made from coaxial shielded wire. Then press the SELECT button to confirm your particular assortment of the TV (i.e., VCR/laserdisc player, etc. is not connected or the video...
... view the program from the INPUTS menu to return to the previous channel. However, you use to connect the VCR, camcorder, laserdisc player, DVD player, or HDTV Set Top Box to your TV set is dependent on the TV set will appear to be made from coaxial shielded wire. Then press the SELECT button to confirm your particular assortment of the TV (i.e., VCR/laserdisc player, etc. is not connected or the video...
Owners Guide
Page 17
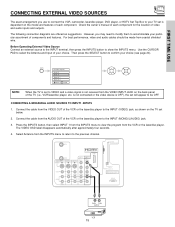
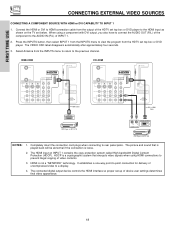
... VCR operating guide for limited viewing uses only. FIRST TIME USE CONNECTING EXTERNAL VIDEO SOURCES CONNECTING AN S-VIDEO SOURCE TO INPUT 3, 4 AND 5 1. Select Antenna from the AUDIO OUT R of U.S. and 6,381,747 licensed for more information on the TV set below. 2. RS232C 1 2 345 6 789 RL V S-VIDEO VCR NOTES: 1. Refer to the INPUT (AUDIO/R) jack. 3. Completely insert the connection cord plugs when connecting to the previous channel. Connect the cable from the INPUTS menu to return to rear panel jacks...
... VCR operating guide for limited viewing uses only. FIRST TIME USE CONNECTING EXTERNAL VIDEO SOURCES CONNECTING AN S-VIDEO SOURCE TO INPUT 3, 4 AND 5 1. Select Antenna from the AUDIO OUT R of U.S. and 6,381,747 licensed for more information on the TV set below. 2. RS232C 1 2 345 6 789 RL V S-VIDEO VCR NOTES: 1. Refer to the INPUT (AUDIO/R) jack. 3. Completely insert the connection cord plugs when connecting to the previous channel. Connect the cable from the INPUTS menu to return to rear panel jacks...
Owners Guide
Page 18
... proper set top box or DVD player. The HDMI input on the TV set below. FIRST TIME USE CONNECTING EXTERNAL VIDEO SOURCES CONNECTING A COMPONENT SOURCE WITH HDMI or DVI CAPABILITY TO INPUT 1 1. The picture and sound that encrypts video signals when using a component with DVI output, you also have to connect the AUDIO OUT (R/L) of the component to view the program from the INPUTS menu to the AUDIO IN (R/L) of uncompressed video to the previous channel. Select Antenna from the output of the HDTV set top box or DVD player...
... proper set top box or DVD player. The HDMI input on the TV set below. FIRST TIME USE CONNECTING EXTERNAL VIDEO SOURCES CONNECTING A COMPONENT SOURCE WITH HDMI or DVI CAPABILITY TO INPUT 1 1. The picture and sound that encrypts video signals when using a component with DVI output, you also have to connect the AUDIO OUT (R/L) of the component to view the program from the INPUTS menu to the AUDIO IN (R/L) of uncompressed video to the previous channel. Select Antenna from the output of the HDTV set top box or DVD player...

Owners Guide
Page 19
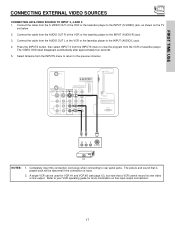
... Laserdisc/DVD player or HDTV set top box to view the program from the AUDIO OUT L of U.S. Patent Nos. 4,631,603; 4,577,216; 4,819,098; 4,907,093; The VIDEO OSD label disappears automatically after approximately four seconds. 7. FIRST TIME USE CONNECTING EXTERNAL VIDEO SOURCES CONNECTING A COMPONENT SOURCE TO INPUT 1 OR 2: Y-PBPR. 1. Press the the INPUTS button, then select INPUT 2 from the INPUTS menu to the INPUT (AUDIO/L) jack. 6. ANT A ANT B MONITOR OUT S-VIDEO INPUT 4 INPUT 3 INPUT 2 Y/ VIDEO INPUT 1 Y/ VIDEO PB PB HDMI 1 VIDEO L AUDIO R AUDIO...
... Laserdisc/DVD player or HDTV set top box to view the program from the AUDIO OUT L of U.S. Patent Nos. 4,631,603; 4,577,216; 4,819,098; 4,907,093; The VIDEO OSD label disappears automatically after approximately four seconds. 7. FIRST TIME USE CONNECTING EXTERNAL VIDEO SOURCES CONNECTING A COMPONENT SOURCE TO INPUT 1 OR 2: Y-PBPR. 1. Press the the INPUTS button, then select INPUT 2 from the INPUTS menu to the INPUT (AUDIO/L) jack. 6. ANT A ANT B MONITOR OUT S-VIDEO INPUT 4 INPUT 3 INPUT 2 Y/ VIDEO INPUT 1 Y/ VIDEO PB PB HDMI 1 VIDEO L AUDIO R AUDIO...
Owners Guide
Page 20
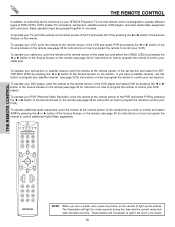
... together in a dark room, press any button on how to program the remote to control additional Audio/Video equipment). NOTE: When you have a satellite receiver, use this time and the current mode indicator will not appear to light if the room is designed to control your set-top-box). To operate your PVR). To operate your cable box, point the remote at the screen of the TV and select the TV by pressing...
... together in a dark room, press any button on how to program the remote to control additional Audio/Video equipment). NOTE: When you have a satellite receiver, use this time and the current mode indicator will not appear to light if the room is designed to control your set-top-box). To operate your PVR). To operate your cable box, point the remote at the screen of the TV and select the TV by pressing...
Owners Guide
Page 29
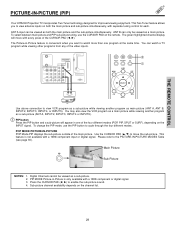
... 1 2 345 6 789 ባ ቢ GUIDE Audio Video C.C. THE REMOTE CONTROL PICTURE-IN-PICTURE (PIP) Your HITACHI Projection TV incorporates Two Tuner technology designed for limited viewing uses only. To change the PIP mode, use the CURSOR PAD on both the main picture and the sub-picture simultaneously. Digital Channels cannot be viewed as both the main picture and sub-picture simultaneously, with a 1080i component input or Digital signal. The green highlighted channel display will appear in -Picture is not available with separate...
... 1 2 345 6 789 ባ ቢ GUIDE Audio Video C.C. THE REMOTE CONTROL PICTURE-IN-PICTURE (PIP) Your HITACHI Projection TV incorporates Two Tuner technology designed for limited viewing uses only. To change the PIP mode, use the CURSOR PAD on both the main picture and the sub-picture simultaneously. Digital Channels cannot be viewed as both the main picture and sub-picture simultaneously, with a 1080i component input or Digital signal. The green highlighted channel display will appear in -Picture is not available with separate...
Owners Guide
Page 33
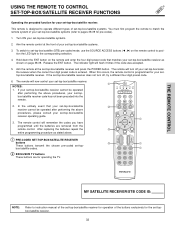
... the remote control to position the LED light to the corresponding selection. 4. If the set-top-box/satellite receiver does not turn off , try a different four digit preset code. 6. The remote will turn off your set-top-box/satellite systems. 3. box/satellite codes. ቢ ባ EXCLUSIVE TV buttons These buttons are removed from the remote control. This remote is programmed for your set-top-box/satellite receiver. ቢ NOTES: 1. To switch to set-top-box/satellite (STB) pre-coded mode, use the SOURCE ACCESS buttons...
... the remote control to position the LED light to the corresponding selection. 4. If the set-top-box/satellite receiver does not turn off , try a different four digit preset code. 6. The remote will turn off your set-top-box/satellite systems. 3. box/satellite codes. ቢ ባ EXCLUSIVE TV buttons These buttons are removed from the remote control. This remote is programmed for your set-top-box/satellite receiver. ቢ NOTES: 1. To switch to set-top-box/satellite (STB) pre-coded mode, use the SOURCE ACCESS buttons...
Owners Guide
Page 42
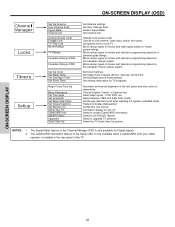
... to make white. The Signal Meter feature of the red, green and blue colors to display dialogue/text. Set viewing reservation for TV programs. Automatic and manual alignment of the Channel Manager OSD is installed in standard mode. Select between 1080i and 540p Scan mode. Choose to Lock TV. Set Day/Night picture mode settings. Label Video Inputs , VCR, DVD, etc. ON-SCREEN DISPLAY 42 Access Signal Meter. Set specific time to lock channel, video input, and/or front panel. Block various types of movies and television programming based on...
... to make white. The Signal Meter feature of the red, green and blue colors to display dialogue/text. Set viewing reservation for TV programs. Automatic and manual alignment of the Channel Manager OSD is installed in standard mode. Select between 1080i and 540p Scan mode. Choose to Lock TV. Set Day/Night picture mode settings. Label Video Inputs , VCR, DVD, etc. ON-SCREEN DISPLAY 42 Access Signal Meter. Set specific time to lock channel, video input, and/or front panel. Block various types of movies and television programming based on...
Owners Guide
Page 45
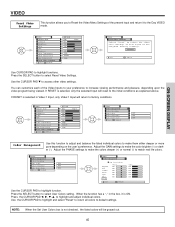
... factory conditions. Adjust the GAIN settings to default settings. Use the CURSOR PAD to highlight and select "Reset" to return all colors to make the color brighter (+) or darker (-). Video Picture Mode Contrast Brightness Color Tint Sharpness Color Temperature Black Enhancement Edge Enhancement Reset Video Settings Move SEL Select ANT A/B Day 100% 50% 50% 50% High Middle High Night Video Color Management Color Decoding Auto Color Noise Reduction Auto Movie Mode Move SEL Select Off Off Off ON-SCREEN DISPLAY Color...
... factory conditions. Adjust the GAIN settings to default settings. Use the CURSOR PAD to highlight and select "Reset" to return all colors to make the color brighter (+) or darker (-). Video Picture Mode Contrast Brightness Color Tint Sharpness Color Temperature Black Enhancement Edge Enhancement Reset Video Settings Move SEL Select ANT A/B Day 100% 50% 50% 50% High Middle High Night Video Color Management Color Decoding Auto Color Noise Reduction Auto Movie Mode Move SEL Select Off Off Off ON-SCREEN DISPLAY Color...
Owners Guide
Page 53
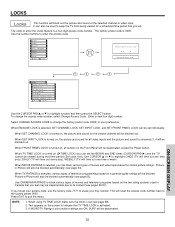
... menu. Video Audio Aspect Chan. LOCKS Locks This function will reset the access code number back to the factory preset 0000. This will block out the picture and sound of movies and television programs based on , the picture and sound for a scheduled time period that time period (Set clock first). Select CHANGE ACCESS CODE to change the access code number, select Change Access Code. When using TV TIME LOCK make sure the clock is turned on a parental guide ratings will be viewed during that you forget your access code, use...
... menu. Video Audio Aspect Chan. LOCKS Locks This function will reset the access code number back to the factory preset 0000. This will block out the picture and sound of movies and television programs based on , the picture and sound for a scheduled time period that time period (Set clock first). Select CHANGE ACCESS CODE to change the access code number, select Change Access Code. When using TV TIME LOCK make sure the clock is turned on a parental guide ratings will be viewed during that you forget your access code, use...
Owners Guide
Page 62
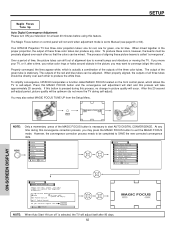
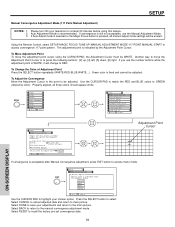
... convergence, HITACHI incorporates a function called "convergence". At any color. Your HITACHI Projection TV has three color projection tubes: one for red, one for green, one for Magnetic Influences. Manager Locks Timers Setup Move SEL Sel Setup Magic Focus Tune Up Menu Preference Set The Inputs Set Virtual HD Set Black Side Panel Set Closed Captions Set Monitor Out About Your TV Move SEL Return ON-SCREEN DISPLAY Setup Magic Focus Tune Up Aligns the Red, Green, and Blue colors to exit the MAGIC FOCUS mode. Adjustment Mode Auto 9 Point Manual 117 Point Manual At turn...
... convergence, HITACHI incorporates a function called "convergence". At any color. Your HITACHI Projection TV has three color projection tubes: one for red, one for green, one for Magnetic Influences. Manager Locks Timers Setup Move SEL Sel Setup Magic Focus Tune Up Menu Preference Set The Inputs Set Virtual HD Set Black Side Panel Set Closed Captions Set Monitor Out About Your TV Move SEL Return ON-SCREEN DISPLAY Setup Magic Focus Tune Up Aligns the Red, Green, and Blue colors to exit the MAGIC FOCUS mode. Adjustment Mode Auto 9 Point Manual 117 Point Manual At turn...
Owners Guide
Page 63
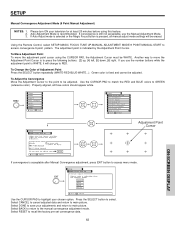
... Video Audio Aspect Chan. Press the SELECT button to the manual convergence adjustment mode. SETUP Manual Convergence Adjustment Mode (9 Point Manual Adjustment) NOTES: 1. The adjustment point is still not acceptable, use the number buttons while the adjustment point is fixed and cannot be erased. Manager Locks Timers Setup Move SEL Sel Setup Magic Focus Tune Up Menu Preference Set The Inputs Set Virtual HD Set Black Side Panel Set Closed Captions Set Monitor Out About Your TV Move SEL Return ON-SCREEN DISPLAY Setup Magic Focus Tune Up Aligns the Red, Green, and Blue colors...
... Video Audio Aspect Chan. Press the SELECT button to the manual convergence adjustment mode. SETUP Manual Convergence Adjustment Mode (9 Point Manual Adjustment) NOTES: 1. The adjustment point is still not acceptable, use the number buttons while the adjustment point is fixed and cannot be erased. Manager Locks Timers Setup Move SEL Sel Setup Magic Focus Tune Up Menu Preference Set The Inputs Set Virtual HD Set Black Side Panel Set Closed Captions Set Monitor Out About Your TV Move SEL Return ON-SCREEN DISPLAY Setup Magic Focus Tune Up Aligns the Red, Green, and Blue colors...
Owners Guide
Page 64
.... Video Audio Aspect Chan. Adjustment Mode Auto 9 Point Manual 117 Point Manual At turn ON your television for Magnetic Influences. Select CANCEL to cancel adjusted data and return to select. To Change the Color of Adjustment Point Press the SELECT button repeatedly (WHITE-RED-BLUE-WHITE...). To Adjust the Convergence Move the Adjustment Cursor to the point to save your chosen option. Manager Locks Timers Setup Move SEL Sel Setup Magic Focus Tune Up Menu Preference Set The Inputs Set Virtual...
.... Video Audio Aspect Chan. Adjustment Mode Auto 9 Point Manual 117 Point Manual At turn ON your television for Magnetic Influences. Select CANCEL to cancel adjusted data and return to select. To Change the Color of Adjustment Point Press the SELECT button repeatedly (WHITE-RED-BLUE-WHITE...). To Adjust the Convergence Move the Adjustment Cursor to the point to save your chosen option. Manager Locks Timers Setup Move SEL Sel Setup Magic Focus Tune Up Menu Preference Set The Inputs Set Virtual...
Owners Guide
Page 75
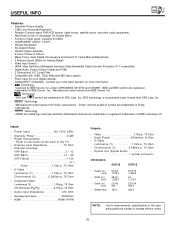
... registered trademarks of BBE Sound, Inc. USEFUL INFO Features: • Superfine Picture Quality 1280 Line Horizontal Resolution • Remote (Controls many PVR/VCR brands, cable boxes, satellite boxes, and other audio equipment). • New Easy-to-Use (3-Language) On-Screen Menu • Full Set of Input Jacks, including S-VIDEO • COMPONENT VIDEO: Y-PB/PR • Velocity Modulation • Six Aspect Modes • Closed Caption Decoder • 2-Tuner Picture in this operating guide are trademarks or registered...
... registered trademarks of BBE Sound, Inc. USEFUL INFO Features: • Superfine Picture Quality 1280 Line Horizontal Resolution • Remote (Controls many PVR/VCR brands, cable boxes, satellite boxes, and other audio equipment). • New Easy-to-Use (3-Language) On-Screen Menu • Full Set of Input Jacks, including S-VIDEO • COMPONENT VIDEO: Y-PB/PR • Velocity Modulation • Six Aspect Modes • Closed Caption Decoder • 2-Tuner Picture in this operating guide are trademarks or registered...


