

Owner's Manual
Page 7
...(main carton) 1 1 Collar (blue bag) 3 Retaining Clip (blue bag) 3 Rail Strap (blue bag) 1 1 1/4"-20 Hex Head Bolt (blue bag) 2 2 Open Limit Switch Assembly (White)(green bag) 1 1 Close Limit Switch Assembly (Brown) (green bag) 1 1 No. 8-32 x 1" Hex Head Screw (green bag) 2 2 Emergency Release Cord (green bag) 1 1 Emergency Release Cord (long)(... x 3/8" Hex Head No. 8-32 x 1" Phillips Screw No. 8-32 x 3/8" Slotted Hex Head Screw Power Cord For Help, call 1-800-35-GENIE or visit www.geniecompany.com 7 These items will be illustrated throughout the manual as required.
...(main carton) 1 1 Collar (blue bag) 3 Retaining Clip (blue bag) 3 Rail Strap (blue bag) 1 1 1/4"-20 Hex Head Bolt (blue bag) 2 2 Open Limit Switch Assembly (White)(green bag) 1 1 Close Limit Switch Assembly (Brown) (green bag) 1 1 No. 8-32 x 1" Hex Head Screw (green bag) 2 2 Emergency Release Cord (green bag) 1 1 Emergency Release Cord (long)(... x 3/8" Hex Head No. 8-32 x 1" Phillips Screw No. 8-32 x 3/8" Slotted Hex Head Screw Power Cord For Help, call 1-800-35-GENIE or visit www.geniecompany.com 7 These items will be illustrated throughout the manual as required.
Owner's Manual
Page 8
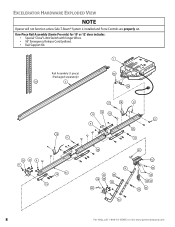
EXCELERATOR HARDWARE EXPLODED VIEW NOTE Opener will not function unless Safe-T-Beam® System is installed and Force Controls are properly set. One-Piece Rail Assembly (Genie Pro only) for 10' or 12' door includes: • Special "Close" Limit Switch with longer Wires. • 96" Emergency Release Cord (yellow). • Rail Support Kit. 11 Rail Assembly... 99 45A 1100 46B 3311 30 28 556 3322 3366 3344 333 32 112 3333 2225 2222 23 2244 3355 8 For Help, call 1-800-35-GENIE or visit www.geniecompany.com
EXCELERATOR HARDWARE EXPLODED VIEW NOTE Opener will not function unless Safe-T-Beam® System is installed and Force Controls are properly set. One-Piece Rail Assembly (Genie Pro only) for 10' or 12' door includes: • Special "Close" Limit Switch with longer Wires. • 96" Emergency Release Cord (yellow). • Rail Support Kit. 11 Rail Assembly... 99 45A 1100 46B 3311 30 28 556 3322 3366 3344 333 32 112 3333 2225 2222 23 2244 3355 8 For Help, call 1-800-35-GENIE or visit www.geniecompany.com

Owner's Manual
Page 10
... of Rail. D Place Close Limit Switch (Brown Wire) 15" from Power Head. Close Limit Switch (Brown wire) 19 DOOR Open Limit Switch (White wire) 18 DOOR 15" Arrows point DOOR toward door Wire Clip 53 15" #8-32 x 1" Hex Head Screws 21 Figure 14 Install Limit Switches on End Rail Section with... A Align all fasteners now. Insert (#8-32 x 1") Hex Head Screw into slot on Assembled Rail 10 For Help, call 1-800-35-GENIE or visit www.geniecompany.com Assembly Step C3H: INSTALL MAGNETIC CARRIAGE ASSEMBLY ONTO RAILS A Place Magnetic Carriage Assembly Lever in "release" position....
... of Rail. D Place Close Limit Switch (Brown Wire) 15" from Power Head. Close Limit Switch (Brown wire) 19 DOOR Open Limit Switch (White wire) 18 DOOR 15" Arrows point DOOR toward door Wire Clip 53 15" #8-32 x 1" Hex Head Screws 21 Figure 14 Install Limit Switches on End Rail Section with... A Align all fasteners now. Insert (#8-32 x 1") Hex Head Screw into slot on Assembled Rail 10 For Help, call 1-800-35-GENIE or visit www.geniecompany.com Assembly Step C3H: INSTALL MAGNETIC CARRIAGE ASSEMBLY ONTO RAILS A Place Magnetic Carriage Assembly Lever in "release" position....

Owner's Manual
Page 11
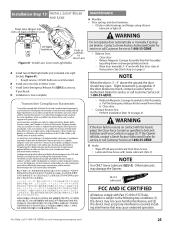
... (Figure 14). Antenna Terminal Block White Limit Brown Limit Switch wires Switch wires Figure 15 Connect Limit Switch Wires to call 1-800-35-GENIE or visit www.geniecompany.com 11 NOTE • Loosen (Do Not Remove) Terminal Block Screws. • Limit Switch adjustments and securing the Wires will be required... 14). Leave just enough Wire to Power Head Terminal Block (Figure 15): • Terminal 4: OPEN Limit Switch Wire (white). • Terminal 5: OPEN Limit Switch Wire (white) and CLOSE Limit Switch Wire (brown). • Terminal 6: CLOSE Limit Switch Wire (brown).
... (Figure 14). Antenna Terminal Block White Limit Brown Limit Switch wires Switch wires Figure 15 Connect Limit Switch Wires to call 1-800-35-GENIE or visit www.geniecompany.com 11 NOTE • Loosen (Do Not Remove) Terminal Block Screws. • Limit Switch adjustments and securing the Wires will be required... 14). Leave just enough Wire to Power Head Terminal Block (Figure 15): • Terminal 4: OPEN Limit Switch Wire (white). • Terminal 5: OPEN Limit Switch Wire (white) and CLOSE Limit Switch Wire (brown). • Terminal 6: CLOSE Limit Switch Wire (brown).

Owner's Manual
Page 20
... of Limit Switches A Setting Close Limit Switch (Figure 34): • Check that Magnetic Carriage Assembly is disengaged. • With garage door fully closed ) Carriage (disengaged) Switch Magnet Open Limit Switch Switch (door fully open) Carriage (disengaged) Magnet Figure 34 Setting Limit Switches Force Controls HI LO HI LO OPEN CLOSE FORCE FORCE Figure 35 Making Force Adjustments 20 For Help, call 1-800-35-GENIE...
... of Limit Switches A Setting Close Limit Switch (Figure 34): • Check that Magnetic Carriage Assembly is disengaged. • With garage door fully closed ) Carriage (disengaged) Switch Magnet Open Limit Switch Switch (door fully open) Carriage (disengaged) Magnet Figure 34 Setting Limit Switches Force Controls HI LO HI LO OPEN CLOSE FORCE FORCE Figure 35 Making Force Adjustments 20 For Help, call 1-800-35-GENIE...

Owner's Manual
Page 21
... Force to minimum needed to Open Limit Switch. If your Excelerator® is blocked, door will prevent the Timer/Cycle Counter from Close Limit Switch to set Limit Switch positions. A Open garage door using Wall Console. If not, readjust the Close Limit Switch. 2" x 4" board laid flat Figure 36 Checking Contact Reverse For Help, call 1-800-35-GENIE or visit www.geniecompany.com...
... Force to minimum needed to Open Limit Switch. If your Excelerator® is blocked, door will prevent the Timer/Cycle Counter from Close Limit Switch to set Limit Switch positions. A Open garage door using Wall Console. If not, readjust the Close Limit Switch. 2" x 4" board laid flat Figure 36 Checking Contact Reverse For Help, call 1-800-35-GENIE or visit www.geniecompany.com...
Owner's Manual
Page 25
... Rail Assembly: a. GLU-3 Lubricant SDcoroerwOPDaprrteiNvnoee. Close door. - Reattach Magnetic Carriage Assembly to close Lens Figure 41 Install Lens Cover and Light Bulbs A Install two 60 Watt light bulbs (not included) into slots in Set Limit Switches and Force Controls on page 3. For Help, call Customer Service at 1-800-35-GENIE. • Balance Door. - Other lubricants...
... Rail Assembly: a. GLU-3 Lubricant SDcoroerwOPDaprrteiNvnoee. Close door. - Reattach Magnetic Carriage Assembly to close Lens Figure 41 Install Lens Cover and Light Bulbs A Install two 60 Watt light bulbs (not included) into slots in Set Limit Switches and Force Controls on page 3. For Help, call Customer Service at 1-800-35-GENIE. • Balance Door. - Other lubricants...

Owner's Manual
Page 27
...further assistance. NOTE: Safe-T-Beam® System must be closed electrically by holding the Wall Console Button down until door is fully closed. • The Remote Controls and Wireless Keypad will not work • • Limit Switches • not working Safe-T-Beam® System. See ... 10 minutes for further service. See page 20. Vacation Locking Switch on Controller Board. Do not unplug or disconnect power from Opener. Contact Customer service for internal clock to close. Have a Genie Factory Authorized Dealer check that Ribbon Cable on Motor Board is ...
...further assistance. NOTE: Safe-T-Beam® System must be closed electrically by holding the Wall Console Button down until door is fully closed. • The Remote Controls and Wireless Keypad will not work • • Limit Switches • not working Safe-T-Beam® System. See ... 10 minutes for further service. See page 20. Vacation Locking Switch on Controller Board. Do not unplug or disconnect power from Opener. Contact Customer service for internal clock to close. Have a Genie Factory Authorized Dealer check that Ribbon Cable on Motor Board is ...

Owner's Manual
Page 28
... OK: • Check connections at 1-800-35-GENIE. • Check Open Limit Switch for a short circuit and for proper wiring. • Check Open Force adjustment (see Set Limit Switches and Force Controls on page 26). • Check Close Limit Switch for a short circuit and for service,or contact ...any loose connections. If Opener is connected to ensure that they are turning when Motor runs. Have a Genie Factory Authorized Dealer check that Carriage activates Close Limit Switch. Adjust as needed . • Check condition of Rail Drive Screw are not cut insulation and short Wires...
... OK: • Check connections at 1-800-35-GENIE. • Check Open Limit Switch for a short circuit and for proper wiring. • Check Open Force adjustment (see Set Limit Switches and Force Controls on page 26). • Check Close Limit Switch for a short circuit and for service,or contact ...any loose connections. If Opener is connected to ensure that they are turning when Motor runs. Have a Genie Factory Authorized Dealer check that Carriage activates Close Limit Switch. Adjust as needed . • Check condition of Rail Drive Screw are not cut insulation and short Wires...
Owner's Manual
Page 29
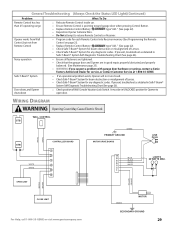
... beam obstruction or misalignment of Wall Console Vacation Lock Switch. WIRING DIAGRAM WARNING Opening Cover May Cause Electric Shock WALL CONTROL CONTROLLER BOARD GREEN PRIMARY GROUND MOTOR DRIVE BOARD LINE PLUG WHITE STRIPE BROWN BROWN WHITE WHITE OPEN LIMIT CLOSE LIMIT For Help, call 1-800-35-GENIE or visit www.geniecompany.com BLUE BLACK WHITE...
... beam obstruction or misalignment of Wall Console Vacation Lock Switch. WIRING DIAGRAM WARNING Opening Cover May Cause Electric Shock WALL CONTROL CONTROLLER BOARD GREEN PRIMARY GROUND MOTOR DRIVE BOARD LINE PLUG WHITE STRIPE BROWN BROWN WHITE WHITE OPEN LIMIT CLOSE LIMIT For Help, call 1-800-35-GENIE or visit www.geniecompany.com BLUE BLACK WHITE...


