
Genie PowerLift Support Question
Genie PowerLift Support Question
Find answers below for this question about Genie PowerLift.Need a Genie PowerLift manual? We have 1 online manual for this item!
Question posted by jchamless on March 25th, 2013
How To Wire Limit Switches From Power Box
The person who posted this question about this Genie product did not include a detailed explanation. Please use the "Request More Information" button to the right if more details would help you to answer this question.
Current Answers
Related Genie PowerLift Manual Pages
Owner's Manual - Page 1

... Instructions 2 Safety Features 2 Pre-installation Checklist 3 Garage Door Opener Assembly 9 Record Data (for 8' Doors
Included Wall Control MUST be Properly Set to Operation of this Garage Door Operator. Extension Kit is available for Service 11 Garage Door Opener Installation 12 Accessories 22 Maintenance 25 Troubleshooting 26 Wiring Diagram 29 Warranty information 30
COMPLETE...
Owner's Manual - Page 2

...opening and closing door, if door does not close door. Safe-T-Reverse® Contact Reversing System Automatically stops and reverses a closing door within 30 seconds. Manual Emergency Release Allows the garage door to be opened... Service at the center of power until instructed to the door before removing operator cover. • When replacing cover, make sure wires are fastened, such as,...
Owner's Manual - Page 4

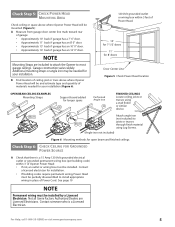
... mounting height (Figure 4): (Do not attach Header Bracket). • Raise door, watching top edge of door and stop door when its edge reaches its highest point. • Measure distance ("H") from top edge of the garage door opening. Mark a point on center line. For one-piece doors, add 6" to "H". Mark this point on center line. Do Not move...
Owner's Manual - Page 5
...
Check ceiling or space above where Opener Power Head will be mounted (Figure 5): A Measure from garage door center line mark toward rear
of Opener Power Head: • If not, an outlet or wiring box must be installed. NOTE
Mounting Straps are Licensed Electricians.
B Find location of ceiling joist or truss above where Opener Power Head will be needed for your...
Owner's Manual - Page 6

... from garage door (Figure 7). A If your garage does not have a separate entry door, it is a power failure. (Please see Accessories Order Form on pages 31/32.)
Before going further, get any items and tools
needed for your installation
❐ Safe-T-Beam® Sensor Mounting Bracket Extensions (dealer) ❐ Garage door opener reinforcement bracket (dealer) ❐ Garage door frame...
Owner's Manual - Page 7

... Name
Quantity Required
1-Pc Rail 3-Pc Rail
Power Head Assembly (main carton)
1
1
1/4"-20...Hex Head Bolt (blue bag)
2
2
Open Limit Switch Assembly (White)(green bag)
1
1
Close Limit Switch Assembly (Brown) (green bag)
1
1...
2
Curved Door Arm (main carton)
1
1
3/8" x 7/8" Hex Head Bolt (yellow bag)
2
2
3/8" Hex Serrated Flange Nut (yellow bag)
2
2
2-Conductor Wire (main carton)...
Owner's Manual - Page 8
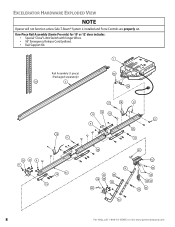
EXCELERATOR HARDWARE EXPLODED VIEW
NOTE
Opener will not function unless Safe-T-Beam® System is installed and Force Controls are properly set.
One-Piece Rail Assembly (Genie Pro only) for 10' or 12' door includes: • Special "Close" Limit Switch with longer Wires. • 96" Emergency Release Cord (yellow). • Rail Support Kit.
11
Rail Assembly...
Owner's Manual - Page 9

... and Middle Rail Sections. • Latch two Hooks together and slide Collar over Hooks
Collar
9 Rail Clamps
13
11D. GARAGE DOOR OPENER ASSEMBLY
Assembly Step C1H: CONNECT RAIL TO POWER HEAD
OPEN BLUE PARTS BAG
A Turn Power Head upside down and place on Retaining Clip
10
Figure 11 Attach Middle Rail Section
For Help, call 1-800...
Owner's Manual - Page 10

....
Insert (#8-32 x 1") Hex Head Screw into Switch hole and finger-tighten until later. Close Limit Switch
(Brown wire)
19
DOOR
Open Limit Switch
(White wire)
18
DOOR
15"
Arrows point DOOR toward door
Wire Clip
53
15"
#8-32 x 1" Hex Head
Screws 21
Figure 14 Install Limit Switches on End Rail
Section with arrow pointing away from Power Head (Figure 14).
Insert (#8-32 x 1") Hex...
Owner's Manual - Page 11

....
25
Emergency Release Tag
Assembly Step C8H: RECORD OPENER MODEL AND SERIAL NUMBER
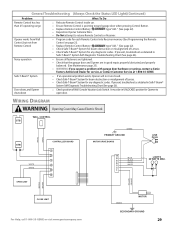
Please note the following information so it is available if you need to Power Head Terminal Block (Figure 15): • Terminal 4: OPEN Limit Switch Wire (white). • Terminal 5: OPEN Limit Switch Wire (white) and CLOSE Limit Switch Wire (brown). • Terminal 6: CLOSE Limit Switch Wire (brown).
Owner's Manual - Page 12

GARAGE DOOR OPENER INSTALLATION
NOTE
For lightweight garage doors, make sure you have sufficient support.
• If a door spring is in Figure 18.
Alternative Header Bracket orientations
Highest Point of bracket flange
CAUTION
• The Header Bracket must be fastened to the Header ...
Owner's Manual - Page 16
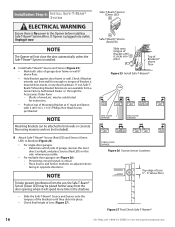
... door frame or wall. Preventing crossed signals is No power to the Opener before installing Safe-T-Beam® System Wires. Check if Bracket extends out from the door opening, where it will not close the door ... INSTALL SAFE-T-BEAM® SYSTEM
ELECTRICAL WARNING
Ensure there is critical. - Blocks of garage door frame or wall 6" above floor
Figure 27 Final Check Safe-T-Beams®
16
For ...
Owner's Manual - Page 18

... garage door). • Away from inside garage. • Independent Light Control allows convenient manual control of Wall Console, connect Striped Wire to terminal "B" and White Wire to the Opener before installing Wall Console Wires.
D Wire Wall Console to Opener (Figure 32):
• On Power Head, connect Striped Wire to Terminal #1 and White Wire to Terminal #2.
• On back of Opener...
Owner's Manual - Page 19
...; Connect permanent wiring to Opener Black Wire.
-
Restore Power to Opener Green Wire.
- Electrical power must be permanently wired to install the proper outlet.
Knockout
Cut Wires here
NOTE
• Use only Underwriters Laboratories, Inc. (U.L.) recognized wire nuts.
• The Circuit Boards are not installing permanent wiring, go to the door Opener Must Be removed...
Owner's Manual - Page 20

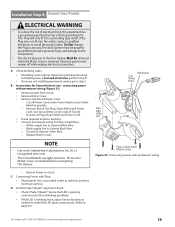
... of Limit Switches
WARNING
• The garage door opens rapidly, and can cause serious injury or death.
• Keep the path clear. • Position the ladder to the side of the Power Head so it is aligned with Carriage Assembly Magnet.
• Tighten Set Screw. Installation SteCpH9: SET LIMIT SWITCHES AND FORCE CONTROLS
Setting of Limit Switches
A Setting Close Limit Switch (Figure...
Owner's Manual - Page 21

...; Place door in open garage door, and close garage door, and open it again.
• Repeat steps above until
door reverses. • If door still does not reverse, move Limit Switch
toward door.
If not, adjust Open Force Control slightly clockwise, close it again.
• Repeat steps above until garage door runs smoothly from Open Limit Switch to Close Limit Switch. F Adjust...
Owner's Manual - Page 26
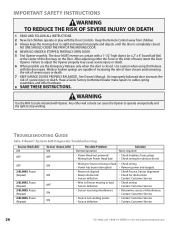
... children operate or play with the door open. Keep the Remote Control away from children. 3 Always keep the moving door in sight and away from Power Head bad
Solution None required
• Check breakers, fuses, plugs • Check wiring for obvious shorts
• Wiring to Source missing or bad • Power has been interrupted • Beam not...
Owner's Manual - Page 27

... signal. Wait 10 minutes for shorted or pinched Wires under the Lens Cover.
Vacation Locking Switch on Wall Control is applied to the Opener. Check door condition. Have a Genie Factory Authorized Dealer check: - Check Wiring Connections at slow speed. NOTE: This Opener is located under Limit Switch Brackets. Opener System Self-Diagnostic Troubleshooting • See Status Light...
Owner's Manual - Page 28

... . • Check garage door for binding.
• Check Open Limit Switch for a short circuit and for beam obstruction or misalignment of garage door and door spring(s). • WARNING: If you suspect a problem with the garage door hardware or springs,contact a Genie Factory Authorized De aler for service,or contact Customer Service at Power Head Terminals (see Set Limit Switches and Force...
Owner's Manual - Page 29
...• Ensure Remote Control is pointing toward garage door when pressing Control Button.
• Replace Remote Control Battery
type "A23." (See page 22).
• Reposition Opener Antenna Wire.
• Do Not attempt to open door.
Noisy operation
• Ensure all fasteners are tightened. • Check that the garage door and Opener are in UNLOCKED position for service, or contact...
Similar Questions

What Remote Do I Use For Powerlift Garage Door Opener Model Wr77 Serial No.08258
(Posted by tmski87 3 years ago)

Garage Door Height
I have a Powerlift Model WR827. It opens all the wat to the top of the door, then falls back about 3...
I have a Powerlift Model WR827. It opens all the wat to the top of the door, then falls back about 3...
(Posted by jachfo25 5 years ago)

Garage Door Opener Not Working
Green light and red light are on the safety"eye" When pushing wall, remote or key pad the screw driv...
Green light and red light are on the safety"eye" When pushing wall, remote or key pad the screw driv...
(Posted by scanty5 9 years ago)

Can I Get A Extension For A Sd9000 Genie Garage Door Opener To Lift A 16x8
(Posted by dlfabes 10 years ago)

Where Is The Learn Code Button Situated On The 3060l-07 Genie Garage Door Opener
Where is the learn code button situated on the 3060L-07 Genie garage door opener. Trying to intregat...
Where is the learn code button situated on the 3060L-07 Genie garage door opener. Trying to intregat...
(Posted by katiaella 10 years ago)