
Genie Excelerator Support Question
Genie Excelerator Support Question
Find answers below for this question about Genie Excelerator.Need a Genie Excelerator manual? We have 1 online manual for this item!
Question posted by emasapp on March 10th, 2014
Door Will Open Slowly But Will Not Close Or Even Light Come On How Do I Fix This
The person who posted this question about this Genie product did not include a detailed explanation. Please use the "Request More Information" button to the right if more details would help you to answer this question.
Current Answers
Related Genie Excelerator Manual Pages
Owner's Manual - Page 1

... Requirements.
3531835447
TABLE OF CONTENTS
Safety Information 2 Important Installation Instructions 2 Safety Features 2 Pre-installation Checklist 3 Garage Door Opener Assembly 9 Record Data (for 8' Doors
Included Wall Control MUST be Properly Set to Operation of this Garage Door Operator. Please call us: 1-800-35-GENIE (354-3643) www.geniecompany.com
Please have Model information...
Owner's Manual - Page 2

... understanding the information in this manual. An improperly balanced door could cause severe injury.
Safe-T-Stop® Timed Reversed System Automatically opens a closing door. Automatic Lighting System Two light bulbs up to remove, repair or adjust springs or anything passes through beam. Manual Emergency Release Allows the garage door to be properly grounded.
• Do Not try to...
Owner's Manual - Page 3

...necessary bracing and a door opener reinforcement bracket (if needed) before proceeding. B If door is equipped with frame and skin - NOTE
The Excelerator Opener is "lightweight" (made with an automatic Garage Door Balance Detection System. One-Piece Door
B Raise door to your garage door for repairs and adjustments
SECTIONAL DOOR, TORSION SPRINGS SECTIONAL DOOR, EXTENSION SPRINGS
ONE...
Owner's Manual - Page 4

... or visit www.geniecompany.com Mark a point on center line. NOTE
• For both types of the garage door opening.
Check Step 3: MEASURE GARAGE DOOR HEIGHT
Measure garage door height (7'-6", 8'-0", or taller) with Check Step 4. Draw a center line to "H". Check Step 4: CHECK DOOR HEADER AREA
NOTE
The header is 7'-6" or less, continue with tape measure. For one-piece...
Owner's Manual - Page 6

... Extensions (dealer) ❐ Garage door opener reinforcement bracket (dealer) ❐ Garage door frame reinforcement brackets, screws, bracing
or reinforcement kits (dealer)
❐ Lag Screws (11/4") for a wood door less than 2" thick (store) ❐ Electrical outlet and/or wiring (supplied by a
licensed electrician)
❐ Excelerator Extension Kit (for 8' garage doors) (store) ❐...
Owner's Manual - Page 8
... 1166
1155
2211
1188
88
1133
DOOR
1144
553
22
99
45A
1100
46B
3311
30 28 556
3322
3366 3344
333
32
112 3333 2225 2222 23 2244 3355
8
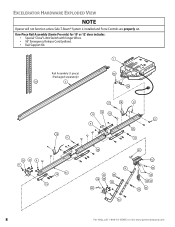
For Help, call 1-800-35-GENIE or visit www.geniecompany.com EXCELERATOR HARDWARE EXPLODED VIEW
NOTE
Opener will not function unless Safe-T-Beam...
Owner's Manual - Page 9

...-tighten until later.
B Install Bumper (Figure 9). C Install Coupler on collar 11B.
See page 8.)
C Attach End Rail Section to Collar (Figure11D). GARAGE DOOR OPENER ASSEMBLY
Assembly Step C1H: CONNECT RAIL TO POWER HEAD
OPEN BLUE PARTS BAG
A Turn Power Head upside down and place on Retaining Clip
10
Figure 11 Attach Middle Rail Section
For...
Owner's Manual - Page 10

...Light Bulb Sockets.
Insert (#8-32 x 1") Hex Head Screw into Switch hole and finger-tighten until later. B Tighten snugly but Do Not over -tighten.
B Uncoil Limit Switch Wires and retain Twist Ties.
#8-32 x 1" Hex Head Screws
Open... Power Head (Figure 12). Close Limit Switch
(Brown wire)
19
DOOR
Open Limit Switch
(White wire)
18
DOOR
15"
Arrows point DOOR toward door
Wire Clip
53
15"
...
Owner's Manual - Page 12

...
Mount directly into header
Center Line of door
Use of Header Bracket support board
Center Line of door
OR
Bottom of door travel + 2-1/2" (sectional door) or
+ 6" (one-piece door) Figure 18 Attach Header Bracket above the spring. GARAGE DOOR OPENER INSTALLATION
NOTE
For lightweight garage doors, make sure you have sufficient support.
• If a door spring is recommended) Lag Screws and...
Owner's Manual - Page 16
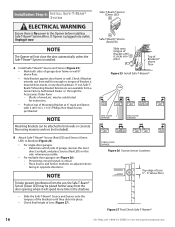
... so tongue of the Brackets until it will not close the door automatically unless the Safe-T-Beam® System is installed. Place Source and Sensor modules on this side whenever possible. • For multiple-door garages see (Figure 26). - NOTE
To help prevent interference from the door opening, where it clicks into place.
• Check final...
Owner's Manual - Page 18

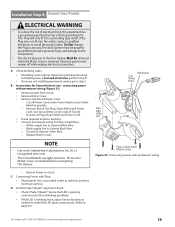
... Staples, be able to only tap them in UNLOCKED position.
F Remove protective backing from inside garage. • Independent Light Control allows convenient manual control of any moving garage door or Opener parts (you
should not be sure to reach door while standing at Wall Console).
Wall Console 40
Figure 31 Wall Console
Allow slack
Terminal Attachment...
Owner's Manual - Page 19
...perform step B.
• If you are light sensitive. If the Plug does not fit into a grounding type outlet. Ground to circuit. Restore Power to Opener Green Wire.
- Electrical power must be ...from circuit.
• Remove Motor Cover.
• Remove and discard Power Cord.
- The door Opener must remain off Power Cord inside Power Head as near Strain
Relief as stated in any way...
Owner's Manual - Page 20

....
• The garage door will move slowly the first time it runs, until the Opener "learns" the type of door.
• Ensure the Magnetic Carriage Assembly is engaged and is between fully counter clockwise and fully clockwise (Figure 35). If door does not close garage door. - Do not over -tighten.
• Re-engage Magnetic Carriage Assembly. If door opens completely, but...
Owner's Manual - Page 21

... board before checking the contact reverse function (Figure 36). If your Excelerator® is blocked, door will prevent the Timer/Cycle Counter from Open Limit Switch to Close Limit Switch. F Adjust Close Force to minimum needed :
• Place door in open garage door, and close . If not, readjust the Close Limit Switch.
2" x 4" board laid flat Figure 36 Checking Contact Reverse
For...
Owner's Manual - Page 22
...
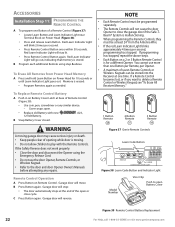
A Press Button on Power Head for a different Opener.
B Snap Battery Cover closed.
B Press Button again. Red Learn Indicator Light will blink 2 times per second, programming has stopped.
To Replace Remote Control Battery
A Push in on Battery Cover Latch at one Button of the open or close the garage door if the Safe-TBeam® System is malfunctioning...
Owner's Manual - Page 23

...NOTE
• If the door does not move the garage door:
-
twice per second. • Enter your PIN and press
.
- B Programming the Keypad for each door opener. Learn Code Indicator LED...Safety Reverse does not work properly
1 Close door and disconnect the Opener using Emergency Release Cord.
2 Do not use the same PIN.
• Enter your door opener does not have an
antenna,you ...
Owner's Manual - Page 26
...to adjust the Opener properly may cause severe injury or death. 6 When possible use the Emergency Release only when the door is completely closed .
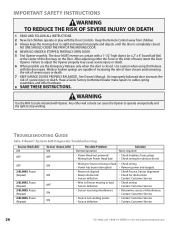
IMPORTANT ...DOOR. 4 NEVER GO UNDER A STOPPED, PARTIALLY OPEN DOOR. 5 Test Opener monthly. Weak or broken springs are capable of increasing the rate of door closure and increasing the risk of severe injury or death. 7 KEEP GARAGE DOORS...
Owner's Manual - Page 27

... for further assistance. Check Limit Switch Wire connections to close. Unlock switch. See page 20. 2. See page 18
NOTE
• The status LED Indicator Light is equipped with an automatic garage door balance detection system.
Check Wall Console Wiring for internal clock to the Opener.
See door
Safety Guide
1. For Help, call Customer Service at Power...
Owner's Manual - Page 28

... is "Closed" (not tripped). • If still no apparent reason
Door starts down, then stops before it is completely closed
• Check Wires to ensure that garage door and Opener are not...Ensure Magnetic Carriage Assembly is completely open Lights will not turn off
• Check Safe-T-Beam® System as detailed in contact with the garage door hardware or springs,contact a Genie
...
Owner's Manual - Page 29
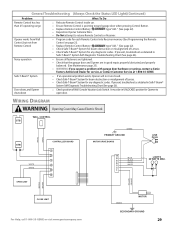
... OPEN LIMIT
CLOSE LIMIT
For Help, call 1-800-35-GENIE or visit www.geniecompany.com
BLUE BLACK WHITE WHITE
LIGHTS 60 WATTS MAX. If present, troubleshoot as detailed in Safe-T-Beam®
System Self-Diagnostic Troubleshooting Chart (See page 26). Noisy operation
• Ensure all fasteners are tightened. • Check that the garage door and Opener...
Similar Questions


Is Genie Excelerator Garage Door Opener Compatible With The 3 Button Remote?
(Posted by ven1anubis 10 years ago)

Garage Door Opener.
The unit will not work from the wall remote. The wall remote lights up but does not operat the unit....
The unit will not work from the wall remote. The wall remote lights up but does not operat the unit....
(Posted by ckniffen 10 years ago)
Why Would The Light Come On My Genie Garage Door Opener If I Have The Wall
operator in the lock position
operator in the lock position
(Posted by Jurda 10 years ago)

I Have A Genie Stealth Pro Garage Door Opener. Both Os Lights Are Not Lit.
I checked the fuses in the unit and they are both good. I read about 0.25 volts on terminals 3 and 4...
I checked the fuses in the unit and they are both good. I read about 0.25 volts on terminals 3 and 4...
(Posted by mdhall 10 years ago)