
Genie Excelerator Support Question
Genie Excelerator Support Question
Find answers below for this question about Genie Excelerator.Need a Genie Excelerator manual? We have 1 online manual for this item!
Question posted by dogballs01 on July 2nd, 2014
How Do You Wire Up The Door Opener?
The person who posted this question about this Genie product did not include a detailed explanation. Please use the "Request More Information" button to the right if more details would help you to answer this question.
Current Answers
Related Genie Excelerator Manual Pages
Owner's Manual - Page 1

... 2 Safety Features 2 Pre-installation Checklist 3 Garage Door Opener Assembly 9 Record Data (for 8' Doors
Included Wall Control MUST be Properly Set to Operation of this Garage Door Operator.
Extension Kit is available for Service 11 Garage Door Opener Installation 12 Accessories 22 Maintenance 25 Troubleshooting 26 Wiring Diagram 29 Warranty information 30
COMPLETE WITH...
Owner's Manual - Page 2

... invisible beam across door opening equipment may cause injuries, your service representative.
2 Do Not install operator on , or next to fully open position if anything to be made by a trained service person using proper tools and instructions. Safe-T-Reverse® Contact Reversing System Automatically stops and reverses a closing door. SAFETY INFORMATION
Garage Doors are used for...
Owner's Manual - Page 3

... equipped with frame and skin - NOTE
The Excelerator Opener is out of whether it moves freely (Figure 1). One-Piece Door
B Raise door to Opener's Door Bracket. Contact a Genie Factory Authorized Dealer
or dealer of garages and garage doors. B If door is acceptable.
Slight movement is "lightweight" (made with an automatic Garage Door Balance Detection System. Make a note of...
Owner's Manual - Page 4

... not at 1-800-35-GENIE. Draw a center line to "H". Mark this point on header directly above door. NOTE
• For both types of the garage door opening. Do Not move the door spring. A Find vertical center line of door and on center line. If the ceiling in the way, place the Header Bracket avove the spring...
Owner's Manual - Page 5
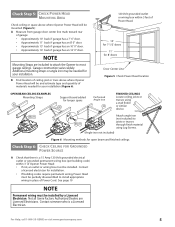
... install appropriate wiring in place of garage: • Approximately 10' back if garage has a 7' 6" door. • Approximately 11' back if garage has an 8' 0" door. • Approximately 13' back if garage has an 10' 0" door. • Approximately 14' back if garage has an 12' 0" door. Check Step 5: CHECK POWER HEAD MOUNTING AREA
Check ceiling or space above where Opener Power Head will...
Owner's Manual - Page 6

... Extensions (dealer) ❐ Garage door opener reinforcement bracket (dealer) ❐ Garage door frame reinforcement brackets, screws, bracing
or reinforcement kits (dealer)
❐ Lag Screws (11/4") for a wood door less than 2" thick (store) ❐ Electrical outlet and/or wiring (supplied by a
licensed electrician)
❐ Excelerator Extension Kit (for 8' garage doors) (store) ❐...
Owner's Manual - Page 8
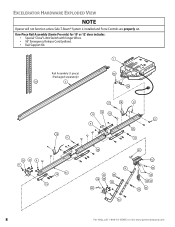
EXCELERATOR HARDWARE EXPLODED VIEW
NOTE
Opener will not function unless Safe-T-Beam® System is installed and Force Controls are properly set. One-Piece Rail Assembly (Genie Pro only) for 10' or 12' door includes: • Special "Close" Limit Switch with longer Wires. • 96" Emergency Release Cord (yellow). • Rail Support Kit.
11
Rail...
Owner's Manual - Page 9

... Screw and Rail Liner can slide out of Rail Sections.
Connect with kit.
11
11A. Keep Rail Sections level until later.
GARAGE DOOR OPENER ASSEMBLY
Assembly Step C1H: CONNECT RAIL TO POWER HEAD
OPEN BLUE PARTS BAG
A Turn Power Head upside down and place on Motor Shaft (Figure 9).
See page 8.)
C Attach End Rail Section...
Owner's Manual - Page 10

... Switch Assembly
Emergency Release Knob
Emergency Release Tag
Hardware (green bag)
E Place Open Limit Switch (White Wire) 15" from the Power Head (Figure 12). B Securely tighten all Rail...Serrated Flange Hex Nuts (Figure 13).
Close Limit Switch
(Brown wire)
19
DOOR
Open Limit Switch
(White wire)
18
DOOR
15"
Arrows point DOOR toward door
Wire Clip
53
15"
#8-32 x 1" Hex Head
Screws 21
...
Owner's Manual - Page 16
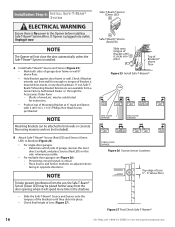
... is No power to the Opener before installing Safe-T-Beam® System Wires.
Check if Bracket extends out from the door opening, where it will not close the door automatically unless the Safe-T-Beam® System is plugged into outlet, Unplug it clicks into place.
• Check final height of garage door frame or wall 6" above
floor...
Owner's Manual - Page 17
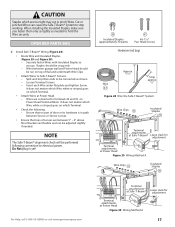
OPEN RED PARTS BAG
C Install Safe-T-Beam® Wiring (Figure 28):
• Route Wire and Insulated Staples (Figure 29 and Figure 30). - Split and strip Wire...#3 on Power Head Terminal Block.
Wires between garage wall and Power Head should be adjusted slightly if needed ...Wire under flat plate and tighten Screw. Brackets are between Source or Sensor Lenses.
• Ensure that tops of door...
Owner's Manual - Page 18

....geniecompany.com
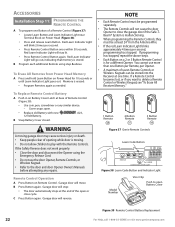
Security Vacation Lock Switch
Independent Light Control
Garage Door Control
NOTE
More than the type included will cause a malfunction. Makes Console easy to find in dark. • Controls door Opener from Entrapment Warning Label, and attach it to the Opener before installing Wall Console Wires.
E Attach Wall Console onto wall at Wall Console). Installation...
Owner's Manual - Page 19
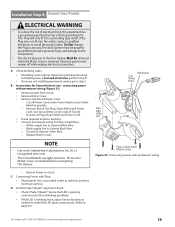
... to prevent personal injury and damage to the components.
• The electrical power to Opener Green Wire.
- Ground to the door Opener Must Be removed when the Motor Cover is installed before energizing the Opener. Knockout
Cut Wires here
NOTE
• Use only Underwriters Laboratories, Inc. (U.L.) recognized wire nuts.
• The Circuit Boards are not installing permanent...
Owner's Manual - Page 21

... slightly clockwise, close garage door, and open garage door, and close . NOTE
The door must be completed before the Carriage activates the Close Limit Switch. E Check Safe-T-Beam® System operation:
• If beam is equipped with a Timer and Cycle Counter which work together to Close Limit Switch. If your Excelerator® is blocked, door will prevent the...
Owner's Manual - Page 22
...or any repairs. If programming has stopped, repeat the above .
Garage door will not cause the door Opener to open Battery Cover
Figure 39 Remote Control Battery Replacement
22
For Help, ...Remote Control Operation
A Press Button on Power Head for a different Opener.
To Erase All Remotes from the Antenna Wire.
• If the red Learn Indicator Light blinks approximately 4 ...
Owner's Manual - Page 23

... wish
to Door and Door Opener Owner's Manuals before attempting any repairs. Each door opener must be programmed to receive the
signal from the Opener by pulling the Emergency Release.
C Operating One Door Operator:
• To move ,check the red LED on Opener)
Learn Code Button
will turn off . NOTE
• If the door does not move the garage door:
- Start...
Owner's Manual - Page 26
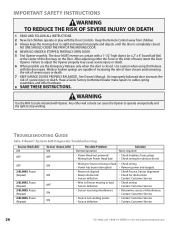
...8226; Wiring from people and objects until the door is closed . After adjusting either the Force or the Limit of severe injury or death. 7 KEEP GARAGE DOORS PROPERLY...Door Controls. NO ONE SHOULD CROSS THE PATH OF THE MOVING DOOR. 4 NEVER GO UNDER A STOPPED, PARTIALLY OPEN DOOR. 5 Test Opener monthly. An improperly balanced door increases the risk of the doorway on contact with the door open...
Owner's Manual - Page 27

...shorts, tight Staples, or pinched Wires.
unplug (or disconnect power), wait 5 seconds, plug back in (reapply power), and activate from Opener. Have a Genie Factory Authorized ...further assistance. Check door condition.
NOTE: This Opener is equipped with an automatic garage door balance detection system. Contact Customer Service for further assistance. See door
Safety Guide
1....
Owner's Manual - Page 28

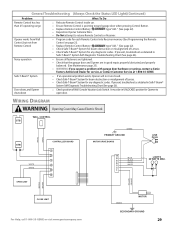
... page 20). Have a Genie Factory Authorized Dealer check that Carriage activates Close Limit Switch. Adjust as needed . • Check garage door for binding.
• Check Open Limit Switch for a short circuit and for proper wiring. • Check Close Force adjustment (see Set Limit Switches and Force Controls on page 18).
If not:
-
NOTE: A licensed...
Owner's Manual - Page 29
...• Relocate Remote Control inside car.
• Ensure Remote Control is pointing toward garage door when pressing Control Button.
• Replace Remote Control Battery
type "A23." (See page 22).
• Reposition Opener Antenna Wire.
• Do Not attempt to open door.
Door closes, and Opener shuts down
• Check position of Wall Console Vacation Lock Switch.
If present...
Similar Questions

Garage Door Opener Not Working
Green light and red light are on the safety"eye" When pushing wall, remote or key pad the screw driv...
Green light and red light are on the safety"eye" When pushing wall, remote or key pad the screw driv...
(Posted by scanty5 9 years ago)
Is Genie Excelerator Garage Door Opener Compatible With The 3 Button Remote?
(Posted by ven1anubis 10 years ago)

Door Will Open Slowly But Will Not Close Or Even Light Come On How Do I Fix This
(Posted by emasapp 10 years ago)

Garage Door Opener.
The unit will not work from the wall remote. The wall remote lights up but does not operat the unit....
The unit will not work from the wall remote. The wall remote lights up but does not operat the unit....
(Posted by ckniffen 10 years ago)

Where Is The Learn Code Button Situated On The 3060l-07 Genie Garage Door Opener
Where is the learn code button situated on the 3060L-07 Genie garage door opener. Trying to intregat...
Where is the learn code button situated on the 3060L-07 Genie garage door opener. Trying to intregat...
(Posted by katiaella 10 years ago)