User Manual
Page 8
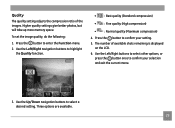
ISO 28 Quality 29 Size 30 Color 31 USING THE MODES 34 LCD Screen display 34 Still shooting mode display 34 Video shooting mode display 36 Playback mode display 37 Auto Scene mode (ASCN 38 Landscape Mode 39 Portrait mode 39 Night Portrait 39 Backlit Portrait 39 Night Landscape Mode 39 Macro Mode 39 ...
ISO 28 Quality 29 Size 30 Color 31 USING THE MODES 34 LCD Screen display 34 Still shooting mode display 34 Video shooting mode display 36 Playback mode display 37 Auto Scene mode (ASCN 38 Landscape Mode 39 Portrait mode 39 Night Portrait 39 Backlit Portrait 39 Night Landscape Mode 39 Macro Mode 39 ...
User Manual
Page 25
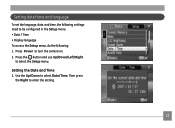
Setting the Date and Time 1. Use the Up/Down to select the Setup menu. Press the button and use Up/Down/Left/Right to select Date/Time. Press Power to enter the setting. 21 Then press the Right to turn the camera on. 2. Setting date/time and language To set the language, date, and time, the following settings need to be configured in the Setup menu. • Date / Time • Display language To access the Setup menu, do the following: 1.
Setting the Date and Time 1. Use the Up/Down to select the Setup menu. Press the button and use Up/Down/Left/Right to select Date/Time. Press Power to enter the setting. 21 Then press the Right to turn the camera on. 2. Setting date/time and language To set the language, date, and time, the following settings need to be configured in the Setup menu. • Date / Time • Display language To access the Setup menu, do the following: 1.
User Manual
Page 27
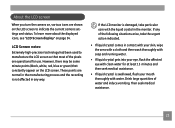
... are shown on the LCD screen to manufacture the LCD screen so that constantly appear on page 34. To learn more about the displayed icons, see "LCD Screen display" on the LCD screen. However, there may be some minute points (black, white, red, blue or green) that most of water and ...induce vomiting. Then seek medical assistance. 23 About the LCD screen When you turn the camera on, various icons are operational for at least 15 ...
... are shown on the LCD screen to manufacture the LCD screen so that constantly appear on page 34. To learn more about the displayed icons, see "LCD Screen display" on the LCD screen. However, there may be some minute points (black, white, red, blue or green) that most of water and ...induce vomiting. Then seek medical assistance. 23 About the LCD screen When you turn the camera on, various icons are operational for at least 15 ...
User Manual
Page 33
... (Standard compression) • : Fine quality (High compression) • : Normal quality (Maximum compression) 4. Quality The quality setting adjusts the compression ratio of available shots remaining is displayed on the LCD. 6. Higher quality settings give better photos, but will take up more memory space.
... (Standard compression) • : Fine quality (High compression) • : Normal quality (Maximum compression) 4. Quality The quality setting adjusts the compression ratio of available shots remaining is displayed on the LCD. 6. Higher quality settings give better photos, but will take up more memory space.
User Manual
Page 34
... larger sizes without degrading the image. Size The size setting refers to select a resolution. 4. A higher image resolution allows you will be able to the various GE digital camera models. 3. Use the Left/Right navigation buttons to confirm your setting. 30 As the number of available shots is , the better the image quality becomes... the screen. The bigger the number of image sizes that image in pixels. Press the button to page 32 for a list of recorded pixels is displayed on a memory card.
... larger sizes without degrading the image. Size The size setting refers to select a resolution. 4. A higher image resolution allows you will be able to the various GE digital camera models. 3. Use the Left/Right navigation buttons to confirm your setting. 30 As the number of available shots is , the better the image quality becomes... the screen. The bigger the number of image sizes that image in pixels. Press the button to page 32 for a list of recorded pixels is displayed on a memory card.
User Manual
Page 38
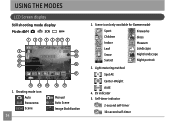
EV indicator 5. Scene icon (only available for Scene mode) Sport Fireworks Children Glass Indoor Museum Leaf Landscape Snow Sunset Night landscape Night portrait 3. Light metering method Spot AE Center-Weight Ai AE 4. Shooting mode icon Auto Panorama Scene 34 16 17 Manual Auto Scene Image Stabilization 2. Self-timer indicator 2-second self-timer 10-second self-timer USING THE MODES LCD Screen display Still shooting mode display Mode: 1 2 3 4 5 67 8 9 10 18 19 20 11 12 21 13 14 15 1.
EV indicator 5. Scene icon (only available for Scene mode) Sport Fireworks Children Glass Indoor Museum Leaf Landscape Snow Sunset Night landscape Night portrait 3. Light metering method Spot AE Center-Weight Ai AE 4. Shooting mode icon Auto Panorama Scene 34 16 17 Manual Auto Scene Image Stabilization 2. Self-timer indicator 2-second self-timer 10-second self-timer USING THE MODES LCD Screen display Still shooting mode display Mode: 1 2 3 4 5 67 8 9 10 18 19 20 11 12 21 13 14 15 1.
User Manual
Page 40
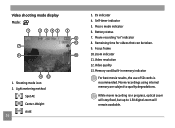
.../built-in progress, optical zoom will stay fixed, but up to quality degradations. Video shooting mode display Mode : 1 2 3 45 7 9 6 8 13 10 11 12 1. Macro mode indicator 6. Movie recordings using internal memory are subject to 1.5X digital zoom will remain available. While movie recording is in memory indicator For best movie results, the...
.../built-in progress, optical zoom will stay fixed, but up to quality degradations. Video shooting mode display Mode : 1 2 3 45 7 9 6 8 13 10 11 12 1. Macro mode indicator 6. Movie recordings using internal memory are subject to 1.5X digital zoom will remain available. While movie recording is in memory indicator For best movie results, the...
User Manual
Page 41
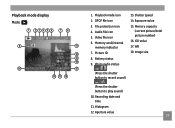
Playback mode display Mode: 1 23456 78 9 11 12 13 14 10 15 18 17 16 1. Audio file icon 5. Memory card/internal memory indicator 7. Histogram 12. Aperture value 37 Battery status 9. Memory capacity (current picture/total picture number) 16. ISO value 17. WB 18. Playback mode icon 2. Video file icon 6. Shutter speed 14. Recording date and time 11. DPOF file icon 3. File protection icon 4. Photo audio status 13. Picture ID 8. Exposure value 15. Image size (Press the shutter button to record sound) (Press the shutter button to play sound) 10.
Playback mode display Mode: 1 23456 78 9 11 12 13 14 10 15 18 17 16 1. Audio file icon 5. Memory card/internal memory indicator 7. Histogram 12. Aperture value 37 Battery status 9. Memory capacity (current picture/total picture number) 16. ISO value 17. WB 18. Playback mode icon 2. Video file icon 6. Shutter speed 14. Recording date and time 11. DPOF file icon 3. File protection icon 4. Photo audio status 13. Picture ID 8. Exposure value 15. Image size (Press the shutter button to record sound) (Press the shutter button to play sound) 10.
User Manual
Page 42
... shutter button all the way down to take good pictures. Follow these steps to "ASCN", LCD display showing the following diagram. 38 2. Auto Scene mode (ASCN) In the "ASCN" mode, different conditions are photographing. 3. Hold the camera steady and aim at the subject. Press the shutter button halfway down to focus. 4. Turn...
... shutter button all the way down to take good pictures. Follow these steps to "ASCN", LCD display showing the following diagram. 38 2. Auto Scene mode (ASCN) In the "ASCN" mode, different conditions are photographing. 3. Hold the camera steady and aim at the subject. Press the shutter button halfway down to focus. 4. Turn...
User Manual
Page 53
Turn your camera to enter the movie playback mode. 4. The last recorded photo or video clip is described in the internal memory or memory card. 3. Use the Left/Right navigation buttons to confirm the selection. The function of each button is displayed. 2. To play a selected video clip, press the button to Playback mode...
Turn your camera to enter the movie playback mode. 4. The last recorded photo or video clip is described in the internal memory or memory card. 3. Use the Left/Right navigation buttons to confirm the selection. The function of each button is displayed. 2. To play a selected video clip, press the button to Playback mode...
User Manual
Page 56
... and at least 1 second long . Use Up/Down/Left/Right to select a photo or video clip to switch between the 2x2, 3x3, and 4x4 thumbnail display. 2. button and Edited video must be recorded per movie. Thumbnail view When in Playback mode, press down the Zoom button at the Wide position ( ) once... to display the thumbnail of footage can be at least 1GB available memory, up to its original image size. 52 Press the button to restore a preview icon...
... and at least 1 second long . Use Up/Down/Left/Right to select a photo or video clip to switch between the 2x2, 3x3, and 4x4 thumbnail display. 2. button and Edited video must be recorded per movie. Thumbnail view When in Playback mode, press down the Zoom button at the Wide position ( ) once... to display the thumbnail of footage can be at least 1GB available memory, up to its original image size. 52 Press the button to restore a preview icon...

User Manual
Page 63
Digital Zoom indicator • Off: gray color. • On: reddish color. • Off • On 59 Histogram The histogram is enabled. When disabled, only the optical zoom is used for checking the exposure while taking pictures. Use this setting to enable or disable the histogram display on the LCD screen. Digital Zoom Use this setting to enable or disable the digital zoom function.
Digital Zoom indicator • Off: gray color. • On: reddish color. • Off • On 59 Histogram The histogram is enabled. When disabled, only the optical zoom is used for checking the exposure while taking pictures. Use this setting to enable or disable the histogram display on the LCD screen. Digital Zoom Use this setting to enable or disable the digital zoom function.
User Manual
Page 67
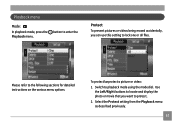
Use the Left/Right buttons to locate and display the photo or movie that you can use this setting to protect. 2. To protect/unprotect a picture or video: 1. Select the Protect setting from the Playback menu as described previously. 63 Please refer to playback mode using the mode dial. Switch to the following sections for detailed instructions on the various menu options. button to enter the Protect To prevent pictures or videos being erased accidentally, you want to lock one or all files. Playback menu Mode : In playback mode, press the Playback menu.
Use the Left/Right buttons to locate and display the photo or movie that you can use this setting to protect. 2. To protect/unprotect a picture or video: 1. Select the Protect setting from the Playback menu as described previously. 63 Please refer to playback mode using the mode dial. Switch to the following sections for detailed instructions on the various menu options. button to enter the Protect To prevent pictures or videos being erased accidentally, you want to lock one or all files. Playback menu Mode : In playback mode, press the Playback menu.
User Manual
Page 68
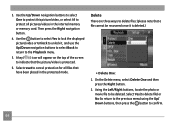
... buttons, then press the button to cancel protection for all pictures/videos in the protected mode. Use the button to select Yes to lock the displayed picture/video or Unlock to delete files: (please note that a file cannot be deleted. Delete There are three ways to unlock it is protected. 6. Use...
... buttons, then press the button to cancel protection for all pictures/videos in the protected mode. Use the button to select Yes to lock the displayed picture/video or Unlock to delete files: (please note that a file cannot be deleted. Delete There are three ways to unlock it is protected. 6. Use...
User Manual
Page 70
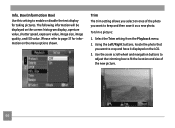
... and navigation buttons to adjust the trimming box to fit the location and size of the photo you want to enable or disable the text display for information on the LCD. 3. Using the Left/Right buttons, locate the photo that you want to page 37 for taking pictures. Box (Information Box...) Use this setting to keep and then save it displayed on the menu options shown. To trim a picture: 1. Select the Trim setting from the Playback menu. 2. Info.
... and navigation buttons to adjust the trimming box to fit the location and size of the photo you want to enable or disable the text display for information on the LCD. 3. Using the Left/Right buttons, locate the photo that you want to page 37 for taking pictures. Box (Information Box...) Use this setting to keep and then save it displayed on the menu options shown. To trim a picture: 1. Select the Trim setting from the Playback menu. 2. Info.
User Manual
Page 77
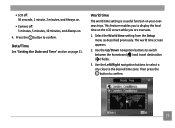
... overseas trips. Select the World time setting from the Setup menu as described previously. Use the Left/Right navigation buttons to select a city close to display the local time on . 4. The world time screen appears. 2. World time The world time setting is a useful function on page 21. This feature enables you...the Up/Down navigation buttons to confirm. Then press the button to confirm. 73 • LCD off: 30 seconds, 1 minute, 2 minutes, and Always on. • Camera off: 3 minutes, 5 minutes, 10 minutes, and Always on the LCD screen while you to the desired time zone.
... overseas trips. Select the World time setting from the Setup menu as described previously. Use the Left/Right navigation buttons to select a city close to display the local time on . 4. The world time screen appears. 2. World time The world time setting is a useful function on page 21. This feature enables you...the Up/Down navigation buttons to confirm. Then press the button to confirm. 73 • LCD off: 30 seconds, 1 minute, 2 minutes, and Always on. • Camera off: 3 minutes, 5 minutes, 10 minutes, and Always on the LCD screen while you to the desired time zone.
User Manual
Page 79
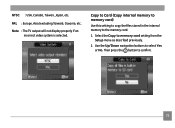
PAL : Europe, Asia (excluding Taiwan), Oceania, etc. Then press the button to the memory card. 1. Note : The TV output will not display properly if an incorrect video system is selected. Copy to Card (Copy internal memory to memory card) Use this setting to copy the files stored in the internal memory to confirm. 75 Select the Copy to select Yes or No. Use the Up/Down navigation buttons to memory card setting from the Setup menu as described previously. 2. NTSC : USA, Canada, Taiwan, Japan, etc.
PAL : Europe, Asia (excluding Taiwan), Oceania, etc. Then press the button to the memory card. 1. Note : The TV output will not display properly if an incorrect video system is selected. Copy to Card (Copy internal memory to memory card) Use this setting to copy the files stored in the internal memory to confirm. 75 Select the Copy to select Yes or No. Use the Up/Down navigation buttons to memory card setting from the Setup menu as described previously. 2. NTSC : USA, Canada, Taiwan, Japan, etc.
User Manual
Page 83
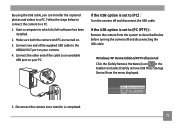
... to which ArcSoft software has been installed. 2. If the USB option is set to [PC (PTP) ] : Remove the camera from the menu displayed. 5. Follow the steps below before turning the camera off and disconnect the USB cable. Connect the other end of the supplied USB cable to a PC. 1. Windows XP Home... USB/AV OUT port on your PC. Connect one end of the cable to [PC] : Turn the camera off and disconnecting the USB cable. Make sure both the camera and PC are turned on your camera. 4. Start a computer to a PC. If the USB option is set to an available USB port on ....
... to which ArcSoft software has been installed. 2. If the USB option is set to [PC (PTP) ] : Remove the camera from the menu displayed. 5. Follow the steps below before turning the camera off and disconnect the USB cable. Connect the other end of the supplied USB cable to a PC. 1. Windows XP Home... USB/AV OUT port on your PC. Connect one end of the cable to [PC] : Turn the camera off and disconnecting the USB cable. Make sure both the camera and PC are turned on your camera. 4. Start a computer to a PC. If the USB option is set to an available USB port on ....
User Manual
Page 84
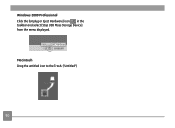
Windows 2000 Professional Click the [Unplug or Eject Hardware] icon in the taskbar and select [Stop USB Mass Storage Device] from the menu displayed. Macintosh Drag the untitled icon to the Trash. ("Untitled") 80
Windows 2000 Professional Click the [Unplug or Eject Hardware] icon in the taskbar and select [Stop USB Mass Storage Device] from the menu displayed. Macintosh Drag the untitled icon to the Trash. ("Untitled") 80
User Manual
Page 88
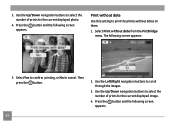
... navigation buttons to print the photos without dates on them. 1. Use the Up/Down navigation buttons to select the number of prints for the current displayed photo. 4. Print without date from the PictBridge menu. Then press the button. 2. The following screen appears. Press the button and the following screen appears. 5. Press.... 84 Use the Up/Down navigation buttons to cancel. 3. Select Yes to confirm printing, or No to select the number of prints for the current displayed image. 4.
... navigation buttons to print the photos without dates on them. 1. Use the Up/Down navigation buttons to select the number of prints for the current displayed photo. 4. Print without date from the PictBridge menu. Then press the button. 2. The following screen appears. Press the button and the following screen appears. 5. Press.... 84 Use the Up/Down navigation buttons to cancel. 3. Select Yes to confirm printing, or No to select the number of prints for the current displayed image. 4.

