GE H855BLK - Digital Camera 8MP Support and Manuals
Get Help and Manuals for this General Electric item
Popular GE H855BLK Manual Pages
User Manual - Page 3

... accept any interference received, including interference that this product complies with part 15 of this product. Tested To Comply
With FCC Standards FOR...or moisture.
For customers in the EU countries. Declaration of waste electrical and electronic equipment in Europe
"CE" mark indicates that may cause ...Model Name
: H855
Trade Name
: GE
Responsible Party : General Imaging Co.
User Manual - Page 5

...permission of General Imaging Company. Trademarks All trademarks mentioned in this manual carefully and ...keep it in this publication may damage the product.
• Turn off the camera before using Li-ion batteries in a safe place for future reference. Inserting the batteries upside down can cause damage to service...
User Manual - Page 6
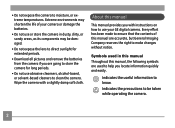
...batteries.
• Do not use or store the camera in this manual Throughout this manual are used to clean the camera. Every effort has been made to...manual, the following symbols are accurate, but General Imaging Company reserves the right to use abrasive cleansers, alcohol-based, or solvent-based cleaners to help you locate information quickly and easily. Wipe the camera with instructions...
User Manual - Page 25
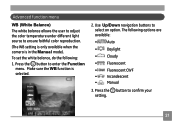
... allows the user to adjust the color temperature under different light source to enter the Function menu. To set the white balance, do the following options are available:
• Auto
• Daylight
• Cloudy
• Fluorescent
• Fluorescent CWF • Incandescent • Manual
3. Press the button to ensure faithful color reproduction.
(The WB...
User Manual - Page 26
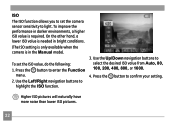
To improve the performance in the Manual mode). To set the camera sensor sensitivity to light. Use the Left/Right navigation buttons to enter the Function
menu. 2. Higher ISO pictures will naturally have more noise than lower ISO pictures.
22 Press ...
User Manual - Page 54

Histogram
The histogram is in the Manual mode).
• Manual: To set a long exposure time between 2~30 sec.
50 Slow Shutter Slow Shutter mode will keep the shutter open as long as you are in complete control of the exposure.
(The Slow Shutter setting is only available when the camera is used for checking the...
User Manual - Page 64

... use the navigation buttons to confirm. Select the Format Memory setting from the Setup menu as described previously.
2.
Refer to enter the setting. Use the Left/Right navigation buttons to select Yes or..., and press the button to select the Setup menu.
2. Setup menu
Mode: The Setup menu is available in all data in any modes, then use this setting:
1. Press the button in the memory ...
User Manual - Page 65

... to adjust the volume of beep when buttons are pressed and change each tone style. Beep Use this setting:
3.
Use the Up/Down navigation buttons to confirm.
61
1. Select the Beep setting from the Setup menu as described previously.
2. Then press the button to switch between volume, shutter tone, key tone, self-timer...
User Manual - Page 66

... the button to switch between LCD power and Camera power fields.
62 Use the Up/Down navigation buttons to confirm. Select the LCD Brightness setting from the Setup menu as described previously.
2. Use the Left/Right navigation buttons to save power and get the maximum possible running time for your LCD screen...
User Manual - Page 67

... Left/Right navigation buttons to specify the idle period before automatic power-off : 3 minutes, 5 minutes, 10 minutes, and Always on.
4.
Select the World time setting from the
Setup menu as described previously. This feature enables you
to the following idle periods.
• LCD off: 30 seconds, 1 minute, 2 minutes, and Always on your...
User Manual - Page 68

... camera will automatically save files in a new folder in the current area. 1. Then press the button to select Yes or No. Select the File numbering setting from
the Setup menu as described previously. 2.
Use the Up/Down navigation buttons to determine your video system in the memory card. 1. You can use this...
User Manual - Page 70
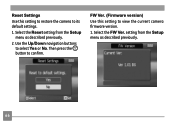
... Settings
Use this setting to view the current camera firmware version.
1. Use the Up/Down navigation buttons to confirm. Then press the button to select Yes or No. FW Ver. (Firmware version) Use this setting to restore the camera to its default settings.
1. Select the Reset setting from the Setup menu as described previously.
2. Select the FW Ver. setting...
User Manual - Page 75

... to ensure that the camera is PictBridge compatible, simply look for the PictBridge logo on the packaging or check the manual for specifications.With the PictBridge function on your camera, you can be set to connect with a PictBridge compatible printer using the supplied USB cable, without the need for a PC.
1. To find out...
User Manual - Page 82

...30fps/15fps, 320x240pixels: 30fps/15fps
Image Compression
Best, Fine, Normal
DCF, DPOF (Ver1.1) Support Yes
File Format
Still Image Movie Audio
Exif 2.2 (JPEG) Image Compression: MPEG4, Audio: G.711 ...[Monoaural] WAVE [Monoaural] (Max 60 seconds)
Shooting Modes
Auto, Manual, Image Stabilization, Movie, Scene (Sport, Children, Indoor, Leaf, Snow, Sunset, Fireworks,...
User Manual - Page 86

...be formatted. Print error
• There is out of paper or out of charge. No connection
• The camera is set to perform during... video/audio
please wait. Sound file cannot be saved
• The write protection switch in the memory card is not connected to the "LOCK" position.
Warning!!
Cannot print
• Check that the printer is a problem...
GE H855BLK Reviews
We have not received any reviews for GE yet.