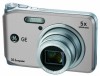
GE J1050-SL - Digital Camera 10MP Support and Manuals
Get Help and Manuals for this General Electric item
Popular GE J1050-SL Manual Pages
User Manual - Page 3
... to the following the provision of Conformity Model Name : A 950/A955Z/A1050/A1150/A1250/
A1035/A1235/E1255W/J1050/L150
Trade Name : GE
Responsible Party : General Imaging Co. For customers in Europe "CE"... including interference that this product complies with part 15 of waste electrical and electronic equipment in the U.S.A. "CE" mark cameras are intended for safety,
health, environment ...
User Manual - Page 4
... contact with your digital camera before turing on a wet surface or places where dripping water or sand may cause irrepairable faults.
Keep the batteries out of reach of time, we suggest you carry the camera suddenly from your camera or recording media, etc, makes the playback of recordings not possible. To edit image data, copy the...
User Manual - Page 5
... of their respective owners. Safety information
Please read this manual are inserted correctly.
Using other types of General Imaging Company. Trademarks All trademarks mentioned in this manual carefully and keep it in any form, by any language or computer language, in a safe place for purchasing GE digital cameras.
BEFORE YOU START
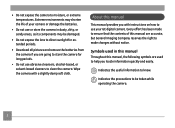
Preface
Thank you for future reference...
User Manual - Page 6
... expose the lens to direct sunlight for long periods.
• Do not use or store the camera in this manual Throughout this manual are accurate, but General Imaging Company reserves the right to ensure that the contents of your GE digital camera. Indicates the useful information to moisture, or extreme temperatures.
Every effort has been made to make...
User Manual - Page 7
... used in this manual 2
CONTENTS 3
GETTING READY 7
Unpacking 7 Camera Views : A Series 8
: E Series 10 : J Series 12 Charging the battery 14
Inserting the battery 15 Inserting an optional SD/SDHC card 18 Turning on and off 19 Using the Mode Dial 20 Setting date/time and language 21
Setting the Date and Time 21 Setting the Language...
User Manual - Page 24
...) Movie Image Stabilization Scene
Auto Scene
Panorama
Manual
20
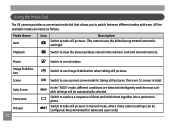
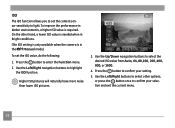
Switch to switch between different modes with ease. In the "ASCN" mode, different conditions are listed as follows. Using the Mode Dial
The GE camera provides a convenient mode dial that allows you to record videos.
Switch to take still pictures. (The camera uses the default programmed automatic settings.)
Playback...
User Manual - Page 25
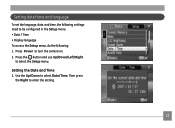
.... Use the Up/Down to enter the setting.
21 Press Power to be configured in the Setup menu. • Date / Time • Display language To access the Setup menu, do the following: 1. Setting date/time and language
To set the language, date, and time, the following settings need to turn the camera on. 2. Press the button and use...
User Manual - Page 31

... to select other options, or press the button once to ensure faithful color reproduction. (The WB setting is only available when the camera is selected.
2. Make sure the WB function is in the Manual mode). The following :
1. To set the white balance, do the following options are available:
•
Auto
•
Daylight
•
Cloudy...
User Manual - Page 32
... than lower ISO pictures.
3. To set the camera sensor sensitivity to ...80,100, 200, 400, 800, or 1600.
4. ISO The ISO function allows you to set the ISO value, do the following:
1.
Use the Left/Right buttons to ... the Manual mode). To improve the performance in darker environments, a higher ISO value is in bright conditions. (The ISO setting is only available when the camera is required...
User Manual - Page 34
... the various GE digital camera models.
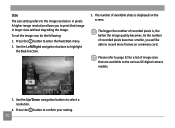
3. Please refer to page 32 for a list of recorded pixels becomes smaller, you to print that are available to confirm your setting.
30 Press the button to enter the Function menu. 2. As the number of image sizes that image in pixels. Size The size setting refers to the image resolution in larger sizes without degrading the image. The number...
User Manual - Page 67
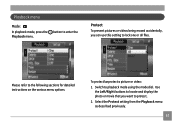
... want to lock one or all files. Select the Protect setting from the Playback menu as described previously.
63 Playback menu
Mode :
In playback mode, press the Playback menu.
Use
the Left/Right buttons to locate and display the photo or movie that you can use this setting to protect. 2.
To protect/unprotect a picture or video: 1.
User Manual - Page 70
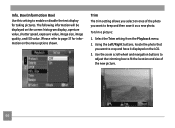
... the Playback menu. 2. To trim a picture:
1. Use the zoom scroll wheel and navigation buttons to
adjust the trimming box to fit the location and size of the photo you select an area of the new picture.
66 Info. Trim The trim setting allows you want to keep and then save it displayed on the menu options shown.
User Manual - Page 85
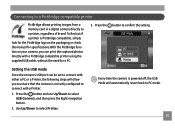
... USB Mode will allow you can print the captured photos directly with a Printer.
1. Setting the USB mode
Since the camera's USB port can be set to connect with either a PC or a Printer, the following steps will automatically revert back to a printer, regardless of brand. Connecting to a PictBridge compatible printer
PictBridge allows printing images from a memory card in a digital camera...
User Manual - Page 88
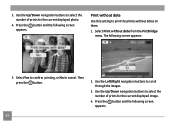
... Use this setting to print the photos without date from the PictBridge menu. Then press the button.
2. Use the Up/Down navigation buttons to scroll through the images.
3. Press the button and the following screen appears.
84 Use the Left/Right navigation buttons to select the number of prints for the current displayed image.
4. Press the button...
User Manual - Page 90
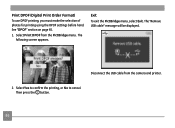
... exit the PictBridge menu, select Exit. Select Yes to confirm the printing, or No to cancel. The following screen appears. Print DPOF (Digital Print Order Format) To use DPOF printing, you must make the selection of photos for printing using the DPOF settings before hand. Disconnect the USB cable from the PictBridge menu. The "Remove USB cable" message will be displayed.
GE J1050-SL Reviews
We have not received any reviews for GE yet.