GE A835PL - Digital Camera 8MP Support and Manuals
Get Help and Manuals for this General Electric item
Popular GE A835PL Manual Pages
User Manual (English) - Page 3
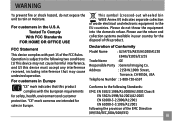
.... Please do not expose the unit to the following the provision of waste electrical and electronic equipment in Europe. Please use the return and collection systems available..."CE" mark cameras are intended for the disposal of this product complies with part 15 of Conformity
Model Name
: G2/A735/A835/A1030/A1230
E840s/E1035/E1235
Trade Name
: GE
Responsible Party : General Imaging Co....
User Manual (English) - Page 4
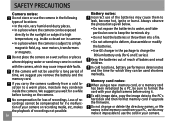
...format the card with the camera, which they can be used for a long period of babies and small children.
near motors, transformers or magnets.
...camera in your digital camera before turning on a wet surface or places
where dripping water or sand may come in summer. • In a place where the camera is subject to the PC's hard disk and then format memory card if upgrade the firmware...
User Manual (English) - Page 5
... upside down can cause damage to service the camera yourself.
• Do not drop or knock the camera. BEFORE YOU START
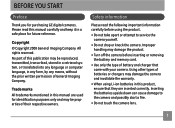
Preface
Thank you for future reference. Safety information
Please read this manual carefully and keep it in this product, ensure that came with your camera. Trademarks All trademarks mentioned in a safe place for purchasing GE digital cameras.
User Manual (English) - Page 6
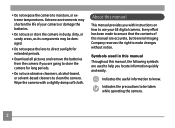
... this manual Throughout this manual
This manual provides you with a slightly damp soft cloth.
• Do not expose the camera to help you locate information quickly and easily. Wipe the camera with instructions on how to use abrasive cleansers, alcohol-based, or solvent-based cleaners to store the camera for long periods.
• Do not use your GE digital camera...
User Manual (English) - Page 7
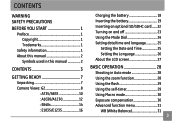
... used in this manual 2
CONTENTS 3
GETTING READY 7
Unpacking 7 Camera Views: G2 8
: A735/A835 10 : A1030/A1230 12 : E840s 14 : E1035/E1235 16
Charging the battery 18 Inserting the battery 19 Inserting an optional SD/SDHC card.......22 Turning on and off 23 Using the Mode Dial 24 Setting date/time and language 25...
User Manual (English) - Page 9
...(Exposure Metering)..58 Cont.Shot (Continuous shot 59 Grid 59 Quick Review 60 Digital Zoom 60 Histogram 61 Slow shutter 61 Blink detection 62 Date Imprint...64
Playback menu 65 Protect 65 Delete 66 DPOF (Digital Print Order Format).....68
Info. Box (Information Box 68 Trim 69...69 Rotate 70 Slide show 70 Red-eye removal 71 Setup menu 72 Format Memory 72 Beep 73 LCD Brightness 74 ...
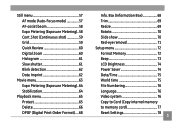
User Manual (English) - Page 11
... damaged, please contact your vendor. (The accessories will vary based on model purchased and are noted below.)
User Manual
Rechargeable Lithium-ion battery (except A735/A835 A1030/A1230)
AA-size alkaline batteries X2 (A735/A835/A1030/ A1230only)
User Manual
Quick start guide Wrist strap
USB cable
AV cable
Battery charger (except A735/A835/ A1030...
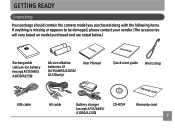
User Manual (English) - Page 22

Throughout the rest of the manual, the following illustrations show theE1035 model as shown.
2.
Plug one end of the connecting cable into the charger base.
3. Charging the battery (..., A835, A1030, A1230,E840s, and E1235 operate similarly.)
1
2
Leave the battery to charge until the charger light goes green. (To maximize battery life, the first charge should be at least 4 hours)
18
User Manual (English) - Page 28
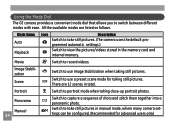
...Manual 24
Switch to take still pictures. (The camera uses the default pro- Switch to capture a sequence of shots and stitch them together into a panoramic photo. Using the Mode Dial
The GE camera...
grammed automatic settings.)
Switch to use Image Stabilization when taking still pictures. Switch to view the pictures/videos stored in manual mode, where many camera settings can be ...
User Manual (English) - Page 35

... the current menu. 31 Advanced function menu (quick menu setup)
WB (White Balance) The white balance allows the user to adjust the color temperature under different light source to ensure faithful color reproduction.
(The WB setting is only available when the camera is selected.
2. To set )
3. Make sure the WB function is in the Manual mode).
User Manual (English) - Page 36

To set the camera sensor sensitivity to light. Press the button to confirm your selection and exit the current menu.
32 Press the button to
highlight the ISO function. ..., 200, 400, 800, or 1600.
4. Use the Left/Right buttons to select other hand, a lower ISO value is needed when in the Manual mode). ISO The ISO function allows you to set the ISO value, do the following: 1.
User Manual (English) - Page 38
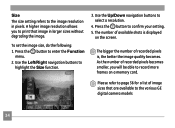
... navigation buttons to enter the Function
menu. 2. The number of recorded pixels becomes smaller, you to print that are available to the various GE digital camera models
34 Size The size setting refers to the image resolution in larger sizes without degrading the image. Press the button to select a resolution.
4. The bigger the number of...
User Manual (English) - Page 65
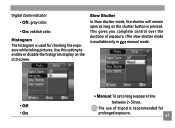
... of exposure. (The slow shutter mode is used for
prolonged exposure.
61
Histogram The histogram is available only in manual mode.
• Off • On
• Manual: To set a long exposure time
between 2~30 sec.
Digital Zoom indicator
• Off: gray color.
• On: reddish color. This gives you complete control over the duration...
User Manual (English) - Page 76

... press the button to
scroll through the menu items. 72
2. Format Memory Please note: formatting enables you to enter the setting. Select the Format Memory setting from
the Setup menu as described previously. 2. To configure the settings: 1. Use the Up/Down navigation buttons to confirm.
Press the Right navigation button to delete all modes.
User Manual (English) - Page 78

.../ Right buttons to switch between LCD power and Camera power fields.
3. Use the Up/Down buttons to select to Auto or Manual brightness adjustment,
and then press to confirm your battery. Select the Power Save setting from the Setup menu as described previously.
2. Power Saver
This setting allows you to save power and get the...
GE A835PL Reviews
We have not received any reviews for GE yet.