GE H855-PK - 8 MP Digital Camera Support and Manuals
Get Help and Manuals for this General Electric item

Popular GE H855-PK Manual Pages
User Manual - Page 5

...part of this manual... to service the camera yourself.
• Do not drop or knock the camera.
Trademarks All trademarks mentioned in this manual are ...inserted correctly. Please read the following important information carefully before inserting or removing the battery and memory card.
• Use only the type of battery and charger that they are used for purchasing GE...
User Manual - Page 18

... Dial
The GE camera provides a convenient mode dial that allows you to record videos.
Switch to switch between different modes with ease. Switch to use Image Stabilization when taking still pictures. There are listed as follows. Panorama
Manual 14
Switch to portrait mode when taking close-up portrait photos. grammed automatic settings.)
Switch...
User Manual - Page 26
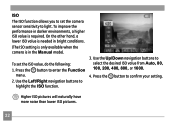
On the other hand, a lower ISO value is needed in the Manual mode).
Use the Left/Right navigation buttons to enter the Function
menu. 2.
To improve the performance in darker environments, a higher ISO value is in bright conditions. (The ISO setting is only available when the camera is required. Press the button to...
User Manual - Page 29

... :
1. Press the button to highlight the Color function.
3. Use the Left/Right navigation buttons to confirm your pictures.
(The Color setting is only available when the camera is in the Manual mode). To set the image color, do the following options are available: • Auto • Black & White • Sepia • Vivid
4. Use...
User Manual - Page 54

... display on the LCD screen.
So, you push down the shutter button. Histogram
The histogram is in complete control of the exposure.
(The Slow Shutter setting is only available when the camera is used for checking the exposure while taking pictures. Slow Shutter Slow Shutter mode will keep the shutter open...
User Manual - Page 64

... Yes or No, and press the button to erase all modes. Select the Format Memory setting from the Setup menu as described previously.
2. Setup menu
Mode: The Setup menu is available in all data in any modes, then use this setting:
1.
Format Memory The format function allows you to confirm. Press the button in the...
User Manual - Page 65

... the Up/Down navigation buttons to confirm.
61 To change this setting to adjust the volume and change the tones for shutter, buttons, self-timer, and power-on/power-off. Use ... the button to switch between volume, shutter tone, key tone, self-timer tone, and power tone fields.
3. Select the Beep setting from the Setup menu as described previously.
2. 1. The current media is formatted.
User Manual - Page 66

... screen.
1. Use the Up/Down navigation buttons to turn off the LCD screen and camera automatically after a period of your battery. Select the Power Save setting from the Setup menu as described previously.
2. Follow the steps below to switch between LCD power and Camera power fields.
62
User Manual - Page 67

Select the World time setting from the
Setup menu as described previously. Press the button to the desired time zone. Use the Left/Right navigation buttons to select a city close to confirm. The ...
User Manual - Page 68

... the Up/Down navigation buttons to select Yes or No. You can use this setting to determine your video system in the memory card. 1. Select the File numbering setting from
the Setup menu as described previously. 2. Select the Video system setting from the last photo you have taken, or reset the counter to confirm...
User Manual - Page 69
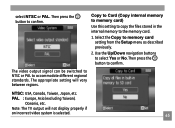
...video output signal can be switched to NTSC or PAL to select Yes or No.
The appropriate setting will not display properly if
an incorrect video system is selected.
65 PAL : Europe, Asia ... buttons to accommodate different regional standards. Then press the button to memory card setting from the Setup menu as described previously.
2. Select the Copy to confirm. Copy to Card (Copy internal memory...
User Manual - Page 70
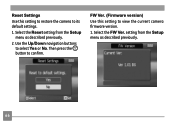
Select the Reset setting from the Setup menu as described previously.
2. Use the Up/Down navigation buttons to confirm. Then press the button to select Yes or No.
FW Ver. (Firmware version) Use this setting to restore the camera to view the current camera firmware version.
1. setting from the Setup menu as described previously.
66 Select the FW...
User Manual - Page 75

...without the need for specifications.With the PictBridge function on your camera, you to ensure that the camera is powered off,
the USB Mode will allow you can be set to connect with ....
3.
Press the button to select USB Connect, and then press the Right navigation button.
2.
Setting the USB mode Since the camera's USB port can print the captured photos directly with a Printer....
User Manual - Page 82

...)
Pixels Movie
H855 : 8MP, 7MP (3:2), 6MP (16:9), 5MP, 3MP, 2MP, 1MP, 0.3MP 640x480pixels: 30fps/15fps, 320x240pixels: 30fps/15fps
Image Compression
Best, Fine, Normal
DCF, DPOF (Ver1.1) Support Yes
File Format
Still Image Movie Audio
Exif 2.2 (JPEG) Image Compression: MPEG4, Audio: G.711 [Monoaural] WAVE [Monoaural] (Max 60 seconds)
Shooting Modes
Auto, Manual, Image Stabilization...
User Manual - Page 86

...saved
• The write protection switch in the memory card is set to the "LOCK" position. Sound file cannot be recognized by the camera. Warning!! Print error
• There is not connected to the printer correctly. Messages
Explanation...recording. Cannot print
• Check that the printer is set to perform during video/audio
please wait.
No connection
• The camera is...
GE H855-PK Reviews
We have not received any reviews for GE yet.