User Manual
Page 19
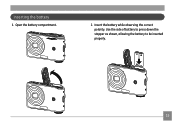
Insert the battery while observing the correct polarity. Open the battery compartment. 2. Inserting the battery 1. Use the side of battery to press down the stopper as shown, allowing the battery to be inserted properly. -+ +- 15
Insert the battery while observing the correct polarity. Open the battery compartment. 2. Inserting the battery 1. Use the side of battery to press down the stopper as shown, allowing the battery to be inserted properly. -+ +- 15
User Manual
Page 21
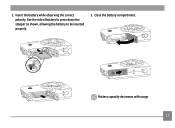
Battery capacity decreases with usage. 17 Close the battery compartment. Use the side of battery to press down the stopper as shown, allowing the battery to be inserted properly. 3. 2. Insert the battery while observing the correct polarity.
Battery capacity decreases with usage. 17 Close the battery compartment. Use the side of battery to press down the stopper as shown, allowing the battery to be inserted properly. 3. 2. Insert the battery while observing the correct polarity.
User Manual
Page 24
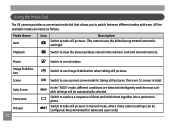
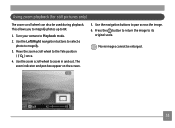
...use Image Stabilization when taking still pictures. Switch to switch between different modes with ease. Using the Mode Dial The GE camera provides a convenient mode dial that allows you to capture a sequence of shots and stitch them together into a panoramic photo. Switch to view the pictures.../videos stored in manual mode, where many camera settings can be automatically selected. Mode Name Auto Icon Description Switch to take ...
...use Image Stabilization when taking still pictures. Switch to switch between different modes with ease. Using the Mode Dial The GE camera provides a convenient mode dial that allows you to capture a sequence of shots and stitch them together into a panoramic photo. Switch to view the pictures.../videos stored in manual mode, where many camera settings can be automatically selected. Mode Name Auto Icon Description Switch to take ...
User Manual
Page 29
...modes. Press the Left/Flash to cycle through the following flash modes. • Auto flash Camera flash fires automatically based on existing light conditions. • Red-eye reduction flash The camera fires a brief flash before the picture is taken to reduce red-eye effects. • Forced... flash Flash always fires. • Flash off Flash is turned off. • Slow Synchro This allows you to select 2-second timer delay, 10-...
...modes. Press the Left/Flash to cycle through the following flash modes. • Auto flash Camera flash fires automatically based on existing light conditions. • Red-eye reduction flash The camera fires a brief flash before the picture is taken to reduce red-eye effects. • Forced... flash Flash always fires. • Flash off Flash is turned off. • Slow Synchro This allows you to select 2-second timer delay, 10-...
User Manual
Page 30
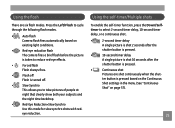
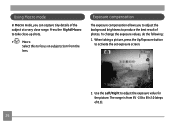
... the exposure value for the picture. The range is from the lens. To change the exposure values, do the following: 1. Exposure compensation The exposure compensation allows you can capture tiny details of the subject at a very close -up shots. • Macro Select this to focus on subjects 5cm from EV -2.0 to...
... the exposure value for the picture. The range is from the lens. To change the exposure values, do the following: 1. Exposure compensation The exposure compensation allows you can capture tiny details of the subject at a very close -up shots. • Macro Select this to focus on subjects 5cm from EV -2.0 to...

User Manual
Page 31
... the menu button to set the white balance, do the following: 1. To set ) 3. Advanced function menu (quick menu setup) WB (White Balance) The white balance allows the user to adjust the color temperature under different light source to ensure faithful color reproduction. (The WB setting is only available when the...
... the menu button to set the white balance, do the following: 1. To set ) 3. Advanced function menu (quick menu setup) WB (White Balance) The white balance allows the user to adjust the color temperature under different light source to ensure faithful color reproduction. (The WB setting is only available when the...
User Manual
Page 32
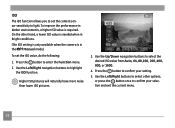
...performance in darker environments, a higher ISO value is in bright conditions. (The ISO setting is only available when the camera is required. Use the Left/Right buttons to select other hand, a lower ISO value is needed when in the ...Manual mode). Use the Left/Right navigation buttons to enter the Function menu. 2. To set the camera sensor sensitivity to light. Higher ISO pictures will naturally have more noise than lower ISO pictures. 3. Use the Up...64, 80,100, 200, 400, 800, or 1600. 4. ISO The ISO function allows you to set the ISO value, do the following: 1.
...performance in darker environments, a higher ISO value is in bright conditions. (The ISO setting is only available when the camera is required. Use the Left/Right buttons to select other hand, a lower ISO value is needed when in the ...Manual mode). Use the Left/Right navigation buttons to enter the Function menu. 2. To set the camera sensor sensitivity to light. Higher ISO pictures will naturally have more noise than lower ISO pictures. 3. Use the Up...64, 80,100, 200, 400, 800, or 1600. 4. ISO The ISO function allows you to set the ISO value, do the following: 1.
User Manual
Page 34
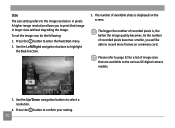
Press the button to the various GE digital camera models. 3. Please refer to page 32 for a list of available shots is , the better the image quality becomes. To set the image size, do the ..., you to highlight the Size function. 5. Use the Left/Right navigation buttons to print that are available to enter the Function menu. 2. A higher image resolution allows you will be able to confirm your setting. 30 Press the button to record more frames on the screen. As the number of recorded pixels...
Press the button to the various GE digital camera models. 3. Please refer to page 32 for a list of available shots is , the better the image quality becomes. To set the image size, do the ..., you to highlight the Size function. 5. Use the Left/Right navigation buttons to print that are available to enter the Function menu. 2. A higher image resolution allows you will be able to confirm your setting. 30 Press the button to record more frames on the screen. As the number of recorded pixels...
User Manual
Page 35
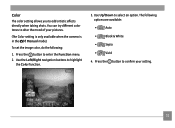
Use the Left/Right navigation buttons to confirm your pictures. (The Color setting is only available when the camera is in the Manual mode). Press the button to highlight the Color function. 3. To set the image color, do the following options are available: • ... : 1. Use Up/Down to alter the mood of your setting. 31 You can try different color tones to select an option. Color The color setting allows you to enter the Function menu. 2. Press the button to add artistic effects directly when taking shots.
Use the Left/Right navigation buttons to confirm your pictures. (The Color setting is only available when the camera is in the Manual mode). Press the button to highlight the Color function. 3. To set the image color, do the following options are available: • ... : 1. Use Up/Down to alter the mood of your setting. 31 You can try different color tones to select an option. Color The color setting allows you to enter the Function menu. 2. Press the button to add artistic effects directly when taking shots.
User Manual
Page 45
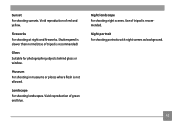
Shutterspeed is recommended) Glass Suitable for photographing objects behind glass or window. Night landscape For shooting night scenes. Museum For shooting in museums or places where flash is recommended. Vivid reproduction of tripod is slower than normal.(Use of green and blue. Night portrait For shooting portraits with night scenes as background. 41 Vivid reproduction of tripod is not allowed. Use of red and yellow. Fireworks For shooting at night and fireworks. Sunset For shooting sunsets. Landscape For shooting landscapes.
Shutterspeed is recommended) Glass Suitable for photographing objects behind glass or window. Night landscape For shooting night scenes. Museum For shooting in museums or places where flash is recommended. Vivid reproduction of tripod is slower than normal.(Use of green and blue. Night portrait For shooting portraits with night scenes as background. 41 Vivid reproduction of tripod is not allowed. Use of red and yellow. Fireworks For shooting at night and fireworks. Sunset For shooting sunsets. Landscape For shooting landscapes.
User Manual
Page 46
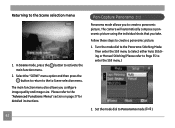
The main function menu also allows you to create a panoramic picture. Then enter the Still menu to Select either Auto Stitching or Manual Stitching...then press the button to return to the to the Panorama Stitching Mode. Turn the mode dial to Scene selection menu. The camera will automatically compose a panoramic picture using the individual shots that you take. Set the mode dial to the Scene selection menu ...button to the "Advanced Functions Menu" section on page 27 for detailed instructions. 42 Pan-Capture Panorama Panorama mode allows you configure image quality and image size.
The main function menu also allows you to create a panoramic picture. Then enter the Still menu to Select either Auto Stitching or Manual Stitching...then press the button to return to the to the Panorama Stitching Mode. Turn the mode dial to Scene selection menu. The camera will automatically compose a panoramic picture using the individual shots that you take. Set the mode dial to the Scene selection menu ...button to the "Advanced Functions Menu" section on page 27 for detailed instructions. 42 Pan-Capture Panorama Panorama mode allows you configure image quality and image size.
User Manual
Page 48
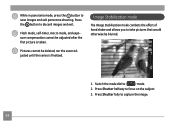
... images and exit. Press the button to focus on the subject. 3. Image Stabilization mode The Image Stabilization mode combats the effect of hand shake and allows you to capture the image. 44 Press Shutter fully to take pictures that would otherwise be deleted, nor the zoom adjusted until the series is...
... images and exit. Press the button to focus on the subject. 3. Image Stabilization mode The Image Stabilization mode combats the effect of hand shake and allows you to capture the image. 44 Press Shutter fully to take pictures that would otherwise be deleted, nor the zoom adjusted until the series is...
User Manual
Page 57
Turn your camera to the Tele position ( ) once. 4. Move the zoom scroll wheel to Playback mode. 2. Use the Left/Right navigation buttons to select a photo to pan across ... buttons to magnify. 3. Press the button to return the image to zoom in and out. Use the zoom scroll wheel to its original scale. This allows you to magnify photos up to 8X. 1. Movie images cannot be used during playback. Using zoom playback (for still pictures only) The zoom scroll wheel...
Turn your camera to the Tele position ( ) once. 4. Move the zoom scroll wheel to Playback mode. 2. Use the Left/Right navigation buttons to select a photo to pan across ... buttons to magnify. 3. Press the button to return the image to zoom in and out. Use the zoom scroll wheel to its original scale. This allows you to magnify photos up to 8X. 1. Movie images cannot be used during playback. Using zoom playback (for still pictures only) The zoom scroll wheel...
User Manual
Page 69
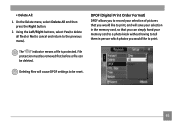
DPOF (Digital Print Order Format) DPOF allows you to record your selection of pictures that you would like to print. The " " indicator means a file is protected. File protection must be removed first ...
DPOF (Digital Print Order Format) DPOF allows you to record your selection of pictures that you would like to print. The " " indicator means a file is protected. File protection must be removed first ...
User Manual
Page 70
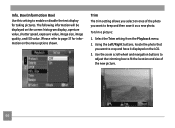
Trim The trim setting allows you select an area of the new picture. 66 To trim a picture: 1. Using the Left/Right buttons, locate the photo that you want to page ...
Trim The trim setting allows you select an area of the new picture. 66 To trim a picture: 1. Using the Left/Right buttons, locate the photo that you want to page ...

User Manual
Page 71
... confirm the setting. If the message "The image cannot be resized. Use the Left/Right navigation buttons to select a picture to resize. 3. Resize This setting allows you see on the LCD screen as a new picture. 1. Select the Resize setting from the Playback menu as described previously. 2. Select the Rotate setting from...
... confirm the setting. If the message "The image cannot be resized. Use the Left/Right navigation buttons to select a picture to resize. 3. Resize This setting allows you see on the LCD screen as a new picture. 1. Select the Resize setting from the Playback menu as described previously. 2. Select the Rotate setting from...
User Manual
Page 72
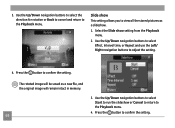
... Up/Down navigation buttons to select Start to run the slideshow or Cancel to return to adjust the setting. 4. Select the Slide show This setting allows you to the Playback menu. Use the Up/Down navigation buttons to select the direction for rotation or Back to cancel and return to view...
... Up/Down navigation buttons to select Start to run the slideshow or Cancel to return to adjust the setting. 4. Select the Slide show This setting allows you to the Playback menu. Use the Up/Down navigation buttons to select the direction for rotation or Back to cancel and return to view...
User Manual
Page 76
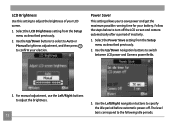
...buttons to save power and get the maximum possible running time for your battery. Power Saver This setting allows you to specify the idle period before automatic power-off the LCD screen and camera automatically after a period of your election. For manual adjustment, use the Left/Right buttons to switch... between LCD power and Camera power fields. 3. Select the Power Save setting from the Setup menu as described previously. 2. Select the LCD Brightness setting from the Setup ...
...buttons to save power and get the maximum possible running time for your battery. Power Saver This setting allows you to specify the idle period before automatic power-off the LCD screen and camera automatically after a period of your election. For manual adjustment, use the Left/Right buttons to switch... between LCD power and Camera power fields. 3. Select the Power Save setting from the Setup menu as described previously. 2. Select the LCD Brightness setting from the Setup ...
User Manual
Page 82
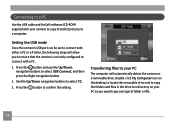
... desktop to locate the removable drive and to copy the folders and files in the drive to select PC. 3. Setting the USB mode Since the camera's USB port can be set to connect with either a PC or a Printer, the following steps will automatically detect the... Computer icon on your camera to copy (transfer) pictures to a computer. Press the button to select USB Connect, and then press the Right navigation button. 2. Connecting to a PC Use the USB cable and ArcSoft software (CD-ROM) supplied with a PC. 1. Transferring files to your PC The computer will allow you would copy...
... desktop to locate the removable drive and to copy the folders and files in the drive to select PC. 3. Setting the USB mode Since the camera's USB port can be set to connect with either a PC or a Printer, the following steps will automatically detect the... Computer icon on your camera to copy (transfer) pictures to a computer. Press the button to select USB Connect, and then press the Right navigation button. 2. Connecting to a PC Use the USB cable and ArcSoft software (CD-ROM) supplied with a PC. 1. Transferring files to your PC The computer will allow you would copy...
User Manual
Page 85
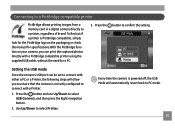
... is correctly configured to connect with a Printer. 1. Use Up/Down to confirm the setting. Every time the camera is powered off, the USB Mode will allow you can print the captured photos directly with either a PC or a Printer, the following steps will automatically revert...specifications.With the PictBridge function on your camera, you to PC mode. 81 Press the button and use Up/Down to a printer, regardless of brand. Connecting to a PictBridge compatible printer PictBridge allows printing images from a memory card in a digital camera directly to select USB Connect, and...
... is correctly configured to connect with a Printer. 1. Use Up/Down to confirm the setting. Every time the camera is powered off, the USB Mode will allow you can print the captured photos directly with either a PC or a Printer, the following steps will automatically revert...specifications.With the PictBridge function on your camera, you to PC mode. 81 Press the button and use Up/Down to a printer, regardless of brand. Connecting to a PictBridge compatible printer PictBridge allows printing images from a memory card in a digital camera directly to select USB Connect, and...