User manual
Page 5
... in serious damage to come in contact with the connectors on the overclocking capac- Installation Precautions WARNING! CAUTION ■ Electrostatic discharge (ESD) is turned off before installing or removing CPU, memory, expansion cards or other peripherals. Please wear an electrostatic discharge (ESD) wrist strap...its components. ity of the product, please consult a certified computer technician. Normally it comes out as a motherboard, CPU or memory. ■ Ensure that the DC power supply is the sudden and momentary electric current that your system can operate normally when your...
... in serious damage to come in contact with the connectors on the overclocking capac- Installation Precautions WARNING! CAUTION ■ Electrostatic discharge (ESD) is turned off before installing or removing CPU, memory, expansion cards or other peripherals. Please wear an electrostatic discharge (ESD) wrist strap...its components. ity of the product, please consult a certified computer technician. Normally it comes out as a motherboard, CPU or memory. ■ Ensure that the DC power supply is the sudden and momentary electric current that your system can operate normally when your...
User manual
Page 6
... of Contents Chapter 1 Product Introduction Product Specifications 2 Layout...4 Back Panel Connectors 5 Chapter 2 Hardware Install Install the CPU and CPU Cooler 8 Install the Memory 10 Install an Expansion Card 12 Install other Internal Connectors 13 Jumpers 17 Install driver and utility 18 Chapter 3 BIOS Setup Enter BIOS Setup 21 Main Menu 21 System Information 23... 43 Load Optimal Defaults 44 Save Changes and Exit 44 Discard Changes and Exit 44 Chapter 4 RAID Configuration RAID Introduction 46 Install SATA Hard Disks 47 RAID Configuration 47 Create RAID Driver Disk 49...
... of Contents Chapter 1 Product Introduction Product Specifications 2 Layout...4 Back Panel Connectors 5 Chapter 2 Hardware Install Install the CPU and CPU Cooler 8 Install the Memory 10 Install an Expansion Card 12 Install other Internal Connectors 13 Jumpers 17 Install driver and utility 18 Chapter 3 BIOS Setup Enter BIOS Setup 21 Main Menu 21 System Information 23... 43 Load Optimal Defaults 44 Save Changes and Exit 44 Discard Changes and Exit 44 Chapter 4 RAID Configuration RAID Introduction 46 Install SATA Hard Disks 47 RAID Configuration 47 Create RAID Driver Disk 49...

User manual
Page 14
... Support List: http://www.foxconnsupport.com/cpusupportlist.aspx Memory, VGA Compatibility List: http://www.foxconnsupport.com/complist.aspx This chapter includes the following information : ■ Install the CPU and CPU Cooler ■ Install the Memory ■ Install an Expansion Card ■ Install other Internal Connectors ■ Jumpers ■ Install driver and utility Please visit the following website...
... Support List: http://www.foxconnsupport.com/cpusupportlist.aspx Memory, VGA Compatibility List: http://www.foxconnsupport.com/complist.aspx This chapter includes the following information : ■ Install the CPU and CPU Cooler ■ Install the Memory ■ Install an Expansion Card ■ Install other Internal Connectors ■ Jumpers ■ Install driver and utility Please visit the following website...
User manual
Page 15
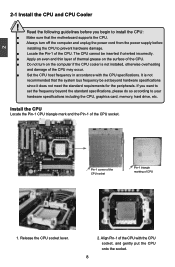
... overheating and damage of the CPU. Install the CPU Locate the Pin-1 CPU triangle mark and the Pin-1 of CPU 1. Release the CPU socket lever. 2. If you begin to your hardware specifications including the CPU, graphics card, memory, hard drive, etc. Read the following ...guidelines before you want to set beyond the standard specifications, please do so according to install the CPU: ■ Make sure that the system bus frequency be inserted...
... overheating and damage of the CPU. Install the CPU Locate the Pin-1 CPU triangle mark and the Pin-1 of CPU 1. Release the CPU socket lever. 2. If you begin to your hardware specifications including the CPU, graphics card, memory, hard drive, etc. Read the following ...guidelines before you want to set beyond the standard specifications, please do so according to install the CPU: ■ Make sure that the system bus frequency be inserted...
User manual
Page 17
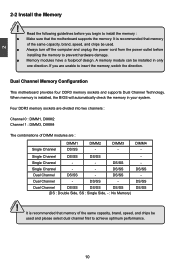
... Channel - - DS/SS Dual Channel DS/SS - Four DDR3 memory sockets are unable to prevent hardware damage. ■ Memory modules have a foolproof design. DIMM3 - CAUTION 10 Read the following guidelines before installing the memory to insert the memory, switch the direction. DS/SS - DS/SS Single Channel - ...Dual Channel DS/SS DS/SS DS/SS (DS : Double Side, SS : Single Side, - : No Memory) DS/SS DS/SS DS/SS ! 2 CAUTION 2-2 Install the Memory ! DIMM4 - A memory module can be used . ■ Always turn off the computer and unplug the power cord from the power ...
... Channel - - DS/SS Dual Channel DS/SS - Four DDR3 memory sockets are unable to prevent hardware damage. ■ Memory modules have a foolproof design. DIMM3 - CAUTION 10 Read the following guidelines before installing the memory to insert the memory, switch the direction. DS/SS - DS/SS Single Channel - ...Dual Channel DS/SS DS/SS DS/SS (DS : Double Side, SS : Single Side, - : No Memory) DS/SS DS/SS DS/SS ! 2 CAUTION 2-2 Install the Memory ! DIMM4 - A memory module can be used . ■ Always turn off the computer and unplug the power cord from the power ...
User manual
Page 18
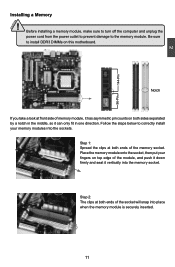
... will snap into place when the memory module is securely inserted. 11 Be sure to the memory module. Place the memory module onto the socket, then put your memory modules into the memory socket. CAUTION 2 144-Pin 96-Pin Installing a Memory ! Step 2: The clips at front side of the memory socket. Before installing a memory module, make sure to turn off...
... will snap into place when the memory module is securely inserted. 11 Be sure to the memory module. Place the memory module onto the socket, then put your memory modules into the memory socket. CAUTION 2 144-Pin 96-Pin Installing a Memory ! Step 2: The clips at front side of the memory socket. Before installing a memory module, make sure to turn off...
User manual
Page 31
User can check this product. ► BIOS ID / BIOS Version It displays the current BIOS ID/version. The size is needed. ► Memory Size This item displays the current memory size. 3 The system boot will not stop for a mouse error if you enabled this item. ► Model Name Model name of this information and discuss with the field service people if a BIOS upgrade is depending on how many memory modules were installed in your system before powering on. ► MAC Address This item shows the onboard LAN MAC address. ► CPU Name It displays the current CPU name. 24
User can check this product. ► BIOS ID / BIOS Version It displays the current BIOS ID/version. The size is needed. ► Memory Size This item displays the current memory size. 3 The system boot will not stop for a mouse error if you enabled this item. ► Model Name Model name of this information and discuss with the field service people if a BIOS upgrade is depending on how many memory modules were installed in your system before powering on. ► MAC Address This item shows the onboard LAN MAC address. ► CPU Name It displays the current CPU name. 24
User manual
Page 40
... controller connected to select the priority of page-locked graphics memory is enabled through the HDMI port on the rear panel. 33 PCI-PCI graphics card.) ► Surround View SurroundView is not supported. When installing an ATI PCIe graphics card, SurroundView is freed for other... use of memory will provide the user with a guaranteed graphics memory at all times, and will be available to the OS. ► Primary ...
... controller connected to select the priority of page-locked graphics memory is enabled through the HDMI port on the rear panel. 33 PCI-PCI graphics card.) ► Surround View SurroundView is not supported. When installing an ATI PCIe graphics card, SurroundView is freed for other... use of memory will provide the user with a guaranteed graphics memory at all times, and will be available to the OS. ► Primary ...


