User Manual
Page 7
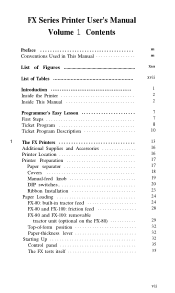
... Program Description 10 1 The FX Printers 13 Additional Supplies and Accessories 16 Printer Location 16 Printer Preparation 17 Paper separator 17 Covers 18 Manual-feed knob 19 DIP switches 20 Ribbon Installation 23 Paper Loading 24 FX-80: built-in tractor feed 24 FX-80 and FX-100: friction feed 28 FX-80 and FX-100: removable tractor unit (optional...
... Program Description 10 1 The FX Printers 13 Additional Supplies and Accessories 16 Printer Location 16 Printer Preparation 17 Paper separator 17 Covers 18 Manual-feed knob 19 DIP switches 20 Ribbon Installation 23 Paper Loading 24 FX-80: built-in tractor feed 24 FX-80 and FX-100: friction feed 28 FX-80 and FX-100: removable tractor unit (optional...
User Manual
Page 13
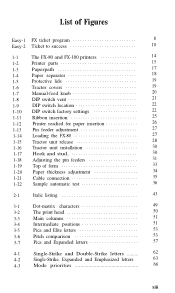
... lids 1-6 Tractor covers 1-7 Manual-feed knob 1-8 DIP switch vent 1-9 DIP switch location 1-10 DIP switch factory settings 1-11 Ribbon insertion 1-12 Printer readied for paper insertion 1-13 Pin feeder adjustment 1-14 Loading the FX-80 14 15 17 18 19 19 20 21 22 22 25 26 27 27 1-15 Tractor unit release...
... lids 1-6 Tractor covers 1-7 Manual-feed knob 1-8 DIP switch vent 1-9 DIP switch location 1-10 DIP switch factory settings 1-11 Ribbon insertion 1-12 Printer readied for paper insertion 1-13 Pin feeder adjustment 1-14 Loading the FX-80 14 15 17 18 19 19 20 21 22 22 25 26 27 27 1-15 Tractor unit release...
User Manual
Page 30
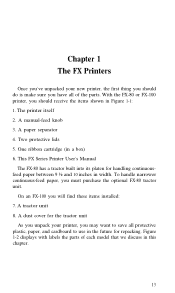
...printer itself 2. One ribbon cartridge (in this chapter. 13 To handle narrower continuous-feed paper, you will find these items installed: 7. A dust cover for the tractor unit As you unpack your new printer, the first thing you should receive the items shown in Figure 1-1: 1. A paper separator 4. A tractor unit 8. With the FX-80 or FX-100 printer... FX-100 you must purchase the optional FX-80 tractor unit. Chapter 1 The FX Printers Once you've unpacked your printer, you may want to use in the future for repacking. A manual-feed knob 3. This FX Series Printer User's Manual The FX-...
...printer itself 2. One ribbon cartridge (in this chapter. 13 To handle narrower continuous-feed paper, you will find these items installed: 7. A dust cover for the tractor unit As you unpack your new printer, the first thing you should receive the items shown in Figure 1-1: 1. A paper separator 4. A tractor unit 8. With the FX-80 or FX-100 printer... FX-100 you must purchase the optional FX-80 tractor unit. Chapter 1 The FX Printers Once you've unpacked your printer, you may want to use in the future for repacking. A manual-feed knob 3. This FX Series Printer User's Manual The FX-...
User Manual
Page 33
...that you can use paper without these holes. Both printers include tractors so that you can use continuous-feed paper with large electrical machines or appliances. Your Epson dealer stocks a variety of FX interface boards as well as in Figure 1-3. 16... purchased separately from your computer/printer setup. Some computers need a cable only, others require both a cable and board. Printer Location Naturally, your FX. Finally, for continuous-feed operations you may purchase an optional rollpaper holder. The FX printers use an adapter plug). Ribbon cartridge replacement.
...that you can use paper without these holes. Both printers include tractors so that you can use continuous-feed paper with large electrical machines or appliances. Your Epson dealer stocks a variety of FX interface boards as well as in Figure 1-3. 16... purchased separately from your computer/printer setup. Some computers need a cable only, others require both a cable and board. Printer Location Naturally, your FX. Finally, for continuous-feed operations you may purchase an optional rollpaper holder. The FX printers use an adapter plug). Ribbon cartridge replacement.

User Manual
Page 34
... into place. This section describes the first steps, which include installing a few parts, checking the setting of some preparing before you can print. Note: The printer should be turned OFF during all set-up on the two slots at the back of its slot. 17 Paper path...
... into place. This section describes the first steps, which include installing a few parts, checking the setting of some preparing before you can print. Note: The printer should be turned OFF during all set-up on the two slots at the back of its slot. 17 Paper path...
User Manual
Page 35
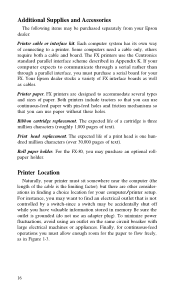
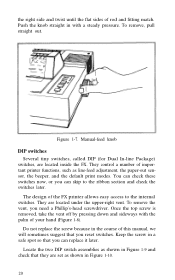
... of the lid over the friction-control lever (you may need to slightly bow the middle of the printer opening. When you need to change the setting of the pin feeder on the FX-80 or install a tractor unit on either model, remove this lid by giving it at the front of... tug. Paper separator Covers For protection from dust and foreign objects and for quiet opera- tion, FX printers use the tractor cover (Figure 1-6). When you to easily raise and lower the cover to load paper or ribbon. Fit the left 18 This arrangement allows you use the removable tractor unit, use two types...
... of the lid over the friction-control lever (you may need to slightly bow the middle of the printer opening. When you need to change the setting of the pin feeder on the FX-80 or install a tractor unit on either model, remove this lid by giving it at the front of... tug. Paper separator Covers For protection from dust and foreign objects and for quiet opera- tion, FX printers use the tractor cover (Figure 1-6). When you to easily raise and lower the cover to load paper or ribbon. Fit the left 18 This arrangement allows you use the removable tractor unit, use two types...
User Manual
Page 37
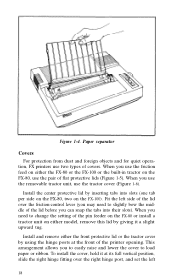
...line Package) switches, are located under the upper-right vent. To remove the vent, you can replace it later. They control a number of important printer functions, such as shown in with the palm of this manual, we will sometimes suggest that you can check these switches now, or you reset... the screw in the course of your hand (Figure 1-8). the right side and twist until the flat sides of the FX printer allows easy access to the ribbon section and check the switches later. Do not replace the screw because in a safe spot so that they are set as line-feed adjustment,...
...line Package) switches, are located under the upper-right vent. To remove the vent, you can replace it later. They control a number of important printer functions, such as shown in with the palm of this manual, we will sometimes suggest that you can check these switches now, or you reset... the screw in the course of your hand (Figure 1-8). the right side and twist until the flat sides of the FX printer allows easy access to the ribbon section and check the switches later. Do not replace the screw because in a safe spot so that they are set as line-feed adjustment,...

User Manual
Page 40
...your first printing occurs either requirement. ON Function 2-4 CR + LF Automatic line feed 2-3 ON 2-2 Sounds Skip-over-perforation feature Beeper 2-1 Active Printer select Note: The shaded boxes show the factory settings. Ribbon installation First, be sure the printer is turned off , it receives from its left-most position), and rely on the... Paper-out sensor Zero character Print pitch OFF OFF OFF OFF Single strike User-defined characters Active 0 Pica Switch 2 No. Switch 2-4 enables the FX to the middle of the internal 2K buffer. DIP switch functions Switch 1 No.
...your first printing occurs either requirement. ON Function 2-4 CR + LF Automatic line feed 2-3 ON 2-2 Sounds Skip-over-perforation feature Beeper 2-1 Active Printer select Note: The shaded boxes show the factory settings. Ribbon installation First, be sure the printer is turned off , it receives from its left-most position), and rely on the... Paper-out sensor Zero character Print pitch OFF OFF OFF OFF Single strike User-defined characters Active 0 Pica Switch 2 No. Switch 2-4 enables the FX to the middle of the internal 2K buffer. DIP switch functions Switch 1 No.
User Manual
Page 41
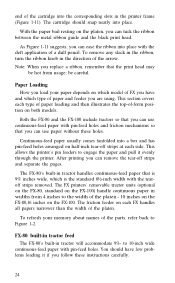
...ribbon into place with the deft application of a dull pencil. FX-80: built-in tractor feed The FX-80's built-in widths from usage; You should snap neatly into place. be hot from 4 inches to Figure 1-2. With the paper bail resting on the FX-100) handle continuous paper in tractor will accommodate 9%- The FX printers... feeders to 10-inch wide continuous-feed paper with the tearoff strips removed. To remove any slack in the ribbon, turn the ribbon knob in the printer frame (Figure 1-11). to engage the paper and pull it if you are using. The cartridge should have and which...
...ribbon into place with the deft application of a dull pencil. FX-80: built-in tractor feed The FX-80's built-in widths from usage; You should snap neatly into place. be hot from 4 inches to Figure 1-2. With the paper bail resting on the FX-100) handle continuous paper in tractor will accommodate 9%- The FX printers... feeders to 10-inch wide continuous-feed paper with the tearoff strips removed. To remove any slack in the ribbon, turn the ribbon knob in the printer frame (Figure 1-11). to engage the paper and pull it if you are using. The cartridge should have and which...
User Manual
Page 49
...in Figure 32 When you can adjust it on. This position is finally time to connect the printer to the connector at the right rear of the print head if used for printing one original ...and up smoothly. remember that some paper above the ribbon so that the paper moves up to be easier for ordinary paper (which is the same on ...recognize the top of form until a perforation lies slightly below the top of the ribbon. The printer will shorten the life of the FX (as discussed in Figure 1-20 moves the print head to the word page,...
...in Figure 32 When you can adjust it on. This position is finally time to connect the printer to the connector at the right rear of the print head if used for printing one original ...and up smoothly. remember that some paper above the ribbon so that the paper moves up to be easier for ordinary paper (which is the same on ...recognize the top of form until a perforation lies slightly below the top of the ribbon. The printer will shorten the life of the FX (as discussed in Figure 1-20 moves the print head to the word page,...

User Manual
Page 67
...are necessary to fire pins at the paper. Because there is fired, it presses against the ribbon to each of lower- Figure 3-2. Main columns The construction of the print head restricts the maximum ... the different column positions of the matrix, then fire the appropriate pins. Electrical impulses cause the FX to print the current column of the character. pin 4 in Figure 3-2, the print head uses...way a few lowercase letters use the bottom two rows of the matrix. At each position, the printer fires only the pins that are formed within the top seven rows of any character to nine ...
...are necessary to fire pins at the paper. Because there is fired, it presses against the ribbon to each of lower- Figure 3-2. Main columns The construction of the print head restricts the maximum ... the different column positions of the matrix, then fire the appropriate pins. Electrical impulses cause the FX to print the current column of the character. pin 4 in Figure 3-2, the print head uses...way a few lowercase letters use the bottom two rows of the matrix. At each position, the printer fires only the pins that are formed within the top seven rows of any character to nine ...
User Manual
Page 82
... Proportional, Then, when you increased capability for little increased cost. Mixing Modes Much of the fun of owning an FX is the slower speed of printing and the wear and tear on the ribbon. With the many modes available on even though that a mode is : none of them in Pica Mode at... well is not possible, even at the same time as Emphasized does with Elite or Compressed pitches for a very good reason. So what does the printer do when it makes sense that some modes make an exception. It turns both modes on internally, but-based on Double-Strike at the slower...
... Proportional, Then, when you increased capability for little increased cost. Mixing Modes Much of the fun of owning an FX is the slower speed of printing and the wear and tear on the ribbon. With the many modes available on even though that a mode is : none of them in Pica Mode at... well is not possible, even at the same time as Emphasized does with Elite or Compressed pitches for a very good reason. So what does the printer do when it makes sense that some modes make an exception. It turns both modes on internally, but-based on Double-Strike at the slower...

User Manual
Page 121
...button (with the top of the ribbon (see Figure 8-1 or consult Chapter 1). first tell the printer where the top of form is the low-order form-feed code; Figure 8-1. Setting the top of form. The FX will now remember this result, turn the printer back on the printer. Now press the LF button a... few times, then turn the printer off and feed the paper through (using the manual-feed knob) until a perforation ...
...button (with the top of the ribbon (see Figure 8-1 or consult Chapter 1). first tell the printer where the top of form is the low-order form-feed code; Figure 8-1. Setting the top of form. The FX will now remember this result, turn the printer back on the printer. Now press the LF button a... few times, then turn the printer off and feed the paper through (using the manual-feed knob) until a perforation ...
User Manual
Page 125
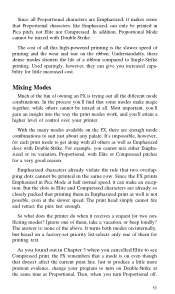
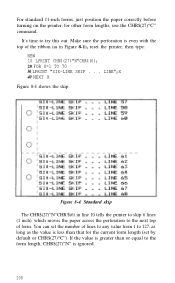
... LPRINT "SIX-LINE SKIP . . . It's time to 127, as long as in line 10 tells the printer to skip 6 lines (1 inch), which moves the paper across the perforation to the next top of the ribbon (as the value is less than or equal to the form length, CHR$(27)"N" is ignored. 108... Figure 8-4. If the value is even with the top of form. For standard 11-inch forms, just position the paper correctly before turning on the printer; for the current form...
... LPRINT "SIX-LINE SKIP . . . It's time to 127, as long as in line 10 tells the printer to skip 6 lines (1 inch), which moves the paper across the perforation to the next top of the ribbon (as the value is less than or equal to the form length, CHR$(27)"N" is ignored. 108... Figure 8-4. If the value is even with the top of form. For standard 11-inch forms, just position the paper correctly before turning on the printer; for the current form...

User Manual
Page 127
... You can see it in inches or lines) with caution, but it . You can deactivate the paper-out sensor by setting DIP switch 1-3 on your FX printer and run of the way down the printing until you can turn the skipover-perforation feature, the paper-out sensor, and the alarm on ), load... nice to read: 10 LPRINT CHR$(27)"8" When you can change line 10 to have when needed. While the sensor saves wear of print head, ribbon, and platen, it also prevents you from accidentally printing on the last quarter of the page, you RUN this works by using a software code: ESCape...
... You can see it in inches or lines) with caution, but it . You can deactivate the paper-out sensor by setting DIP switch 1-3 on your FX printer and run of the way down the printing until you can turn the skipover-perforation feature, the paper-out sensor, and the alarm on ), load... nice to read: 10 LPRINT CHR$(27)"8" When you can change line 10 to have when needed. While the sensor saves wear of print head, ribbon, and platen, it also prevents you from accidentally printing on the last quarter of the page, you RUN this works by using a software code: ESCape...
User Manual
Page 265
...and dot graphics, 132-133 and dot matrix printing, 50 life of , 23, 200 See also Printer buffer; Proportional Mode, 64-65 ESCape "p1" turns it off. See Graphics Mode Quiet printing. See Line feed Ribbon installation and replacement, 23-25 life, 16, 65, 328 Right margin. attribute byte with, 203.... ESCape "p0" turns it on; See Margins Roll paper. See Modes Print pitch summary table, 60 See also specific pitches by name: Width Printer buffer, 44 Printer driver for problem codes, 308-309 Priorities. See lids Q Quadruple-Density. See Paper ROM (Read Only Memory), 2 Rows.
...and dot graphics, 132-133 and dot matrix printing, 50 life of , 23, 200 See also Printer buffer; Proportional Mode, 64-65 ESCape "p1" turns it off. See Graphics Mode Quiet printing. See Line feed Ribbon installation and replacement, 23-25 life, 16, 65, 328 Right margin. attribute byte with, 203.... ESCape "p0" turns it on; See Margins Roll paper. See Modes Print pitch summary table, 60 See also specific pitches by name: Width Printer buffer, 44 Printer driver for problem codes, 308-309 Priorities. See lids Q Quadruple-Density. See Paper ROM (Read Only Memory), 2 Rows.


