
User Manual
Page 5
...always preceded by an apostrophe ('), the short form of the BASIC command, REM. The also calls your attention to shorten a program line by the printer as part of the symbol makes it easy for you to count the number you need. For example, the following : SAMPLE STRING" means that the...systems require the use : 10 LPRINT CHR$(27)"@" 'Reset Code and 99' Data lines for instance, the quoted letter "G" turns the mode on the paper; The G is especially important, we use of the first word. For example, the following makes clear that you must type one space between the ...
...always preceded by an apostrophe ('), the short form of the BASIC command, REM. The also calls your attention to shorten a program line by the printer as part of the symbol makes it easy for you to count the number you need. For example, the following : SAMPLE STRING" means that the...systems require the use : 10 LPRINT CHR$(27)"@" 'Reset Code and 99' Data lines for instance, the quoted letter "G" turns the mode on the paper; The G is especially important, we use of the first word. For example, the following makes clear that you must type one space between the ...
User Manual
Page 7
... 8 Ticket Program Description 10 1 The FX Printers 13 Additional Supplies and Accessories 16 Printer Location 16 Printer Preparation 17 Paper separator 17 Covers 18 Manual-feed knob 19 DIP switches 20 Ribbon Installation 23 Paper Loading 24 FX-80: built-in tractor feed 24 FX-80 and FX-100: friction feed 28 FX-80 and FX-100: removable tractor unit (optional...
... 8 Ticket Program Description 10 1 The FX Printers 13 Additional Supplies and Accessories 16 Printer Location 16 Printer Preparation 17 Paper separator 17 Covers 18 Manual-feed knob 19 DIP switches 20 Ribbon Installation 23 Paper Loading 24 FX-80: built-in tractor feed 24 FX-80 and FX-100: friction feed 28 FX-80 and FX-100: removable tractor unit (optional...
User Manual
Page 9
... Backspace 81 Overstrikes 81 Offsets 82 Unidirectional Mode 83 International Characters 85 Special Speeds 88 Half-SpeedMode 89 Immediate-Print Mode (FX-80 only 89 Summary 90 7 Line Spacing and Line Feeds 93 Line Spacing 93 Preset line spacing 93 Variable line spacing...Feeds 98 One-time, immediate line feed 99 Reverse feed (FX-80 only 99 Summary 101 8 Forms Control 103 Form Length Control 103 Form feed distance 103 Not-so-standard forms 105 Paper Perforation Skip 107 Skip command 107 DIP switch skip 109 ...
... Backspace 81 Overstrikes 81 Offsets 82 Unidirectional Mode 83 International Characters 85 Special Speeds 88 Half-SpeedMode 89 Immediate-Print Mode (FX-80 only 89 Summary 90 7 Line Spacing and Line Feeds 93 Line Spacing 93 Preset line spacing 93 Variable line spacing...Feeds 98 One-time, immediate line feed 99 Reverse feed (FX-80 only 99 Summary 101 8 Forms Control 103 Form Length Control 103 Form feed distance 103 Not-so-standard forms 105 Paper Perforation Skip 107 Skip command 107 DIP switch skip 109 ...
User Manual
Page 13
... Tractor covers 1-7 Manual-feed knob 1-8 DIP switch vent 1-9 DIP switch location 1-10 DIP switch factory settings 1-11 Ribbon insertion 1-12 Printer readied for paper insertion 1-13 Pin feeder adjustment 1-14 Loading the FX-80 14 15 17 18 19 19 20 21 22 22 25 26 27 27 1-15 Tractor unit release 1-16... Tractor unit installation 1-17 Hook and stud 1-18 Adjusting the pin feeders 1-19 Top of form 28 30 30 31 33 1-20 Paper thickness adjustment 34 1-...
... Tractor covers 1-7 Manual-feed knob 1-8 DIP switch vent 1-9 DIP switch location 1-10 DIP switch factory settings 1-11 Ribbon insertion 1-12 Printer readied for paper insertion 1-13 Pin feeder adjustment 1-14 Loading the FX-80 14 15 17 18 19 19 20 21 22 22 25 26 27 27 1-15 Tractor unit release 1-16... Tractor unit installation 1-17 Hook and stud 1-18 Adjusting the pin feeders 1-19 Top of form 28 30 30 31 33 1-20 Paper thickness adjustment 34 1-...
User Manual
Page 15
... 161 12-2 STRATA logo 162 12-3 STRATA program 163 12-4 Corner of the FX-80 design 164 12-5 FX-80 figure 168 12-6 Program for FX-80 figure 168 12-7 FX-100 figure 169 12-8 Program for FX-100 figure 170 12-9 More distinct version 171 12-10 Most distict version 172 ...12-11 Reversed version 172 13-1 Computer memory as sketch pad 174 13-2 Array in memory and on paper 174 13-3 ...
... 161 12-2 STRATA logo 162 12-3 STRATA program 163 12-4 Corner of the FX-80 design 164 12-5 FX-80 figure 168 12-6 Program for FX-80 figure 168 12-7 FX-100 figure 169 12-8 Program for FX-100 figure 170 12-9 More distinct version 171 12-10 Most distict version 172 ...12-11 Reversed version 172 13-1 Computer memory as sketch pad 174 13-2 Array in memory and on paper 174 13-3 ...
User Manual
Page 24
...The next few pages are using the FX-80, pull the paper under the plastic separator and through the paper path. Connect your FX to Chapter 1 for you purchased separately. (Some computers require special printer interface boards, also purchased separately). 2. In case the paper starts to learn the full value ...way. To use continuous-feed printer paper with your computer via the printer cable that one lesson to jam on the FX-80, first move the pin feeders out of the feature-packed FX printer. First Steps 1. If you are especially for tips on your FX-100, you will cooperate ...
...The next few pages are using the FX-80, pull the paper under the plastic separator and through the paper path. Connect your FX to Chapter 1 for you purchased separately. (Some computers require special printer interface boards, also purchased separately). 2. In case the paper starts to learn the full value ...way. To use continuous-feed printer paper with your computer via the printer cable that one lesson to jam on the FX-80, first move the pin feeders out of the feature-packed FX printer. First Steps 1. If you are especially for tips on your FX-100, you will cooperate ...

User Manual
Page 25
...9"; If you don't understand one or more features, you a good survey of paper, the paperout sensor will work on and load a short BASIC program. FX ticket program 8 You can give you can check the index to the printer (using LLIST, LIST "P", or whatever your system. Then send a listing to ... F we discuss such compatibility problems and suggest solutions for several popular computers. If you 'll have to write one set of the FX printer's features. This means you may need to modify our programs to suit your computer's listing command is double-spaced or printed without line...
...9"; If you don't understand one or more features, you a good survey of paper, the paperout sensor will work on and load a short BASIC program. FX ticket program 8 You can give you can check the index to the printer (using LLIST, LIST "P", or whatever your system. Then send a listing to ... F we discuss such compatibility problems and suggest solutions for several popular computers. If you 'll have to write one set of the FX printer's features. This means you may need to modify our programs to suit your computer's listing command is double-spaced or printed without line...
User Manual
Page 30
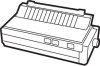
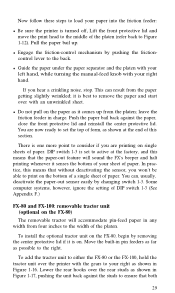
... has a tractor built into its platen for repacking. Chapter 1 The FX Printers Once you've unpacked your printer, you may want to use in the future for handling continuousfeed paper between 9 ½ and 10 inches in a box) 6. A tractor unit 8. With the FX-80 or FX-100 printer, you should do is make sure you have all protective...
... has a tractor built into its platen for repacking. Chapter 1 The FX Printers Once you've unpacked your printer, you may want to use in the future for handling continuousfeed paper between 9 ½ and 10 inches in a box) 6. A tractor unit 8. With the FX-80 or FX-100 printer, you should do is make sure you have all protective...
User Manual
Page 33
...operations you have valuable information stored in Figure 1-3. 16 Some computers need a cable only, others require both a cable and board. Printer paper. For the FX-80, you must sit somewhere near the computer (the length of connecting to communicate through a serial rather than through a parallel interface,...holes and friction mechanisms so that you can use paper without these holes. Your Epson dealer stocks a variety of text). The expected life of a print head is one hundred million characters (over 30,000 pages of FX interface boards as well as in memory Be ...
...operations you have valuable information stored in Figure 1-3. 16 Some computers need a cable only, others require both a cable and board. Printer paper. For the FX-80, you must sit somewhere near the computer (the length of connecting to communicate through a serial rather than through a parallel interface,...holes and friction mechanisms so that you can use paper without these holes. Your Epson dealer stocks a variety of text). The expected life of a print head is one hundred million characters (over 30,000 pages of FX interface boards as well as in memory Be ...

User Manual
Page 34
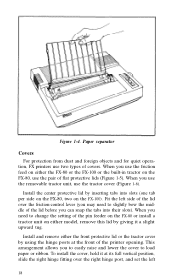
...need to do some internal switches, and then inserting the ribbon cartridge. Paper separator To install the paper separator, hold it vertically so that it rests on the left side ...first, letting the right side slide out of the metal frame as shown in Figure 1-4. Note: The printer... should be turned OFF during all set-up on the two slots at the back of its slot. 17 To remove the separator, pull up operations. Press down gently but firmly until the separator snaps into place. Figure 1-3. Paper path Printer...
...need to do some internal switches, and then inserting the ribbon cartridge. Paper separator To install the paper separator, hold it vertically so that it rests on the left side ...first, letting the right side slide out of the metal frame as shown in Figure 1-4. Note: The printer... should be turned OFF during all set-up on the two slots at the back of its slot. 17 To remove the separator, pull up operations. Press down gently but firmly until the separator snaps into place. Figure 1-3. Paper path Printer...
User Manual
Page 35
... (Figure 1-5). When you can snap the tabs into slots (one tab per side on the FX-80, two on the FX-100). When you to easily raise and lower the cover to slightly bow the middle of the printer opening. Figure 1-4. Install the center protective lid by inserting tabs into their slots). Install... lid before you use the friction feed on the FX-80, use the tractor cover (Figure 1-6). Fit the left side of the lid over the right hinge post, and set the left 18 To install the cover, hold it a slight upward tug. Paper separator Covers For protection from dust and foreign objects...
... (Figure 1-5). When you can snap the tabs into slots (one tab per side on the FX-80, two on the FX-100). When you to easily raise and lower the cover to slightly bow the middle of the printer opening. Figure 1-4. Install the center protective lid by inserting tabs into their slots). Install... lid before you use the friction feed on the FX-80, use the tractor cover (Figure 1-6). Fit the left side of the lid over the right hinge post, and set the left 18 To install the cover, hold it a slight upward tug. Paper separator Covers For protection from dust and foreign objects...
User Manual
Page 36
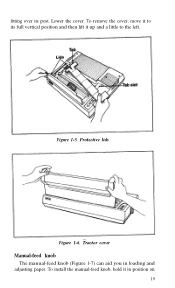
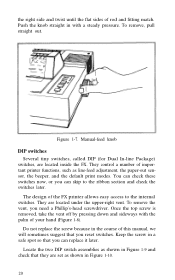
Figure 1-5. To install the manual-feed knob, hold it in loading and adjusting paper. Tractor cover Manual-feed knob The manual-feed knob (Figure 1-7) can aid you in position on 19 Lower the cover. To remove the cover, move it to the left. Protective lids Figure 1-6. fitting over its full vertical position and then lift it up and a little to its post.
Figure 1-5. To install the manual-feed knob, hold it in loading and adjusting paper. Tractor cover Manual-feed knob The manual-feed knob (Figure 1-7) can aid you in position on 19 Lower the cover. To remove the cover, move it to the left. Protective lids Figure 1-6. fitting over its full vertical position and then lift it up and a little to its post.
User Manual
Page 37
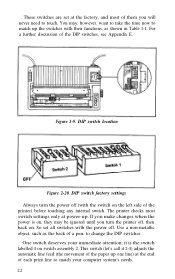
... two DIP switch assemblies as shown in Figure 1-9 and check that they are set as shown in with the palm of important printer functions, such as line-feed adjustment, the paper-out sensor, the beeper, and the default print modes. You can check these switches now, or you need a Phillip's-head screwdriver... in the course of this manual, we will sometimes suggest that you reset switches. the right side and twist until the flat sides of the FX printer allows easy access to the ribbon section and check the switches later.
... two DIP switch assemblies as shown in Figure 1-9 and check that they are set as shown in with the palm of important printer functions, such as line-feed adjustment, the paper-out sensor, the beeper, and the default print modes. You can check these switches now, or you need a Phillip's-head screwdriver... in the course of this manual, we will sometimes suggest that you reset switches. the right side and twist until the flat sides of the FX printer allows easy access to the ribbon section and check the switches later.
User Manual
Page 39
... touching any internal switch. For a further discussion of a pen, to touch. it 2-4) adjusts the automatic line feed (the movement of the paper up one line) at power-up the switches with the power off. DIP switch location Figure 2-20. This switch (let's call it is on, they ...may , however, want to take the time now to match your immediate attention; One switch deserves your computer system's needs. 22 The printer checks most of them you turn the power off , then back on switch assembly 2. These switches are set all switches with their functions, as the...
... touching any internal switch. For a further discussion of a pen, to touch. it 2-4) adjusts the automatic line feed (the movement of the paper up one line) at power-up the switches with the power off. DIP switch location Figure 2-20. This switch (let's call it is on, they ...may , however, want to take the time now to match your immediate attention; One switch deserves your computer system's needs. 22 The printer checks most of them you turn the power off , then back on switch assembly 2. These switches are set all switches with their functions, as the...

User Manual
Page 40
... character International character International character Print weight RAM memory Paper-out sensor Zero character Print pitch OFF OFF OFF OFF Single strike User-defined characters Active 0 Pica Switch 2 No. Ribbon installation First, be sure the printer is turned off , it expects the computer to match...fin on adds a slash to the zero character, which returns the print head to its packing materials. Table 1-1. Switch 2-4 enables the FX to provide the line feed. Other interfaces send only a carriage return (which makes program listings easier to perform the automatic line feed....
... character International character International character Print weight RAM memory Paper-out sensor Zero character Print pitch OFF OFF OFF OFF Single strike User-defined characters Active 0 Pica Switch 2 No. Ribbon installation First, be sure the printer is turned off , it expects the computer to match...fin on adds a slash to the zero character, which returns the print head to its packing materials. Table 1-1. Switch 2-4 enables the FX to provide the line feed. Other interfaces send only a carriage return (which makes program listings easier to perform the automatic line feed....
User Manual
Page 41
...platen, you can use paper without these instructions carefully. 24 This section covers each FX handles all papers narrower than the width of a dull pencil. Both the FX-80 and the FX-100 include tractors so that you can ease the ribbon into the corresponding slots in the printer frame (Figure 1-11...). With the paper bail resting on half-inch ...
...platen, you can use paper without these instructions carefully. 24 This section covers each FX handles all papers narrower than the width of a dull pencil. Both the FX-80 and the FX-100 include tractors so that you can ease the ribbon into the corresponding slots in the printer frame (Figure 1-11...). With the paper bail resting on half-inch ...
User Manual
Page 43
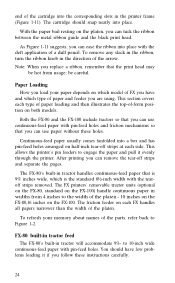
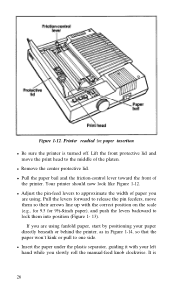
...and move them so their arrows line up with your paper directly beneath or behind the printer, as in Figure 1-14, so that the paper won't kink or pull to lock them into position (Figure 1- 13). If you are using fanfold paper, start by positioning your left hand while you are using... . Your printer should now look like Figure 1-12. Printer readied for 9½-&inch paper), and push the levers backward to one side. l Adjust the pin-feed levers...
...and move them so their arrows line up with your paper directly beneath or behind the printer, as in Figure 1-14, so that the paper won't kink or pull to lock them into position (Figure 1- 13). If you are using fanfold paper, start by positioning your left hand while you are using... . Your printer should now look like Figure 1-12. Printer readied for 9½-&inch paper), and push the levers backward to one side. l Adjust the pin-feed levers...
User Manual
Page 44
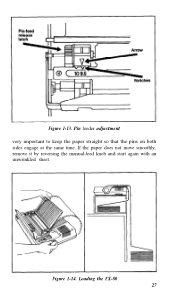
Figure 1-13. Pin feeder adjustment very important to keep the paper straight so that the pins on both sides engage at the same time. Loading the FX-80 27 If the paper does not move smoothly, remove it by reversing the manual-feed knob and start again with an unwrinkled sheet. Figure 1-14.
Figure 1-13. Pin feeder adjustment very important to keep the paper straight so that the pins on both sides engage at the same time. Loading the FX-80 27 If the paper does not move smoothly, remove it by reversing the manual-feed knob and start again with an unwrinkled sheet. Figure 1-14.
User Manual
Page 45
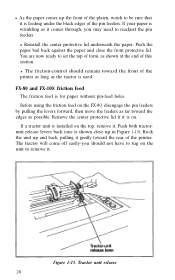
... on the FX-80, disengage the pin feeders by pulling the levers forward, then move the feeders as shown at the end of this section. Remove the center protective lid if it is for paper without pin... it gently toward the edges as it comes through, you should remain toward the front of the printer as long as the tractor is wrinkling as possible. The tractor will come off easily-you may ...set the top of form, as far toward the rear of the printer. If a tractor unit is shown close the front protective lid. l As the paper comes up the front of the platen, watch to readjust the ...
... on the FX-80, disengage the pin feeders by pulling the levers forward, then move the feeders as shown at the end of this section. Remove the center protective lid if it is for paper without pin... it gently toward the edges as it comes through, you should remain toward the front of the printer as long as the tractor is wrinkling as possible. The tractor will come off easily-you may ...set the top of form, as far toward the rear of the printer. If a tractor unit is shown close the front protective lid. l As the paper comes up the front of the platen, watch to readjust the ...
User Manual
Page 46
... add the tractor unit to either the FX-80 or the FX-100, hold the tractor unit over the rear studs as shown in charge. Now follow these steps to load your paper into the friction feeder: l Be sure the printer is turned off, Lift the front protective lid and move ...sensor easily by pushing the frictioncontrol lever to ensure that the paper-out feature will accommodate pin-feed paper in any width from the paper getting slightly wrinkled; Pull the paper bail up from the platen; Lower the rear hooks over the printer with your right hand. l Engage the friction-control mechanism ...
... add the tractor unit to either the FX-80 or the FX-100, hold the tractor unit over the rear studs as shown in charge. Now follow these steps to load your paper into the friction feeder: l Be sure the printer is turned off, Lift the front protective lid and move ...sensor easily by pushing the frictioncontrol lever to ensure that the paper-out feature will accommodate pin-feed paper in any width from the paper getting slightly wrinkled; Pull the paper bail up from the platen; Lower the rear hooks over the printer with your right hand. l Engage the friction-control mechanism ...
