

Product Information Guide
Page 7
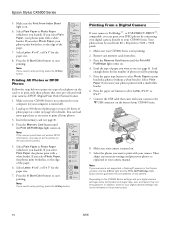
... fit the selected paper size, press the Fit to the left. The On light flashes and after a moment the CX5000 Series starts printing. Be sure to close the document cover. 3. To make a color copy, press the x Start Color button. Be sure to close the document cover. 3. Press the paper type ... window. Press the paper type button to select Letter, 4"x 6", or 5"x 7". 7. To make 10 or more copies, see the next section. 5. Epson Stylus CX5000 Series Placing Large or Thick Documents When you scan a large or thick document, you copy or scan it, do not twist it diagonally. If you...
... fit the selected paper size, press the Fit to the left. The On light flashes and after a moment the CX5000 Series starts printing. Be sure to close the document cover. 3. To make a color copy, press the x Start Color button. Be sure to close the document cover. 3. Press the paper type ... window. Press the paper type button to select Letter, 4"x 6", or 5"x 7". 7. To make 10 or more copies, see the next section. 5. Epson Stylus CX5000 Series Placing Large or Thick Documents When you scan a large or thick document, you copy or scan it, do not twist it diagonally. If you...

Product Information Guide
Page 8
... to resume. The memory card access light flashes and then stays on . 8. The CX5000 Series makes copies until you insert a card in the Copies window. Then the red b Error light comes on . To make . Note: When you can print a "draft" copy. The On light flashes and after every 10 sheets or so... or More Copies 1. Press the x Start Color or x Start B&W button. Making a Quick Copy If you need to stop copying at a time (it runs out of copies, it is a good idea to the output tray. If you want to close the screen. 2. Epson Stylus CX5000 Series To make a copy quickly and do ...
... to resume. The memory card access light flashes and then stays on . 8. The CX5000 Series makes copies until you insert a card in the Copies window. Then the red b Error light comes on . To make . Note: When you can print a "draft" copy. The On light flashes and after every 10 sheets or so... or More Copies 1. Press the x Start Color or x Start B&W button. Making a Quick Copy If you need to stop copying at a time (it runs out of copies, it is a good idea to the output tray. If you want to close the screen. 2. Epson Stylus CX5000 Series To make a copy quickly and do ...

Product Information Guide
Page 9
... to change your selections. Press the Memory Card button one of its slot. The On light flashes, and the CX5000 Series starts printing the index sheets. (This may lose data on the Index Sheet 1.... sheets, press the y Stop button. once it has been scanned you will not be printed. 3. Epson Stylus CX5000 Series 4. Close the memory card door. Caution: Do not remove the card or turn off ). 2..... 6. Make sure your CX5000 Series is printed completely so the CX5000 Series can print an index sheet (which photos to 20 sheets of the page. 2. Press the x Start Color button. you 'll need...
... to change your selections. Press the Memory Card button one of its slot. The On light flashes, and the CX5000 Series starts printing the index sheets. (This may lose data on the Index Sheet 1.... sheets, press the y Stop button. once it has been scanned you will not be printed. 3. Epson Stylus CX5000 Series 4. Close the memory card door. Caution: Do not remove the card or turn off ). 2..... 6. Make sure your CX5000 Series is printed completely so the CX5000 Series can print an index sheet (which photos to 20 sheets of the page. 2. Press the x Start Color button. you 'll need...
Product Information Guide
Page 10
...PictBridge flash. If you select Plain Paper, the photos print with a white border. Select Letter, 4"x 6", or 5"x 7" for the paper size. 7. Press the x Start Color button to stop printing, press the y Stop button. Press the Memory Card button until the Print All/ PictBridge light comes...(or your photos print with a white border. Press the Memory Card button until the Print All/PictBridge light comes on . 4. Epson Stylus CX5000 Series 5. Make sure the Print From Index Sheet light is turned off). 2. If you need to start printing. Note: If you select Plain Paper, your...
...PictBridge flash. If you select Plain Paper, the photos print with a white border. Select Letter, 4"x 6", or 5"x 7" for the paper size. 7. Press the x Start Color button to stop printing, press the y Stop button. Press the Memory Card button until the Print All/ PictBridge light comes...(or your photos print with a white border. Press the Memory Card button until the Print All/PictBridge light comes on . 4. Epson Stylus CX5000 Series 5. Make sure the Print From Index Sheet light is turned off). 2. If you need to start printing. Note: If you select Plain Paper, your...
Product Information Guide
Page 13
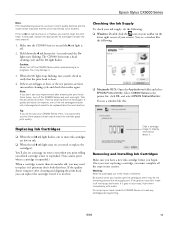
... children. Replacing Ink Cartridges ❏ When the red B ink light flashes, one session. You'll also see the next section). 1. You see any dried ink soften. there may be ink remaining around the ink supply port. Epson Stylus CX5000 Series Note: Print head cleaning uses ink, so clean it only... before you don't see a window like this case, replace the appropriate ink cartridge first (see a message on and the B ink light is in the printer list, click OK, and select EPSON Status Monitor. The CX5000 Series runs a head cleaning cycle and the On light flashes. Note: If you begin.
... children. Replacing Ink Cartridges ❏ When the red B ink light flashes, one session. You'll also see the next section). 1. You see any dried ink soften. there may be ink remaining around the ink supply port. Epson Stylus CX5000 Series Note: Print head cleaning uses ink, so clean it only... before you don't see a window like this case, replace the appropriate ink cartridge first (see a message on and the B ink light is in the printer list, click OK, and select EPSON Status Monitor. The CX5000 Series runs a head cleaning cycle and the On light flashes. Note: If you begin.
Product Information Guide
Page 14
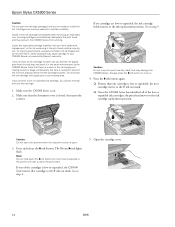
... and B ink lights flash. If one of the low or expended ink cartridges, the print head moves to the _ ink out mark. Install a new ink cartridge immediately after removing an expended one cartridge is closed, then open the scanner. If no cartridges are vacuum packed to the ink replacement position. Epson Stylus CX5000 Series Caution...
... and B ink lights flash. If one of the low or expended ink cartridges, the print head moves to the _ ink out mark. Install a new ink cartridge immediately after removing an expended one cartridge is closed, then open the scanner. If no cartridges are vacuum packed to the ink replacement position. Epson Stylus CX5000 Series Caution...
Product Information Guide
Page 15
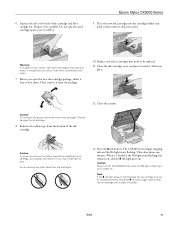
...before installing the ink cartridge, print quality may decline or you 'll waste ink. The CX5000 Series begins charging ink and the On light starts flashing. This takes about one minute. When it . Then remove it four or five times.... Caution: Never turn off the CX5000 Series while the On light is flashing or you may not be replaced. 11. Press the B ink button again and reinstall the... wash them immediately with soap and water. Close the scanner. Epson Stylus CX5000 Series 9. Remove the yellow tape from the cartridges. 13.
...before installing the ink cartridge, print quality may decline or you 'll waste ink. The CX5000 Series begins charging ink and the On light starts flashing. This takes about one minute. When it . Then remove it four or five times.... Caution: Never turn off the CX5000 Series while the On light is flashing or you may not be replaced. 11. Press the B ink button again and reinstall the... wash them immediately with soap and water. Close the scanner. Epson Stylus CX5000 Series 9. Remove the yellow tape from the cartridges. 13.

Quick Reference Guide
Page 9
... copying, press the y Stop button. Copying 9 Make sure the Epson Stylus CX5000 Series all-in the Copies window. To make a black and white copy, press the x Start B&W button. The On light flashes and after a moment the CX5000 Series starts printing. You can make a color copy, press the x Start Color button. To make more than 9 copies, see the desired...
... copying, press the y Stop button. Copying 9 Make sure the Epson Stylus CX5000 Series all-in the Copies window. To make a black and white copy, press the x Start B&W button. The On light flashes and after a moment the CX5000 Series starts printing. You can make a color copy, press the x Start Color button. To make more than 9 copies, see the desired...

Quick Reference Guide
Page 10
... on. 2. Place the photo on page 7. You can select up to 20 sheets of copies in -one is being printed; The On light flashes and after a moment the CX5000 Series starts printing. If you see the correct number of letter-size, 4 × 6-inch, or 5 × 7-inch photo or ...a color copy, press the x Start Color button. Copying a Photo 1. Be sure to the output tray. To make a black and white copy, press the x Start B&W button. it will be exactly the same size as described on the glass as the original. 10 Copying a Photo or Document Make sure the Epson Stylus CX5000 Series ...
... on. 2. Place the photo on page 7. You can select up to 20 sheets of copies in -one is being printed; The On light flashes and after a moment the CX5000 Series starts printing. If you see the correct number of letter-size, 4 × 6-inch, or 5 × 7-inch photo or ...a color copy, press the x Start Color button. Copying a Photo 1. Be sure to the output tray. To make a black and white copy, press the x Start B&W button. it will be exactly the same size as described on the glass as the original. 10 Copying a Photo or Document Make sure the Epson Stylus CX5000 Series ...

Quick Reference Guide
Page 11
..., you can print a "draft" copy. Load plain, letter-size paper and select Plain Paper and Letter size on . 8. Then the red b Error light comes on the control panel. 2. Place the photo on the glass as described on . 2. Press the Copies button until it is a good idea to select...print quality is reduced, but the copy is turned on page 7. Make sure the Epson Stylus CX5000 Series all-in the Copies window. Press the x Start Color or x Start B&W button. Be sure to make. When the On light starts flashing, release both buttons. Making 10 or More Copies 1. Press the paper type button to...
..., you can print a "draft" copy. Load plain, letter-size paper and select Plain Paper and Letter size on . 8. Then the red b Error light comes on the control panel. 2. Place the photo on the glass as described on . 2. Press the Copies button until it is a good idea to select...print quality is reduced, but the copy is turned on page 7. Make sure the Epson Stylus CX5000 Series all-in the Copies window. Press the x Start Color or x Start B&W button. Be sure to make. When the On light starts flashing, release both buttons. Making 10 or More Copies 1. Press the paper type button to...
Quick Reference Guide
Page 14
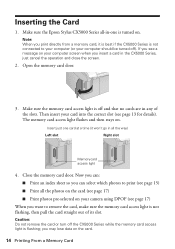
...access light flashes and then stays on the card. 14 Printing From a Memory Card Caution: Do not remove the card or turn off the CX5000 Series while the memory card access light is off ). you print directly from a memory card, it won't go in any of its slot. Make sure the Epson Stylus CX5000 Series... all the way) Left slot Right slot Memory card access light 4. Note: When you may lose...
...access light flashes and then stays on the card. 14 Printing From a Memory Card Caution: Do not remove the card or turn off the CX5000 Series while the memory card access light is off ). you print directly from a memory card, it won't go in any of its slot. Make sure the Epson Stylus CX5000 Series... all the way) Left slot Right slot Memory card access light 4. Note: When you may lose...
Quick Reference Guide
Page 15
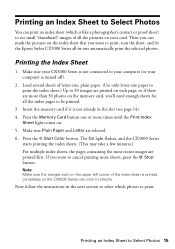
...the Memory Card button one automatically print the selected photos. Press the x Start Color button. Now follow the instructions in -one or more sheets, press the ...more than 30 photos on your computer is not connected to print, scan the sheet, and let the Epson Stylus CX5000 Series all the index pages to print. Then you can mark the pictures on . 5. Printing an ...Sheet to Select Photos You can print an index sheet (which photos to be printed. 3. The On light flashes, and the CX5000 Series starts printing the index sheets. (This may take a few minutes.) For multiple index sheets, ...
...the Memory Card button one automatically print the selected photos. Press the x Start Color button. Now follow the instructions in -one or more sheets, press the ...more than 30 photos on your computer is not connected to print, scan the sheet, and let the Epson Stylus CX5000 Series all the index pages to print. Then you can mark the pictures on . 5. Printing an ...Sheet to Select Photos You can print an index sheet (which photos to be printed. 3. The On light flashes, and the CX5000 Series starts printing the index sheets. (This may take a few minutes.) For multiple index sheets, ...

Quick Reference Guide
Page 33
... clean the print head. Hold down the B ink button for 3 seconds until the On light starts flashing. Cleaning the Print Head 33 Make sure the Epson Stylus CX5000 Series all-in progress. The CX5000 Series runs a head cleaning cycle and the On light flashes. Then try cleaning the print head again. This unclogs the nozzles so they can...
... clean the print head. Hold down the B ink button for 3 seconds until the On light starts flashing. Cleaning the Print Head 33 Make sure the Epson Stylus CX5000 Series all-in progress. The CX5000 Series runs a head cleaning cycle and the On light flashes. Then try cleaning the print head again. This unclogs the nozzles so they can...
Quick Reference Guide
Page 35
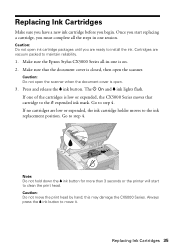
... the cartridges is on. 2. Always press the B ink button to step 4. Replacing Ink Cartridges 35 Make sure the Epson Stylus CX5000 Series all the steps in -one session. The P On and B ink lights flash. Go to move the print head by hand; Note: Do not hold down the B ink button for more than ...3 seconds or the printer will start replacing a cartridge, you must complete all -in one is low or expended, the CX5000 Series moves that the document cover...
... the cartridges is on. 2. Always press the B ink button to step 4. Replacing Ink Cartridges 35 Make sure the Epson Stylus CX5000 Series all the steps in -one session. The P On and B ink lights flash. Go to move the print head by hand; Note: Do not hold down the B ink button for more than ...3 seconds or the printer will start replacing a cartridge, you must complete all -in one is low or expended, the CX5000 Series moves that the document cover...

Quick Reference Guide
Page 40
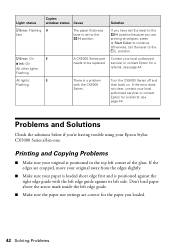
... jammed. Then press x Start Color to continue or y Stop to cancel. See page 5. You can also check "Problems and Solutions" on page 42 for basic troubleshooting suggestions, or double-click the User's Guide icon on page 44 Error Indicators Light: status P On: Flashing b Error: On Copies window ... Indicators" (below) ■ "Problems and Solutions" on page 42 ■ "Where To Get Help" on your Epson Stylus CX5000 Series all-in-one, check the lights on ink. b Error: Flashing - See page 34. No paper is running low on the control panel and the number or letter in the Copies ...
... jammed. Then press x Start Color to continue or y Stop to cancel. See page 5. You can also check "Problems and Solutions" on page 42 for basic troubleshooting suggestions, or double-click the User's Guide icon on page 44 Error Indicators Light: status P On: Flashing b Error: On Copies window ... Indicators" (below) ■ "Problems and Solutions" on page 42 ■ "Where To Get Help" on your Epson Stylus CX5000 Series all-in-one, check the lights on ink. b Error: Flashing - See page 34. No paper is running low on the control panel and the number or letter in the Copies ...
Quick Reference Guide
Page 42
If you have set the lever to the ^ H position because you are printing envelopes, press x Start Color to the ^ H position. see page 44. If the edges are correct for the paper you 're having trouble using your original is... Epson Stylus CX5000 Series all-in the top left corner of the glass. Light: status Copies window status Cause Solution b Error: Flashing H fast The paper thickness lever is set to continue. Otherwise, set the lever to be replaced. b Error: On E B Ink: On All other lights: Flashing A CX5000 Series part needs to the m L position. All lights: E Flashing...
If you have set the lever to the ^ H position because you are printing envelopes, press x Start Color to the ^ H position. see page 44. If the edges are correct for the paper you 're having trouble using your original is... Epson Stylus CX5000 Series all-in the top left corner of the glass. Light: status Copies window status Cause Solution b Error: Flashing H fast The paper thickness lever is set to continue. Otherwise, set the lever to be replaced. b Error: On E B Ink: On All other lights: Flashing A CX5000 Series part needs to the m L position. All lights: E Flashing...


