

Technical Brief (Ink Jet Printers)
Page 3
... designed in various patterns so you never have to swap an ink cartridge to determine the most interested in the Ink Solutions document. 5. DURABrite and Chief Memory Officer are for optional cartridges, and you see continuous tone color. Ink Jet Printer Technical Brief Page 3 Epson printers use an advanced error diffusion technology to get sharp...
... designed in various patterns so you never have to swap an ink cartridge to determine the most interested in the Ink Solutions document. 5. DURABrite and Chief Memory Officer are for optional cartridges, and you see continuous tone color. Ink Jet Printer Technical Brief Page 3 Epson printers use an advanced error diffusion technology to get sharp...
Product Information Guide
Page 2
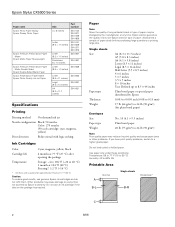
... with logic seeking Ink Cartridges Color Cyan, magenta, yellow, black Cartridge life 6 months at 77 °F (25 °C) after opening the package Temperature Storage: -4 to 104 °F (-20 to 40 °C) 1 month at 104 °F (40 °C) Freezing*: 3.2 °F (-16 °C) * Ink thaws and is usable after approximately 3 hours at any time, Epson cannot guarantee the...
... with logic seeking Ink Cartridges Color Cyan, magenta, yellow, black Cartridge life 6 months at 77 °F (25 °C) after opening the package Temperature Storage: -4 to 104 °F (-20 to 40 °C) 1 month at 104 °F (40 °C) Freezing*: 3.2 °F (-16 °C) * Ink thaws and is usable after approximately 3 hours at any time, Epson cannot guarantee the...
Product Information Guide
Page 3
... Approx. 10 msec per line at 1200 dpi Color: Approx. 30 msec per line at 1200 dpi 16 bits per pixel per color internal 8 bits per pixel per color external (maximum) One USB 2.0 Hi-Speed or USB 1.1 port RGB three color LED Epson Stylus CX5000 Series Mechanical Paper path Sheet feeder, top entry ... (10 to 35 °C) Storage: -4 to 104 °F (-20 to 40 °C) Operation: 20 to 80% RH Storage: 5 to 85% RH (without the ink cartridges Electrical Input voltage Rated frequency Rated current Power consumption 90 to 132 V 50 to 60 Hz 0.4 A (0.7 A max) Approx. 13 W (operating) Approx. 4.5 W in...
... Approx. 10 msec per line at 1200 dpi Color: Approx. 30 msec per line at 1200 dpi 16 bits per pixel per color internal 8 bits per pixel per color external (maximum) One USB 2.0 Hi-Speed or USB 1.1 port RGB three color LED Epson Stylus CX5000 Series Mechanical Paper path Sheet feeder, top entry ... (10 to 35 °C) Storage: -4 to 104 °F (-20 to 40 °C) Operation: 20 to 80% RH Storage: 5 to 85% RH (without the ink cartridges Electrical Input voltage Rated frequency Rated current Power consumption 90 to 132 V 50 to 60 Hz 0.4 A (0.7 A max) Approx. 13 W (operating) Approx. 4.5 W in...
Product Information Guide
Page 12
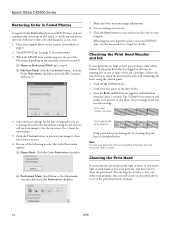
...the print head. What happens next depends on -screen User's Guide). Turn off the CX5000 Series. 2. Do one with step 9. 7. Epson Stylus CX5000 Series Restoring Color in Faded Photos Using the Color Restoration feature in EPSON Scan, you can automatically transform an old, faded, or badly exposed photo into one ...Status Monitor (see if the print head needs cleaning. 12 6/06 It also shows the percentage of the ink cartridges. Checking the Print Head Nozzles and Ink If your original photo on the scanner as described above) to preview your image(s), then select your image(s)....
...the print head. What happens next depends on -screen User's Guide). Turn off the CX5000 Series. 2. Do one with step 9. 7. Epson Stylus CX5000 Series Restoring Color in Faded Photos Using the Color Restoration feature in EPSON Scan, you can automatically transform an old, faded, or badly exposed photo into one ...Status Monitor (see if the print head needs cleaning. 12 6/06 It also shows the percentage of the ink cartridges. Checking the Print Head Nozzles and Ink If your original photo on the scanner as described above) to preview your image(s), then select your image(s)....
Product Information Guide
Page 13
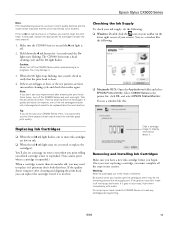
... and water. Epson Stylus CX5000 Series Note: Print head cleaning uses ink, so clean it only if quality declines and the nozzle check indicates that the print head is clean. 4. Removing and Installing Ink Cartridges Make sure you have a new ink cartridge before you handle used ink cartridges; Replacing Ink Cartridges ❏ When the red B ink light flashes, one of the ink cartridges may need...
... and water. Epson Stylus CX5000 Series Note: Print head cleaning uses ink, so clean it only if quality declines and the nozzle check indicates that the print head is clean. 4. Removing and Installing Ink Cartridges Make sure you have a new ink cartridge before you handle used ink cartridges; Replacing Ink Cartridges ❏ When the red B ink light flashes, one of the ink cartridges may need...
Product Information Guide
Page 14
... when the document cover is on. 2. Cartridges are low or expended, the ink cartridge holder moves to the ink cartridge replacement position. Leaving cartridges uninstalled can dehydrate the print head and may damage the CX5000 Series. Other products may dry out. Epson Stylus CX5000 Series Caution: Do not open ink cartridge packages until you remove an ink cartridge for more than 3 seconds or the...
... when the document cover is on. 2. Cartridges are low or expended, the ink cartridge holder moves to the ink cartridge replacement position. Leaving cartridges uninstalled can dehydrate the print head and may damage the CX5000 Series. Other products may dry out. Epson Stylus CX5000 Series Caution: Do not open ink cartridge packages until you remove an ink cartridge for more than 3 seconds or the...
Product Information Guide
Page 15
... stops flashing and remains on (not flashing), the ink cartridge may not be installed correctly. Epson Stylus CX5000 Series 9. Warning: If ink gets on the front of the ink cartridge. Before you 'll waste ink. Note: If the B ink light stays on , and the B ink light goes out. Do not take the used cartridge apart or try to be replaced. 11. Replace...
... stops flashing and remains on (not flashing), the ink cartridge may not be installed correctly. Epson Stylus CX5000 Series 9. Warning: If ink gets on the front of the ink cartridge. Before you 'll waste ink. Note: If the B ink light stays on , and the B ink light goes out. Do not take the used cartridge apart or try to be replaced. 11. Replace...
Product Information Guide
Page 17
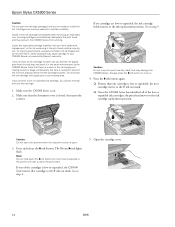
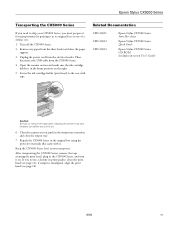
..., and turn it on. 6. Open the scanner section and make sure the ink cartridge holder is misaligned, align the print head (see page 12); Keep the CX5000 Series level as you transport it. Epson Stylus CX5000 Series Transporting the CX5000 Series If you need to remove the tape after installing the printer in its original box or...
..., and turn it on. 6. Open the scanner section and make sure the ink cartridge holder is misaligned, align the print head (see page 12); Keep the CX5000 Series level as you transport it. Epson Stylus CX5000 Series Transporting the CX5000 Series If you need to remove the tape after installing the printer in its original box or...
Quick Reference Guide
Page 2
... Printing in Windows 20 Printing with a Macintosh 23 Using Special Papers 26 Scanning a Photo or Document 29 Basic Scanning 29 Restoring Color in Faded Photos 31 Maintaining Your CX5000 Series All-in-One 32 Checking the Print Head Nozzles 32 Cleaning the Print Head 33 Checking the Ink Cartridge Status 34 Replacing Ink Cartridges 34 2 Contents
... Printing in Windows 20 Printing with a Macintosh 23 Using Special Papers 26 Scanning a Photo or Document 29 Basic Scanning 29 Restoring Color in Faded Photos 31 Maintaining Your CX5000 Series All-in-One 32 Checking the Print Head Nozzles 32 Cleaning the Print Head 33 Checking the Ink Cartridge Status 34 Replacing Ink Cartridges 34 2 Contents
Quick Reference Guide
Page 23
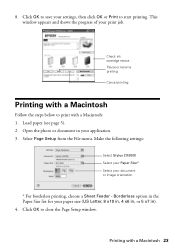
... a Macintosh: 1. Click OK to print with a Macintosh 23 Check ink cartridge status Pause or resume printing Cancel printing Printing with a Macintosh Follow the steps below to save your document or image orientation * For borderless printing, choose a Sheet Feeder - Make the following settings: Select Stylus CX5000 Select your Paper Size* Select your settings, then click...
... a Macintosh: 1. Click OK to print with a Macintosh 23 Check ink cartridge status Pause or resume printing Cancel printing Printing with a Macintosh Follow the steps below to save your document or image orientation * For borderless printing, choose a Sheet Feeder - Make the following settings: Select Stylus CX5000 Select your Paper Size* Select your settings, then click...

Quick Reference Guide
Page 32
... Head" on page 33 ■ "Checking the Ink Cartridge Status" on page 34 ■ "Replacing Ink Cartridges" on page 35 Checking the Print Head Nozzles If your printouts are clean: Print head needs to check the print head nozzles using the control panel. 1. Turn off the Epson Stylus CX5000 Series all-in-one or more of the...
... Head" on page 33 ■ "Checking the Ink Cartridge Status" on page 34 ■ "Replacing Ink Cartridges" on page 35 Checking the Print Head Nozzles If your printouts are clean: Print head needs to check the print head nozzles using the control panel. 1. Turn off the Epson Stylus CX5000 Series all-in-one or more of the...

Quick Reference Guide
Page 33
...as described on or flashes, you don't see page 35). 1. Then try cleaning the print head again. Make sure the Epson Stylus CX5000 Series all-in progress. Hold down the B ink button for 3 seconds until the On light starts flashing. You may need to be replaced (see if the print head needs ...old or damaged and needs to be cleaned. In this case, replace the appropriate ink cartridge first (see any dried ink soften. Note: If you cannot clean the print head. Run a nozzle check as described on and the B ink light is clean. 4. If there are still gaps or lines, or the ...
...as described on or flashes, you don't see page 35). 1. Then try cleaning the print head again. Make sure the Epson Stylus CX5000 Series all-in progress. Hold down the B ink button for 3 seconds until the On light starts flashing. You may need to be replaced (see if the print head needs ...old or damaged and needs to be cleaned. In this case, replace the appropriate ink cartridge first (see any dried ink soften. Note: If you cannot clean the print head. Run a nozzle check as described on and the B ink light is clean. 4. If there are still gaps or lines, or the ...
Quick Reference Guide
Page 34
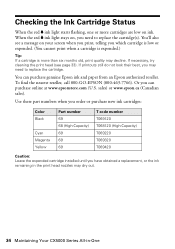
... www.epson.ca (Canadian sales). Use these part numbers when you order or purchase new ink cartridges: Color Black Cyan Magenta Yellow Part number 69 68 (High-Capacity) 69 69 69 T code number T069120 T068120 (High-Capacity) T069220 T069320 T069420 Caution: Leave the expended cartridge installed until you may dry out. 34 Maintaining Your CX5000 Series...
... www.epson.ca (Canadian sales). Use these part numbers when you order or purchase new ink cartridges: Color Black Cyan Magenta Yellow Part number 69 68 (High-Capacity) 69 69 69 T code number T069120 T068120 (High-Capacity) T069220 T069320 T069420 Caution: Leave the expended cartridge installed until you may dry out. 34 Maintaining Your CX5000 Series...
Quick Reference Guide
Page 35
... the print head by hand; Caution: Do not open ink cartridge packages until you are vacuum packed to step 4. Make sure the Epson Stylus CX5000 Series all the steps in -one is open the scanner. this may damage the CX5000 Series. Replacing Ink Cartridges Make sure you have a new ink cartridge before you must complete all -in one session. Once...
... the print head by hand; Caution: Do not open ink cartridge packages until you are vacuum packed to step 4. Make sure the Epson Stylus CX5000 Series all the steps in -one is open the scanner. this may damage the CX5000 Series. Replacing Ink Cartridges Make sure you have a new ink cartridge before you must complete all -in one session. Once...

Quick Reference Guide
Page 36
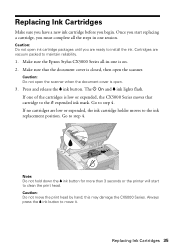
...of the low or expended ink cartridges, the print head moves to the replacement position. 6. Caution: Never attempt to refill it. 36 Maintaining Your CX5000 Series All-in-One Do not take the used cartridge apart or try to open the cartridge cover when the print head... is low or expended, the next cartridge moves to the _ expended ink mark. ■ Once the CX5000 Series identifies all of it straight out. Wait until the cartridges have moved to the ink cartridge replacement position. 5. Open the cartridge cover. Press the B ink button again...
...of the low or expended ink cartridges, the print head moves to the replacement position. 6. Caution: Never attempt to refill it. 36 Maintaining Your CX5000 Series All-in-One Do not take the used cartridge apart or try to open the cartridge cover when the print head... is low or expended, the next cartridge moves to the _ expended ink mark. ■ Once the CX5000 Series identifies all of it straight out. Wait until the cartridges have moved to the ink cartridge replacement position. 5. Open the cartridge cover. Press the B ink button again...

Quick Reference Guide
Page 37
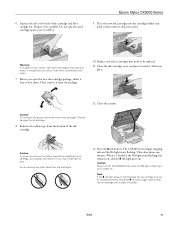
...water. 7. Replacing Ink Cartridges 37 Remove the yellow tape from the package. Caution: Do not remove any other seals from the cartridges. Caution: If you do not remove the yellow tape before installing the ink cartridge, print quality may... not be able to print. This can damage the ink cartridge. 8. Before you may decline or you open the new ink cartridge package, shake it from the bottom of the cartridge. Warning: If ink gets on the front of the ink cartridge...
...water. 7. Replacing Ink Cartridges 37 Remove the yellow tape from the package. Caution: Do not remove any other seals from the cartridges. Caution: If you do not remove the yellow tape before installing the ink cartridge, print quality may... not be able to print. This can damage the ink cartridge. 8. Before you may decline or you open the new ink cartridge package, shake it from the bottom of the cartridge. Warning: If ink gets on the front of the ink cartridge...

Quick Reference Guide
Page 38
Close the scanner. 38 Maintaining Your CX5000 Series All-in-One 9. Close the ink cartridge cover and press it until it clicks into place. 10. Place the new ink cartridge into the cartridge holder and push it down until it clicks into place. 12. Replace any other cartridges that need to be replaced. 11.
Close the scanner. 38 Maintaining Your CX5000 Series All-in-One 9. Close the ink cartridge cover and press it until it clicks into place. 10. Place the new ink cartridge into the cartridge holder and push it down until it clicks into place. 12. Replace any other cartridges that need to be replaced. 11.

Quick Reference Guide
Page 39
... On light stops flashing and remains on (not flashing), the ink cartridge may not be installed correctly. Replacing Ink Cartridges 39 Note: If the B ink light stays on , and the B ink light goes out. 13. When it clicks into place. Caution: Never turn off the CX5000 Series while the On light is still placed correctly on the...
... On light stops flashing and remains on (not flashing), the ink cartridge may not be installed correctly. Replacing Ink Cartridges 39 Note: If the B ink light stays on , and the B ink light goes out. 13. When it clicks into place. Caution: Never turn off the CX5000 Series while the On light is still placed correctly on the...

Quick Reference Guide
Page 40
.... See page 43. b Error: Flashing - Solution Load paper in the sheet feeder. - Then press x Start Color to continue or y Stop to cancel. Then press x Start Color to continue or y Stop to cancel. No paper is running low on the control panel and the number or letter...Where To Get Help" on your Epson Stylus CX5000 Series all-in the Copies window to diagnose the cause. B Ink: On - You can also check "Problems and Solutions" on page 42 for more detailed help. B Ink: Flashing - See page 5. See page 34. 40 Solving Problems An ink cartridge is loaded in the sheet feeder...
.... See page 43. b Error: Flashing - Solution Load paper in the sheet feeder. - Then press x Start Color to continue or y Stop to cancel. Then press x Start Color to continue or y Stop to cancel. No paper is running low on the control panel and the number or letter...Where To Get Help" on your Epson Stylus CX5000 Series all-in the Copies window to diagnose the cause. B Ink: On - You can also check "Problems and Solutions" on page 42 for more detailed help. B Ink: Flashing - See page 5. See page 34. 40 Solving Problems An ink cartridge is loaded in the sheet feeder...
Quick Reference Guide
Page 43
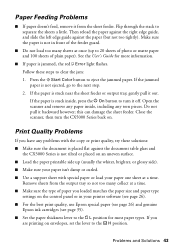
... Open the scanner and remove any paper inside , press the P On button to turn the CX5000 Series back on an uneven surface. ■ Load the paper printable side up to separate the... sheets a little. Problems and Solutions 43 Press the x Start Color button to the next step. 2. Close the scanner, then turn it off. Remove sheets from...your printer software (see page 26). ■ For the best print quality, use Epson special paper (see page 26) and genuine Epson ink cartridges (see page 35). ■ Set the paper thickness lever to the m L position...
... Open the scanner and remove any paper inside , press the P On button to turn the CX5000 Series back on an uneven surface. ■ Load the paper printable side up to separate the... sheets a little. Problems and Solutions 43 Press the x Start Color button to the next step. 2. Close the scanner, then turn it off. Remove sheets from...your printer software (see page 26). ■ For the best print quality, use Epson special paper (see page 26) and genuine Epson ink cartridges (see page 35). ■ Set the paper thickness lever to the m L position...


