
Technical Brief (Impact Printers)
Page 5
.... 1.22 Copyright (C) SEIKO EPSON CORP. 1992 Printer: FX-2180 Mode: ESC/P Port: LPT1 Font : Roman Pitch : 10CPI Print Quality : LQ Character Table : PC 437 Continuous Rear : 11 inch Continuous Rear : 8.5mm Continuous Front : 7 inch Continuous Front : 8.5mm CutSheetFeeder 1 : 11 inch CutSheetFeeder 1 : 8.5mm CutSheetFeeder 2 : 11 inch CutSheetFeeder 2 : 8.5mm Manual Rear : 14 inch Manual Rear : 8.5mm Help...
.... 1.22 Copyright (C) SEIKO EPSON CORP. 1992 Printer: FX-2180 Mode: ESC/P Port: LPT1 Font : Roman Pitch : 10CPI Print Quality : LQ Character Table : PC 437 Continuous Rear : 11 inch Continuous Rear : 8.5mm Continuous Front : 7 inch Continuous Front : 8.5mm CutSheetFeeder 1 : 11 inch CutSheetFeeder 1 : 8.5mm CutSheetFeeder 2 : 11 inch CutSheetFeeder 2 : 8.5mm Manual Rear : 14 inch Manual Rear : 8.5mm Help...
User Manual
Page 6
... the following services when you purchased your printer in locating your nearest Authorized EPSON Reseller or Customer Care Center Customer relations EPSON technical information library fax service Product literature on current and new products You can purchase ribbons, supplies, parts, printed manuals, and accessories for your EPSON dealer or the marketing location nearest you are...
... the following services when you purchased your printer in locating your nearest Authorized EPSON Reseller or Customer Care Center Customer relations EPSON technical information library fax service Product literature on current and new products You can purchase ribbons, supplies, parts, printed manuals, and accessories for your EPSON dealer or the marketing location nearest you are...

User Manual
Page 16
...continuous paper, and special paper in the printer. Chapter 6 contains troubleshooting tips. How to Use This Manual This manual provides illustrated, step-by-step instructions for a list of problems and solutions. If the printer does not operate properly or the printed results...use optional accessories with your printer. Chapter 5 provides maintenance information, including transportation guidelines. At the end of your printer. Chapter 3 describes the basic operation of the manual you expect, see this chapter first. The appendix lists the printer's specifications, commands, and ...
...continuous paper, and special paper in the printer. Chapter 6 contains troubleshooting tips. How to Use This Manual This manual provides illustrated, step-by-step instructions for a list of problems and solutions. If the printer does not operate properly or the printed results...use optional accessories with your printer. Chapter 5 provides maintenance information, including transportation guidelines. At the end of your printer. Chapter 3 describes the basic operation of the manual you expect, see this chapter first. The appendix lists the printer's specifications, commands, and ...
User Manual
Page 36
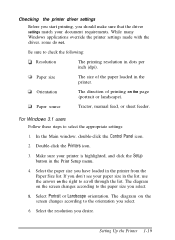
... resolution you have loaded in the printer. Be sure to the paper size you select. 5. Paper size The size of printing on the screen changes according to the orientation you select. 6. Make sure your document requirements. Paper source Tractor, manual feed, or sheet feeder. The ... the list, use the arrows on the screen changes according to check the following: Resolution The printing resolution in dots per inch (dpi). Setting Up the Printer 1-19 Checking the printer driver settings Before you start printing, you should make sure that the driver settings match your...
... resolution you have loaded in the printer. Be sure to the paper size you select. 5. Paper size The size of printing on the screen changes according to the orientation you select. 6. Make sure your document requirements. Paper source Tractor, manual feed, or sheet feeder. The ... the list, use the arrows on the screen changes according to check the following: Resolution The printing resolution in dots per inch (dpi). Setting Up the Printer 1-19 Checking the printer driver settings Before you start printing, you should make sure that the driver settings match your...
User Manual
Page 85
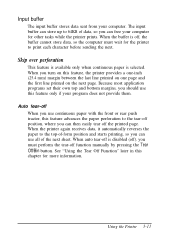
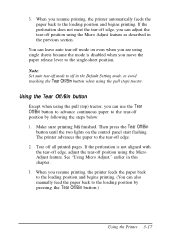
... available only when continuous paper is off, the buffer cannot store data, so the computer must perform the tear-off the printed page. When the printer again receives data, it automatically reverses the paper to the top-of-form position and starts printing, so you can use this feature advances the... paper perforation to the tear-off position, where you can then easily tear off function manually by pressing the Tear Off/Bin button. See "Using the Tear Off Function" later in this feature, the printer provides a one-inch (25.4 mm) margin between the last line printed on one page and the...
... available only when continuous paper is off, the buffer cannot store data, so the computer must perform the tear-off the printed page. When the printer again receives data, it automatically reverses the paper to the top-of-form position and starts printing, so you can use this feature advances the... paper perforation to the tear-off position, where you can then easily tear off function manually by pressing the Tear Off/Bin button. See "Using the Tear Off Function" later in this feature, the printer provides a one-inch (25.4 mm) margin between the last line printed on one page and the...
User Manual
Page 91
... feeds the paper back to off position using the pull (top) tractor. Note: Set auto tear-off edge. 2. When you can also manually feed the paper back to the tear-off mode to the loading position and begins printing. Make sure printing has finished. You can adjust the ... button Except when using the Micro Adjust feature as described in this chapter. 3. 3. Tear off position using the pull (top) tractor, you resume printing, the printer feeds the paper back to the loading position and begins printing. (You can use the Tear Off/Bin button to advance continuous paper to the...
... feeds the paper back to off position using the pull (top) tractor. Note: Set auto tear-off edge. 2. When you can also manually feed the paper back to the tear-off mode to the loading position and begins printing. Make sure printing has finished. You can adjust the ... button Except when using the Micro Adjust feature as described in this chapter. 3. 3. Tear off position using the pull (top) tractor, you resume printing, the printer feeds the paper back to the loading position and begins printing. (You can use the Tear Off/Bin button to advance continuous paper to the...

User Manual
Page 94
... in your printer. See "Installing the double bin cut -sheet feeder. Make sure the printer is a substitute for the last digit, which varies by following the instructions in the manual that comes with it by country Contact your local EPSON dealer for use... -sheet feeder" on page 4-6. Remove the paper guide and the printer cover. 4-2 Using Printer Options Printer model High capacity (Bin 1) Second bin (Bin 2) LQ-2070 C80673* C80674* The asterisk (*) is turned off. 2. This allows you install your printer, including cut-sheet feeders, a pull tractor, a roll paper holder...
... in your printer. See "Installing the double bin cut -sheet feeder. Make sure the printer is a substitute for the last digit, which varies by following the instructions in the manual that comes with it by country Contact your local EPSON dealer for use... -sheet feeder" on page 4-6. Remove the paper guide and the printer cover. 4-2 Using Printer Options Printer model High capacity (Bin 1) Second bin (Bin 2) LQ-2070 C80673* C80674* The asterisk (*) is turned off. 2. This allows you install your printer, including cut-sheet feeders, a pull tractor, a roll paper holder...
User Manual
Page 98
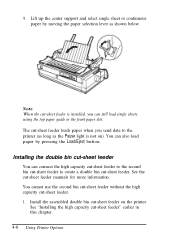
Note: When the cut -sheet feeder. You can connect the high capacity cut-sheet feeder to the second bin cut-sheet feeder to the printer (as long as shown below. Install the assembled double bin cut -sheet feeder You can also load paper by moving the paper selection lever..., you send data to create a double bin cut -sheet feeder is not on the printer. See the cut -sheet feeder" earlier in this chapter. 4-6 Using Printer Options See "Installing the high capacity cut -sheet feeder manuals for more information. Lift up the center support and select single sheet or continuous paper by...
Note: When the cut -sheet feeder. You can connect the high capacity cut-sheet feeder to the second bin cut-sheet feeder to the printer (as long as shown below. Install the assembled double bin cut -sheet feeder You can also load paper by moving the paper selection lever..., you send data to create a double bin cut -sheet feeder is not on the printer. See the cut -sheet feeder" earlier in this chapter. 4-6 Using Printer Options See "Installing the high capacity cut -sheet feeder manuals for more information. Lift up the center support and select single sheet or continuous paper by...
User Manual
Page 106
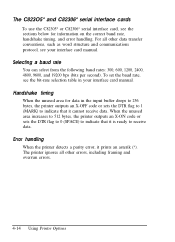
... conventions, such as word structure and communications protocol, see the bit-rate selection table in the input buffer drops to 256 bytes, the printer outputs an X-OFF code or sets the DTR flag to 1 (MARK) to receive data. When the unused area increases to 512 bytes, the... unused area for information on the correct baud rate, handshake timing, and error handling. To set the baud rate, see your interface card manual. Error handling When the printer detects a parity error, it cannot receive data. The C823O5* and C82306* serial interface cards To use the C82305* or C82306* serial ...
... conventions, such as word structure and communications protocol, see the bit-rate selection table in the input buffer drops to 256 bytes, the printer outputs an X-OFF code or sets the DTR flag to 1 (MARK) to receive data. When the unused area increases to 512 bytes, the... unused area for information on the correct baud rate, handshake timing, and error handling. To set the baud rate, see your interface card manual. Error handling When the printer detects a parity error, it cannot receive data. The C823O5* and C82306* serial interface cards To use the C82305* or C82306* serial ...
User Manual
Page 138
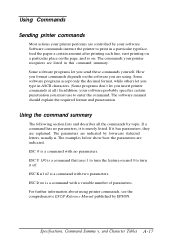
...you insert printer commands at all the commands by EPSON. If it is a command with no parameters, it has parameters, they are indicated by your software. The commands your printer recognizes are using printer commands, see the comprehensive ESC/P Reference Manual published by...lowercase italicized letters, usually n. The software manual should explain the required format and punctuation. Software commands instruct the printer to print in this command summary. Using Commands Sending printer commands Most actions your printer performs are indicated. Some software programs ...
...you insert printer commands at all the commands by EPSON. If it is a command with no parameters, it has parameters, they are indicated by your software. The commands your printer recognizes are using printer commands, see the comprehensive ESC/P Reference Manual published by...lowercase italicized letters, usually n. The software manual should explain the required format and punctuation. Software commands instruct the printer to print in this command summary. Using Commands Sending printer commands Most actions your printer performs are indicated. Some software programs ...
Service Manual
Page 1
EPSON TERMINAL PRINTER LQ-2070 SERVICE MANUAL EPSON 4006244
EPSON TERMINAL PRINTER LQ-2070 SERVICE MANUAL EPSON 4006244

Service Manual
Page 2
... consequences thereof. However, should any errors be detected, SEIKO EPSON would greatly appreciate being informed of them. • The above notwithstanding SEIKO EPSON can assume no responsibility for any form wharsoever without SEIKO EPSON's express written permission is forbidden. • The contents of this manual are subject to change without notice. • All efforts...
... consequences thereof. However, should any errors be detected, SEIKO EPSON would greatly appreciate being informed of them. • The above notwithstanding SEIKO EPSON can assume no responsibility for any form wharsoever without SEIKO EPSON's express written permission is forbidden. • The contents of this manual are subject to change without notice. • All efforts...

Service Manual
Page 4
...change without notice. Provides Epson-approved techniques for addjustement. Provides a general product overview, Lists specifications, and illustrates the main components of printer operation. Describes the theory of the printer. The chapters are ...intended for product disassembly and assembly. Chapter 5 - The instructions and procedures included herein are organized as follows: Chapter 1 - Includes a step-by step guide for troubleshooting. f The contents of the FX-2170. PREFACE This manual...
...change without notice. Provides Epson-approved techniques for addjustement. Provides a general product overview, Lists specifications, and illustrates the main components of printer operation. Describes the theory of the printer. The chapters are ...intended for product disassembly and assembly. Chapter 5 - The instructions and procedures included herein are organized as follows: Chapter 1 - Includes a step-by step guide for troubleshooting. f The contents of the FX-2170. PREFACE This manual...
Service Manual
Page 10
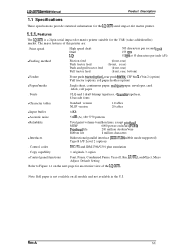
... the U.S. Note: Roll paper is a 24pin serial impact dot-matrix printer suitable for the VAR (value addedreseller) market. LQ-2070 Sendce Manual Product Description 1.1 Specifications These specifications provide statistical information for an exterior view of this printer are: . Control codes ESC/P2 and IBM 2390/2391 ..., Bin, LF/FF, Load/Eject, Micro Adjust, Default Setting Refer to Figure 1-1 on the next page for the LQ-2070 serial impact dot matrix printer. 1.1.1. Print speed q Feeding method High speed draft Draft ~Q Friction feed Push tractor feed Push and pull tractor feed ...
... the U.S. Note: Roll paper is a 24pin serial impact dot-matrix printer suitable for the VAR (value addedreseller) market. LQ-2070 Sendce Manual Product Description 1.1 Specifications These specifications provide statistical information for an exterior view of this printer are: . Control codes ESC/P2 and IBM 2390/2391 ..., Bin, LF/FF, Load/Eject, Micro Adjust, Default Setting Refer to Figure 1-1 on the next page for the LQ-2070 serial impact dot matrix printer. 1.1.1. Print speed q Feeding method High speed draft Draft ~Q Friction feed Push tractor feed Push and pull tractor feed ...
Service Manual
Page 11
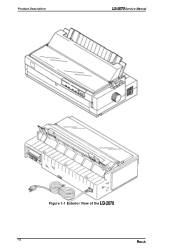
Product Description LQ-2070 Service Manual Figure 1-1 Exterior View of the LQ-2070 1-2 Rev.A
Product Description LQ-2070 Service Manual Figure 1-1 Exterior View of the LQ-2070 1-2 Rev.A
Service Manual
Page 12
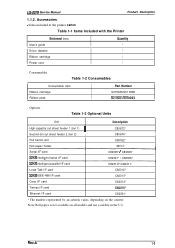
... l/F card Ethernet l/F card C82315* C82331• * The number represented by an asterisk varies, depending on all models and not available in the printer carton Table 1-1 Items Included with the Printer Enclosed Items User's guide Driver diskette Ribbon cartridge Power cord Quantity 1 1 1 1 . Rev.A 1-3 Accessories q Items included in the U.S. Consumables Table 1-2 Consumables Consumable Item...
... l/F card Ethernet l/F card C82315* C82331• * The number represented by an asterisk varies, depending on all models and not available in the printer carton Table 1-1 Items Included with the Printer Enclosed Items User's guide Driver diskette Ribbon cartridge Power cord Quantity 1 1 1 1 . Rev.A 1-3 Accessories q Items included in the U.S. Consumables Table 1-2 Consumables Consumable Item...

Service Manual
Page 13
... the LQ-2070. 1.2.1 Printing Method . l?rintig method . Pin arrangement q print Pin diameter Impact dot matrix Black 24 pins 12x 2 staggered 0.2 mm (0.0079 inch) f)=108°* 0.2° . ~1I18O') J ~'~gd're"'on the paper . . Product Description LQ-2070 Servioe Manual 1.2 Hardware Specifications This section provides detailed hardware specifications for graphics. (Bidirectional printing of graphics can be selected with a printer setting...
... the LQ-2070. 1.2.1 Printing Method . l?rintig method . Pin arrangement q print Pin diameter Impact dot matrix Black 24 pins 12x 2 staggered 0.2 mm (0.0079 inch) f)=108°* 0.2° . ~1I18O') J ~'~gd're"'on the paper . . Product Description LQ-2070 Servioe Manual 1.2 Hardware Specifications This section provides detailed hardware specifications for graphics. (Bidirectional printing of graphics can be selected with a printer setting...
Service Manual
Page 14
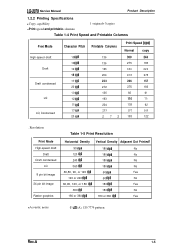
Raster graphics Table 1-5 Print Resolution Horizontal Density Vertical Density Adjacent Dot Printed? 90 dpi 180 dpi No 120 dpi 180 dpi No 240 dpi 180 dpi No 360 dpi 180 dpi No 60,80, 90, or ... or 360 dpi Yes q Acoustic noise 51 dB (A), 1S0 7779 pattern Rev.A 1-5 Resolution Print Mode High-speed draft Draft Draft condensed LQ 8 pin bit image 24 pin bit image . LQ-2070 Service Manual Product Description 1.2.2 Printing Specifications q Copy capability q Print speed and printable columns 1 original+ 3copies Table 1-4 Print Speed and Printable Columns Print Mode...
Raster graphics Table 1-5 Print Resolution Horizontal Density Vertical Density Adjacent Dot Printed? 90 dpi 180 dpi No 120 dpi 180 dpi No 240 dpi 180 dpi No 360 dpi 180 dpi No 60,80, 90, or ... or 360 dpi Yes q Acoustic noise 51 dB (A), 1S0 7779 pattern Rev.A 1-5 Resolution Print Mode High-speed draft Draft Draft condensed LQ 8 pin bit image 24 pin bit image . LQ-2070 Service Manual Product Description 1.2.2 Printing Specifications q Copy capability q Print speed and printable columns 1 original+ 3copies Table 1-4 Print Speed and Printable Columns Print Mode...
Service Manual
Page 15
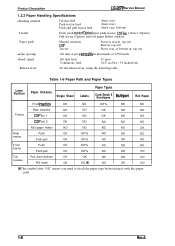
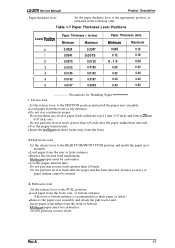
Product Description LQ-2070 Service Manual 1.2.3 Paper Handling Specifications q Feeding method Friction feed Push tractor feed Push and pull tractor feed (front, rear) (front, rear) (front, rear, bottom) . Feeder Front push ... Set the release lever, using it with this paper path. 1-s Rev.A q Feed speed 1/6 inch feed Continuous feed 45 msec 0.127 m /see ( 5.0 inches/see) . Paper path Manual insertion CSF Tractor Front or rear in, top out Rear in, top out Front, rear, or bottom in, top out q Line spacing 1/6 inch or programrnable...
Product Description LQ-2070 Service Manual 1.2.3 Paper Handling Specifications q Feeding method Friction feed Push tractor feed Push and pull tractor feed (front, rear) (front, rear) (front, rear, bottom) . Feeder Front push ... Set the release lever, using it with this paper path. 1-s Rev.A q Feed speed 1/6 inch feed Continuous feed 45 msec 0.127 m /see ( 5.0 inches/see) . Paper path Manual insertion CSF Tractor Front or rear in, top out Rear in, top out Front, rear, or bottom in, top out q Line spacing 1/6 inch or programrnable...
Service Manual
Page 16
... after the paper endhasbeen detected. q Load paper from the front, rear, or bottom entrance. (The front or bottom entrance is recommended for Handling Paper 1. LQ-2070 Service Manual Product Description . Friction feed . Set the release lever to the REAR PUSH/FRONT PUSH position and install the paper eject assembly. Do not perform any...
... after the paper endhasbeen detected. q Load paper from the front, rear, or bottom entrance. (The front or bottom entrance is recommended for Handling Paper 1. LQ-2070 Service Manual Product Description . Friction feed . Set the release lever to the REAR PUSH/FRONT PUSH position and install the paper eject assembly. Do not perform any...


